In planning for the next release of Visual Studio, streamlining the development process was a high priority. In this vein we are proud to announce two new features in Visual Studio 11 Beta that simplify and improve the development experience: setting the default browser from the toolbar, and quickly adding new items to your project from the context menu.
Set Default Browser from the Toolbar
While Visual Studio has always allowed you to change the default browser used for viewing pages and debugging via the Browse With dialog, it is now a simpler process with the new toolbar support. In the standard web toolbar next to the run button, you can now see what the default browser is currently set to, in this case Internet Explorer.
When you click on the small downward facing arrow to the right of the browser name, it will expand to show a menu of all available browsers on your machine. You can easily select another default browser to use the next time you hit F5, Ctrl-F5 or choose View in Browser.
Notice that you can even choose Page Inspector, the new tool for inspecting page properties and making real time changes, as the default browser!
With this new toolbar support, you will always know what the current default browser is by glancing at the toolbar. You will also save time by being able to quickly change between various browsers to verify that your web pages run correctly in each one.
Add New Items from Context Menu
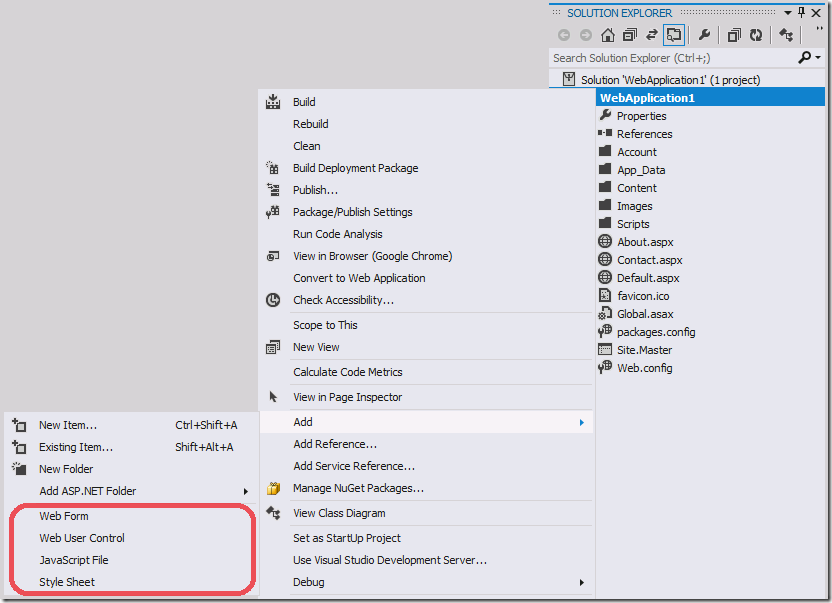
When adding many new items to your web project, the process can be tedious. You need to open the Add New Item window, find the item template that you want, name it and then finally add it to your project. Then repeat for every new item you want to add. To help speed up this process, Visual Studio 11 Beta has added the most commonly used items templates to the Add menu in Solution Explorer. Right click on a folder or project node in Solution Explorer and under the Add menu you will see some common items that can be added directly from the menu.
Click the itemyou want and the only dialog you will see is a prompt to name the new item.
Click OK and your item is added. No need to go through the longer process of picking it from the Add New Item window.
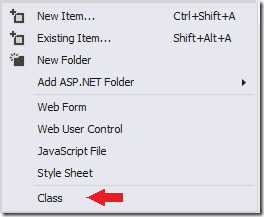
What if the item you want to add, like a class file, is not in the menu? In this case, you do need to add the class via the Add New Item window. However after you add the class file once, look what happens to the Add menu.
Visual Studio remembers your most recently added items and lists the last five in the Add menu below the default items. Now if you need to add more class items, just click that most recently used class item from the menu. Note that the most recent items list is saved per user, but there is a separate list for each project type and target framework. For example, recently used items in a 3.5 C# WAP will not appear in the list of a 4.5 C# WAP.
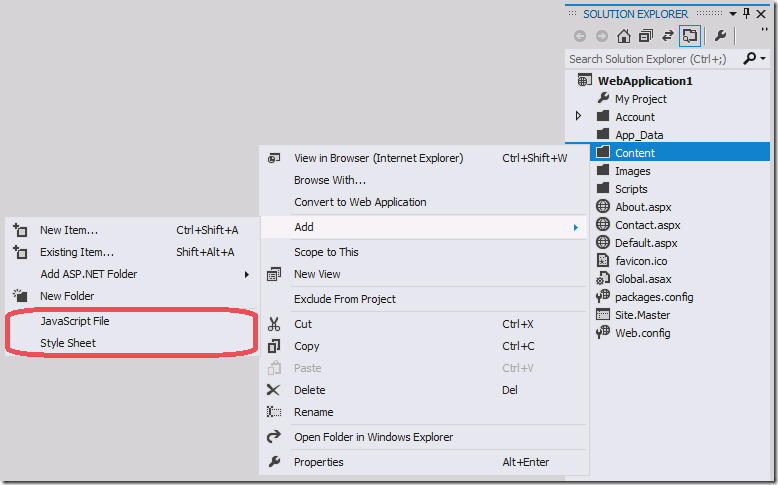
The default item templates listed are also context aware of the folder you clicked. For example, right click on the Content folder and you will see a suggested list of the most common items that would go in that folder like style sheets and JavaScript files.
Don’t like the suggested items listed in the Add menu? You can set your own configuration by creating an XML file in %ProgramFiles%Microsoft Visual Studio 11.0Common7IDEAddItemTemplateInfo (or for Web Express, %ProgramFiles%Microsoft Visual Studio 11.0Common7IDEVWDExpressAddItemTemplateInfo). The default settings are in the file WebFolderItemTemplates.xml in that folder. Any XML file that you create in the same folder will override the defaults. Directly modifying WebFolderItemTemplates.xml is not a good idea because that file could be updated by Visual Studio in the future. But you can use the file as a template for creating your own.
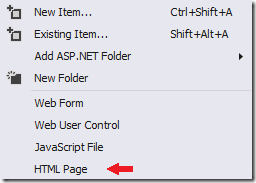
Suppose you want HTML Page as the fourth default item instead of Style Sheet for C# WAPs. You could create an XML file with the following content and place it in the AddItemTemplateInfo folder.
<folderTemplates>
<!–C# WAP—>
<project guid="{349c5853-65df-11da-9384-00065b846f21}">
<folder>
<template id="Microsoft.WAP.CSharp.WebForm"/>
<template id="Microsoft.WAP.CSharp.WebUserControl"/>
<template id="Microsoft.WAP.CSharp.WebJScript"/>
<template id="Microsoft.WAP.CSharp.HTMLPage" />
</folder>
</project>
</folderTemplates>
Then restart Visual Studio and see the following default menu.
You can likewise configure with high granularity the list of items for ordinary folders and each type of ASP.NET folder for each project type. With this ability to configure the common items, and the list of most recently used items, you can add new items to your project faster than ever.
John Wen
SDET
Web Platform And Tools Team


0 comments