Hello everyone. I was prompted to write this post from a comment I received on http://blogs.msdn.com/b/webdev/archive/2013/10/17/announcing-release-of-asp-net-and-web-tools-for-visual-studio-2013.aspx. I am pasting the comment verbatim from the post
“I’m having a lot of difficulty integrating the IdentityDbContext with other DbContexts to create a comprehensive model and database for my applications. If the membership system always stood on its own, there wouldn’t be an issue but the User ID typically gets used throughout other models and tables (think of a blog, for example, where some authenticated users are authorized to create blog posts whereas others are only authorized to leave comments – all users, though, need to have their User ID stored with blogs and/or comments). What are the recommended ways to combine these EF Code First models?”
While this requirement may seem fairly straight forward, it does highlight lots of key components of using any membership system in an application. I thank “Robert Gaut” for posting this comment which motivated me to write this post.
So this should set the context of this blog post 🙂 This blog post shows how you can create a simple ToDo application and associate ToDoes with Users from ASP.NET Identity. In other words, this post shows how you can mix and match Entity Framework Code First Models for the application specific data with the Models of User from ASP.NET Identity.
Let us define the requirements of this application :-
- Only authenticated users should be able to create, edit, delete and see their own ToDoes.
- Users should not be able to view or edit ToDoes which were created by other users. D’Oh you would be thinking that this should be a given, but I figured I should mention that since this is what I hit while writing this sample.
- Only Users who belong to Admin Role (I am going to call this User as Admin User in this post) should be authorized to see all the ToDoes in the application. This means that the Admin User can see the ToDoes for all the users. This requirement will highlight the authorization requirements mentioned in the comment.
Let us see how we can build an application using ASP.NET Identity which fulfills these requirements
I am going to write this post as a tutorial as well and use the ASP.NET Project templates in Visual Studio 2013 so hopefully it would be easy to follow and try out and later on you can implement this flow in your own application.
-
Create a File – New ASP.NET Project and select ASP.NET MVC with Individual User Accounts.
- This project creates an application where a user can login by registering an account with the website or use Social Login providers such as Facebook, Twitter etc. For the purpose of this example we will register a user with the website.
- Initialize ASP.NET Identity to create Admin User and Admin Role and Add Admin User to Admin Role
- You can initialize ASP.NET Identity when the application starts. Since ASP.NET Identity is Entity Framework based in this sample, you can create DatabaseInitializer which is configured to get called each time the app starts.
- Set the Database Initializer in Global.asax
1: Database.SetInitializer<MyDbContext>(new MyDbInitializer());
- Initialize the database to create Admin Role and Admin User
- In Line 5 we are creating a UserManger from ASP.NET Identity system which will let us do operations on the User such as Create, List, Edit and Verify the user. You can think of the UserManager as being analogus to SQLMembershpProvider in ASP.NET 2.0
- In Line 6, we are creating a RoleManager from ASP.NET Identity system which lets us operate on Roles. You can think of the RoleManager as being analogus to SQLRoleMembershpProvider in ASP.NET 2.0
- In this example, my User type is called in MyUser. In the project template, it is called ApplicationUser.
1: public class MyDbInitializer : DropCreateDatabaseAlways<MyDbContext>
2: {
3: protected override void Seed(MyDbContext context)
4: {
5: var UserManager = new UserManager<MyUser>(new
UserStore<MyUser>(context));
6: var RoleManager = new RoleManager<IdentityRole>(new
RoleStore<IdentityRole>(context));
7:
8: string name = "Admin";
9: string password = "123456";
13:
14: //Create Role Admin if it does not exist
15: if (!RoleManager.RoleExists(name))
16: {
17: var roleresult = RoleManager.Create(new IdentityRole(name));
18: }
19:
20: //Create User=Admin with password=123456
21: var user = new MyUser();
22: user.UserName = name;
23: var adminresult = UserManager.Create(user, password);
24:
25: //Add User Admin to Role Admin
26: if (adminresult.Succeeded)
27: {
28: var result = UserManager.AddToRole(user.Id, name);
29: }
30: base.Seed(context);
31: }
32: }
- Create an Entity Framework Code First ToDo model in ModelsAppModels,cs.
- Since we are using Entity Framework Code First, EF will create the right keys between Users and ToDo table.
1: public class MyUser : IdentityUser
2: {
3: public string HomeTown { get; set; }
4: public virtual ICollection<ToDo>
5: ToDoes { get; set; }
6: }
7:
8: public class ToDo
9: {
10: public int Id { get; set; }
11: public string Description { get; set; }
12: public bool IsDone { get; set; }
13: public virtual MyUser User { get; set; }
14: }
- Use Scaffolding to generate a ToDo MVC controller along with Views to create, update, delete and list all the ToDoes. Follow this tutorial on how to use Scaffolding in ASP.NET http://www.asp.net/visual-studio/overview/2013/aspnet-scaffolding-overview
- Please ensure that you reuse the existing database context so you can store ASP.NET Identity and ToDoes in the same database. This is a convenient way of managing application data and membership data. You DbContext should look something like this
1: public class MyDbContext : IdentityDbContext<MyUser>
2: {
3: public MyDbContext()
4: : base("DefaultConnection")
5: {
6: }
7:
8: protected override void OnModelCreating(DbModelBuilder modelBuilder)
9: {
10: public System.Data.Entity.DbSet<AspnetIdentitySample.Models.ToDo>
ToDoes { get; set; }
11: }
- Only Authenticated Users should be able to List, Create, Update and Delete ToDoes
- To protect the ToDoes we will use the existing [Authorize] that existed in MVC4. For more information please visit http://msdn.microsoft.com/en-us/library/system.web.mvc.authorizeattribute(v=vs.108).aspx
1: [Authorize]
2: public class ToDoController : Controller
- Update the generated ToDo controller to associate a User with ToDoes. In this sample I am only going to show you Create and list, but you can follow the similar pattern for Edit and Detele
- Add an overload of ToDo controller constructor which takes in a UserManager for ASP.NET Identity. UserManager allows you to manage the User in ASP.NET Identity system.
1: private MyDbContext db;
2: private UserManager<MyUser> manager;
3: public ToDoController()
4: {
5: db = new MyDbContext();
6: manager = new UserManager<MyUser>(new UserStore<MyUser>(db));
7: }
8:
- Update Create Action
- When you create a ToDo, we look up the logged in User in the ASP.NET Identity and associate the User object with the ToDoes.
1: public async Task<ActionResult> Create
2: ([Bind(Include="Id,Description,IsDone")] ToDo todo)
3: {
4: var currentUser = await manager.FindByIdAsync
(User.Identity.GetUserId());
5: if (ModelState.IsValid)
6: {
7: todo.User = currentUser;
8: db.ToDoes.Add(todo);
9: await db.SaveChangesAsync();
10: return RedirectToAction("Index");
11: }
12:
13: return View(todo);
14: }
- Update List Action
- We will only get the list of ToDoes created by the current logged in User
1: public ActionResult Index()
2: {
3: var currentUser = manager.FindById(User.Identity.GetUserId());
4: return View(db.ToDoes.ToList().Where(
todo => todo.User.Id == currentUser.Id));
5: }
- Allow only Admins to view the ToDoes for all the users
- We will add a new Action in the ToDo controller to list all the ToDoes, but we will only authorize Users in Role Admin to have access to these ToDoes. Again we are using the same [Authorize] attribute that we used before
1: [Authorize(Roles="Admin")]
2: public async Task<ActionResult> All()
3: {
4: return View(await db.ToDoes.ToListAsync());
5: }
- Add support to view the User details from the ToDo table
- Since we associate the ToDoes with a User object, the benefit that we get is when we get the list of ToDoes for all the users, we can easily access any profile specific data for the user from the ToDo model itself. For eg. when the Admin views all the ToDoes we can also get a profile property for the user if we added any. In this sample we have added HomeTowm so we ill display HomeTown next to the ToDoes.
- The markup for the views looks like as follows
1: @model IEnumerable<AspnetIdentitySample.Models.ToDo>
2:
3: @{
4: ViewBag.Title = "Index";
5: }
6:
7: <h2>List of ToDoes for all Users</h2>
8: <p>
9: Notice that we can see the User info (UserName) and profile info such as HomeTown for the user as well.
10: This was possible because we associated the User object with a ToDo object and hence
11: we can get this rich behavior.
12: </p>
13:
14: <table class="table">
15: <tr>
16: <th>
17: @Html.DisplayNameFor(model => model.Description)
18: </th>
19: <th>
20: @Html.DisplayNameFor(model => model.IsDone)
21: </th>
22: <th>@Html.DisplayNameFor(model => model.User.UserName)</th>
23: <th>@Html.DisplayNameFor(model => model.User.HomeTown)</th>
24: </tr>
25:
26: @foreach (var item in Model)
27: {
28: <tr>
29: <td>
30: @Html.DisplayFor(modelItem => item.Description)
31: </td>
32: <td>
33: @Html.DisplayFor(modelItem => item.IsDone)
34: </td>
35: <td>
36: @Html.DisplayFor(modelItem => item.User.UserName)
37: </td>
38: <td>
39: @Html.DisplayFor(modelItem => item.User.HomeTown)
40: </td>
41: </tr>
42: }
43:
44: </table>
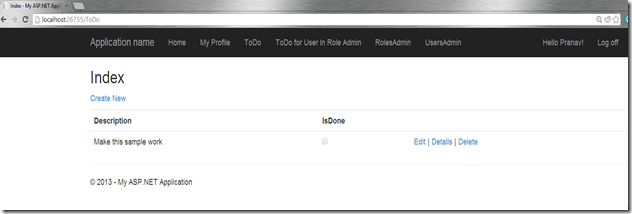
- Create ToDo as a normal user (non admin)
- Click ToDo and you will be redirected to Login page since you are not authenticated
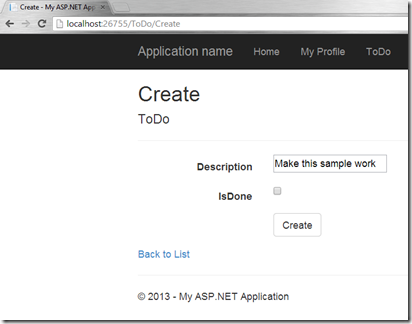
- You can register a new account and create a ToDo
- View the ToDoes for all the users (admin only access)
- Click the link “ToDo for User in Role Admin”. you will be redirected back to the login page since you are not an Admin and hence you are not authorized to view this page
- Logout from this application and Login using the Admin you created when you were initializing the ASP.NET Identity system. User = Admin Password=123456
- Once you login you can view the ToDoes for all users

Conclusion
I hope you will find this walkthrough useful. For a completed sample you can visit my project at https://github.com/rustd/AspnetIdentitySample. If you have any questions around ASP.NET Identity, please feel free to leave comments, ask them on asp.net/forums of stackoverflow. I can also be reached on twitter (@rustd)


Hello,
Is there a more up to date version that works on the dotnet core and ef core?