In the last few months since Windows 8 RTM’ed, we have seen the number of apps on the Windows Store grow significantly. There are several different aspects to shipping a great app to the Store. One of these is testing your app to ensure that the bugs are flushed out and you have automated tests in place to ensure that you can make regression free enhancements to your app.
Visual Studio 2012 enabled Manual testing and Unit testing for Store apps. In the subsequent updates, we continued to enhance these features. Several customers were asking when Coded UI tests could be used for UI testing the Store apps and I am very happy to say that with Visual Studio 2013 Preview, you can now use Coded UI tests to test XAML based Windows Store apps.
So let’s take a look at what’s new and different. Additional posts will come over the next few days to take you into more details.
Getting Started
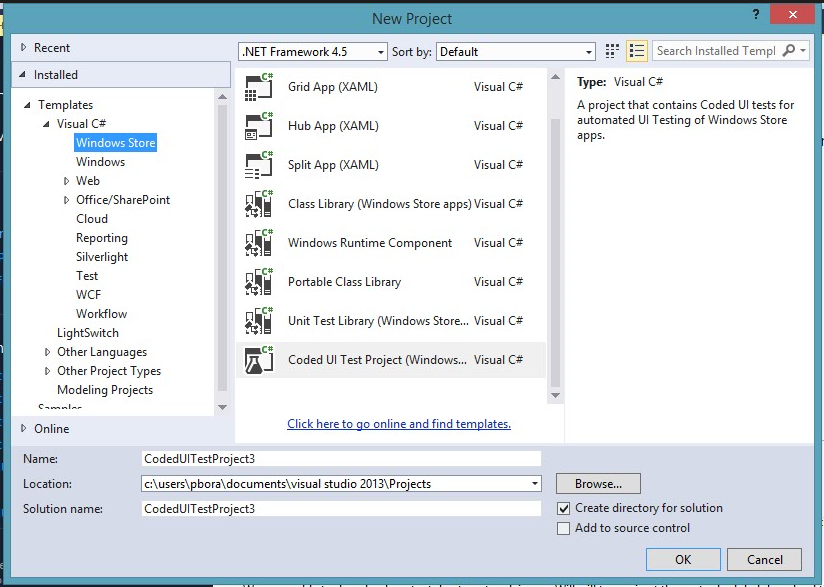
Writing a Coded UI test for XAML based Store app is super easy. When you install Visual Studio 2013 Preview on Windows 8.1, you will see a new template under the Windows Store node that lets you create Coded UI Test for your app.

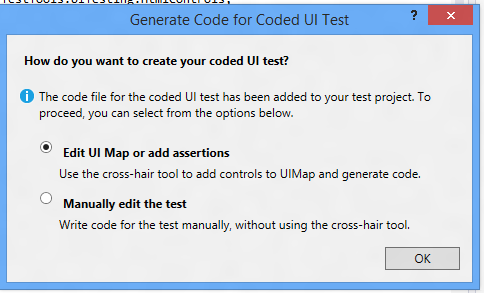
After you create a new project, you will be shown the familiar Generate Code dialog.
A few changes to note here:
- Options related to Recording are not seen. Recording action steps is currently not supported for Store apps. Likewise, you cannot create an action recording for Store apps using MTM and use that to build your Coded UI Test. You can however continue to use the cross-hair tool on the CUIT builder to build the UIMap and generate code for controls. You will need to manually write code to perform relevant actions on these controls.
- The option to manually edit the test is now explicit. So if you do not want to use the CUIT Builder to add controls to UIMap and generate code, you can choose this option and start hand editing your test.
New specialized classes for XAML controls
Similar to the specialized classes that Coded UI test provides for testing WinForms/WPF/Web applications, we have a set of new specialized classes available that you can use for authoring the test.
These are available under the Microsoft.VisualStudio.TestTools.UITesting.WindowsRuntimeControls namespace and all controls are prefixed with Xaml. So XamlButton, XamlList, XamlFlipView etc are the specialized classes to use. WinRT controls such as the Settings charm or the tiles on the start screen are not XAML controls. So when you generate code for tests that say, want to launch an app using the tile or test the Settings charm integration, classes under the namespace Microsoft.VisualStudio.TestTools.UITesting.DirectUIControls are your friend!
And, the familiar Html* classes are available for testing scenarios that involve testing HTML content hosted inside a Webview control in the app.
Support for Touch Gestures
The store apps deliver a great experience with Touch and Coded UI test would be incomplete without supporting Touch Gestures. All touch gestures are supported and you can use the Microsoft.VisualStudio.TestTools.UITesting.Gesture class to write appropriate touch actions to act on controls of interest. For example, to Tap on a button, you can now write:
Gesture.Tap(myButton);
The cool thing is, you do not need a Touch monitor to be able to run tests that use these gestures. Gestures are simulated under the hood by sending appropriate messages to the input subsystem of the OS.
Of course, Mouse actions are available as well. So, for e.g., Mouse.Click and Gesture.Tap would have the same effect of triggering an action on a control and you can use them interchangeably to suit the needs of your test.
Launching an App
With the new app model introduced in Windows 8, you cannot launch a Store app using an executable path like you could in the desktop world. The same goes for launching an app via your test code. You can launch an app in two ways:
- By clicking / tapping on the app tile on start screen. Simply add the app tile as a control to the UIMap and write a Gesture.Tap or Mouse.Click action to launch the app in your test.
- By using the app Launch API. App launch API is available off the XamlWindow class and looks like the following:
XamlWindow myAppWindow = XamlWindow.Launch(stringThatIdentifiesMyApp);
where stringThatIdentifiesMyApp is the unique identifier that Windows uses to identify a Store app. You can obtain this string value by observing the app tile in CUIT builder and copy/pasting the AutomationId property of the tile control, like so:
Other concerns
The rest of the CUIT experience stays the same and you can continue to use the features you are familiar with. For e.g., you can add assertions using the CUIT Builder, use the HTML Logs for troubleshooting, the WaitFor* to wait for specific events during playback, data drive your CUI test just the way you could do when testing desktop apps.
Show me a sample
First things first, install Windows 8.1 Preview and VS 2013 Preview if you haven’t already.
For those of you that have not used Coded UI test before, or want to see these new features in action on a pre-canned test, I am attaching a sample Coded UI Test project I created for testing the multiply functionality of the calculator app that ships inbox with Windows 8.1. Just download and build the project and execute the test from Test Explorer.
Alternately, if you would like to do a walkthrough by creating a simple Store app and writing a Coded UI test for that sample app, this msdn link can help you get started.
Limitations
- Recording of action steps and creating Coded UI test for XAML based store apps from an action recording is not supported.
- Only XAML based store apps are supported. WinJS apps cannot be tested using Coded UI.
- The functionality is only available when Visual Studio 2013 Preview is installed on Windows 8.1. The Coded UI Test template under the Windows Store node will not be seen if Visual Studio 2013 is installed on Windows 8.
We are excited about our customers using Coded UI Test to test their XAML based store apps and look forward to hearing your feedback.


0 comments