
Static Web App PR Workflow for Azure App Service using Azure DevOps
Microsoft recently announced a new Azure service called Static Web Apps. Static Web Apps are tailored for apps with their code in GitHub with static content (html/javascript/css) and backend api’s.
This blog post is not about Static Web Apps. It’s about the amazing pull request workflow that you get right out of the box with Static Web Apps.
Static Web Apps use GitHub Actions for CI/CD and when a user issues a pull request the following happens:
- The app is built/packaged
- A staging environment is dynamically provisioned
- The app with the PR code is deployed into the newly provisioned staging environment
- A comment is added to the pull request with the URL to the newly provisioned staging environment
When the pull request is closed
- The provisioned staging environment for this pull request is deleted
Ok, HOW COOL IS THAT!!!!
That’s great for Static Web Apps, but I have a bunch of apps in Azure App Service. The code is in Azure Repos and the CI/CD pipeline uses Azure Pipelines. I want that Static Web App pull request workflow for my apps in Azure App Service.
Luckily it wasn’t hard to do. In this blog post, I’ll walk you through how I did it. First I’ll show everything using the classic editor as that looks better than a wall of yml. And at the end, I’ll share the yml for my pipeline.
Making this PR workflow for Azure App Service, Azure Repos and Azure Pipelines
For this post, I’ll use a repo that holds a .NET Core web app that is hosted in Azure App Service. Currently my CI build looks like this:

Nothing magic about it. This is just your standard .NET Core build. Any time code is checked into the main branch, this build kicks off.
Enabling Build For Every Pull Request
I need this build to kick off any time someone issues a pull request. This can be set in the branch policies for this repository. This doc will walk you through the steps to do this.
After following the above steps, every time a pull request is issued, my CI build is triggered.
Adding Steps for a Pull Request
If all the build tasks are successful and if the build trigger is because of a pull request, I want the following to happen:
- Provision a staging environment
- Deploy my app to the staging environment
- Write a comment to the pull request with the url of the newly provisioned slot.
Because I’m using Azure App Service, I can totally use deployment slots for the staging environments. Since there are no tasks that let me dynamically create slots, I’ll just use the Azure CLI to dynamically create my slot. Once it is created, I can use a normal App Service deploy task to deploy my app to the slot. And to write a comment to the pull request, I’ll use the Azure DevOps REST API.
Creating a Task to Provision the Staging Slot
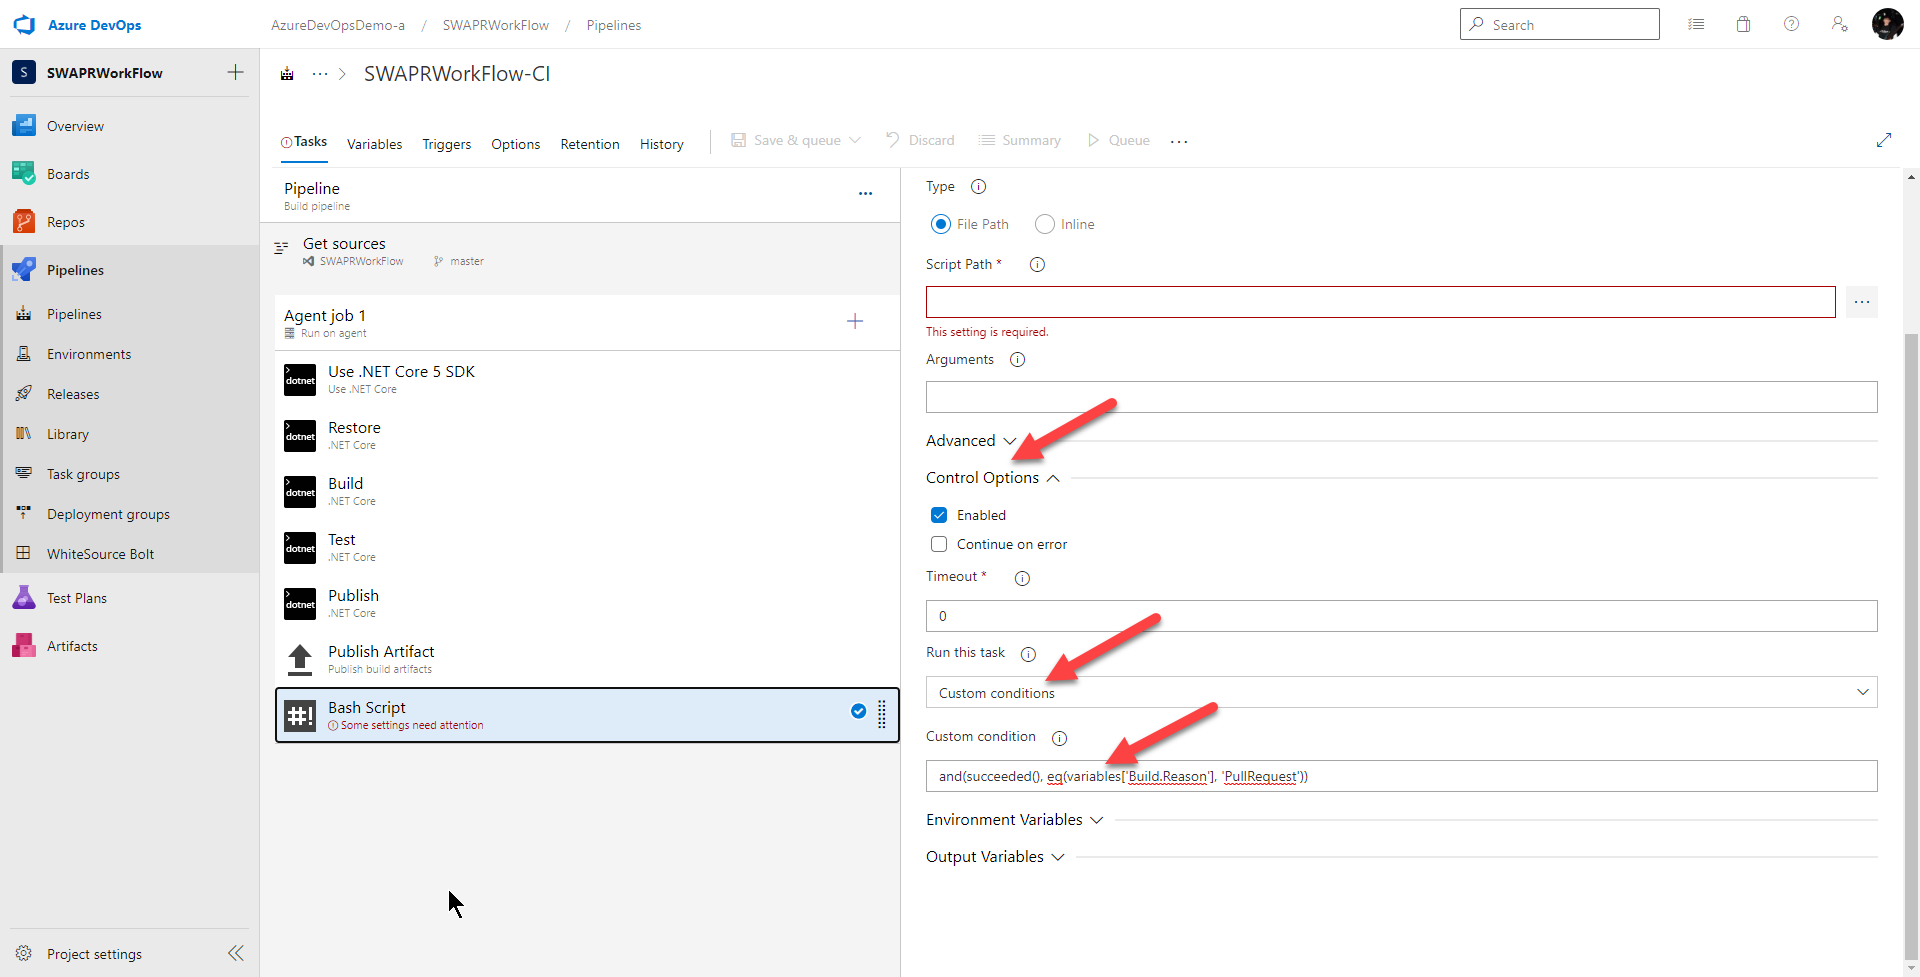
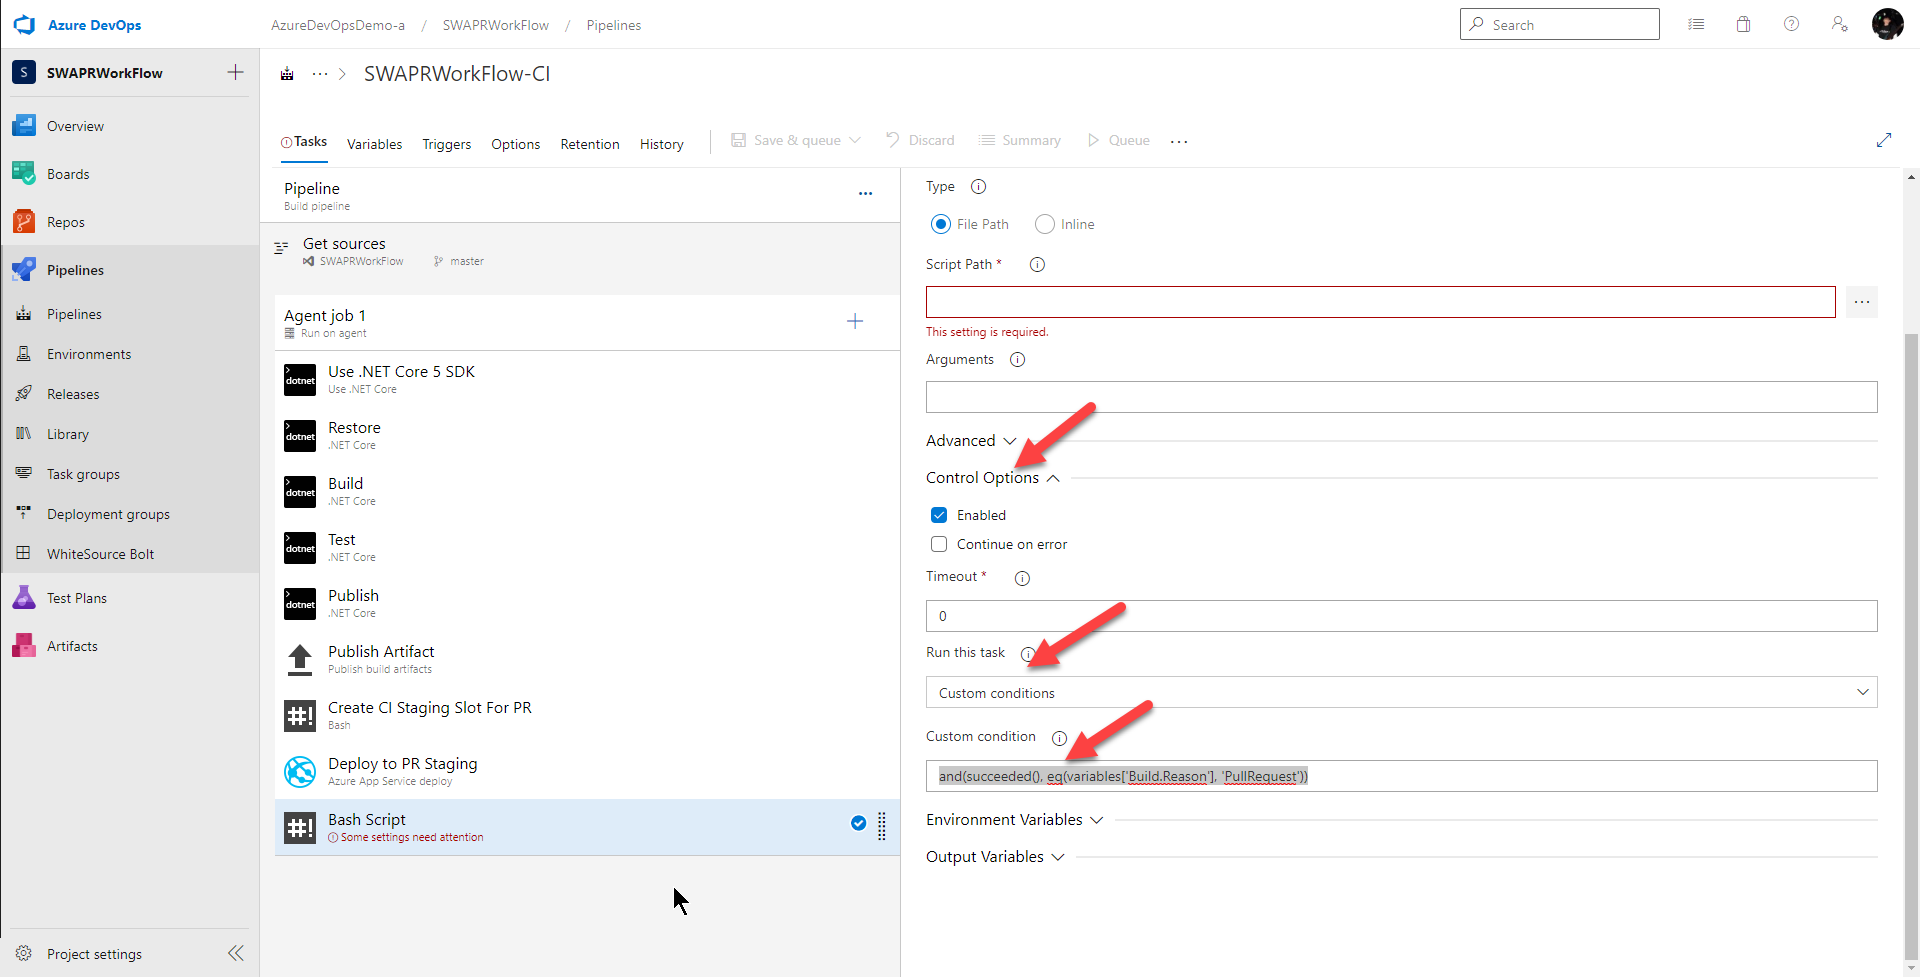
To provision a new staging slot, I’ll use the Bash Script task and from there, use the Azure CLI to provision my slot.
I also want this task to run only if all the previous tasks were successful and the reason for this build is a pull request. To do this, I drag a Bash Script Task to the end and I set the Control Option > Run this task to
Custom conditions
and I set Control Option > Custom condition to
and(succeeded(), eq(variables['Build.Reason'], 'PullRequest'))
Next, let’s give this task a better name
Create CI Staging Slot For PR
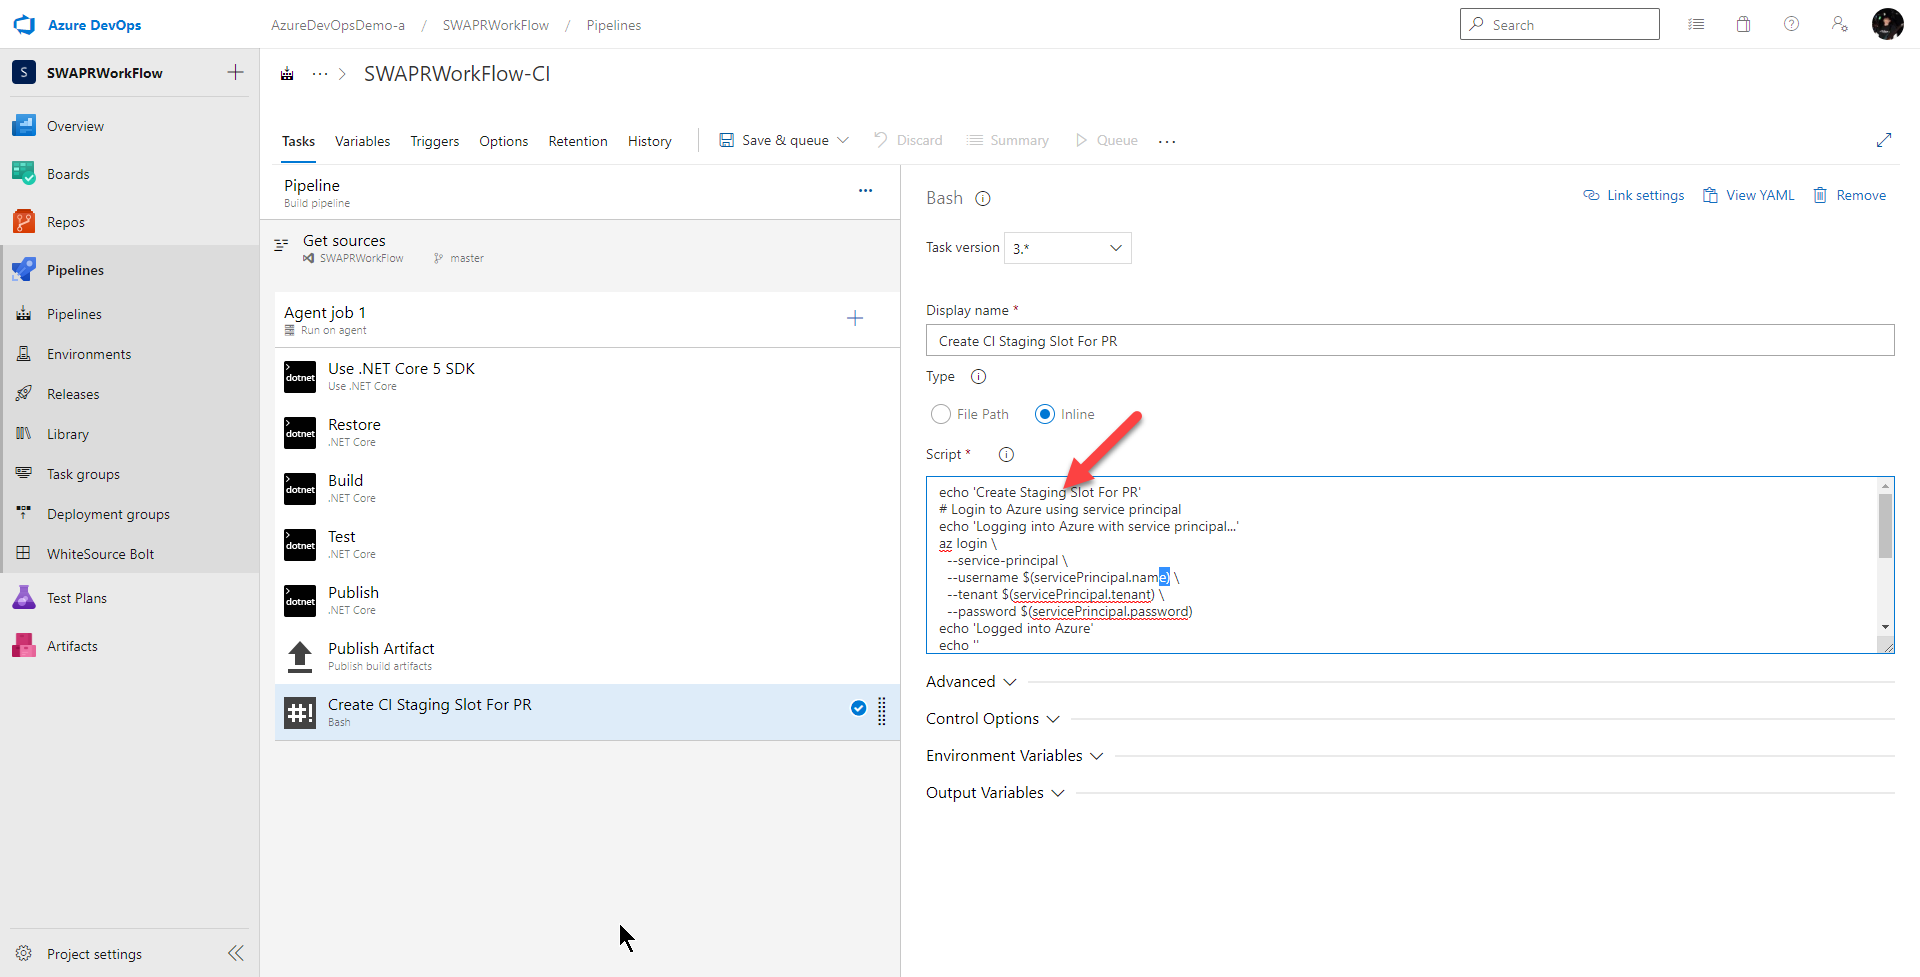
and make sure Inline is selected
In the Script text box, that’s where I will drop in my bash script which calls the Azure CLI to provision the new slot.
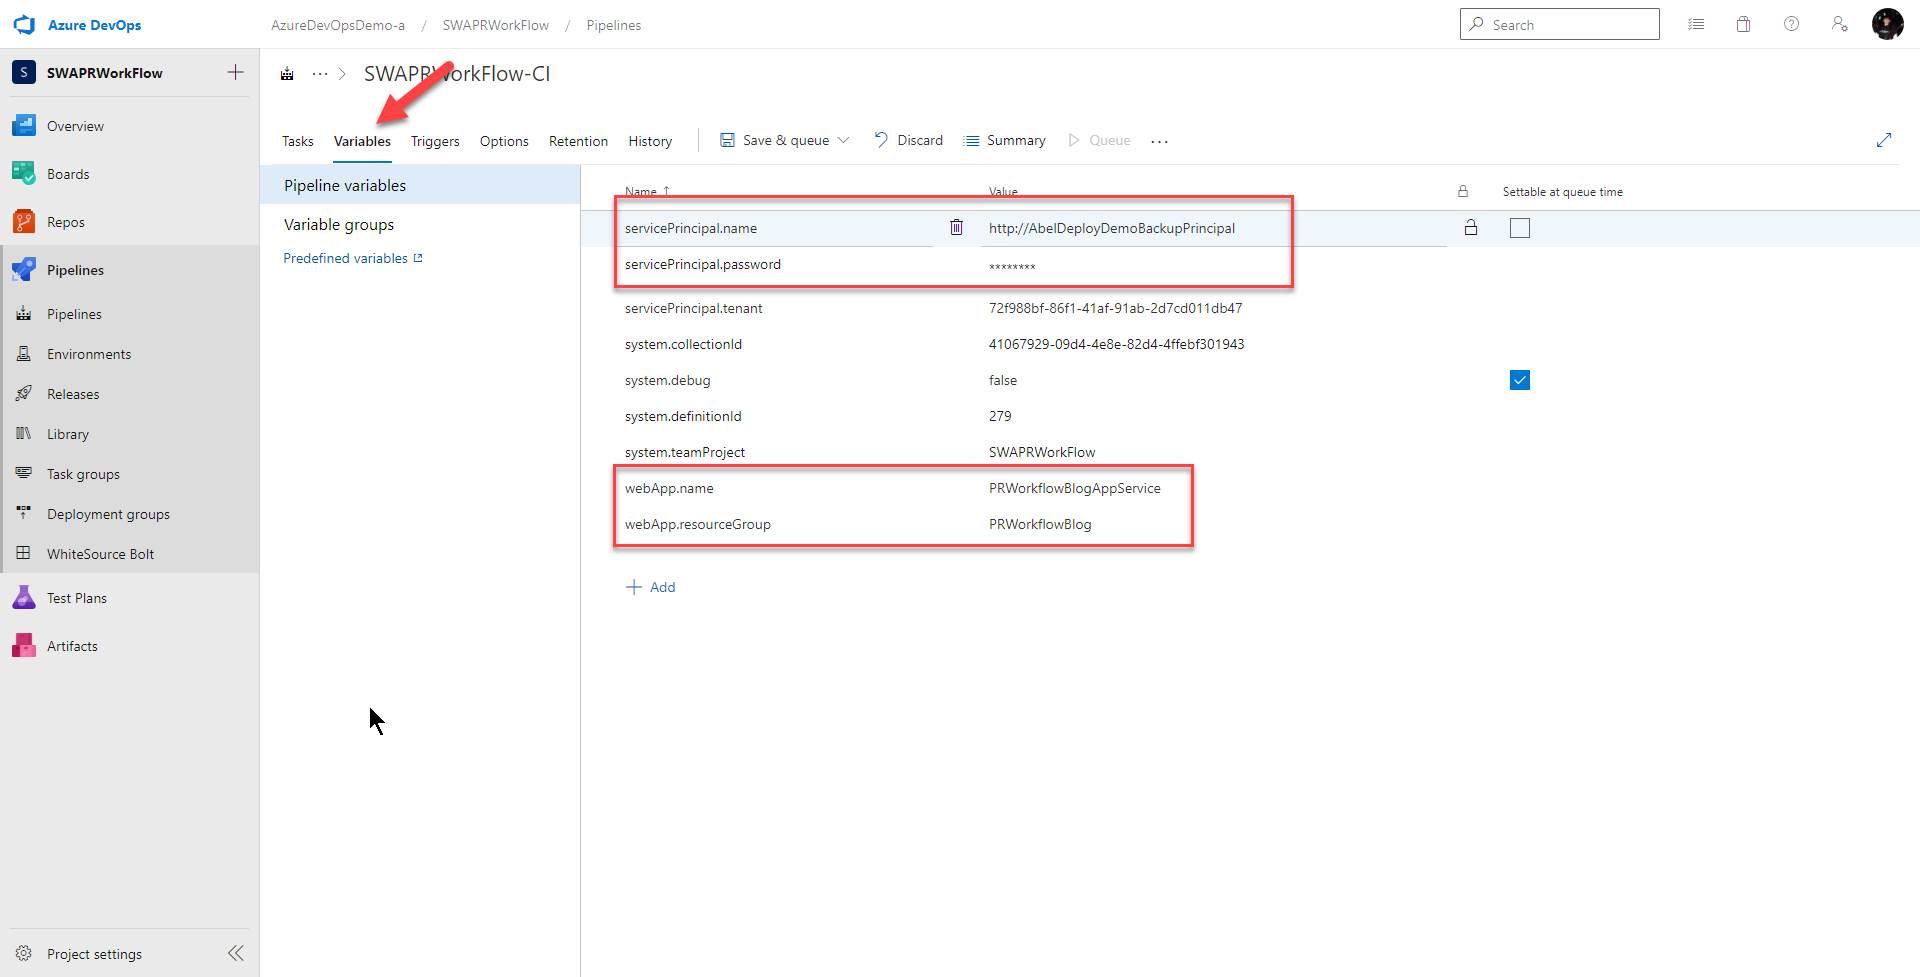
To do that, I will need some pipeline variables. First, to use the Azure CLI, I will need to login using an Azure Service Principal. Follow the link to create a service principal. Next, to create a slot, I will need the app service name as well as the resource group the app service is in.
I add these variables to the variable section of my pipeline. For my service principal password, I encrypt it using the lock function. I usually store all my secrets in key vault, but to simplify this example, I’ll just dump all my variables in the variable section of the pipeline.
Finally, for the script to provisions a new deployment slot, I need to do the following:
- Login to Azure using my Service Principal and the Azure CLI
- Creating Slots with Azure CLI for the pull request
Because I can have multiple pull request happening at the same time and each slot must have a unique slot name, I’ll use the pull request ID as part of my slot name. I’ll name my slot
staging-pr-$(System.PullRequest.PullRequestId)
System.PullRequest.PullRequestId is a built in pipeline variable
In the Script text field, I add the following script:
   # Login to Azure using service principal
   echo 'Logging into Azure with service principal...'
   az login \
     --service-principal \
     --username $(servicePrincipal.name) \
     --tenant $(servicePrincipal.tenant) \
     --password $(servicePrincipal.password)
   echo 'Logged into Azure'
   echo ''

   # Create staging slot for PR
   echo 'Creating staging slot for PR...'
   az webapp deployment slot create \
       --name $(webApp.name) \
       --resource-group $(webApp.resourceGroup) \
       --slot staging-pr-$(System.PullRequest.PullRequestId)
   echo "Created staging slot for PR " $(System.PullRequest.PullRequestId)
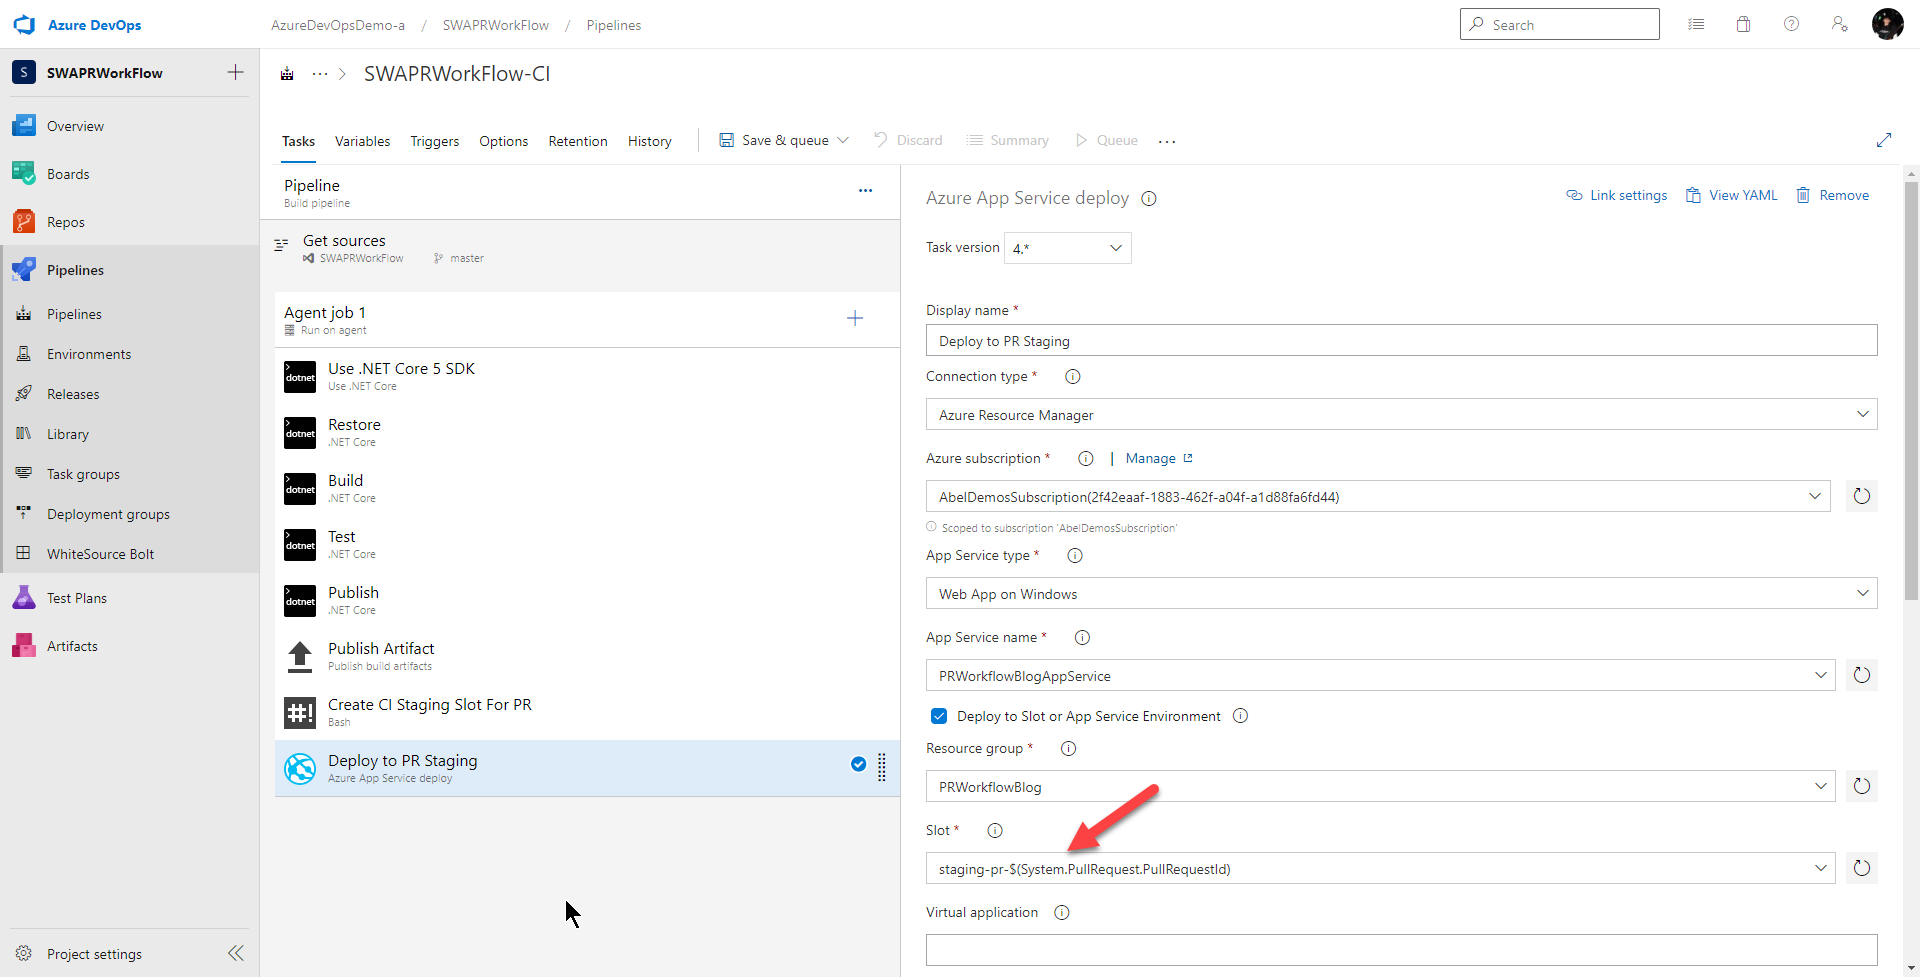
Deploy App To The Newly Provisioned Slot
To deploy my app to the slot, I just use a standard App Service deploy task. Like the previous task, I only want this task to run if all my previous tasks were successful and this build is triggered by a pull request. So I set Control Option > Run this task to
Custom conditions
and I set Control Option > Custom condition to
and(succeeded(), eq(variables['Build.Reason'], 'PullRequest'))
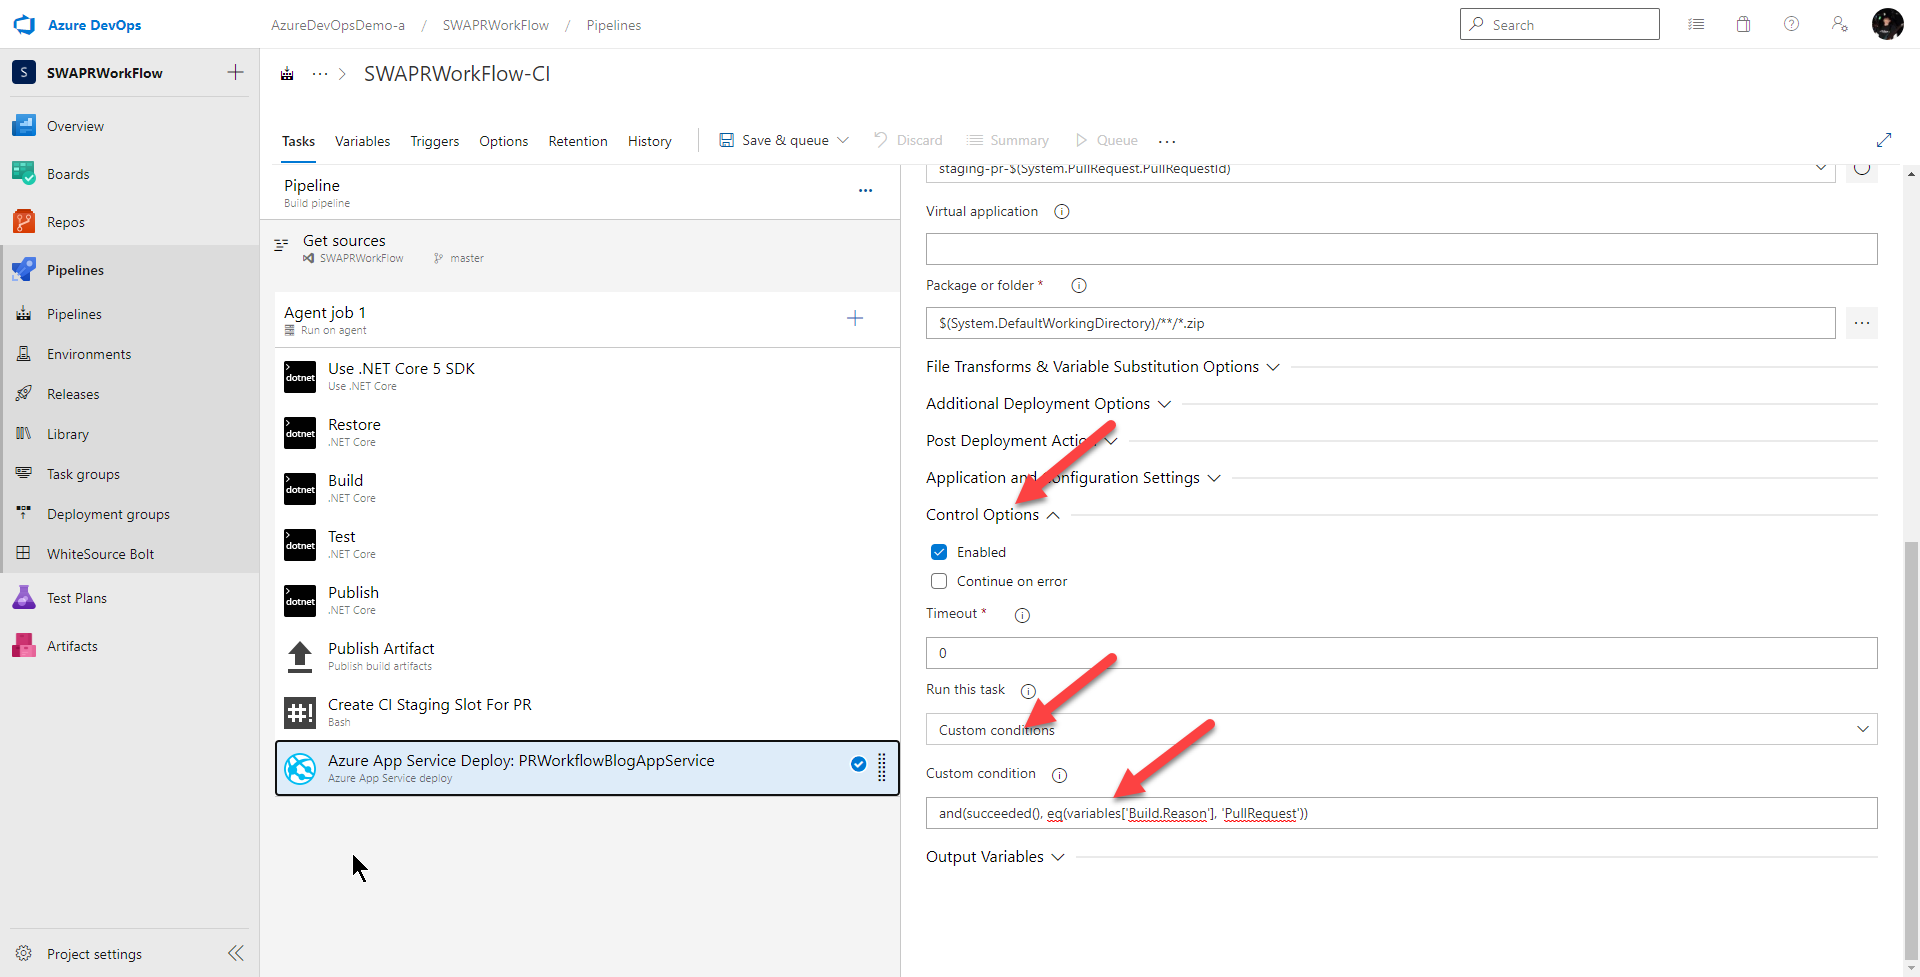
Next, I give this task a nicer name and set the parameters so I’m deploying to the slot. Everything here is pretty standard except the slot name is dynamic based off of the pull request ID. So for the Slot text field, I put in
staging-pr-$(System.PullRequest.PullRequestId)
Write the URL of the Staging Slot as a PR Comment
To write the URL of the staging slot as a pull request comment, I’ll again use a bash script task to call the Azure DevOps REST API. This means I’ll need to use an Azure DevOps PAT. I create a PAT using this, and then I stick it into the variables section of the pipeline and encrypt it.

Next, I drag a bash task to the end and again, this task should only run if all the previous tasks were successful and the build was triggered by a pull request. So I set Control Option > Run this task to
Custom conditions
and I set Control Option > Custom condition to
and(succeeded(), eq(variables['Build.Reason'], 'PullRequest'))
Next, I give this task a better name
Add staging URL to PR Comment
select
Inline
and in the Script textbox, I add the bash script which uses the Azure DevOps Rest API to add the comment to the pull request.
# Add PR comment with link to staging
echo "Adding PR comment with link to staging environment..."
message="Created staging environment for PR - https://$(webApp.name)-staging-pr-"$(System.PullRequest.PullRequestId)".azurewebsites.net/"
echo "message: $message"

# post message to PR using azure devops rest api
curl -i --user :$(azureDevOpsPAT) -H "Content-Type: application/json" -H "Accept: aon" -X POST -d '{"comments": [{ "parentCommentId":0, "content": "'"$message"'", "commentType": 1}], "status": 1}' $(System.TeamFoundationCollectionUri)/$(System.TeamProject)/_apis/git/repositories/$(Build.Repository.ID)/pullRequests/$(System.PullRequest.PullRequestId)/threads?api-version=6.1-preview.1

echo "Done adding PR comment with link to staging environment"

Add Step For When PR Closes
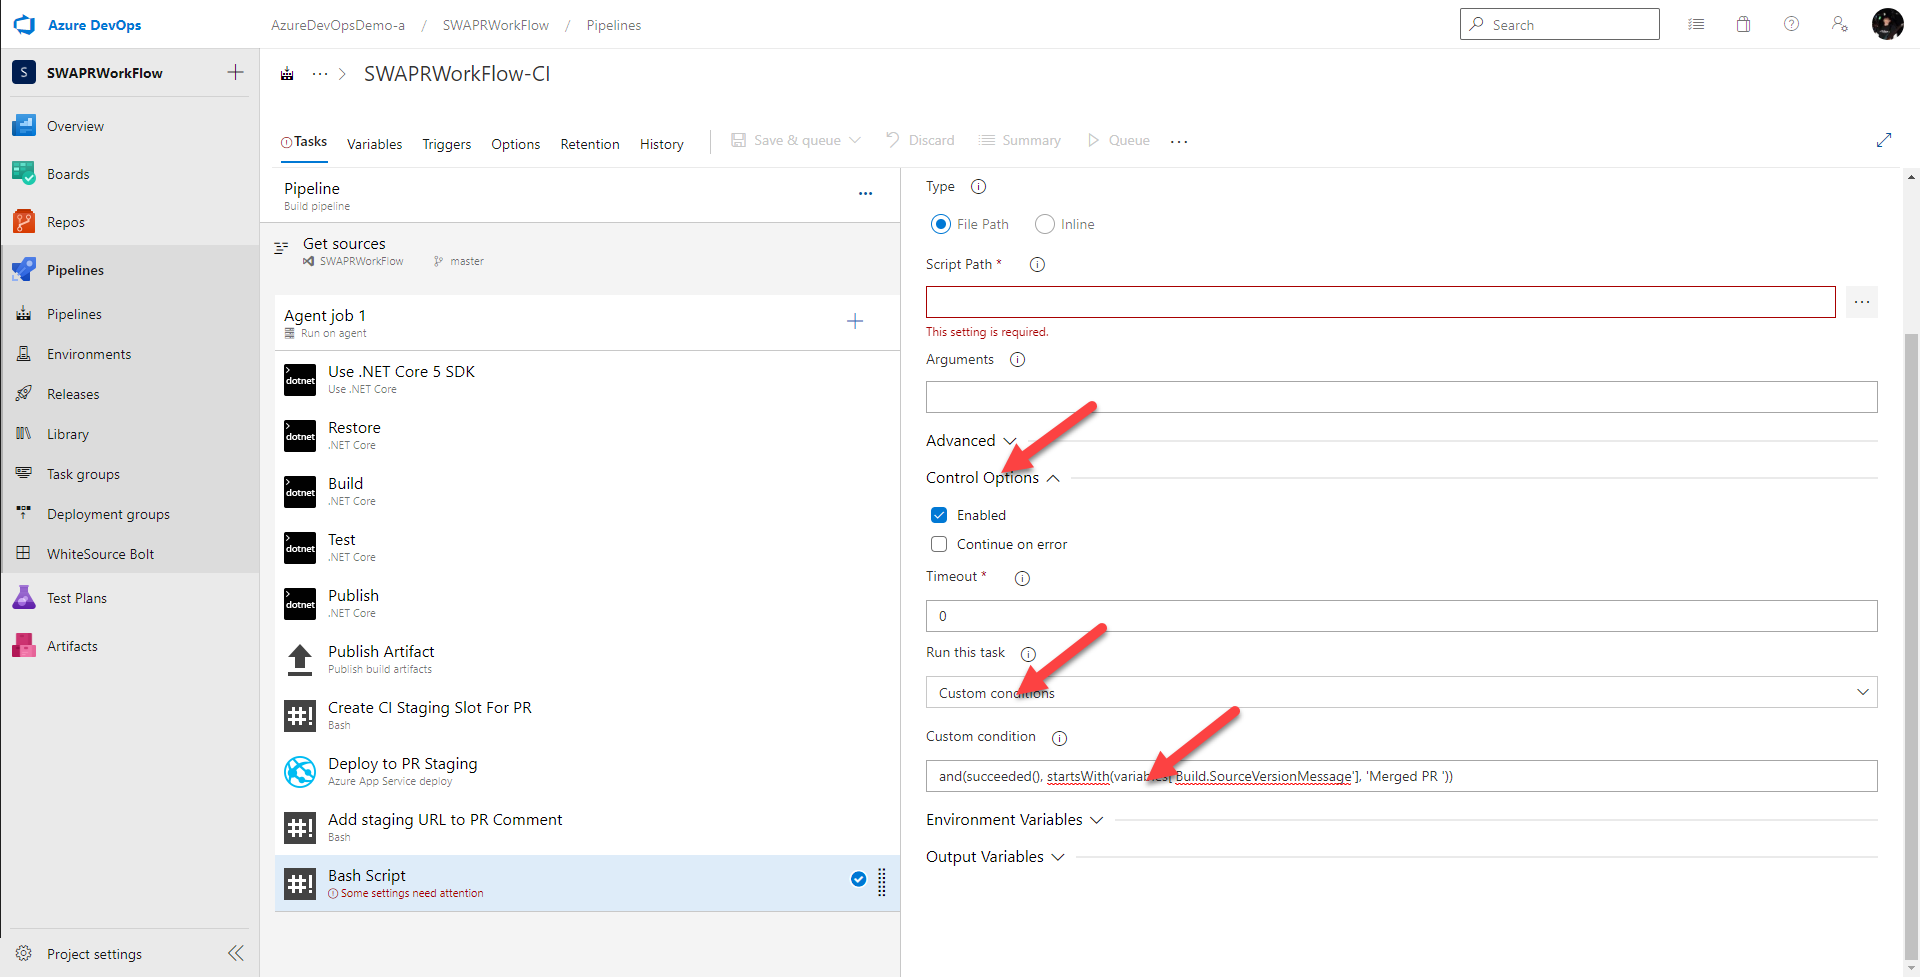
I need to add one final step. When the pull request is closed and the code is merged to master, I need to clean up my staging environment and delete the slot for the specific pull request.
Azure DevOps doesn’t have any easy triggers in the pipeline for when you close a pull request. You could do this with Azure DevOps Web Hooks. But this would require me to use something like Azure Functions to do the pull request cleanup/delete slot logic. I really wanted to keep everything within my pipelines so I’m just triggering this task based on the version control merge message. Whenever a pull request is merged, the merge message will start with Merged PR xxx where xxx is the pull request ID.
I drag a bash task onto the board and I only want this task to run if all the previous tasks were successful and if the commit message starts wtih Merged PR. So I set Control Option > Run this task to
Custom conditions
and I set Control Option > Custom condition to
and(succeeded(), startsWith(variables['Build.SourceVersionMessage'], 'Merged PR '))
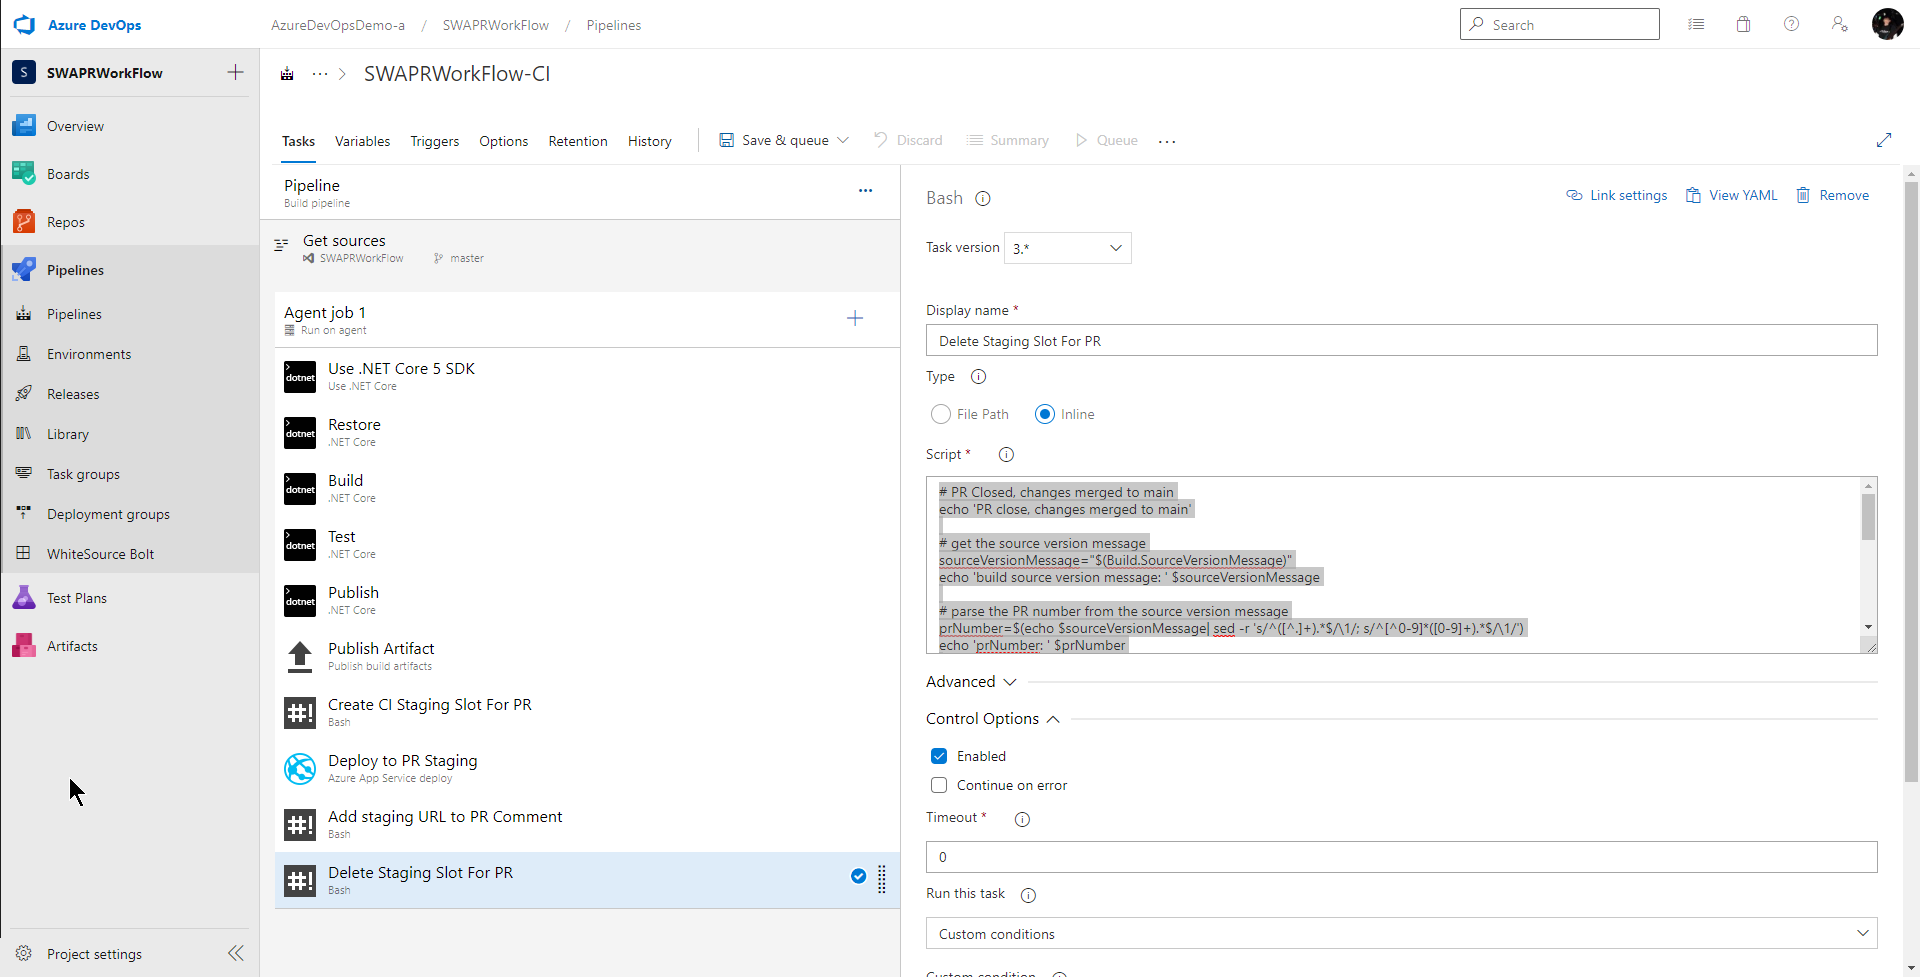
I give this task a better name, make sure inline is selected and in the Script text box, I add the bash script which uses the Azure CLI to delete the right staging slot.
# PR Closed, changes merged to main
echo 'PR close, changes merged to main'

# get the source version message
sourceVersionMessage="$(Build.SourceVersionMessage)"
echo 'build source version message: ' $sourceVersionMessage

# parse the PR number from the source version message
prNumber=$(echo $sourceVersionMessage| sed -r 's/^([^.]+).*$/\1/; s/^[^0-9]*([0-9]+).*$/\1/')
echo 'prNumber: ' $prNumber

# Login to Azure using service principal
echo 'Logging into Azure with service principal...'
az login \
  --service-principal \
  --username $(servicePrincipal.name) \
  --tenant $(servicePrincipal.tenant) \
  --password $SERVICE_PRINCIPAL_PASSWORD
echo 'Logged into Azure'
echo ''

# Delete PR staging slot
echo 'Deleting staging slot for PR ' $prNumber '...'
az webapp deployment slot delete \
  --name $(webApp.name) \
  --resource-group $(webApp.resourceGroup) \
  --slot staging-pr-$prNumber
echo 'Deleted slot for PR ' $prNumber
Complete CI Pipeline
Now, my CI build does everything the Static Web App pull request workflow does and it looks like this:
What about YML pipelines?
Yes, you can do all this using YML pipelines. In fact, that’s how I would normally do this. However, that classic editor sure looks nicer than a wall of yml so I figured I’d start with the classic editor. Here is my YML
trigger:
- master

pool:
  vmImage: 'ubuntu-latest'

variables:
  servicePrincipal.name: 'http://AbelDeployDemoBackupPrincipal'
  servicePrincipal.tenant: '72f988bf-86f1-41af-91ab-2d7cd011db47'
  webApp.name: 'PRWorkflowBlogAppService'
  webApp.resourceGroup: 'PRWorkflowBlog'
  BuildConfiguration: 'release'

steps:

# Use .NET core 5 sdk
- task: UseDotNet@2
  displayName: 'Use .NET Core 5 SDK'
  inputs:
    version: 5.x
    includePreviewVersions: true

# Build .net core project
- task: DotNetCoreCLI@2
  displayName: Build
  inputs:
    projects: '$(Parameters.RestoreBuildProjects)'
    arguments: '--configuration $(BuildConfiguration)'

# Restore project
- task: DotNetCoreCLI@2
  displayName: Build
  inputs:
    projects: '$(Parameters.RestoreBuildProjects)'
    arguments: '--configuration $(BuildConfiguration)'

# Run unit tests
- task: DotNetCoreCLI@2
  displayName: Test
  inputs:
    command: test
    projects: '$(Parameters.TestProjects)'
    arguments: '--configuration $(BuildConfiguration)'

# Publish .net core app to staging directory
- task: DotNetCoreCLI@2
  displayName: Publish
  inputs:
    command: publish
    publishWebProjects: True
    arguments: '-r win-x64 --self-contained true --configuration $(BuildConfiguration) --output $(build.artifactstagingdirectory)'

# Publish build bits as build artifact
- task: PublishBuildArtifacts@1
  displayName: 'Publish Artifact'
  inputs:
    PathtoPublish: '$(build.artifactstagingdirectory)'
  condition: succeededOrFailed()

# Create CI Staging Slot for PR
- bash: |
   # Login to Azure using service principal
   echo 'Logging into Azure with service principal...'
   az login \
     --service-principal \
     --username $(servicePrincipal.name) \
     --tenant $(servicePrincipal.tenant) \
     --password $SERVICE_PRINCIPAL_PASSWORD
   echo 'Logged into Azure'
   echo ''

   # Create staging slot for PR
   echo 'Creating staging slot for PR...'
   az webapp deployment slot create \
       --name $(webApp.name) \
       --resource-group $(webApp.resourceGroup) \
       --slot staging-pr-$(System.PullRequest.PullRequestId)
   echo "Created staging slot for PR " $(System.PullRequest.PullRequestId)

  displayName: 'Create CI Staging Slot For PR'
  condition: and(succeeded(), eq(variables['Build.Reason'], 'PullRequest'))
  env:
    SERVICE_PRINCIPAL_PASSWORD: $(servicePrincipal.password)

# Add staging URL to PR comment
- bash: |
   # Add PR comment with link to staging
   echo "Adding PR comment with link to staging environment..."
   message="Created staging environment for PR - https://$(webApp.name)-staging-pr-"$(System.PullRequest.PullRequestId)".azurewebsites.net/"
   echo "message: $message"

   # post message to PR using azure devops rest api
   curl -i --user :$AZURE_DEVOPS_PAT -H "Content-Type: application/json" -H "Accept: aon" -X POST -d '{"comments": [{ "parentCommentId":0, "content": "'"$message"'", "commentType": 1}], "status": 1}' $(System.TeamFoundationCollectionUri)/$(System.TeamProject)/_apis/git/repositories/$(Build.Repository.ID)/pullRequests/$(System.PullRequest.PullRequestId)/threads?api-version=6.1-preview.1

   echo "Done adding PR comment with link to staging environment"
  displayName: 'Add staging URL to PR Comment'
  condition: and(succeeded(), eq(variables['Build.Reason'], 'PullRequest'))
  env:
    AZURE_DEVOPS_PAT: $(azureDevOpsPAT)

# Deploy build to staging environment
- task: AzureRmWebAppDeployment@4
  displayName: 'Deploy to PR Staging'
  inputs:
    ConnectionType: 'AzureRM'
    azureSubscription: 'AbelDemosSubscription(2f42eaaf-1883-462f-a04f-a1d88fa6fd44)'
    appType: 'webApp'
    WebAppName: 'PRWorkflowBlogAppService'
    deployToSlotOrASE: true
    ResourceGroupName: 'PRWorkflowBlog'
    SlotName: 'staging-pr-$(System.PullRequest.PullRequestId)'
    packageForLinux: '$(System.DefaultWorkingDirectory)/**/netlandingpage.zip'
    enableCustomDeployment: true
    DeploymentType: 'webDeploy'
    RemoveAdditionalFilesFlag: true
    ExcludeFilesFromAppDataFlag: false
  condition: and(succeeded(), eq(variables['Build.Reason'], 'PullRequest'))


# Delete staging slot
- bash: |
   # PR Closed, changes merged to main
   echo 'PR close, changes merged to main'

   # get the source version message
   sourceVersionMessage="$(Build.SourceVersionMessage)"
   echo 'build source version message: ' $sourceVersionMessage

   # parse the PR number from the source version message
   prNumber=$(echo $sourceVersionMessage| sed -r 's/^([^.]+).*$/\1/; s/^[^0-9]*([0-9]+).*$/\1/')
   echo 'prNumber: ' $prNumber

   # Login to Azure using service principal
   echo 'Logging into Azure with service principal...'
   az login \
     --service-principal \
     --username $(servicePrincipal.name) \
     --tenant $(servicePrincipal.tenant) \
     --password $SERVICE_PRINCIPAL_PASSWORD
   echo 'Logged into Azure'
   echo ''

   # Delete PR staging slot
   echo 'Deleting staging slot for PR ' $prNumber '...'
   az webapp deployment slot delete \
     --name $(webApp.name) \
     --resource-group $(webApp.resourceGroup) \
     --slot staging-pr-$prNumber
   echo 'Deleted slot for PR ' $prNumber
  displayName: 'Delete Staging Slot For PR'
  condition: and(succeeded(), startsWith(variables['Build.SourceVersionMessage'], 'Merged PR '))
  env:
    SERVICE_PRINCIPAL_PASSWORD: $(servicePrincipal.password)
Secrets should not be stored in the YML so my Azure DevOps PAT and my password for my Azure Service Principal are saved as encrypted variables in the pipeline.

Secret variables are not automatically decrypted in YML pipelines and need to be passed to your YML with env:. This shows how to do it.

Conclusion
My CI pipeline now perfectly emulates the Static Web Apps pull request workflow. When a pull request happens, my CI build will trigger and the following will occur
- Use the .net core 5 sdk
- Restore
- Build app
- Run unit tests
- Publish to staging directory
- Publish staging as a build artifact
- Create a CI staging slot for this specific PR using the PR ID as part of the slot name
- Deploy the app to this specific staging slot
- Write the URL to this staging slot as a pull request comment
When this pull request is closed out and the changes merged to master, this build will trigger and the following will occure
- Use the .net core 5 sdk
- Restore
- Build app
- Run unit tests
- Publish to staging directory
- Publish staging as a build artifact
- Delete the PR staging slot
To figure out how to do this, I used the same strategy I use for any pipeline I craft. I ask myself, “How would I do this from the command line?” If there are pre-built tasks that do what I need, I use those. And if there are not, I use a bash or powershell task to execute the command line calls. For this example to implement the Static Web Apps pull request workflow from the command line, I needed to use the Azure CLI and the Azure DevOps REST API. I then sat down at a command prompt and figured out the exact commands to call, and then copied those into a bash task.
Don’t forget about the edge cases. What happens when multiple pull requests happen at once? What happens if tasks in the workflow fail? What happens when a pull request merge happens to the main branch and the staging environment doesn’t exist? Things like that.But with a little care, your pipeline will be able to handle all situations.
Please, I beg you, help. Put the list of repos in
Reposhttps://developercommunity.visualstudio.com/idea/989899/list-all-repositories-in-files-tree.html
Can I ask why the Azure pipeline Azure CLI Task was not used as it would move the Azure credentials to a service connection?
https://docs.microsoft.com/en-us/azure/devops/pipelines/tasks/deploy/azure-cli?view=azure-devops
You can absolutely use the Azure CLI task and that is super nice because then you don’t have to pass creds around. I used a normal bash task as I’m using this same example in a variety of CI/CD tools and wanted a generic command line way of doing it. Great point and I should have pointed that out in the blog!
Thanks!
Awesome! I love this workflow and enabling it on Azure App Service really seems worth it to me! Thanks for the insights :)
Just a small question: If I remember correctly, deployment slots are limited regarding your app service tier (5 for Standard tier, and 20 for Premium tier), meaning that for a Standard tier, you need to have no more than 5 simultaneous Pull Request opened (which encourages your team to have short-term life PR, which seems like a good practice anyway) or upgrade to Premium tier to support 20 simultaneous Pull Request (which sounds more than enough for a...
Correct. There is a limit to the number of slots depending on your tier. I also agree that PR’s should not be long living. And if you do have long living PR’s, that’s a flag to review your process and see why you are having long living PR’s. You can also add code to make the PR’s behave in a rolling fashion.