

In episode 2 of this series, Jay helped Abel migrate the Mercury Health application environment into Azure. So we’re in the cloud! But what about future changes? How do we get them out to customers? The answer is DevOps.
Rubbing Some DevOps on a “Legacy” App
It’s not unusual for older products to just stay where they are. Because they’re built on “legacy technology”, and aren’t sporting shiny new cloud-native architecture, it can seem like they’re not built for things like Continuous Integration or Continuous Deployment. But that doesn’t have to be the case!
So rather than pat ourselves on the back and think, “job well done”, it’s time for the team to start applying some DevOps practices to the application we’ve now got in the cloud.
Importantly, configuring CI/CD this early in the migration piece will help us in the long run. The final cloud-native version of our application is likely to look very different from what we have now, and our CI/CD pipeline will as well. But if we have working pipeline, any changes we make to our application architecture will only require tweaks to something we know already works. We’ll be iterating on the pipeline as we modernize rather than trying to create it whole at the end.
It’s a little like the legend of Milo of Croton who was able to lift a bull because he started in childhood lifting a newborn calf every day until it grew to maturity!
Building our Application
Let’s split the pipeline into CI and CD parts – continuous integration, and continuous deployment.
In our continuous integration stage, we want to build our application, run our tests, and package it up ready for deployment. Any CI/CD system is capable of doing this, but I like Azure Pipelines or GitHub Actions. I’m going to build similar pipelines in both tools, just to show how it can be done.
Let’s start with Azure Pipelines.
In Azure Pipelines, this is really easy! We can start by creating a new YAML pipeline in the Azure DevOps portal and tell it where the code lives. Azure Pipelines is capable of pulling code from nearly anywhere – Azure Repos, GitHub, Bitbucket, or any accessible Git or Subversion repository.

Next, the code is analysed and a few templates are suggested. Because this application has plenty of C#, the suggested templates include ASP.NET, ASP.NET Core, and even Xamarin for iOS. If we choose ASP.NET, we’ll get most of the way to a successful build.
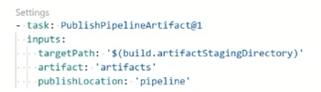
One important step for a multi-stage YAML definition, is to add the Publish Pipeline Artifact task. This allows us to upload the output of our build as well as the database DACPAC to the pipeline. In a future stage (or stages) we can download these artifacts for deployment.
Deploying our Application
One great feature of Azure Pipelines is Environments. You can think of these as logical locations where you deploy your software.
Each environment has a name, and can also contain references to virtual machines or Azure Kubernetes Service resources. In the pipeline, you can reference an environment by name, or even a specifically resource or set of resources.
In our case, we’re using virtual machines (for the moment), so we can add those resources to environments representing our test and production servers. When we do that, we’re given a PowerShell script we can use to install an agent on those virtual machines.
The best part about this feature is when we run a deployment job that refers to our virtual machine resource, the deployment happens on that virtual machine!

We have two artifacts we need to deploy. The SQL DACPAC file can be deployed really easily with the “Deploy SQL Dacpac Deployment Group” task, and the web app can be deployed to IIS with the “IIS Web Application Deployment” task.
What about GitHub Actions?
The great news is you can do all of this in a very similar way with GitHub Actions if you prefer!
While the YAML syntax looks a little different, the concepts are very similar.
Two major differences (at time of writing) are:
- You’ll need to use self-hosted runners on the VMs you want to deploy to. In practice, they work the same way as VM resources in Environments in Pipelines, but they’re not treated as deployment targets – rather just agents that actions are run on.
- The out-of-the-box Azure Pipelines steps for IIS and DACPAC deployment aren’t available as Actions. You’ll either need to find replacement Actions, or just use the command line.
Summary
Now we have an end-to-end pipeline that will build our application and deploy it to a virtual machine in the cloud!
This is a huge step forward. Now, our developers can focus on writing code, and each push or merge to our main branch will trigger a pipeline that takes that code all the way to production.
0 comments