
Visual Studio Team Services (VSTS) and its on-prem version TFS has an extensibility framework that lets 3rd party developers write and publish their own extensions. A VSTS extension is just a set of contributions where each contribution can contribute to certain contribution points provided by VSTS like hubs, pivots, menu items, work item forms, and more.
This blog describes how to write efficient work item form extensions that can contribute to a work item form page, group, or control. General documentation for writing extensions are published in Microsoft docs, which also cover how to write work item form extensions. In this post, I provide more details on how to write well-performing work item form extensions.
How does the work item form work?
To understand the best time to run initialization logic for your contribution, let me first give you a little detail on how the work item form works. When a user opens a work item (either a standalone work item creation/edit or from a query result grid), it creates the form based on the work item’s type. If you open a “Bug” work item, it will create a form instance for the “Bug” type. This form instance will also load all the extension iframes after its creation. After that, if you open a “Feature” type, it will create a new form instance for this type and load new instances of the same contribution iframes in the form.
Each work item type’s form has its own instances of form contributions. These forms are cached by their work item types. If you open multiple “Bug” work items, they will use the same form instance (and thus same contribution instances). For example – if you have a query that returns 2 Bugs and 2 Features, and you open Bug #1, the system will create a “Bug” form. After that, if you open Bug #2 from the grid, it won’t create a new instance of the same form, instead it will unload Bug #1 from the same form instance and load Bug #2 in it. If you open Feature #3 after this, it will create a new form instance for the Feature type (if it hadn’t been created yet on the page) and load new instances of contributions in this new form.
Understanding how the form is created is useful because many developers think that every time they open a new work item form, it will create new instances of contributions. They therefore place most of their initialize logic in the constructor of their contribution App. Instead of starting your contribution logic in the constructor, you should initialize the logic in the Work item form “onload” event as described in the next section.
Note that this logic is true only in triage mode (when you open a work item form side by side with a query results grid). If you open a standalone work item (either in a dialog or in a full view), it creates a new instance of the form everytime, thus creating new instances of extension iframes. But in any case, initializing the logic of the contribution in the constructor is always bad, instead it should be initialized within the “onLoad” event.
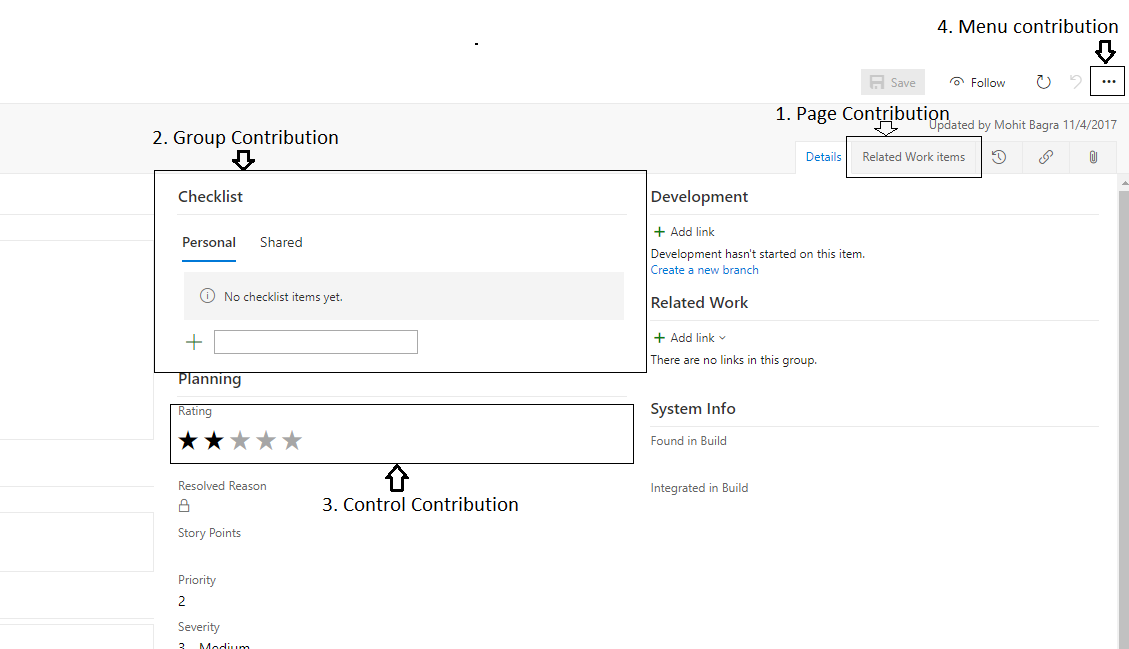
Work item form contribution points
The work item form has 5 contribution points (excluding a menu contribution which is not discussed in this post) –
-
Page contribution
A page contribution contributes to the list of tabs (or pages) in the work item form –

In the screenshot above, “Related work items” tab is a contributed tab. When users click this tab, it will load the contribution iframe in the form below the tab. Note that the contribution is not loaded into the form until the user clicks the tab.
-
Group contribution
A group contribution contributes to the grid of groups in the form –
 The system loads a group contribution as soon as it renders the tab that contains the.
 -
Control contribution
A control contribution is placed inside a group. Similar to group contributions, a control contribution is also not loaded until the tab that contains the contribution is rendered.
-
Menu contribution
A menu contribution contributes to the work item form’s menu bar. These contributions fall under the ellipsis menu item.
-
Observer contribution
If you want a contribution to not render on the form, but still be able to interact with the form, then you use the observer contribution. This contribution is initialized as a hidden iframe in the form. It’s not visible to the user but it can still interact with the form using the services provided (as mentioned below).

 The system loads a group contribution as soon as it renders the tab that contains the.
Work item form extension services
Two services – IWorkItemNotificationListener and WorkItemFormService support the ability for contributions to interact with the work item form. Using these services, a contribution can interact with a work item form in the following two ways: –
Listen to form events
Contributions can listen to form events via IWorkItemNotificationListener. A work item form contribution can register event handlers to certain work item events which will be called whenever the work item form fires those events. The events are as follows:
-
onLoaded
Fired when a work item is loaded in the form, or when a contribution is initialized on an already loaded work item form. This is a good place to initialize your contribution’s logic, because firing of this event means that a work item is ready to be used. When a work item form is opened, it first creates the form (along with all its contributions) and then starts loading the work item data from the server. Once the work item data is loaded, the data is “bound” to the form and at this point it will fire the onLoaded event. Since the contributions are created during form creation, it is not guaranteed that a work item is ready in the form during their creation. So, trying to perform actions on the work item form as soon as the contribution is loaded won’t work. All the work item form related activities should start from the point the onLoaded event is fired. Note that if you switch between work items of the same work item type in a query result grid, it will fire onLoaded event for each work item which is bound to the form. As mentioned above, when a new work item is opened in the form, it doesn’t instantiate a new instance of contribution, instead it uses the same form instance and just unbinds the previous work item and binds the new work item.
-
onUnloaded
Fired when a work item is unloaded in the form. This is particularly useful when users switch between different work items in a query result grid. When users switch between work items of the same type, it will first fire an onUnloaded event on the form for the old work item and then fire an onLoaded event on the form for the new work item. This event is a good place to dispose the internals of a contribution.
-
onSaved
Fired when a work item is saved by the user on the form.
-
onRefreshed
Fired when a work item is refreshed from the form.
-
onReset
Fired when a work item is reset in the form.
-
onFieldChanged
Fired whenever a field is changed on the form. This event w fires whenever the field value changes – either manually, by some work item rule, or by calling a function on the WorkItemFormService.
More information on these events are at Extend the work item form.
Perform actions on work item form
The Work Item Form Service allows contributions to perform certain actions on the form. This service is available with all contribution types, but only works when a work item form is active on a page. The functions exposed by this service are documented in the link above, so I am not going to explain each of them in details. I will point out some interesting facts about some of the functions.
-
Save()
Calling save() method on the form service saves the current state of the work item in the form (if it’s in a valid state). This function returns an empty promise which is resolved if the save succeeds and is rejected if the save fails. If the work item in the form has not been changed at all, or if the work item in in an invalid state, this function would be no-op and the promise would neither resolve nor fail.
-
setFieldValue()
Calling setFieldValue() will update the value for a field on the form and mark the work item as dirty. It will also fire onFieldChanged event on the IWorkItemNotificationListener object registered by the contribution. Keep in mind that any field change by the contribution would also fire a field changed event on the contribution. This information is useful because you don’t want to end up in an infinite loop where on a field change event, the contribution sets a field value which would again fire the event and so on.
All 5 kinds of work item form contributions are similar except for how they are rendered on the form. All of them can interact with the form using these two services.
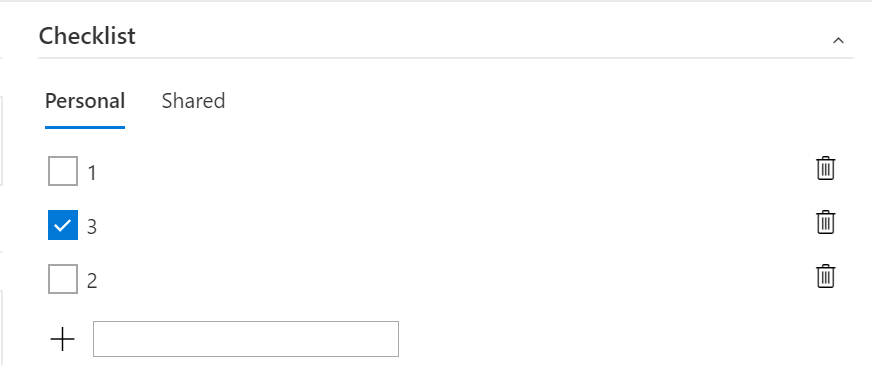
A simple work item form group extension
I am going to demonstrate by using as an example a real custom group extension that is on the marketplace (link). This form group extension is built upon node using npm, typescript 2.3 (using typescript async await) and react. The source code for this extension is here. Although the extension can be written in javascript, I highly recommend using typescript to avoid any runtime errors as most of the errors would be caught at build time in typescript. Microsoft releases typescript declarations of its internal classes, services and interfaces every 3 weeks which can be used if your extension needs to call VSTS rest APIs or Work item. The sdk can be found here. I’ll assume that readers know how create the initial structure of VSTS extension and jump into some best practices on writing form contributions. If not, then please look into samples provided by VSTS here
The checklist group extension start with the declaration of its manifest in the vss-extension.json file:
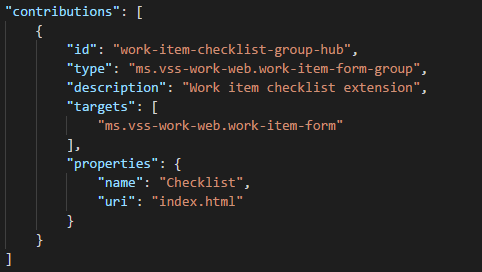
When the system loads a contribution, it loads an iframe targeting the starting html file. In this case, it’s the index.html file.
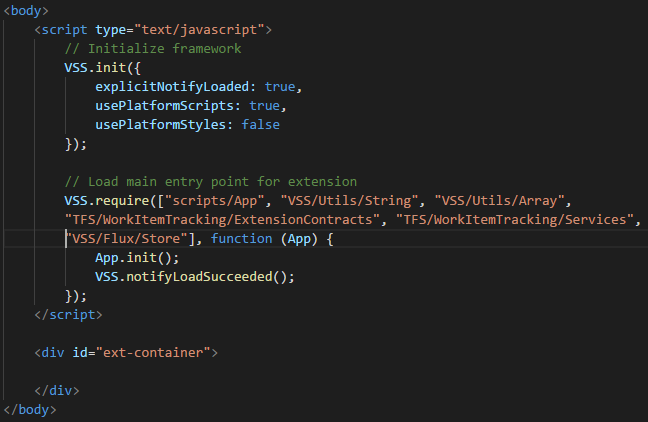
As soon as the html loads, it’ll call this javascript code. A couple of things to note here –
- Authors can call VSS.init to configure the initialization of the extension. VSTS lets authors use some of its inbuilt controls and libraries in an extension, if “usePlatformScripts” is set to true. If authors also want to use css styles published by Microsoft, they can also choose to set “usePlatformStyles” to true. If the contribution wants to use its own styles and controls, then it can set them to false.
- When VSTS host page tries to load a contribution iframe, it sets a load timeout, and if the html page is not fully loaded until that timeout, the page will show an error in place of the extension. To avoid this, make sure that your html file is loaded as quickly as possible. Requiring all your javascripts and css files in the <head> of the html file will make loading the html slow because until all the resources are loaded, the page is not fully loaded. I suggest you lazy load your starting javascript module so that it doesn’t block html render. That’s why I load my “scripts/App” javascript module using VSS.require which is just a wrapper over Requirejs.
- As soon as your module is ready, it needs to call VSS.notifyLoadSucceeded to notify the host page that contribution has successfully loaded.
Let’s see how the App module is defined.

When a contribution loads, there is no guarantee that a work item is bound to the form at that moment. Instead of initializing the internals of the contribution in the constructor of the main module, it should be initialized in an onLoaded() event and disposed of with an onUnloaded() event callback. This makes the contribution robust in scenarios when the user is switching between workitems in a query result grid.
This is the crux of a simple form extension. A page contribution can be written like a group contribution. A control contribution is also the same except it can take some inputs from the user so they can configure the contribution per their needs.
Writing a custom control extension
A custom control can take some user inputs when a user tries to add it to a work item form. These user inputs are then passed to the control contribution when it’s initialized, so that the contribution can initialize itself based on user input. A group or page contribution doesn’t take any user input because they are meant to be standalone apps. The reason we let users pass input values to a custom control is that a custom control is primarily meant to act as a replacement of 1st party field controls on the form. For example, a custom control that replaces the HTML control provided by VSTS with a markdown control. Such a control can be used with any kind of HTML work item field, but only users can decide which field would it be used for.
I created a simple Pattern custom control that restricts a field value to a certain pattern provided by a user (like an Email pattern or a Phone number pattern). The code for this extension is available at – https://github.com/mohitbagra/vsts-extensions-controllibrary.
This custom control binds itself to a string-based field (provided by the user) and restricts the field value to a certain pattern which is also provided by the user. If the value provided in that control doesn’t match the specified pattern, it’ll show an error. This control contribution can define its set of inputs in the extension’s manifest –

In this example, the pattern control contribution needs 3 inputs from a user. Each input is described by its descriptor where authors can describe the type, name and other properties of the inputs. These descriptors are used to validate the input value provided by the user. For example, if an input is of type “number”, and the user tries to enter a string value for it, it won’t let the user do it.
The inputs described in this example are –
- A string-based field which should be bound to this control. Notice that the type of this input is “WorkItemField” which means that users won’t be able to enter any other value to this input. The type of field can also be defined by using “workItemFieldTypes” so that user can only provide field of certain specified types.
- A string pattern which the control should allow as the field value.
- A custom error message if the user provides a value to the control which doesn’t match the pattern.
A control contribution is loaded like a group or page contribution. The difference is that the control contribution will get the input value provided by a user –

This will return an object where keys are the input ids – as defined in the extension manifest and values would be the values provided by the user. In this example, it would look like –
{ “FieldName”: “Test.PatternField”, “Pattern”: “<pattern>”, “ErrorMessage”: “<error message>” }
To initialize the control, register a work item notification listener which listens to work item events –

Depending on the need, the control contribution can listen to other events too like onSaved, onRefreshed etc. But in this example, we only need to listen to 3 events –
- onLoaded – So that the contribution can refresh the field value in its control when user loads a different work item in the form
- onUnloaded – So that the contribution can clear the control’s value
- onFieldChanged – So that the control refreshes its value whenever the value of the field it’s bound to changes. This can be either manually by user or via some work item type rule. The onFieldChanged event is fired for every field value change, but the control needs to only worry about its own field, that’s why we check that the field this control is bound to is in the arguments of field changed event.
A field bound custom control needs 2 things to work – listen to work item’s field changes and refresh its control to show the current field value, and listen to user changes in its own control and change the work item’s field value.
Both onLoaded and onFieldChanged callbacks call _invalidate() function which sets the value of the control by reading the current field value of the work item.
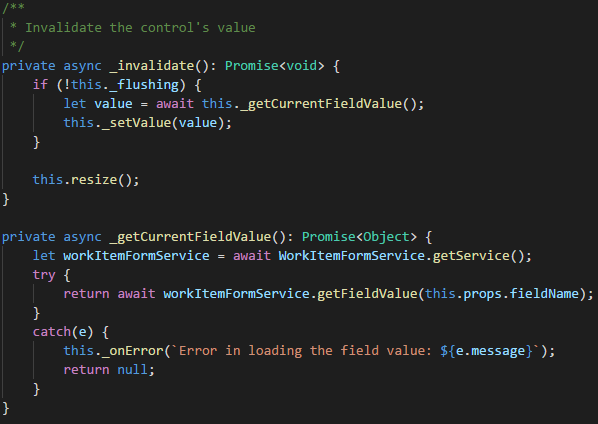
To read the field value of the workitem, we use the WorkItemFormService’s getFieldValue function. Once you read the value, you can set it to the custom control. In this case, I call a _setValue() function which just sets the value in an input box and also validates the input based on the pattern provided by user.
To set the work item’s field value based on user input into the custom control, we can use WorkItemFormService’s setFieldValue function –
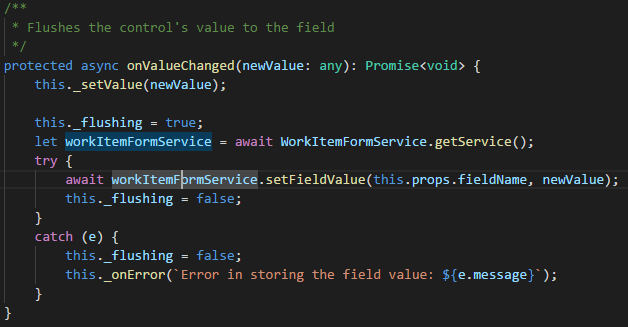
In this example, the onValueChanged function is bound to the “input” event of the text box shown in the control.
Note that both _invalidate and onValueChanged functions reads/writes a variable “_flushing”. This it because the control can set field value as well as listen to field value changes. When this control sets the field value, it’ll still get onFieldChanged event and we don’t want to come across an infinite loop where the control first sets the field value, then gets the field changed event and then tries to refresh the control’s value based on the same field value that it changed originally. This can be avoided by maintaining a private boolean variable here.
Auto resize group and control contribution iframe in the form
Unlike work item form page contributions and hub contributions, control and group contributions on work item form only get limited space for them to render. If you look at the screenshot at the top of this post, you can see how small the group and control contributions are. By default, the work item form gives only 70px height to control contributions and 300px height to group contributions. Since the form is responsive, the width of groups and controls depend upon how much space does the whole form have. Although the initial height of controls and groups are set, the form listens to certain resize events from the contributions and it resizes the parent host of the contributions to fit it.
To change the height of a group or control contribution, the contribution can call VSS.resize function and give it appropriate size in pixels –
VSS.resize(width, height);
When VSS.resize is called from a contribution, it resizes the parent iframe of the contribution on the work item form to resize to the height passed to this function. Note that work item form only respects the height parameter passed to this function and will ignore the width parameter. Also, if the value of height parameter is passed as null, the form will try to automatically resize the iframe to fit its current contents.
For example, if you have a checklist group extension which allows user to add checklist items to it, the contribution would want to expand its height as more and more items are added. In this case, whenever a new item is added, the contribution can call –

This function will call resize with height as contribution’s body height. As more and more items are added, the contribution’s body height will increase, and calling VSS.resize with the body height will expand the contribution’s iframe in the form too.
You can also hook this function as a callback to window resize event, so that whenever the browser window or the form is resized, the contribution can automatically resize itself.
Note that, the contribution should always have a max height attribute in its body element, so that it doesn’t expand too much and make the form look bad.
Also note that if the contribution is making use of popups like a popup context menu, they will still be shown inside the contribution iframe and get cut off by the end of the frame.. To fix this, you can again make use of VSS.resize whenever you show or hide the popup.
Performance tips
As I mentioned above, the system sets a timeout for every contribution it tries to load. If the contribution and all its blocking resources (html, css, javascripts) are not loaded until the timeout hits, the system will show an error message in place of the contribution. To prevent your extensions from hitting this error, here are some tips on how to make the contribution load faster:
- Do not add all your scripts in the html’s <head>. Instead make use of async javascript load using requireJs.
- Note that the system (VSTS/TFS) can provide some 3rd party libraries like jquery, react, react dom, requireJs and Q on demand to the contribution. Contributions don’t need to add these libraries in their html. If you are using AMD style javascript load in your app, you can just add import (or require) statements to these libraries and VSTS will load them for you. If you use typescript to write your app, you can use typescript declarations for these libraries for your dev work, but no need to actually make these libraries a part of your app.
- Make use of bundling tools like webpack. Bundling and minifying can really improve the javascript loading time if your app has many javascript files. I personally make heavy use of webpack and some of its plugins like uglifyJs, commonChunksPlugin and css-loaders and it speeds up the app load time greatly.
- If your App doesn’t make use of any VSS platform javascript modules or VSS platform css styles, you don’t need to load them from your App. In this case you can just set “usePlatformScripts” and “usePlatformStyles” to false in the code snippet above. If you set “usePlatformStyles” to true, it’ll load a couple of css files and fonts from VSS which you can use in your contribution app. But if you are using your own styles, you can set this to false and it won’t load VSS styles which can save you some load time.
- If your app uses a lot of VSS controls or libraries, you can add import or require statements to those scripts in your app and they will be loaded from VSTS page on demand. But these VSS modules will not be bundled when they are loaded. Even loading a single control like Combo from VSS actually loads a few other script modules individually which can really make the app slow. To improve this, add a VSS.require statement in your app’s html file and pass in VSS module names to it which are getting used in your app. If you pass in multiple modules in VSS.require(), it won’t load all of them individually, instead it will load them in one single bundle.
Example –
I hope this blog post has provided you with some new insights to VSTS extensions. I have published 5 extensions to VSTS and the source code for all of them are on my . Pretty much all of them make use of React, Typescript 2.3+, Typescript async await, Office Fabric UI and webpack. You are welcome to use those repos as examples. I also have published a npm package which has some common react components which be used in a VSTS extension.
Some helpful links –
- VSTS sample extensions
- Write your first extension for VSTS
- Extend the work item form
- VSS library typescript typings
Mohit Bagra
Thanks @Mohit Bagra for putting this together! This has helped us immensely to get started with custom extensions for Azure DevOps.
I am trying to use a TreeView – VSS/Controls/TreeView in one of the extensions – a simple one with just js, and was trying to find the events that I can add inside the tree options / properties – like expanded / collapsed, to add the resize logic. I had checked in Vss.d.ts, but was not able to get the right one. Can you please share if you have any thoughts on this? Thanks!