If you are interested in Microsoft Visual Studio Team Services (VSTS) platform and Java development, maybe you know that VSTS has everything you need to organize CI/CD pipeline for your Java application development. Visual Studio ALM Blog has a lot of useful and helpful resources describing how to build and deploy your Java application and artifacts to Azure App Service or Azure VM running lightweight open source Tomcat or Jetty servlet container with VSTS. But what if you are going to use/using enterprise grade Java EE application server like Oracle WebLogic Server in Azure VM and you have a requirement to seamlessly integrate it with your VSTS CI/CD pipeline? Quick answer is: «yes, it is possible». Microsoft VSTS has very flexible mechanism of build/release definitions which allows you to configure your CI/CD pipeline according your requirements and compile, build and deploy your Java EE application to Oracle WebLogic Server. In this article, I will consider the basic steps you need to do to configure your infrastructure for WebLogic deployment.
Prerequisites
In the world of Java development, Apache Maven is a well-known and proven build automation system for simplifying build process for Java projects and widely using by Java developers. Oracle WebLogic Server also provides support for Maven through the provisioning of plug-ins that enable developers to perform various operations on WebLogic Server within a Maven environment. The task of automated deployment to local/remote WebLogic Server instances was simplified since Oracle updated Oracle WebLogic Maven plugin and made it available in Oracle Maven Repository. WebLogic Maven plugin (weblogic-maven-plugin) provides functionality to install, start and stop server instances, create domains, execute WLST scripts, and compile and deploy Java applications. You can find out more details about its functionality in official WebLogic Maven Plugin documentation. Good news that you may not install this plug-in manually now, instead of this you can use Oracle Maven Repository. Alternatively, you can configure the plugin manually if you do not want to use remote repository. To start it usage you must accept license agreement and make some modifications in your Maven settings and project POM artifact. We will consider basic steps in this post, but you can find more details in official documentation. In our case, we are going to deploy our private VSTS Build Agent running on Azure VM instead of the VSTS hosted agent. Then we need to make some modifications in Maven configuration to access Oracle Maven Repository.
Microsoft Azure platform supports Oracle Software including Oracle WebLogic Server to run enterprise grade Java EE deployments. Despite WebLogic Server Infrastructure deployment in Microsoft Azure is out of the scope of this article, you can find all required information in official documentation.
In our case, I am using use Azure VM running Oracle WebLogic Server Quick Installer Distribution with one Admin Server instance listening 7001 port number and WebLogic domain is configured in development mode. But feel free to experiment with your custom WebLogic Domain configuration for more complex deployments.
Infrastructure configuration
Step 1
Before provisioning of VSTS Agent VM we need to create an agent pool. Login to your VSTS account, go to Settings menu and then to Agent Pool Click New Pool… and then enter the pool name. Remember and note your pool name since we will need it during VSTS Agent VM provisioning.
Step 2
Now we need to provision VSTS Agent VM with all required software components for building of our Java web application. To simplify this step, instead of manually creating Azure VM, I’ve prepared an Azure ARM Template which will create Oracle Linux 7.2 VM and run the shell script to install all required components for building and deployment. You can find ARM template artifacts on GitHub. To deploy VM using your Azure subscription just simply click button below:
Then you will need to select your Subscription, Location to deploy, Resource Group, and supply an Admin Username, Password, and unique DNS name for the machine. The machine type will be a Standard D1_V2. You will also need to specify the VSTS Account Name to use and a Personal Access Token (PAT). If you don’t have a personal access token, follow this link to create one. Finally, you need to define VSTS Agent Pool Name (the one you’ve created on the previous step 1) and VSTS Agent Name. The VM will be deployed to a Resource Group along with a virtual network and some other required resources. You can delete this resource group to remove all the created resources at any time. Please allow about 10 – 15 minutes to complete provisioning and configuration.
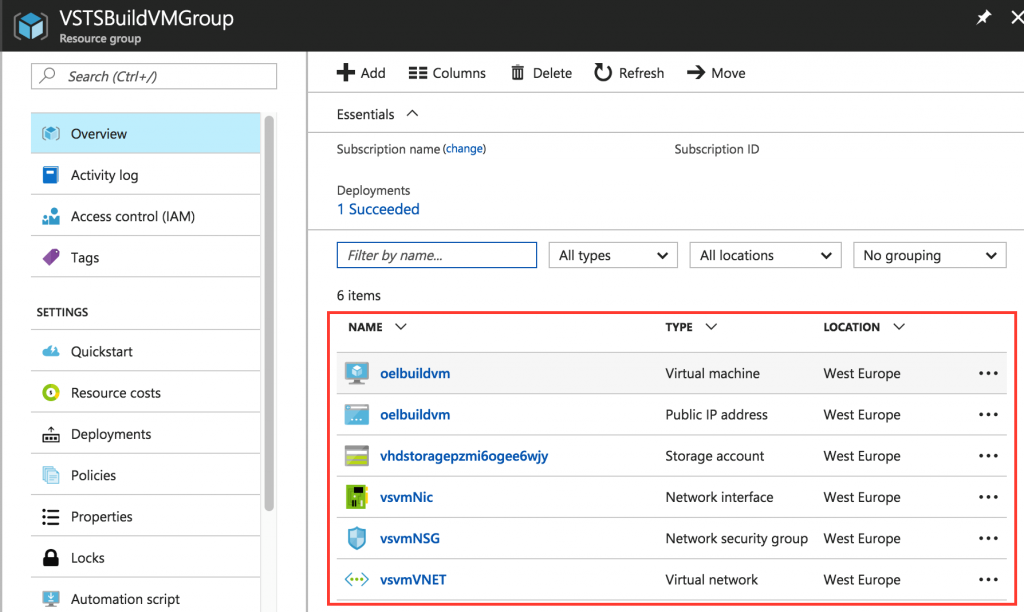
Once deployment completed, you should see the following resources created in the Azure Portal:
Step 3
The VM provisioned on previous step includes the following components:
- VSTS Build Agent for Linux
- Oracle JDK 8u131
- Apache Maven 3.5.0
- Git 2.9.2
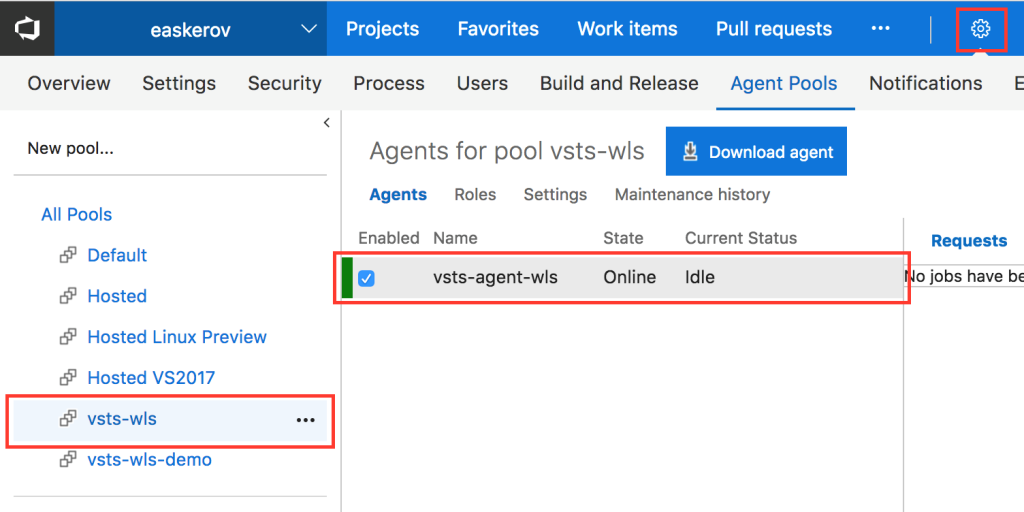
Once the VM is provisioned, VSTS Build Agent service will be installed and run. You need to go to your Visual Studio Team Services console, navigate to Settings -> Agent Pool tab, then click on the pool item, you’ve created during the step 1. You should see that your VSTS agent is up and running now.
Step 4
It is time for the next step. Now we need to configure Apache Maven settings to add Oracle Maven Repository in our provisioned Azure VM. The Maven artifact xml requires additional configuration to support the Oracle Maven Repository. To do this you need to SSH to you VSTS agent VM using admin username and password, provided on the step 2. Using Putty, Bash for Windows or other Linux machine go the terminal end execute the following command:
$ ssh <vsvm_admin_username>@<vsvm_public_ip>
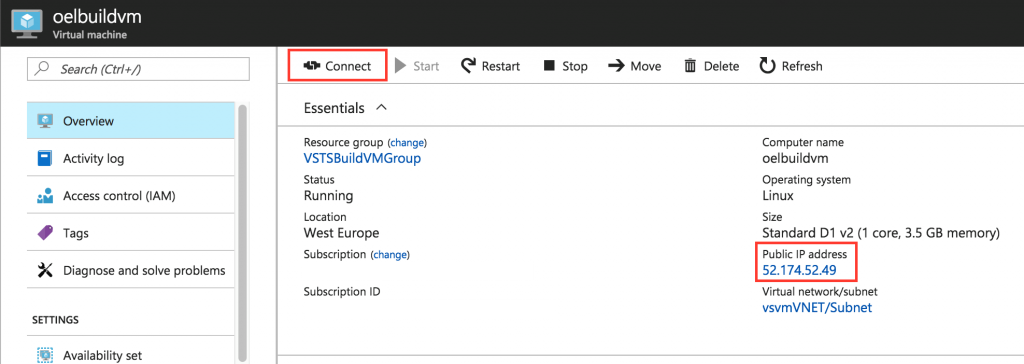
You can check the VSTS Agent VM public IP address in Azure portal. Alternatively, you can simply click Connect button at the top of VM info panel and system will generate full ssh command to connect:
Now you will need to edit settings.xml artifact and add Oracle Maven Repository configuration to the <servers> section. There are several locations where you can modify settings.xml artifact:
- Maven global conf folder: $MAVEN_HOME/conf/settings.xml
- A user’s local .m2 folder: $HOME/.m2/settings.xml
In our case, we will use global configuration settings.xml file located in Maven $MAVEN_HOME/conf/ directory. For further details please check Maven documentation.
Example of configuration code is provided below:
<settings>
    ...
 <servers>
    ...
  <server>
      <id>maven.oracle.com</id>
      <username>OTN_USERNAME</username>
      <password>OTN_PASSWORD</password>
      <configuration>
        <basicAuthScope>
          <host>ANY</host>
          <port>ANY</port>
          <realm>OAM 11g</realm>
        </basicAuthScope>
        <httpConfiguration>
          <all>
            <params>
              <property>
                <name>http.protocol.allow-circular-redirects</name>
                <value>%b,true</value>
              </property>
            </params>
          </all>
        </httpConfiguration>
      </configuration>
  </server>
    ...
 </servers>
    ...
</settings>
You must define your Oracle OTN Account username and password using <username> and <password> entries.
Important note: It is strongly recommended to encrypt your password using the standard Maven encryption mechanisms. Please check official Maven documentation for further clarifications.
Step 5
Now your VSTS Build Agent VM configuration has been completed and we are ready to move to next step, where we will configure VSTS project for building and deployment. It is assumed that your VSTS project and GIT repository for your Java project already created, so I will not focus on this here. If it is not created, please check official VSTS documentation how to do that.
Now we need to modify configure the POM artifact of our Java Application project.
First, you need to add repository definition to your POM project file:
<project>
  ...
    <repositories>
    <repository>
        <id>maven.oracle.com</id>
        <releases>
        <enabled>true</enabled>
        </releases>
        <snapshots>
        <enabled>false</enabled>
        </snapshots>
        <url>https://maven.oracle.com</url>
        <layout>default</layout>
    </repository>
    </repositories>
    <pluginRepositories>
    <pluginRepository>
        <id>maven.oracle.com</id>
        <url>https://maven.oracle.com</url>
    </pluginRepository>
    </pluginRepositories>
  ...
</project>
Next, you need to add WebLogic Maven Plugin configuration in <plugins> entry in your POM project file. In our case, we are using simple configuration to perform remote deployment with deploy goal. However, as I’ve mentioned earlier, plugin supports other functionality and more complex scenarios, where you are able not only to deploy your app, but start, stop WebLogic Server instances, create domain, execute WLST scripts and even install WebLogic Server binaries. For additional information please check WebLogic Maven Plugin official documentation.
<project>
    <modelVersion>4.0.0</modelVersion>
    <groupId>com.example.myapplication</groupId>
    <artifactId>myapplication</artifactId>
    <packaging>war</packaging>
    <version>1.0-SNAPSHOT</version>
    <name>myapplication Maven Webapp</name>
    <url>http://maven.apache.org</url>
    ...
    <build>
        <finalName>myapplication</finalName>
        <plugins>
            ...
            <plugin>
                <groupId>com.oracle.weblogic</groupId>
                <artifactId>weblogic-maven-plugin</artifactId>
                <version>12.2.1-2-0</version>
                <configuration>
                    <adminurl>t3://WLS_HOSTNAME:7001</adminurl>
                    <user>${weblogic.username}</user>
                    <password>${weblogic.password}</password>
                    <upload>true</upload>
                    <targets>AdminServer</targets>
                    <remote>true</remote>
                    <verbose>true</verbose>
                    <source>${project.build.directory}/${project.build.finalName}.${project.packaging}</source>
                    <name>${project.build.finalName}</name>
                </configuration>
                <executions>
                    <execution>
                        <phase>install</phase>
                        <goals>
                            <goal>deploy</goal>
                        </goals>
                    </execution>
                </executions>
            </plugin>
            ...
        </plugins>
    </build>
</project>
Please note some important parameters related to WebLogic in configuration above:
- <version>12.2.1-2-0</version> – WebLogic Maven Plugin version. In our case this is 2.1-2-0.
- <adminurl>t3://WLS_HOSTNAME:7001</adminurl> – listen address and listen port of the Administration Server. Please note that in our case we are using default listen port is 7001. However, in your domain configuration the port number could be different.
- <user>${weblogic.username}</user> <password>${weblogic.password}</password> – WebLogic administrative username and password defined as environment variables.
- <remote>true</remote> – indicating that plugin is not running on the same machine as Administration Server. This is exactly our case since we are going to perform remote deployment.
- <targets>AdminServer</targets> – this parameter specifies a comma-separated list of targets for the current operation, in our case this is deployment to Admin Server target. Please note that Admin Server name could be different and depends on your WebLogic Domain configuration. For instance, if you are using WebLogic Quick Installer, Admin Server name could be myserver by default.
Step 6
Now we are ready to move to next step and create Build Definition in VSTS console. Go to your VSTS account homepage and browse (if necessary) your Java Application project. Once on the project’s home page, click on the Build & Release menu and then select Builds option.
Click the + New Definition button to create a new build definition.
Select Empty template and click Apply button. There are a plenty of predefined templates are available for different kind of build definitions, but we are going to create custom one.
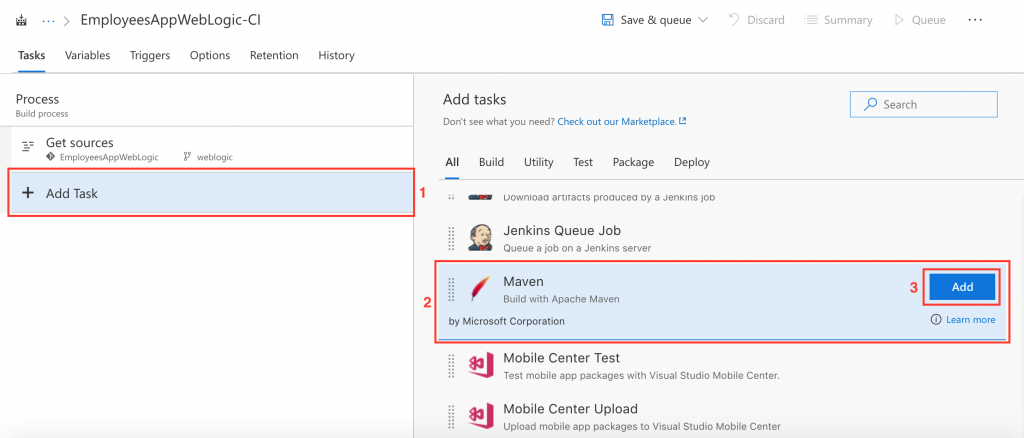
Go to the Tasks tab and click + Add task button, then find and select Maven task item and finally click Add button to add it to the build definition.
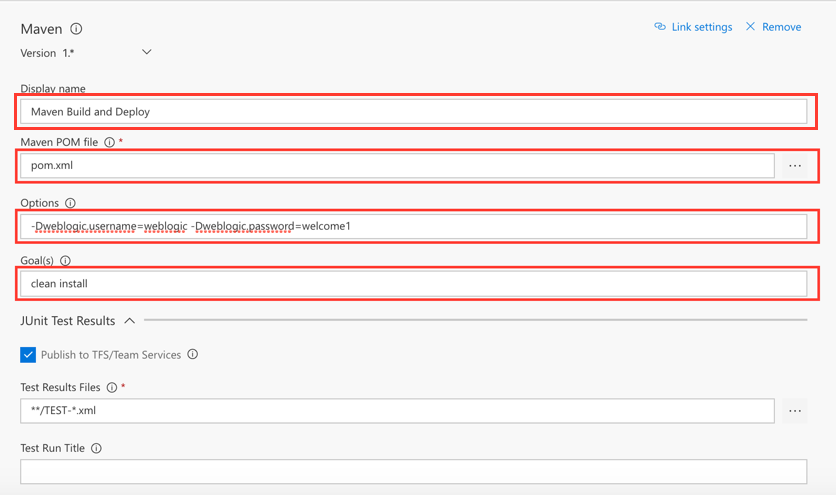
Select just created Maven task. Now you need to define task properties:
- Set Display name as Maven Build and Deploy (or another name you like).
- Set Maven POM file You can either type or browse using the … button.
- Define Maven goals in the Goal(s) field, in our case it will be clean install.
- In the Options field, you need to define WebLogic Admin username and password as the values of environmental variables (please define your correct WebLogic Admin username and password):
-Dweblogic.username=weblogic -Dweblogic.password=welcome1
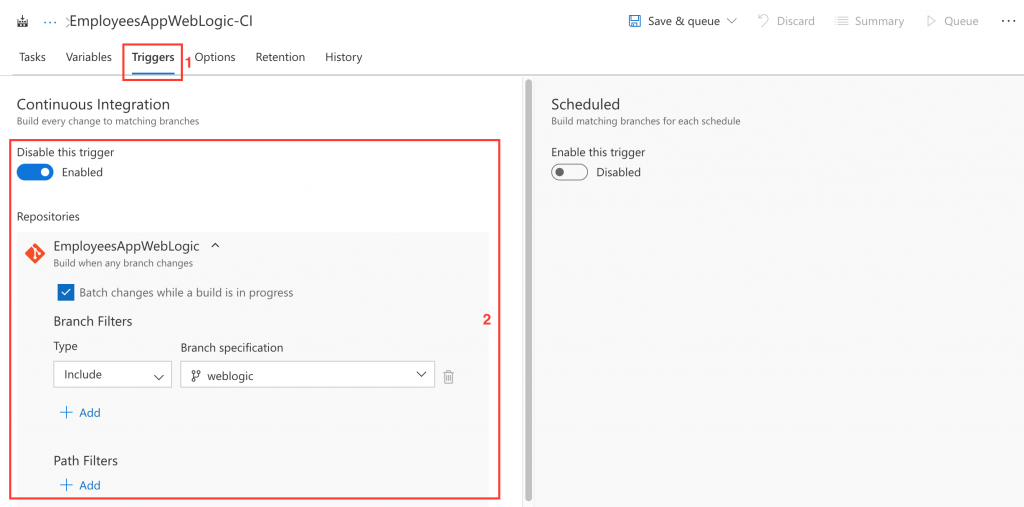
Navigate to the Triggers tab and switch on Continuous Integration (CI) option. Ensure that other settings like Branch Filters are set up correctly. Check Batch changes while a build is in progress option if this is required in your case.
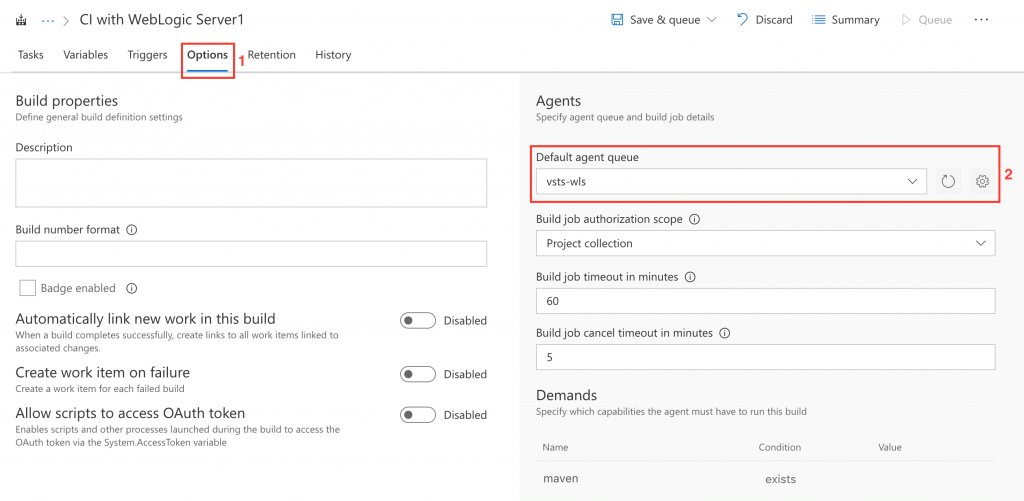
Go to Options tab and select Default agent queue to the one you have created and configured on the step 1 (e.g. vsts-wls).
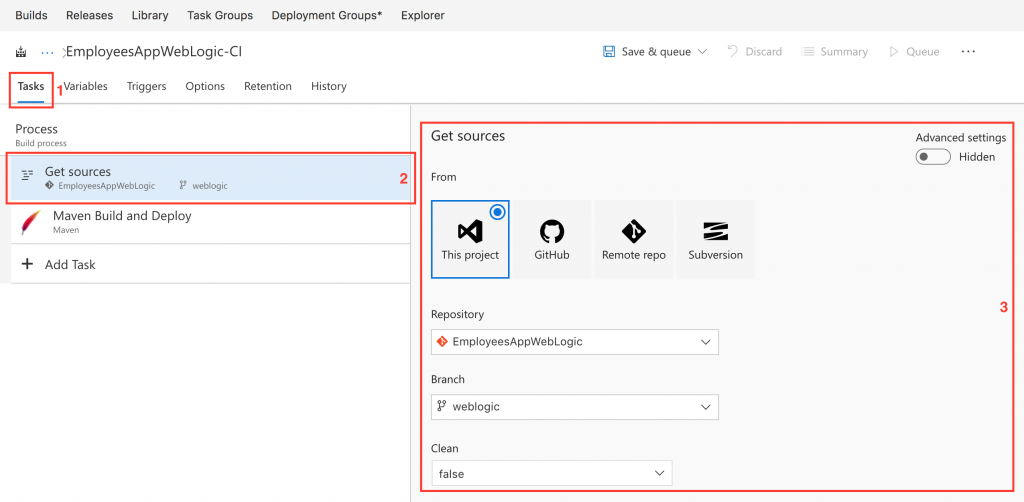
Navigate back to Tasks tab, select Get Sources step and ensure that This Project is selected with appropriate Repository and Branch.
Finally give a name for our build definition (i.e. «CI with WebLogic Server»), clicking to the build definition title, then click on Save & queue dropdown list and select Save option to save our build definition. Accept default settings (or add your comment) and click Save button in the pop-up dialog window.
Step 7
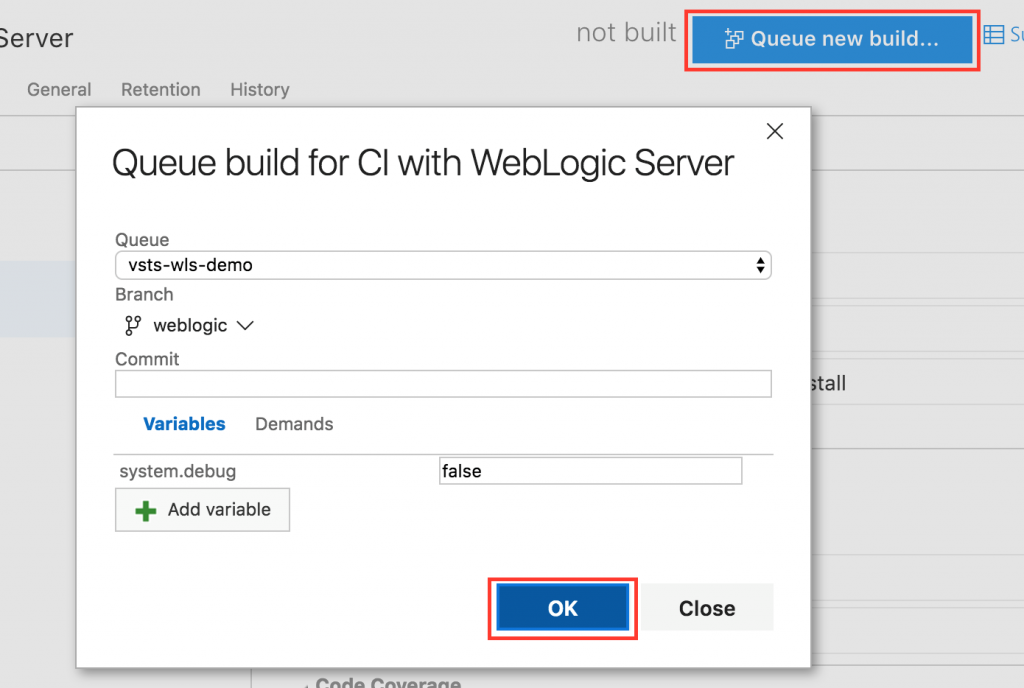
Now we are ready to start build and deploy process. Since we have enabled Continuous Integration (CI) trigger above, build and deploy process will start automatically once we push any new commit to our repository. Alternatively, to test our build definition we can queue new build manually. Click Queue new build… button for just created build definition. Leave settings by default and then click OK button to start.
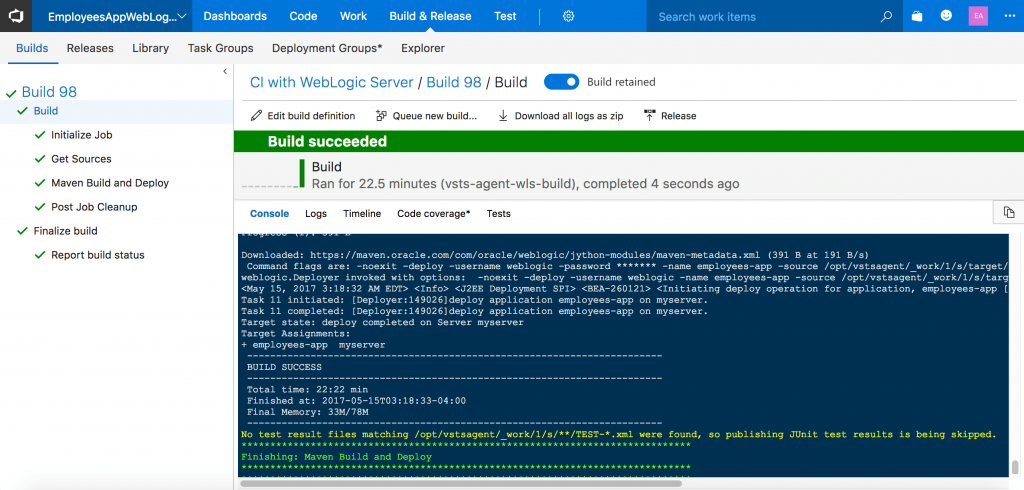
This should trigger the build definition we have created. Click the Build tab to see the build process in action. Once complete, you should see build summary, which includes deployment results.
Please note that in our case since we are using WebLogic Domain in development mode we do not need to start our application explicitly, but if your WebLogic domain in production mode then you need to start your application using start-app plugin goal.
Step 8
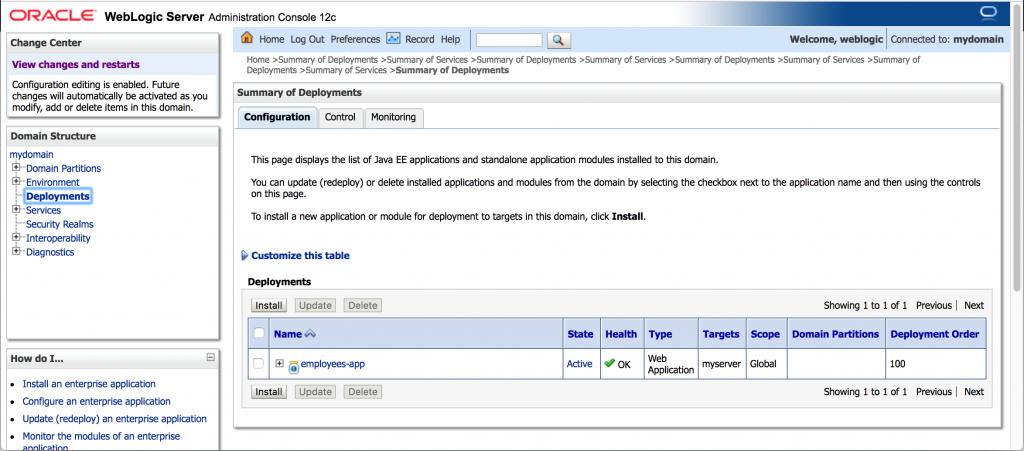
Finally go to your Oracle WebLogic Server Administration Console to ensure that your application is deployed and running successfully.
Conclusion
In this article, we’ve considered relatively simple case of Java Project CI/CD with Oracle WebLogic Server, but flexibility of Microsoft Visual Studio Team Services Platform allows you to define much more complex CI/CD pipelines with build and release definitions mechanism along with private Build Agents. Find out more on Microsoft VSTS ALM blog and official documentation.






0 comments