
Last time, I showed you how to create a Cosmos DB account for your MongoDB data using an ARM template. This time, we’ll use the Azure Database Migration Service (DBMS) to migrate my data I have on a Virtual Machine into Cosmos DB.
Why migrate?
Before we migrate, we should do some evaluation of our existing database server and ask why? My database server doesn’t have authentication enabled, even with a standard set of firewall rules, this leaves our data at risk. Secondly, I’ve not configured SSL which means my actual MongoDB database connections are not encrypted, this leaves our data in transit at risk as well. My server is a VM which is hosting the data, this Infrastructure as a Service model for hosting my database requires me to manage the server operating system. If I miss a patch to a critical service, that puts our data at risk. Another bad part of my existing setup is the lack of backups. If my data was corrupted or this standalone server were to fail, I could lose all of the data, once again putting us at risk. A standalone also isn’t replicating my data, leaving me without redundancy for my data. This adds risk because there’s no failover if my database service stops or my VM crashes.
Let’s remember that databases are complex beasts from an operational standpoint. There are a number of tasks that in the past had been laid at the feet of people known as Ops or DBA. Those tasks typically involve scaling your database servers, handling performance, ensuring backups, and monitoring. Let’s not forget licensing for your enterprise database server. Oh and who exactly is creating your indexes for speeding up your queries?
I did it the wrong way on purpose
So why did I leave all these important services out of my database? Simply stated, I wanted to show you the wrong way first. A developer gets a great idea, apt-get installs the MongoDB service and just moves ahead with the project. By the time we’ve found out that all of these are real problems, it’s already a potential single point of failure. Now I am not just trying to blame a developer here, but mistakes happen. The best we can do is look for ways to mitigate risk by reducing our potential methods of failure. Cosmos DB keeps me from having to concern myself with the latest kernel patches, configuring replication, enabling a backup service, and tightening security of our data. The more we abstract the management away from our database, the more we can focus on managing the data and building the application we’re using it for.
Azure DBMS
Azure Database Migration Service is a fully managed service designed to enable seamless migrations from multiple database sources to Azure data platforms with minimal downtime (online migrations).
Online vs Offline
From the Azure docs on the migration service, we’ve got this definition:
Offline versus online migrations
With Azure Database Migration Service, you can do an offline or an online migration. With offline migrations, application downtime begins at the same time that the migration starts. To limit downtime to the time required to cut over to the new environment when the migration completes, use an online migration. It’s recommended to test an offline migration to determine whether the downtime is acceptable; if not, do an online migration.
During your migration planning phase you can determine if an Online or Offline migration makes sense. If your data is mission critical and you can’t handle any downtime or slowdowns, choose an Online migration. If your data isn’t that important, which in my case it’s certainly not, you can go with an Offline migration.
Network
To get started, I’ve made a few modifications to my VM. I have configured MongoDB to listen on all network interfaces so I can create a remote connection from the Virtual Machine to the migration service. Here is the change within my config file:
# mongodb.conf

# Where to store the data.
dbpath=/var/lib/mongodb

# where to log
logpath=/var/log/mongodb/mongodb.log

logappend=true

bind_ip = 0.0.0.0
# port = 27017
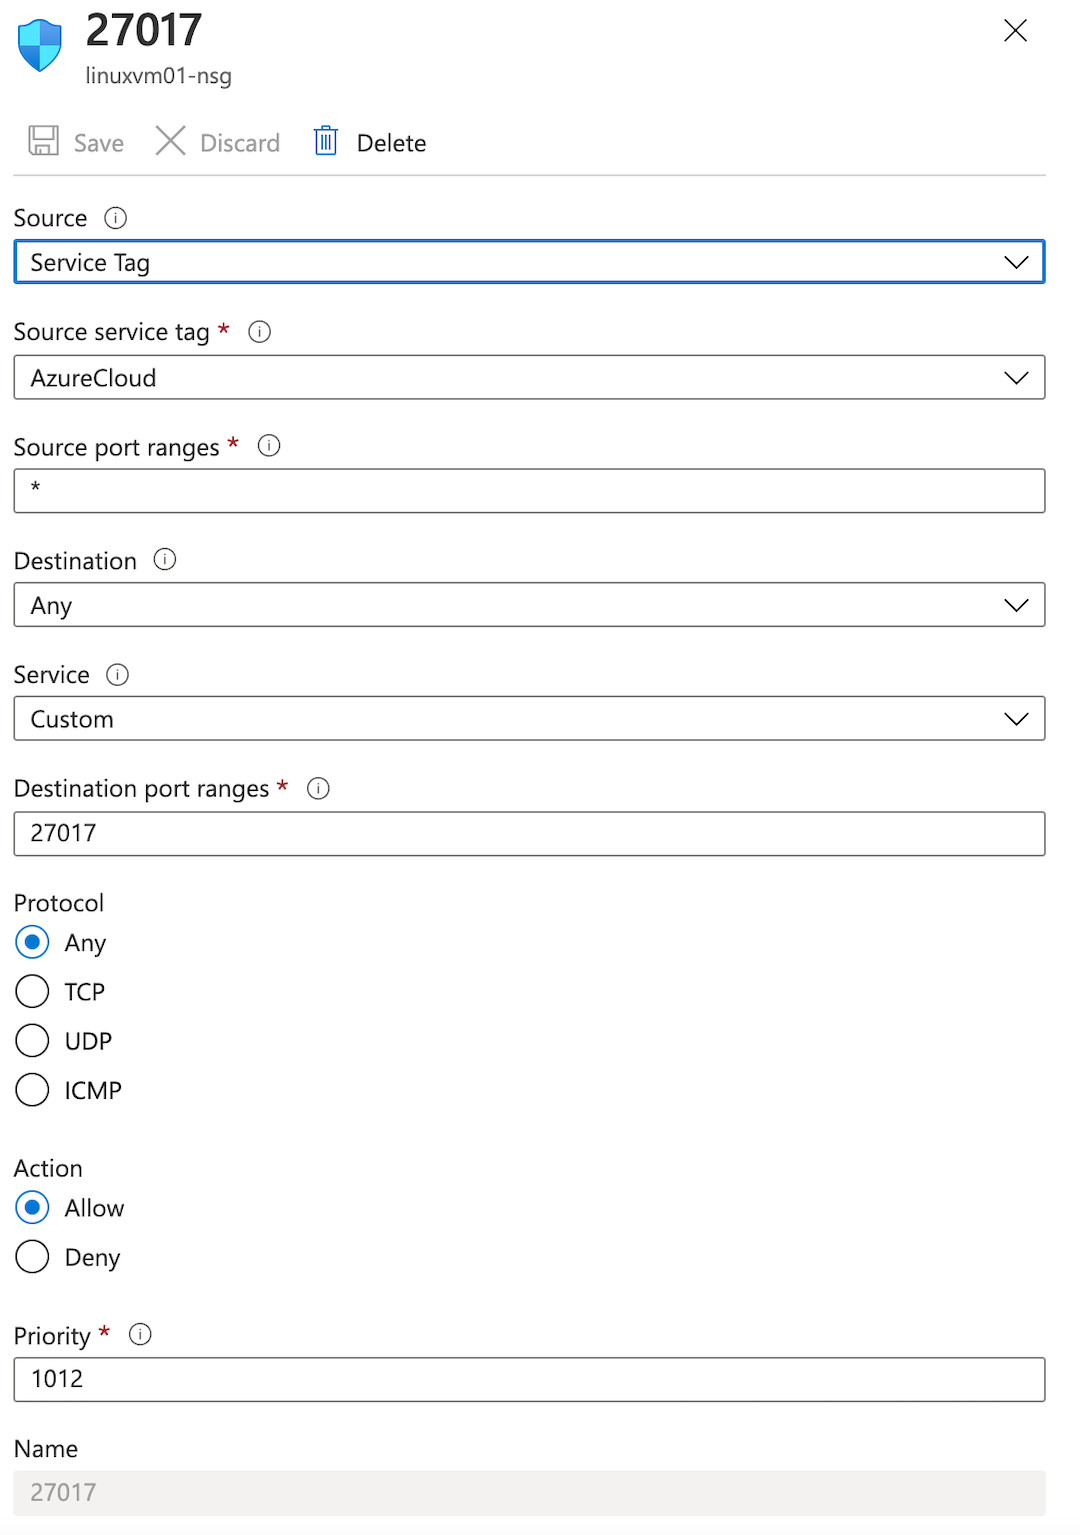
The bind_ip setting here is the key to allowing this connection from the VM. Once I’ve restarted mongod this new setting will take effect. The next step will be to allow remote connections via the Network Security Group within Azure. I’ve gone into the portal and created a rule that uses the source of the connection as “Service Tag” and allowed the “AzureCloud” service tag. A service tag represents a group of IP address prefixes from a given Azure service. This makes the process of accessing our database a bit easier because we don’t need to know inbound IP addresses from the DBMS. I’ve exposed the default port, 27017, for both UDP and TCP and set the Action to “Allow.”
DBMS
Now that my network connections are ready for my migration, I’ll create the DBMS within the Azure portal.
- Go to the search box at the top of the portal
- Search for and select “Azure Database Migration Services”
- Click “Create” to begin creating the new service
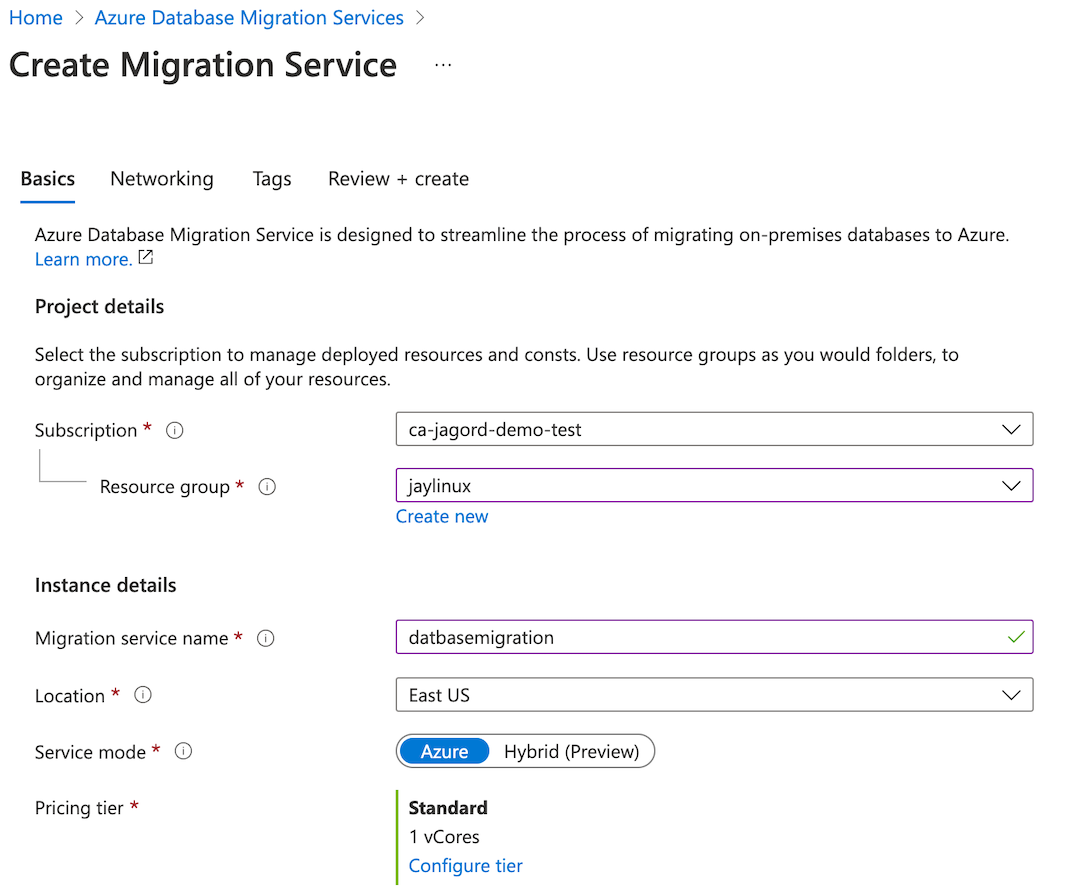
- Create or use an existing resource group. In this case I’ll just use my existing one the VM lives in
- Give the service a name
- Select a location where the DBMS server will live. To reduce latency, pick a location close to the VM.
- Select a service mode. Azure means the worker server will be hosted by Azure. Hybrid allows for an on-prem worker. In this demo, we’ll just use the Azure hosted service.
- Pricing tier, I can configure a certain number of cores I may need to migrate my data. The standard tier supports offline migrations only. Change to “Premium” tier to perform online migrations. I will be doing an offline migration.
Alternatively, you can connect to an Azure Cosmos account using an Azure Private Endpoint, check out the tutorial here.
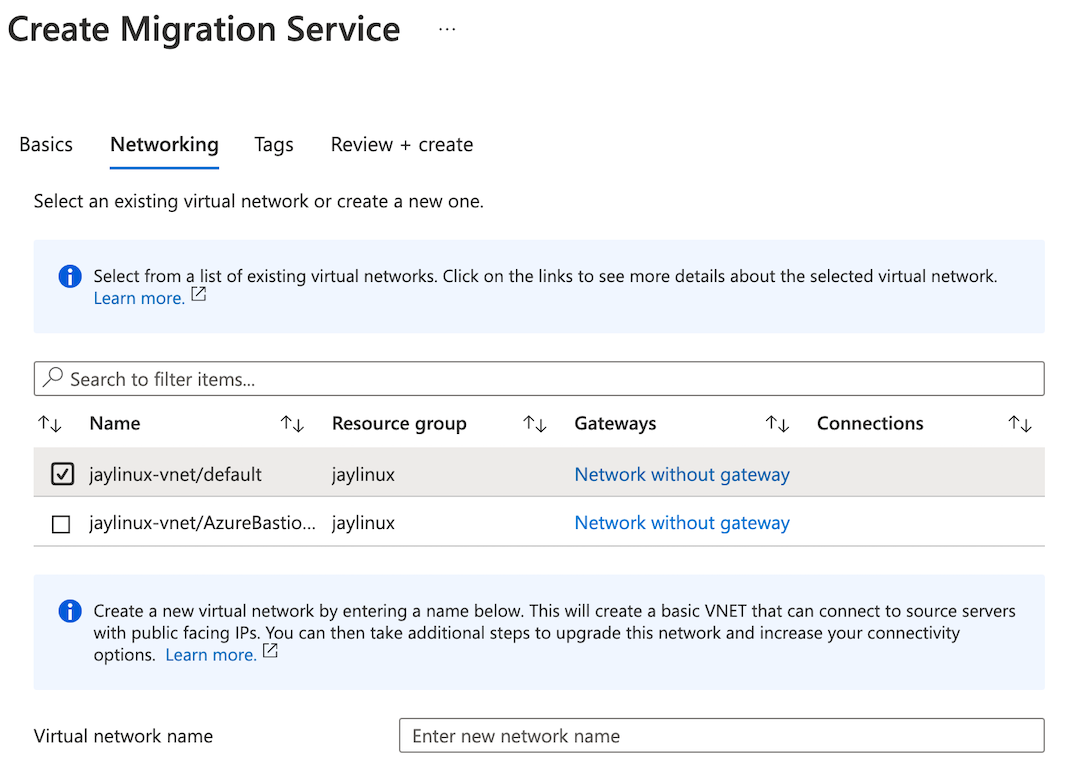
- Now I’ll click Networking which will let met select a VNET to connect the DBMS to, I’m going to use the same as my VM server
- Finally I’ll click “Review and Create” which will take me to my validation screen. There I can just hit “Create” to begin deploying the DBMS.
Deployment of our DBMS will take a few minutes, when complete you can access the service in the portal and begin the process of migrating the data.
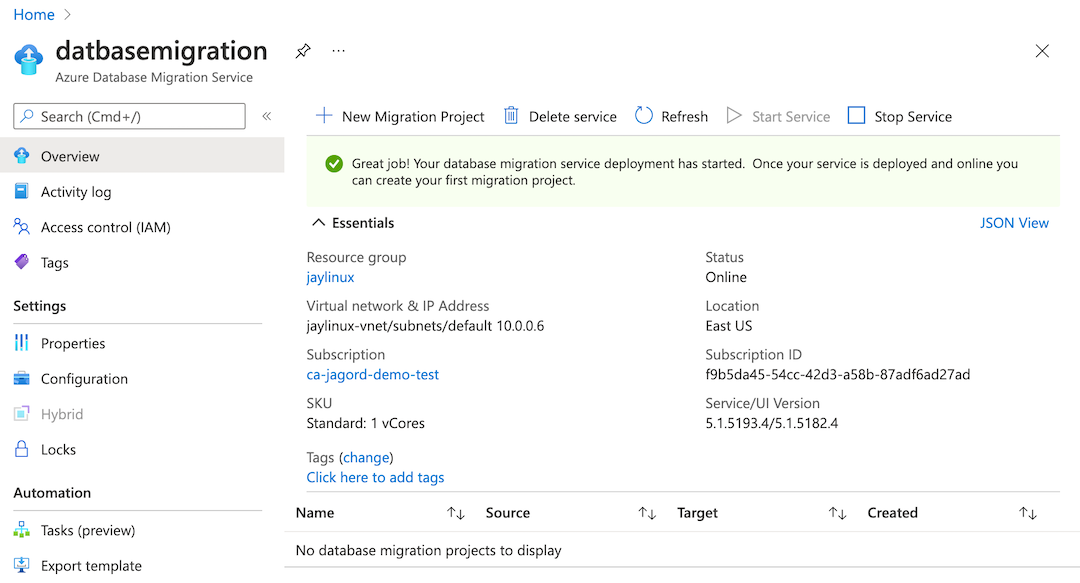
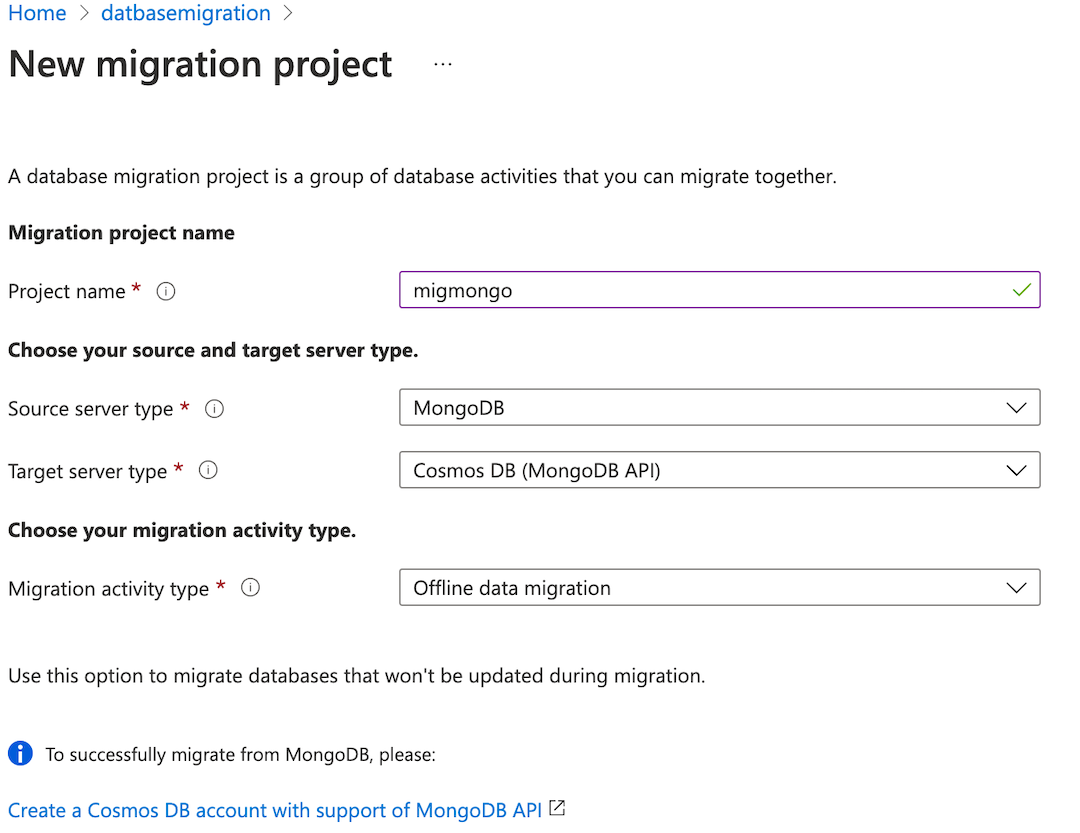
Up at the right hand corner, you’ll see “New Migration Project,” this is where I’ll start the migration process.
-
Give your project a name
-
Select your source and target server types. I will be using MongoDB as the source and Cosmos DB for MongoDB API as the target
-
Because I am using the basic worker tier, I will be selecting an offline migration.

-
Click “Create and run activity”
-
Now I am selecting my source. I will be using my MongoDB VM’s IP address as the source server name. The port will be standard 27017. I disabled SSL and didn’t enter a username or password because as mentioned earlier, the DB installation was done “the wrong way.” Move forward by clicking “Select Target.”

-
I have already created a Cosmos DB database, I can select the subscription and specific DB name from the dropdown menu. This will fill out the connection string required for the DBMS to authenticate to our database deployment. I have obscured the entire connection string for security purposes in the image below. Once that’s done, click “Database setting” on the bottom of the page.

-
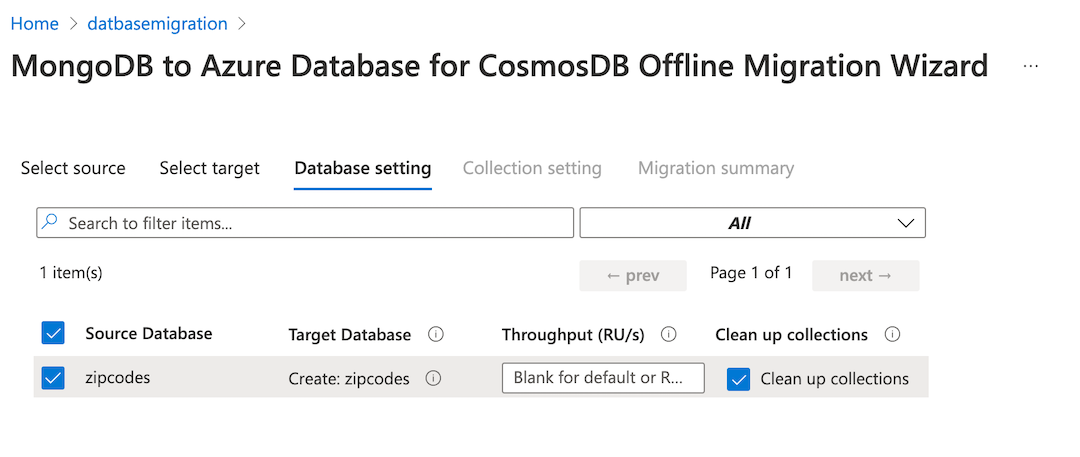
Select the source database being migrated. In this case my database is called “zipcodes.” I will be leaving the defaults for the settings here. If you’d like to learn more about Request Units (RU/s), check these docs here. Clean up collections will clean out any data that may exist on the target database. After selecting the source, click next for the collection setting.

-
MongoDB databases are made up of collections. My collection contains the documents for our zipcodes database called zips. For more details on what a Shard Key is, check this doc. Unique refers to creating an index for this shard key. I will leave all of our options as default here then click “Migration Summary.”

-
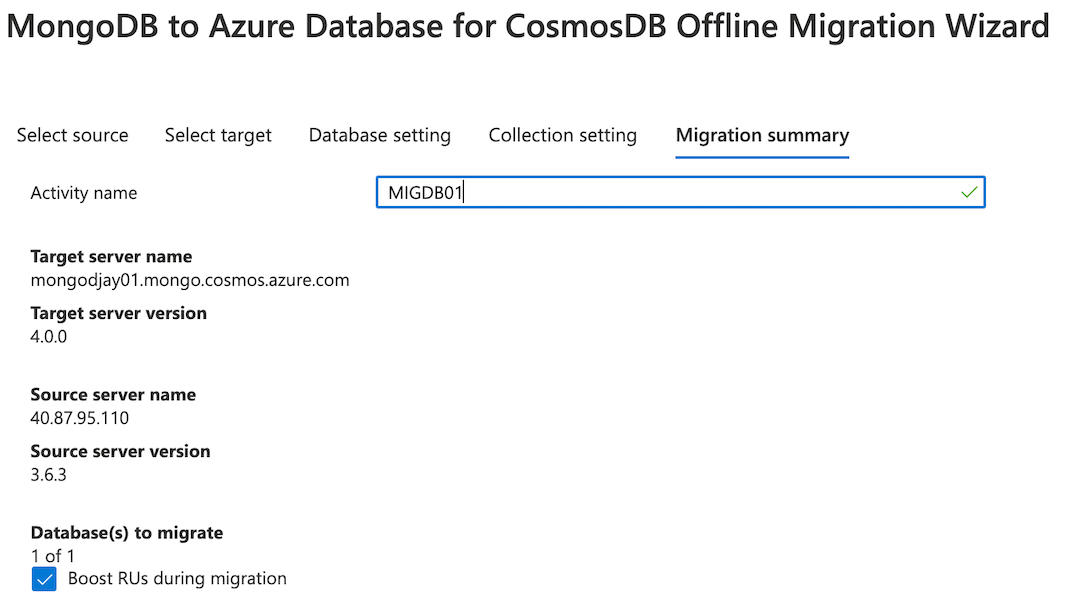
I will give the “Create Activity” box a name and then click “Start Migration.” This will begin the process of moving the data into Cosmos DB.


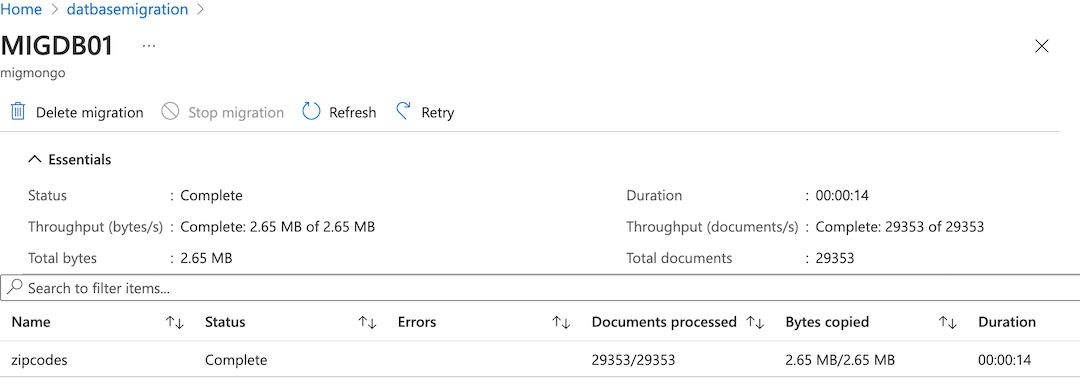
The Migration Service will now provide a status box of what’s being done, you can click refresh to update the status. When completed you’ll get details on how many documents were migrated, how large they are, and how long it took to migrate.
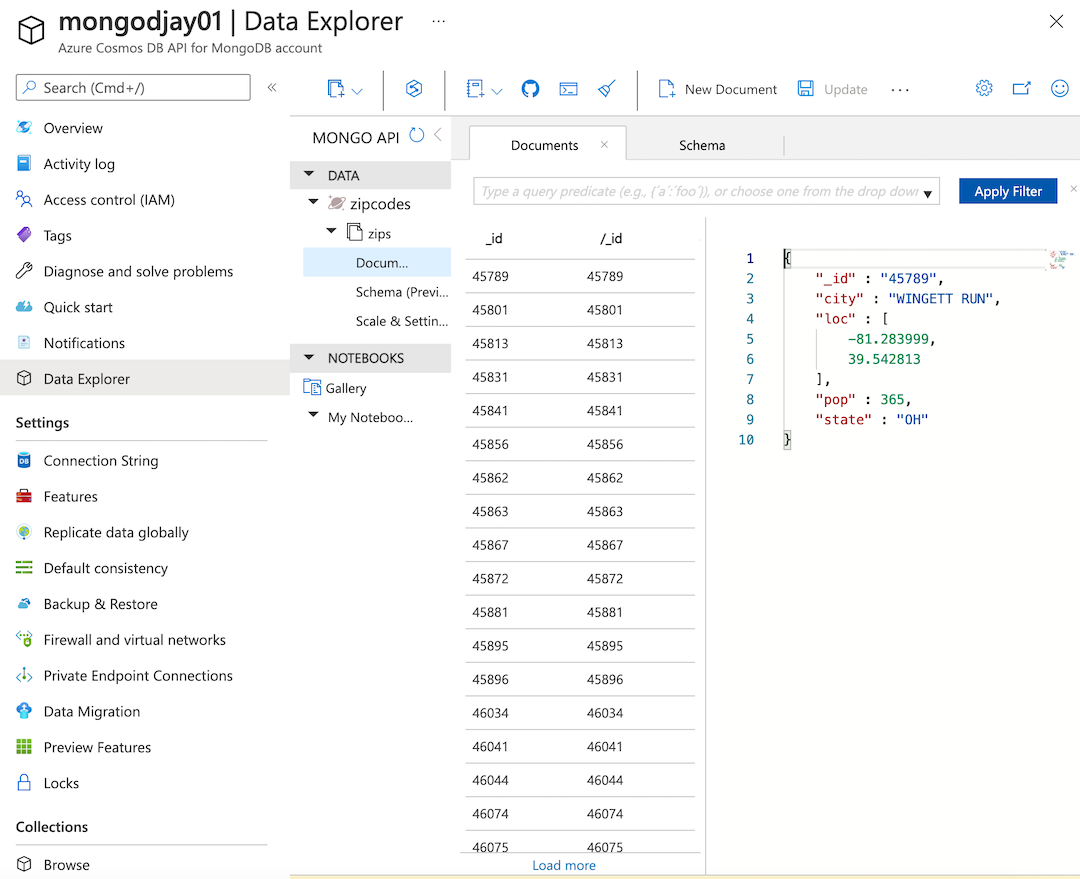
I can now navigate to the Cosmos DB deployment and verify my data in the explorer, be sure to expose your local IP using this guide:
Conclusion
I am done using my DBMS instance, so I can just go into the portal and delete it from my resource group. If my source server is no longer required, I can just archive what’s on the data disk and then terminate the VM.
My data has been migrated as expected, my collection contains all the documents I expect, and now my risk to loss is reduced. By moving my database to Cosmos DB I shift operational responsibility over to Azure.
You can do this. There are tons of docs available for you to check if you need reference or more details. Here’s a list of important ones that will help you along the way.
Azure Database Migration Service
What is Azure Database Migration Service?
Quickstart: Create an instance of the Azure Database Migration Service by using the Azure portal
Tutorial: Migrate MongoDB to Azure Cosmos DB API for MongoDB offline
Tutorial: Migrate MongoDB to Azure Cosmos DB’s API for MongoDB online using DMS
Monitor migration activity using the Azure Database Migration Service
FAQ about using Azure Database Migration Service Welcome to Azure Cosmos DB
Azure Cosmos DB
Learn about Azure fundamentals with me!
Live stream is available on Twitch, YouTube, and LearnTV at 11 AM PT / 2 PM ET Thursday. You can also find the recordings here as well:
AzureFunBytes on Twitch
AzureFunBytes on YouTube
Azure DevOps YouTube Channel
Follow AzureFunBytes on Twitter
Very useful 🙂
Thank you!