
Recently we partnered with LogDNA to help migrate their existing infrastructure to Azure using SaltStack and the Azure Python SDK. LogDNA is based in the San Francisco area, and their product offerings include log data ingestion and analytics. The company has been leveraging SaltStack to provision and manage their infrastructure across AWS and DigitalOcean. In this post, we will use ElasticSearch as an example to illustrate the end-to-end process of how we provisioned and configured the deployment of an ElasticSearch cluster on Azure using SaltStack.
SaltStack is an open source project, supported by the company of the same name that delivers an enterprise version of the project. SaltStack delivers infrastructure as code and configuration management with an abstraction of the cloud provider selected. At the time of writing this post, support for Azure ARM by SaltStack is still in preview, and the documentation for Azure ARM support is still in development. We hope this post serves as both an example and guide.
Overview
The model of SaltStack is based on masters and minions, with each minion agent reaching back to the master; this approach makes the solution very scalable. The master holds the configuration of the minions in a set of configuration files. Those files provide an idempotent configuration that will be applied when the minion role is deployed or at any time the configuration is re-applied. In this scenario, we will be using SaltStack to install and configure an ElasticSearch cluster on Azure.
Installation
Clone this repo:
$ git clone https://github.com/ritazh/azure-saltstack-elasticsearch
Get Azure CLI 2.0 from here if you don’t already have it. Then log into the CLI:
$ az login
$ az account show
Create a service principal following these steps.The output should look something like the following:
{
"appId": "59db508a-3429-4094-a828-e8b4680fc790",
"displayName": "myserviceprincipalapp",
"name": "https://myserviceprincipalapp.azurewebsites.net",
"password": {the password you supplied displayed here},
"tenant": "72f988bf-86f1-41af-91ab-2d7cd011db47"
}
Now you are ready to kick off the scripts. Use appId from the previous step for servicePrincipalAppId, and password from the previous step for serviceprincipalsecret. Sit back and enjoy a cup of coffee. (This might take a while!) Once the script is done, you will have a working ElasticSearch cluster ready for use.
$ deploy-salt-cluster.sh -o create
-u <adminUsernameForVM>
-n <namespaceForResourceGroup>
-c <servicePrincipalAppId>
-s <serviceprincipalsecret>
-t <tenantid>
When prompted, create a password for the SaltStack cluster master node admin user. This credential will be used by the scripts to complete installation and configuration on the master node. You can also modify this example to use an ssh key.
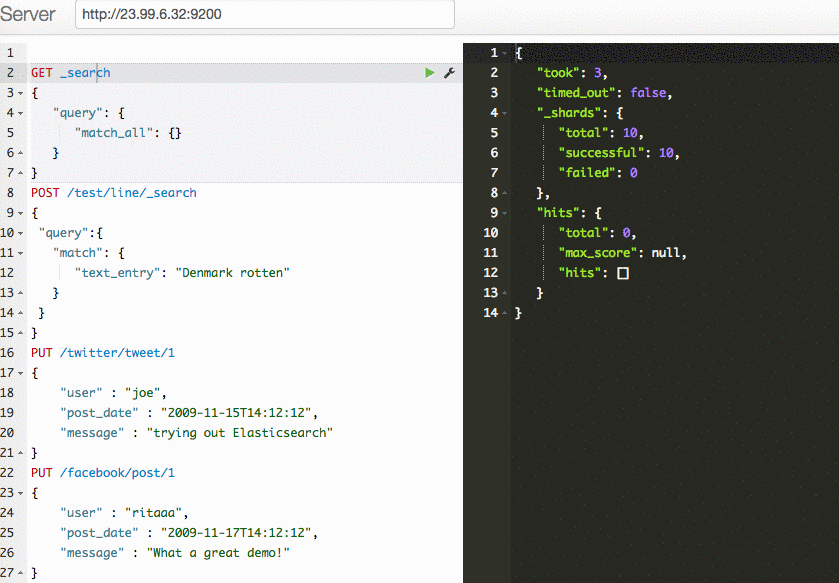
After the deploy-salt-cluster.sh script is done, look for the IP address of the minionesmaster node from the Azure portal. This IP address is the public IP of the ElasticSearch master node. Now ElasticSearch is accessible via http://{minionesmaster-public-ip}:9200.
You can use a tool like the Sense Chrome extension to add new content to your search index and to conduct search queries.
What is the script doing?
Now let’s take a look under the hood. When we run deploy-salt-cluster.sh, we are actually doing two things:
- Deploying resources needed to provision a SaltStack cluster on Azure
- Creating and configuring an ElasticSearch cluster using SaltStack
Deploy Resources needed for a SaltStack Cluster
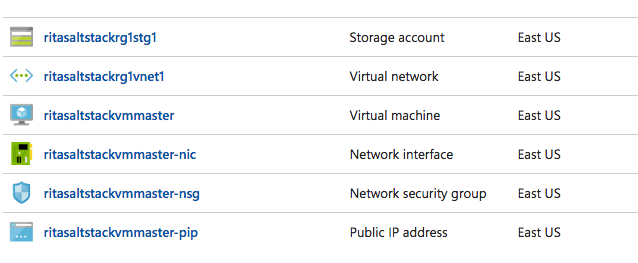
In deploy-salt-cluster.sh, we are using the Azure Service Principal created in the previous section to create an Azure Resource Group and all the resources needed to provision a SaltStack cluster using an Azure ARM template and the Azure CLI.
$ az group deployment create
-g $resourceGroupName -n $NamePrefix
--template-uri $TEMPLURI --parameters "$PARAMS"
From the Azure ARM template azuredeploy.json, we’ll provision the following resources on Azure for the SaltStack cluster:
- 1 virtual machine for the SaltStack master node
- 1 storage account to persist the data
- 1 public IP for the SaltStack master
- 1 network interface card for the SaltStack master
- 1 network security group to allow SaltStack and ElasticSearch ports to be accessible
- 1 virtual network to ensure all nodes within the SaltStack cluster can talk to each other
- 1 custom script that runs after all resources are provisioned
Create the ElasticSearch cluster using SaltStack
Now that we have all the Azure resources created for our SaltStack cluster, the post-install script saltstackinstall.sh at the end of the previous section will kick off the installation of the ElasticSearch cluster using the azurearm driver of salt-cloud. Salt Cloud is the system used to provision virtual machines on various public clouds via a cleanly controlled profile and mapping system.
From saltstackinstall.sh, you will see the following cloud profile definition, which tells salt-cloud what resources to use to create a new virtual machine on Azure.
azure-vm:
  provider: azure
  image: OpenLogic|CentOS|7.2n|7.2.20160629
  size: Standard_DS2_v2
  location: $location
  ssh_username: $adminUsername
  ssh_password: $adminPassword
  storage_account: $storageName
  resource_group: $resourceGroupname
  security_group: $nsgname
  network_resource_group: $resourceGroupname
  network: $vnetName
  subnet: $subnetName
  public_ip: True
  script: bootstrap-salt.sh
  script_args: -U
  sync_after_install: grains
The following cloud provider definition is for ElasticSearch minion nodes. It tells salt-cloud what resources to create for each of the ElasticSearch minion nodes. Note that its definition is extended from the azure-wus1 cloud provider’s one in the previous section. Specifically, the cloud provider definition below tells salt-cloud to create a new VM of size Standard_DS2_v2 in region $location, attach a new data disk of size 50GB created in our Azure storage account $storageName, and set its role as elasticsearch, and its cluster as es-cluster-local-01.
azure-vm-esnode:
  extends: azure-vm
  size: Standard_DS2_v2
  volumes:
    - {disk_size_gb: 50, name: 'datadisk1' }
  minion:
    grains:
      region: $location
      roles: elasticsearch
      elasticsearch:
        cluster: es-cluster-local-01
Next, we have the cloud provider definition for the ElasticSearch master node. It has almost the same configurations as the ElasticSearch minion nodes, except for its role, which is elasticsearchmaster.
azure-vm-esmaster:
  extends: azure-vm
  size: Standard_DS2_v2
  volumes:
    - {disk_size_gb: 50, name: 'datadisk1' }
  minion:
    grains:
      region: $location
      roles: elasticsearchmaster
      elasticsearchmaster:
        cluster: es-cluster-local-01
With the following commands in the saltstackinstall.sh script, salt-cloud creates the ElasticSearch master node and the ElasticSearch minion nodes in Azure.
salt-cloud -p azure-wus1-esmaster "${resourceGroupname}minionesmaster"
salt-cloud -p azure-wus1-esnode "${resourceGroupname}minionesnode"
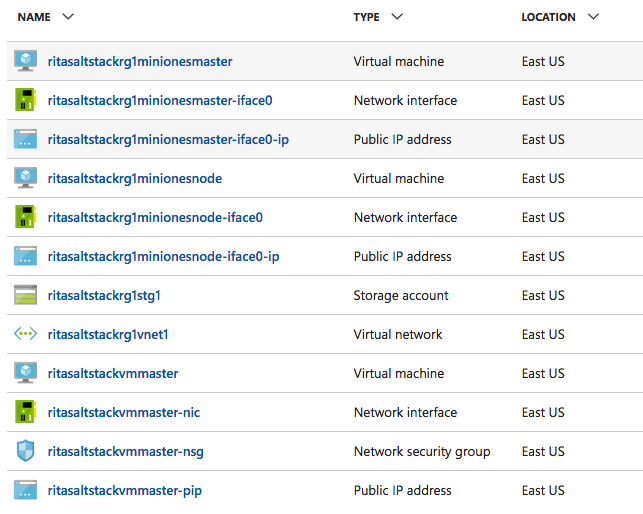
From the previous image, salt-cloud created the following resources for the ElasticSearch cluster:
- 1 virtual machine for the ElasticSearch master node
- 1 public IP for the ElasticSearch master node
- 1 network interface card for the ElasticSearch master
- 1 virtual machine for the ElasticSearch minion node
- 1 public IP for the ElasticSearch minion node
- 1 network interface card for the ElasticSearch minion
Configure the ElasticSearch cluster using SaltStack
Now that we have all the Azure resources created for our ElasticSearch cluster, the post install script saltstackinstall.sh will kick off the configuration of the ElasticSearch cluster. It will use SaltStack Configuration Management to run ElasticSearch on each node in the cluster.
We also need to manage the group of machines in our cluster effectively. One way is to create roles for machines that perform similar tasks. In Salt, the file that contains the mapping between groups of machines on a network and the configuration roles that should be applied to them is called a top file.
From saltstackinstall.sh, you will see the following top.sls top file added to /srv/salt of the Salt master node. The top file defines the roles of the machines in the cluster, in this case, elasticsearch and elasticsearchmaster, and it defines a set of state files to apply to the targeted machines based on the roles tagged. Specifically, we are going to apply the “common_packages” state file to all the machines here.
base:
  '*':
    - common_packages
  'roles:elasticsearch':
    - match: grain
    - elasticsearch
  'roles:elasticsearchmaster':
    - match: grain
    - elasticsearchmaster
The core of the Salt State system is the SLS, or SaLt State file. The SLS is a representation of the state that a system should be in. From saltstackinstall.sh, we are adding the common_packages.sls state file to /srv/salt of the Salt master node. This state file tells SaltStack which packages to install on each target machine.
common_packages:
    pkg.installed:
        - names:
            - git
            - tmux
            - tree
The SLS files are laid out in a directory structure on the Salt master. An SLS file describes which files to download to the target machines. From saltstackinstall.sh, we are creating two directories in /srv, elasticsearch and elasticsearchmaster, on the Salt master. Each directory contains the following files:
- init.sls state file
- describes what files to copy to the target machine
- tells what packages to install on the target machine
- elasticsearch.yml helps ElasticSearch to discover and identify nodes in the ElasticSearch cluster
With the following command in the script, Salt configures and applies all the states to the target nodes:
salt '*' state.highstate
Voilà! Now we have a working ElasticSearch cluster running on Azure configured by SaltStack.
Opportunities for Reuse
That’s it! As we’ve just demonstrated, you can use SaltStack to create, configure, and manage infrastructure on Azure. Similarly, you can use SaltStack to create, configure, and manage applications or distributed systems.
Our solution for deploying an ElasticSearch cluster on Azure using SaltStack is on GitHub, which can serve as an example of how to leverage SaltStack to manage infrastructure as code for your own application.