
This post explores how we can leverage machine learning techniques to help partially automate the processes of accounting and expenditure reimbursement. Often, such methods require manual input of information from an invoice or receipt, such as total amount spent, tax amount, type of expenditure, transaction date, etc. This code story will demonstrate how multiclass classification algorithms and Optical Character Recognition (OCR) can be leveraged to predict the type of expense from an imaged receipt automatically. By the end of this post, reader will be able to build a Xamarin-based expense recognition from imaged receipt with model built using Azure ML Studio deployed as a web service.
Before we can predict or recognize the type of expense from a receipt, we must first convert a database of imaged receipts into structured data via OCR to extract the information into text format. This information is then used to train a predictive model.
Overall Structure
The figure below shows the overall structure of the solution in Azure Machine Learning (ML) Studio, with the following assumptions:
- A database of imaged receipts already exists
- Images are stored in Azure Blob Storage
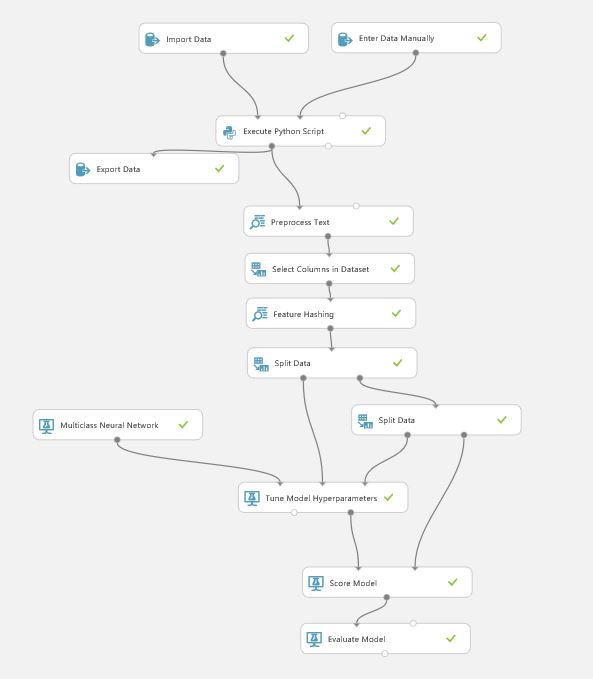
This example will load training images from blob storage and extract text using OCR. The data is then used to train a predictive model using a multiclass neural network (with default settings), and finally published as a web service.
Dataset
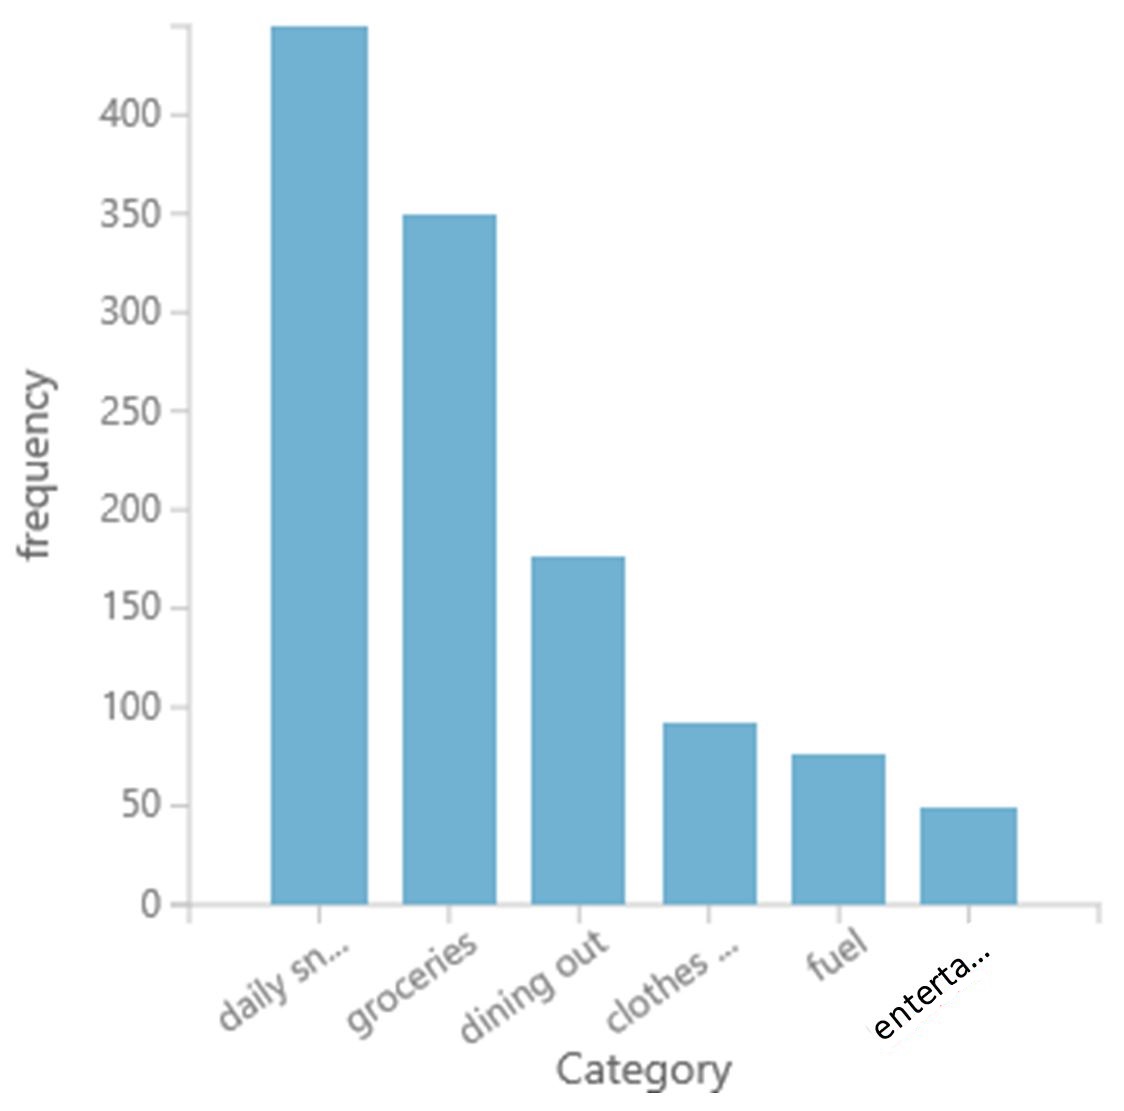
We are basing our example on a private dataset of ~1200 images of receipts of different expense types, such as snacks, groceries, dining, clothes, fuel and entertainment. The figure below shows the distribution of these six classes.
Extract Text via OCR
Below is an example of how you can call Microsoft’s Cognitive Services from within Azure ML Studio using the Execute Python Script module. The Python code below will extract texts out from those images via Microsoft’s OCR. This code should reside within the Execute Python Script module.
The snippet below shows the required packages and sets the URL for OCR in the Vision API from Microsoft Cognitive Services.
  # The script MUST contain a function named azureml_main
  # which is the entry point for this module.

  # imports up here can be used to
  import pandas as pd
  import json
  import time
  import requests
  from io import StringIO

  # url for Microsoft's Cognitive Services - Vision API - OCR
  #_url = 'https://api.projectoxford.ai/vision/v1.0/ocr' # previous url, still work
  _url = 'https://westus.api.cognitive.microsoft.com/vision/v1.0/ocr' # latest url

  # maximum number of retries when posting a request
  _maxNumRetries = 10
Below is the entry point function for Execute Python Script module within Azure ML Studio experiment. It sets up parameters for the OCR API, processes requests, and returns a new data frame which contains text extracted from a receipt, and its associated label (that is, its expensing category).
  # The entry point function can contain up to two input arguments:
  #   Param<dataframe1>: a pandas.DataFrame
  #   Param<dataframe2>: a pandas.DataFrame
  def azureml_main(dataframe1 = None, dataframe2 = None):

      # Get the OCR key
      VISION_API_KEY = str(dataframe2['Col1'][0])

      # Load the file containing image url and label
      df_url_label = dataframe1

      # create an empty pandas data frame
      df = pd.DataFrame({'Text' : [], 'Category' : [], 'ReceiptID' : []})

      # extract image url, setting OCR API parameters, process request
      for index, row in df_url_label.iterrows():
          imageurl = row['Url']

          # setting OCR parameters
          params = { 'language': 'en', 'detectOrientation ': 'true'}
          headers = dict()
          headers['Ocp-Apim-Subscription-Key'] =  VISION_API_KEY
          headers['Content-Type'] = 'application/json'

          image_url = { 'url': imageurl } ;
          image_file = None
          result = processRequest( image_url, image_file, headers, params )

          if result is not None:
              # extract text
              text = extractText(result);

              # populate dataframe
              df.loc[index,'Text'] = text
          else:
              # populate dataframe
              df.loc[index,'Text'] = None

          # 'Category' is the label
          df.loc[index,'Category'] = row['Category']
          df.loc[index,'ReceiptID'] = imageurl[-17:-4]

      # Return value must be a sequence of pandas.DataFrame
      return df
extractText seeks and extracts only texts recognized by OCR, and ignores other information such as regions, lines and words. While that information is not utilized in this example, it could be useful if the location of the text is of interest.
  # Extract text only from OCR's response
  def extractText(result):
      text = ""
      for region in result['regions']:
          for line in region['lines']:
              for word in line['words']:
                  text = text + " " + word.get('text')
      return text
processRequest processes the REST API request to the OCR API. For more information on this routine, see an example on GitHub.
  # Process request
  def processRequest( image_url, image_file, headers, params ):

      """
      Ref: https://github.com/Microsoft/Cognitive-Vision-Python/blob/master/Jupyter%20Notebook/Computer%20Vision%20API%20Example.ipynb
      Helper function to process the request to Project Oxford
      Parameters:
      json: Used when processing images from its URL. See API Documentation
      data: Used when processing image read from disk. See API Documentation
      headers: Used to pass the key information and the data type request
      """

      retries = 0
      result = None

      while True:
          response = requests.request( 'post', _url, json = image_url, data = image_file, headers = headers, params = params )

          if response.status_code == 429:
              print( "Message: %s" % ( response.json()['message'] ) )

              if retries <= _maxNumRetries:
                  time.sleep(1)
                  retries += 1
                  continue
              else:
                  print( 'Error: failed after retrying!' )
                  break

          elif response.status_code == 200 or response.status_code == 201:
              if 'content-length' in response.headers and int(response.headers['content-length']) == 0:
                  result = None
              elif 'content-type' in response.headers and isinstance(response.headers['content-type'], str):
                  if 'application/json' in response.headers['content-type'].lower():
                      result = response.json() if response.content else None
                  elif 'image' in response.headers['content-type'].lower():
                      result = response.content
          else:
              print(response.json())
              print( "Error code: %d" % ( response.status_code ) );
              print( "Message: %s" % ( response.json()['message'] ) );

          break

      return result
All the above snippets should be included in the Execute Python Script module within the Azure ML Studio experiment.
Results
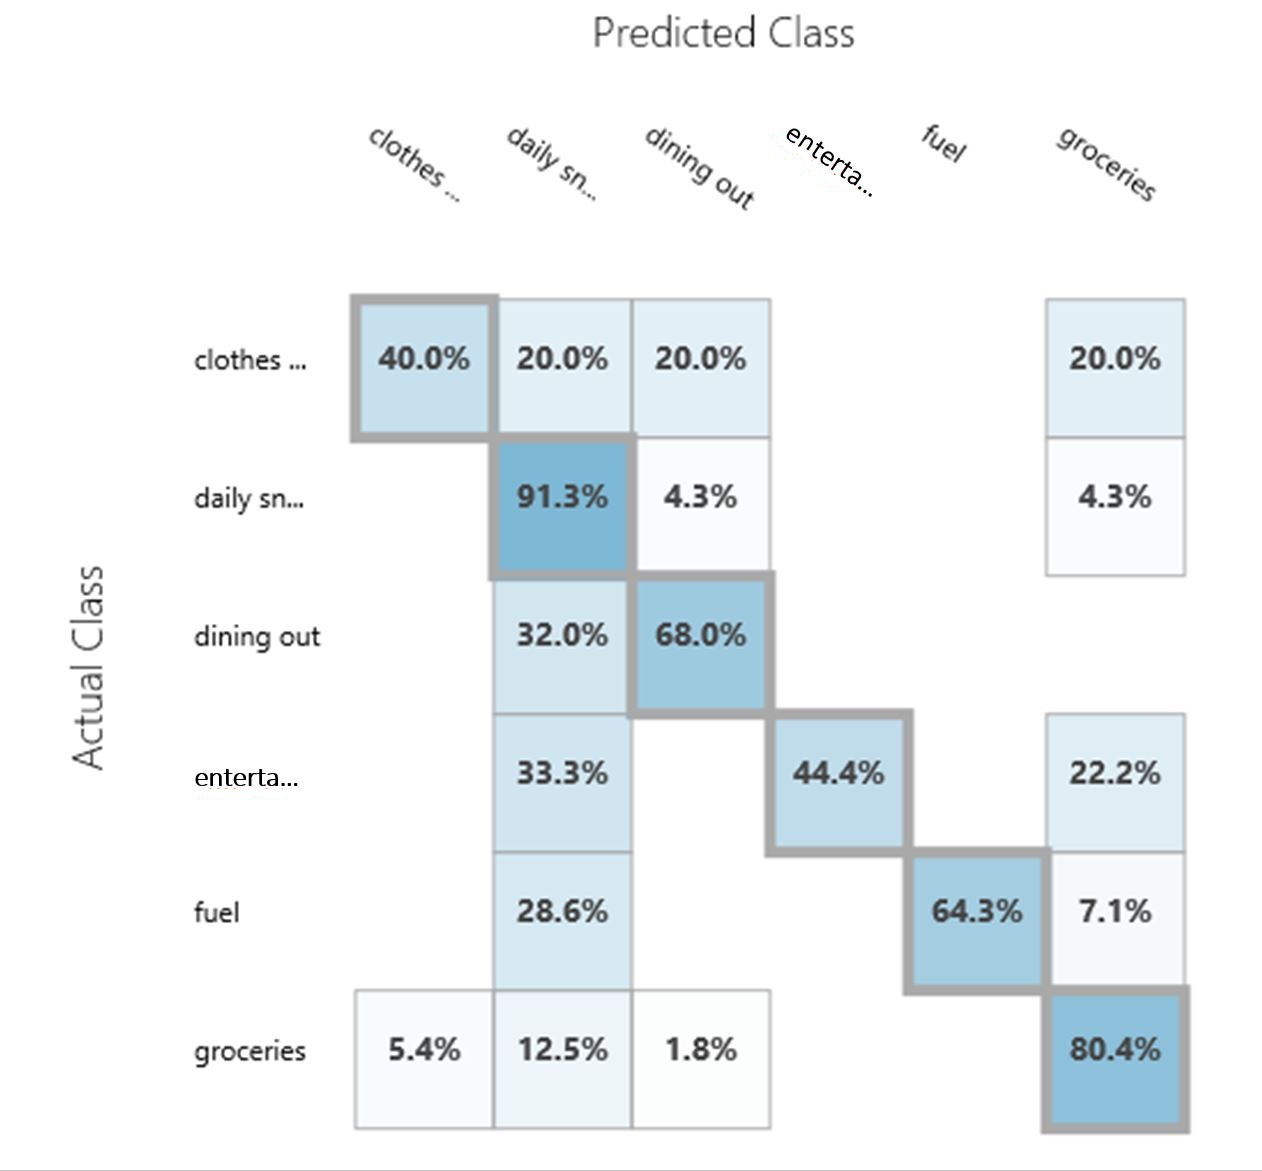
The multiclass decision jungle and multiclass neural network modules have been tested, and the results are as shown below:
| Algorithm | Decision Jungle | Neural Network |
|---|---|---|
| Overall Accuracy | 0.786517 | 0.837079 |
| Decision Jungle | Neural Network |
|---|---|
 |
 |
Integration into a Mobile App
The creation of a mobile app to consume the published expense predictor can be achieved by using this Xamarin-based mobile phone app under the MobileApp folder (in our example). The app will take a picture of a receipt, send it to the web service, and a predicted type of expense will be returned.
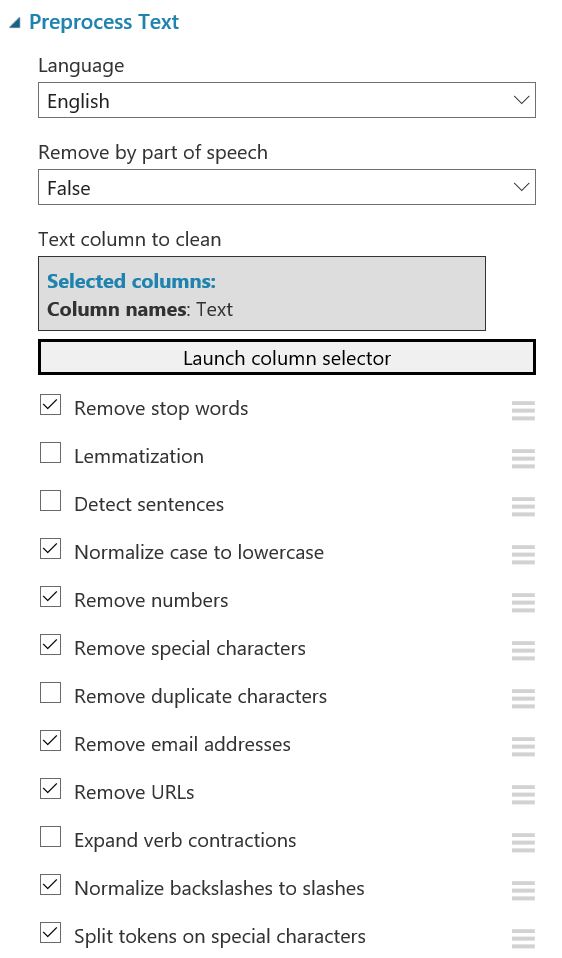
Experiment Settings
This section provides detial information about the experiment settings. Readers are welcome do to experiment with different settings and see how they affect the model performance.
| Text Preprocessing | Feature Hashing |
|---|---|
 |
 |
| Neural Network | Decision Jungle |
|---|---|
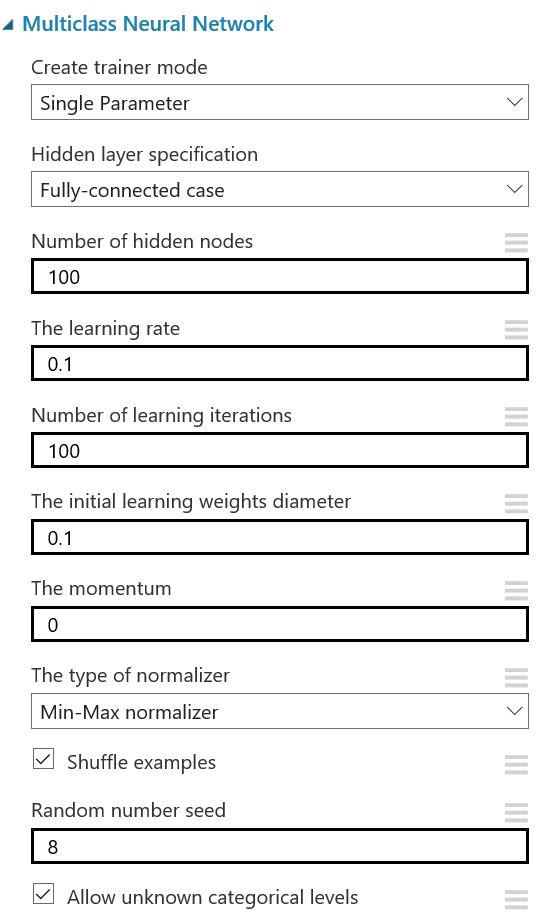 |
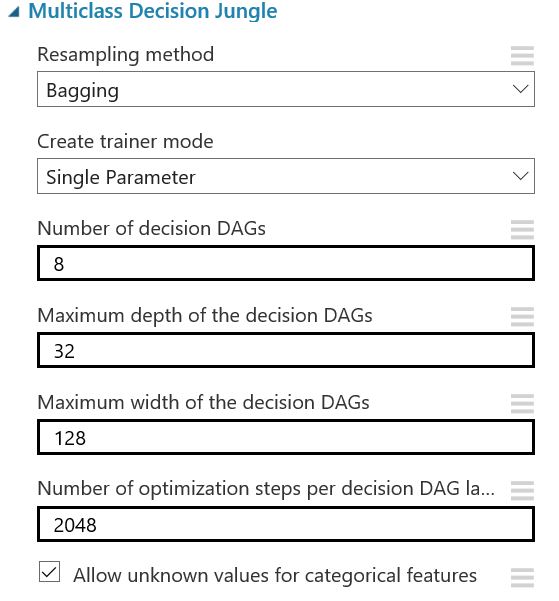 |
Hyperparameter Tuning
| Neural Network | Decision Jungle |
|---|---|
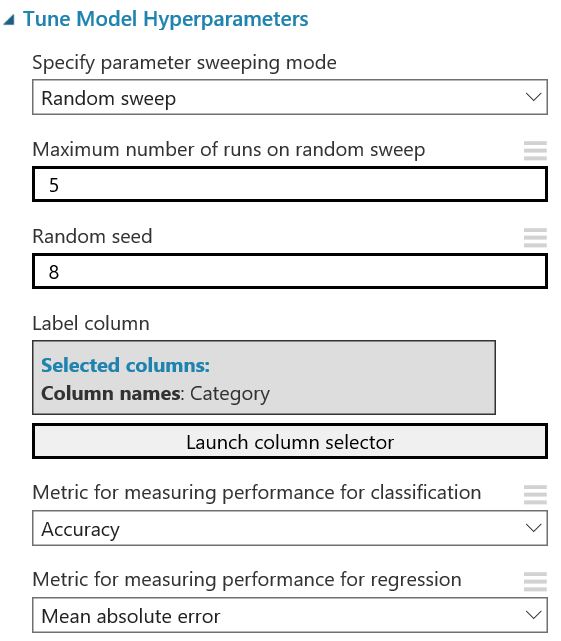 |
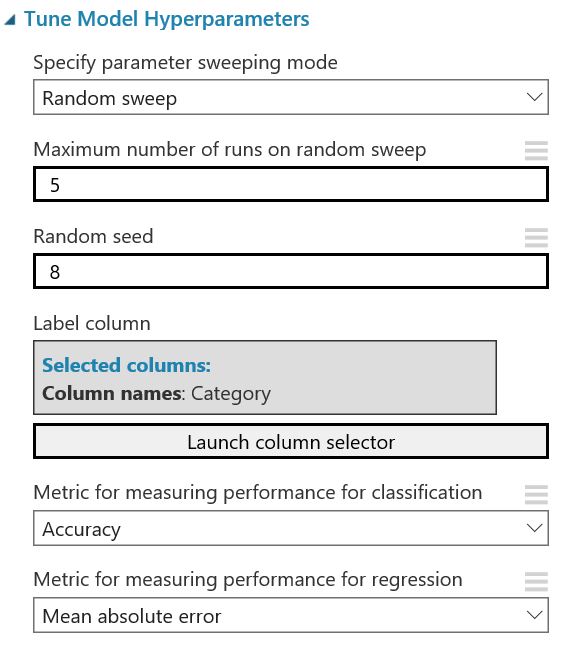 |
Conclusions
An Optical Character Recognition application can be built and developed using Azure ML Studio for easy model development and deployment as a web service, interfacing with Microsoft Cognitive Services Vison API via the Execute Python Script module for custom Python codes, and Xamarin as the front-end user interface.
Further Information
Please see Channel 9 video for story behind this project.
Code
Receipt-recognition is the related GitHub repository.