
Dokku is one of the most popular application frameworks for deploying apps for development and testing. With the tiny amount of code that is Dokku, you can git-push any application or any Dockerfile. It’s almost magic.
Dokku is powered by Docker, and automatically builds a Docker image for any application you push to it. These apps can be linked to databases which can also run as local containers using container linking.
Previously, Dokku wasn’t very straightforward to install on Azure. It required you to create a virtual machine, a public IP, and a VNET, then run the installation.
We worked directly with the Dokku maintainers as well as Azure engineering to make the process as easy as possible.
Deploying Dokku to Azure – The Easy Way
Now that we’ve contributed an Azure Resource Manager (ARM) template to automagically create a Dokku instance, you can literally create a Dokku instance with just a few clicks. Just follow these steps:
- Create an ssh key pair using
ssh-keygen. - Head over to the Dokku deployment for Azure page and click the pretty blue Deploy to Azure button.
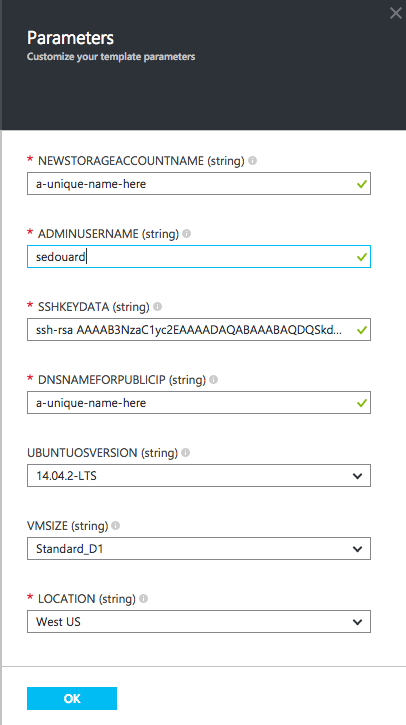
- You’ll be swept off to the Azure Portal to fill in the parameters to create the instance. You’ll need a unique name for the NEWSTORAGEACCOUNTNAME and DNSNAMEFORPUBLICIP values:
After about 5 minutes, the Dokku instance will be up and running.
Configuring Dokku
Now that the instance is up and running, we need to do a couple of tiny steps to get things working.
First create another ssh key pair for deploying Dokku applications.
Then browse to your Dokku instance in your browser, which is this address:
http://[[DNSNAMEFORPUBLICIP]].[[LOCATION]].cloudapp.azure.com
Where DNSNAMEFORPUBLICIP and LOCATION are the template variables you filled out. For example, if your DNSFORPUBLICIP is ‘helloauniquename’ and your LOCATION is ‘West US’ then your address would be:
http://helloauniquename.westus.cloudapp.azure.com
When Dokku first starts up, it spins up a tiny web server which allows you to configure the deployment settings:
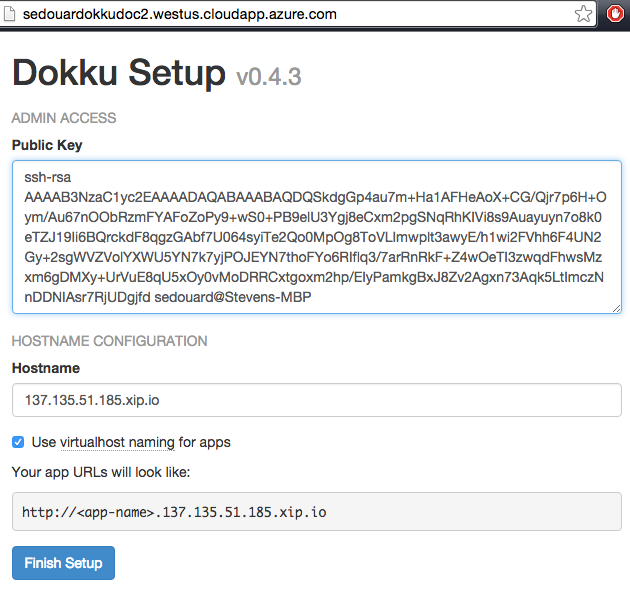
- Copy and paste your SSH public key for Dokku deployments to the public key box.
- Check off ‘Use virtualhost naming for apps’.
- Thanks to the folks at xip.io you can use your public IP as its own domain. Change your hostname to
[[your azure public IP]].xip.io. Check out your VM properties in the Azure Portal to find your VM’s public IP address.
Deploy Your App!
Create a Rails App
Let’s deploy a Rails application. Clone the Heroku rails example from github to your local machine:
git clone https://github.com/heroku/ruby-rails-sample.git
SSH into the VM using the private key you generated to provision the VM:
ssh -i <your-ssh-private-key> your-admin-user-name@[[DNSNAMEFORPUBLICIP]].[[LOCATION]].cloudapp.azure.com
Then create a new Dokku application:
dokku apps:create ruby-rails-sample
Add Postgres
What’s a Rails application without Postgres? We can easily add a Postgres plugin to create an instance and link it to the application we created:
# install the postgres plugin
# plugin installation requires root, hence the user change
sudo dokku plugin:install https://github.com/dokku/dokku-postgres.git

# create a postgres service with the name rails-database
dokku postgres:create rails-database

# each official datastore offers a `link` method to link a service to any application
dokku postgres:link rails-database ruby-rails-sample
-----> Setting config vars
       DATABASE_URL: postgres://postgres:ef081eb5672fcdc4d16e95d9805047cb@dokku-postgres-rails-database:5432/rails_database
-----> Restarting app ruby-rails-sample
App ruby-rails-sample has not been deployed
The new Postgres instance is created in another container on the Dokku host.
Git-Push!
Finally, exit out of your VM and add a dokku remote to your local repo using the dokku username and push the app.
ssh-add <your-dokku-deploy-private-key>
git remote add dokku dokku@[[DNSNAMEFORPUBLICIP]].[[LOCATION]].cloudapp.azure.com
git push dokku master
You’ll start to see some remote output showing that Dokku detects a Rails application and starts to build a deployment image for Ruby:
Counting objects: 231, done.
Delta compression using up to 8 threads.
Compressing objects: 100% (162/162), done.
Writing objects: 100% (231/231), 36.96 KiB | 0 bytes/s, done.
Total 231 (delta 93), reused 147 (delta 53)
-----> Cleaning up...
-----> Building ruby-rails-sample from herokuish...
-----> Adding BUILD_ENV to build environment...
-----> Ruby app detected
-----> Compiling Ruby/Rails
-----> Using Ruby version: ruby-2.2.1
-----> Installing dependencies using 1.9.7
       Running: bundle install --without development:test --path vendor/bundle --binstubs vendor/bundle/bin -j4 --deployment
       Fetching gem metadata from https://rubygems.org/...........
       Fetching version metadata from https://rubygems.org/...
       Fetching dependency metadata from https://rubygems.org/..
       Using rake 10.4.2

=====> Application deployed:
       http://ruby-rails-sample.40.118.253.250.xip.io
After a short while, the application is deployed and at the end of the output you’ll see its address. Browse to the provided URL at the end of the output and you’ll see that your app is up and running:

What Else Does it Do?
Despite being a single instance PaaS development playground, Dokku comes packed with features that can get you ready to scale up to a high-availability PaaS platform like Deis with ease.
SSL Certificates
Creating a self-signed or certificate signing request (CSR) is a cinch using the certs plugin:
certs:generate <app> DOMAIN
certs:add <app> CRT KEY
Checkout the official documentation for more info on using SSL with Dokku apps.
Load Balancing & Routing
Dokku can support any number of applications each backed by any number of containers. Out of the box, it comes with HTTP load balancing and routing thanks to nginx.
This makes Dokku ideal for developing 12 factor applications where applications can be horizontally scaled simply by adding more instances behind a load balancer.
Zero-downtime Deployments
Dokku also supports zero-downtime application deployments and will redirect traffic from old containers to new containers of an application.
Here’s an example that highlights this simple but super useful feature:
Say you want to update the Rails application we just deployed. First add a file called CHECKS to the root repo. This file instructs Dokku to wait 10 seconds to check the output of the new container, giving the application time to start up. If the check succeeds (when the GET / response contains ‘Hello World’) then Dokku will kill the old container and reroute traffic to the new ones.
/                       Hello World
WAIT=10     # Wait 10 seconds
TIMEOUT=30  # Timeout after 30 seconds
In one window we’ll run a simple script that sends a request to the server continuously:
while true
do
echo =====================================
curl http://ruby-rails-sample.40.118.253.250.xip.io/
echo =====================================
sleep .8
done
In the other, we’ll perform the git-push deployment:
git push dokku master
You can see from the animation below, that the script (left console) always receives a response, even though its continuously sending requests to the server. The console on the right is the Dokku output of the git-push.
In the animation above, Dokku checks that the new container is up and running before redirecting traffic and killing the old one. The output seamlessly changes from Hello World 1.0 to Hello World 2.0 without a hitch!
Useful Links
Here are some useful links to get started: