
In Visual Studio 2017 15.4 you can now target Linux from your CMake projects. This enables you to work on your existing code base that uses CMake as your build solution without having to convert it to a VS project. If your code base is cross-platform you can target both Windows and Linux from within Visual Studio.
This post will give an overview of the CMake support for Linux in Visual Studio. You can go here to learn more about CMake in Visual Studio generally.
Update 10/24/2017: 15.4.1 is in the Release channel now and addresses the setup issue previously noted here. 15.5 is in the Preview channel and removes the limitation on CMake 3.9, there CMake >= 3.8 can be used.
Getting Started
To enable this capability, make sure that you choose the Linux C++ Workload in the Visual Studio installer. The CMake support for Linux is selected by default for this workload. The CMake support in Visual Studio requires the server mode support that was introduced in CMake 3.8. See these instructions for building CMake from source if your package manager provides an older version.
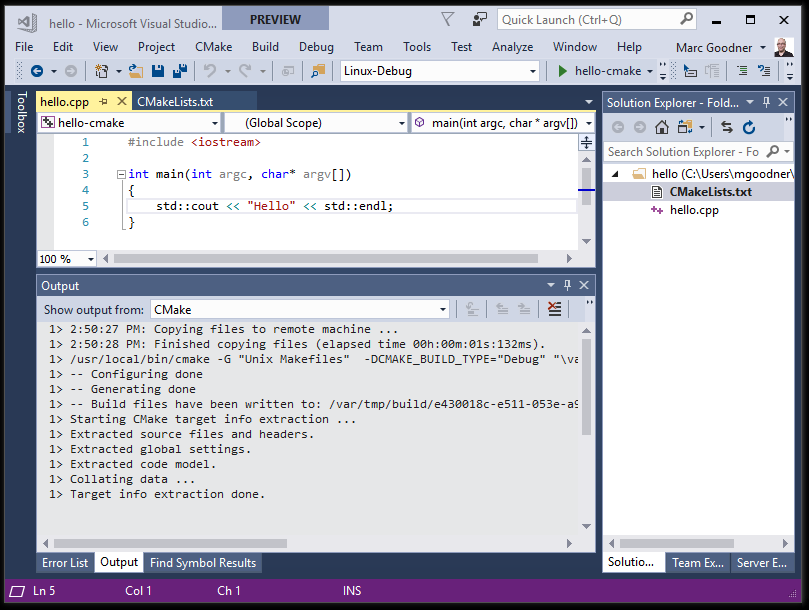
To get started, create a simple CMakeLists.txt file in the same folder as a cpp file as in the example below. (via File > Open > Folder… or devenv.exe <foldername>).
Hello.cpp
#include <iostream>;

int main(int argc, char* argv[])
{
    std::cout << "Hello" << std::endl;
}
CMakeLists.txt
project (hello-cmake)
add_executable(hello-cmake hello.cpp)
As soon as you open this folder, Visual Studio will parse the CMakeLists.txt. By default, a Windows target of x86-Debug will be used. To target Linux, change the project settings to Linux-Debug or Linux-Release. When you do this, your source will be copied to your Linux machine where CMake will be run to generate the CMake cache for your project.
By default, the first remote system in the list under Tools > Options > Cross Platform > Connection Manager will be used. If you have not created any remote connections, you will be prompted to create one the first time you select a Linux target in your project settings.
To debug your code on the remote system, set a breakpoint, select the CMake target as the startup item in the toolbar menu next to the project setting, and click run (or press F5).
Configuring CMake Settings for Linux
To change the defaults that are used use the menu CMake > Change CMake Settings > CMakeLists.txt, or use the context menu by right clicking CMakeSettings.txt and choosing Change CMake Settings. This will create a new file in your folder called CMakeSettings.json. Initially this will be populated with the default configurations that are listed in the project settings menu item. Here is an example configuration for Linux-Debug based on the example above.
{
      "name": "Linux-Debug",
      "generator": "Unix Makefiles",
      "remoteMachineName": "${defaultRemoteMachineName}",
      "configurationType": "Debug",
      "remoteCMakeListsRoot": "/var/tmp/src/${workspaceHash}/${name}",
      "cmakeExecutable": "/usr/local/bin/cmake",
      "buildRoot": "${env.LOCALAPPDATA}\\CMakeBuilds\\${workspaceHash}\\build\\${name}",
      "remoteBuildRoot": "/var/tmp/build/${workspaceHash}/build/${name}",
      "remoteCopySources": true,
      "remoteCopySourcesOutputVerbosity": "Normal",
      "remoteCopySourcesConcurrentCopies": "10",
      "cmakeCommandArgs": "",
      "buildCommandArgs": "",
      "ctestCommandArgs": "",
      "inheritEnvironments": [ "linux-x64" ]
}
The name on line 2 can be of your choosing to identify your custom configuration. If you have more than one remote system defined, you can enter it in place of the default on line 4. IntelliSense is enabled for this field from your system to help you select the right system. The field remoteCMakeListsRoot on line 6 is where your project sources will be copied to on the remote system, by default under /var/tmp. The field remoteBuildRoot on line 9 is where the build output will be generated on your remote system, that output is also copied locally in the location specified by buildRoot on line 8.
Building a supported CMake release from source
The minimum version of CMake required on your Linux machine is 3.8, and it must also support server mode. To verify this run
cmake --version
To verify that server mode is enabled run
cmake -E capabilities
In the output look for “serverMode”:true. Note that even if compiling from source as described below you should check the capabilities when done. Your Linux system may have limitations that prevent server mode from being enabled. As one example we have run into issues with enabling server mode on Ubuntu 14.04 because of library and compiler limitations.
To get started building from source in the shell for your Linux system make sure your package manager is up to date, you have git and cmake available, then clone the CMake sources.
sudo apt-get update
sudo apt-get install -y git cmake
git clone https://github.com/Kitware/CMake.git
cd CMake
Now, make sure you are on a supported release of CMake for Visual Studio. We are actively tracking CMake development, but we cannot guarantee we support the latest.
15.4.1 is in the Release channel and supports up to 3.9.0 which you can ensure you build by running.
git checkout tags/v3.9.0
15.5 is in the Preview channel and removes the limitation on CMake 3.9, there CMake >= 3.8 can be used. You should be able to use the current release there.
Now to build and install a supported version, run the following commands.
mkdir out
cd out
cmake ../
make
sudo make install
The above will build and install the current release of CMake to /usr/local/bin. Verify the version is >= 3.8 and that server mode is enabled.
/usr/local/bin/cmake –version
cmake -E capabilities
Current Limitations
These are some known limitations that we are actively working on.
The Linux console window that enables input and output with a remote Linux application is not enabled for CMake yet. This is a limitation that this window currently only works for gdbserver mode, but our CMake support for Linux only works with gdb mode. This will be addressed in a future release.
What’s next
Download the Visual Studio 2017 Preview, install the Linux C++ Workload, and try our CMake support for Linux with your code. Let us know how it is or isn’t working for you. Your feedback matters.
The best way to reach us is via our GitHub hosted issue list, directly via mail at vcpplinux-support@microsoft.com or find me on Twitter @robotdad.
Thanks for info. I have compiled list of 50 popular C++ Interview Questions.
thanks..was looking for information to solve my problem, matched exactly the same.
such a good information to me