

Azure Managed Instance for Apache Cassandra, a fully managed service, enables you to run Apache Cassandra workloads on Azure, freeing you from managing the infrastructure. In this blog post, I will show you how to use self-signed certificates to connect to your cluster and verify the identity of both the client and the server.
What is a self-signed certificate?
By default, all connections made by Azure Managed Instance for Apache Cassandra are secured using SSL certificates signed by a Certificate Authority (CA). Certificate authority signed certificates provide an extra layer of trust and security to all connections that use them. They are used in Cassandra’s inter-node communication and the default for client-side authorization of the server. With a self-signed certificate, you act as your own CA, creating the root (private) and leaf (public) certificates. This certificate is only to verify your own client’s connection to the database, so there is no need for a third party.
Why use self-signed certificates?
When you use this managed service, all communication is done through your own personal virtual network (VNet) into which resources are injected, so all traffic from client to node will be done on secure Microsoft channels. This also allows fine tuning of the network security rules applied to the connection through network security groups (NSGs), except for certain rules needed for the operation of Cassandra.
Self-signed certificates add an extra layer of security by enabling authentication of the client by the cluster. By default, the client verifies the cluster it is connecting to using Azure’s default certificates. Those certificates are signed by a trusted certificate authority. However, in this default setup, the cluster does not verify the client, instead trusting that anyone able to access the VNet can access the database. Adding the self-signed certificates ensures that only clients who have access to the key can communicate with the cluster.
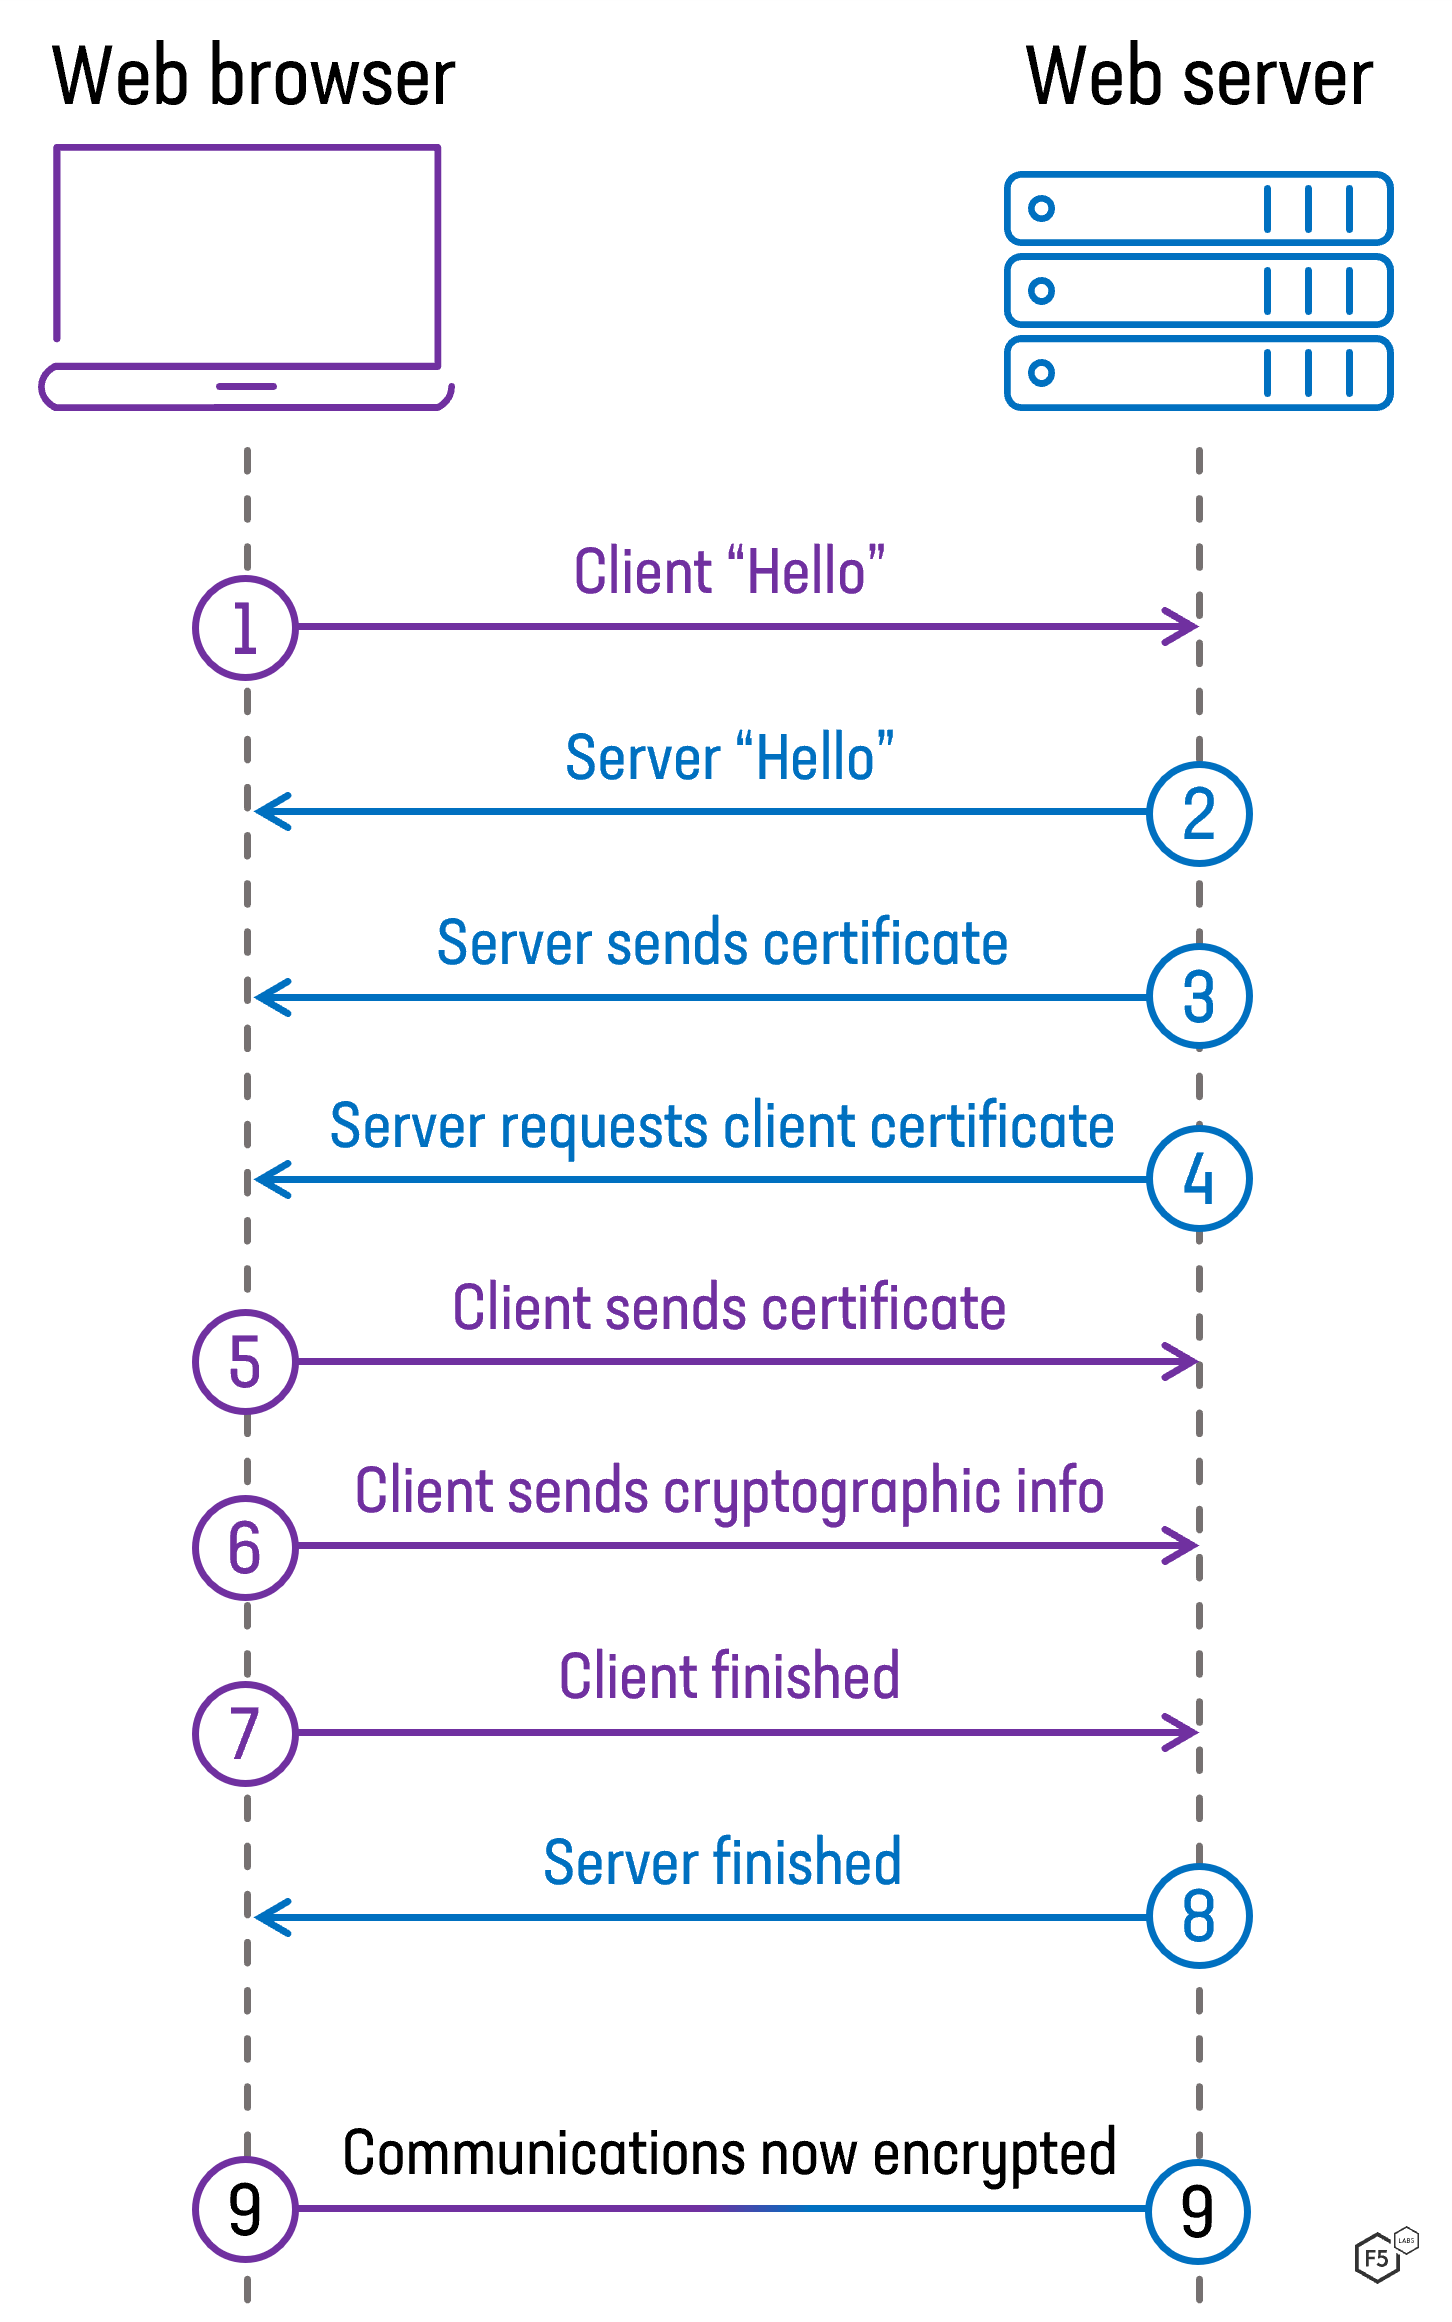
Figure 1: An example of the communication pattern for a mutual TLS connection (one where the self-signed certificates are set up)
How to use self-signed certificates?
Generating a client certificate is a straightforward process. First you need a configuration file, for example: gen_rootCa_cert.conf from the DataStax documentation:
# gen_rootCa_cert.conf
[ req ]
distinguished_name = req_distinguished_name
prompt             = no
output_password    = myPass
default_bits       = 2048

[ req_distinguished_name ]
C                  = US
O                  = YourCompany
OU                 = TestCluster
CN                 = YourComputerName
This file contains information included in your certificate, such as the common name, country, and organization. You can edit this file to suit your needs.
Then, if you have openssl installed on your machine, you can use the command:
openssl req \
  -config gen_rootCa_cert.conf \
  -new -x509 -nodes \
  -subj /CN=YourComputerName/OU=TestCluster/O=YourCompany/C=US/ \
  -keyout rootCa.key \
  -out rootCa.crt \
  -days 365
To generate the key and the certificate in PEM format. The client uses the key to verify the cert which the cluster provides.
The rest of the steps described in the DataStax document are not necessary. Instead, simply run the following steps from the Quickstart Guide:
resourceGroupName='<Resource_Group_Name>'
clusterName='<Cluster Name>'
az managed-cassandra cluster update \
  --resource-group $resourceGroupName \
  --cluster-name $clusterName \
  --client-certificates /usr/csuser/clouddrive/rootCert.pem
The reason that you do not have to follow all the steps laid out in the linked tutorial is because issuing the managed-cassandra update sets up the cassandra.yaml to use the client_encryption_options and adds the certificate you included in the command to the keystore of each node. The rolling restart applies those yaml changes to the Cassandra process.
In the end, all nodes will expect a valid client certificate with every request.
How to connect to your cluster using cqlsh?
To connect to the cluster with cqlsh after you set up your self-signed certificates, use the following settings.
[authentication]
username = <cluster-username>
password = <cluster-password>

[connection]
hostname = <node-ip OR node.managedcassandra.cosmos.azure.com>
port = 9042

[ssl]
userkey = /path/to/rootCa.key
usercert = /path/to/rootCa.crt
certfile = /etc/ssl/certs/digicertroot.crt
validate = true ;; Optional, see below
In this file, you need to replace the following placeholders with the actual values:
- <cluster-username>/<cluster-password> with your configured Cassandra login.
- /path/to/rootCa.key with the path to your client certificate file.
- /path/to/rootCa.crt with the path to your client key file.
- /etc/ssl/certs/digicertroot.crt with the path to your server certificate file.
- NOTE: This is only needed when you set validate = true
To use validate=true, you need to enable hostname validation. The cluster uses *.managedcassandra.cosmos.azure.com for the internal node names, so you need to configure your hosts file like this, with <dcname> as the Cassandra datacenter name, and IP addresses as their given values. You will need to do this for each node you want to connect to.
<node 1 ip> <dcname>000000.managedcassandra.cosmos.azure.com
<node 2 ip> <dcname>000001.managedcassandra.cosmos.azure.com
<node 3 ip> <dcname>000002.managedcassandra.cosmos.azure.com
…
Finally, you can use the following command to launch cqlsh:
cqlsh --cqlshrc=/path/to/cqlshrc
If you see any errors or warnings, you may need to check your cqlshrc file or your certificate files for any mistakes or inconsistencies. If you are using “valdate=true” then check using openssl to see what certificate the cluster is providing. If it is not DigiCert, then change the certfile value in the cqlshrc to match whatever value is returned. To see that certificate, you can use the command:
openssl s_client -showcerts \
  -connect <nodename>.managedcassandra.internal.cosmos.azure.com:9042 \
  -cert /path/to/rootCa.crt \
  -key  /path/to/rootCa.key
How to connect to your cluster using python?
To connect to your cluster using python, you can use the cassandra-driver package, which provides a high-level API for interacting with Cassandra. You can install it using pip:
pip install cassandra-driver
Use the following configuration, adjusted for your environment, to connect with self-signed certificates through the python driver.
import ssl
import cfg
from cassandra.auth import PlainTextAuthProvider
from cassandra.cluster import Cluster

ssl_context = ssl.SSLContext(ssl.PROTOCOL_TLSv1_2)
ssl_context.verify_mode = ssl.CERT_REQUIRED
ssl_context.load_verify_locations(capath="/etc/ssl/certs/")
ssl_context.load_cert_chain(
    "/path/to/rootCa.crt"
    keyfile="/path/to/rootCa.key")
auth_provider = PlainTextAuthProvider(
    username=cfg.config['username'],
    password=cfg.config['password'])
cluster = Cluster(
    [cfg.config['contactPoint']],
    port=cfg.config['port'],
    auth_provider=auth_provider,
    ssl_context=ssl_context,
    protocol_version=4)
session = cluster.connect()
rows = session.execute('SELECT * FROM system.local')
for row in rows:
    print(row)
Note that you may need to adjust the contact points, the port, the certificates, the key file, and the queries according to your cluster configuration and schema.
SSL Validation
As seen in the examples above, when you want to validate there are extra steps you need to take. SSL hostname validation exists as an extra check the client makes to confirm that the server it is talking to is correct. At this point in the process, the client has verified that the server is authentic, confirmed by the CA signed certificates, but the extra step makes sure that the name is right. The cluster’s nodes will present themselves as dcname000000.managedcassandra.cosmos.azure.com, so if you connect to them using the plain IP Address, this validation tells you that this is the wrong server, and the connection fails.
It is not usually necessary, but those who need it must take those extra steps to have this final layer of protection.
Conclusion
When security is your highest priority this process to ensures that your client is validated with self-signed certificates. However, Azure Managed Instance for Apache Cassandra provides a very high level of security right out of the box and can be used in a safe way with minimal configuration.
About Azure Cosmos DB
Azure Cosmos DB is a fully managed and serverless distributed database for modern app development, with SLA-backed speed and availability, automatic and instant scalability, and support for open-source PostgreSQL, MongoDB, and Apache Cassandra. Try Azure Cosmos DB for free here. To stay in the loop on Azure Cosmos DB updates, follow us on X, YouTube, and LinkedIn.
0 comments