


In this article, we will demonstrate how to build a data layer in Python for Azure Cosmos DB using FastAPI, a web framework for building and testing Python APIs.
To demonstrate this, we will leverage the To Do App Quickstart in our docs. This app shows simple CRUD operations (insert, update, list and delete) using a simple data model for a To-Do item consisting of id, name, description, and isComplete fields. The application that we will create, will wrap these CRUD operations and expose them through a set of custom APIs (Application Programming Interfaces) using the FastAPI routing feature. We will then test our custom APIs in Swagger UI that comes pre-packaged with FastAPI.
Find complete code in Github
The code related to this tutorial can be found in our Azure Cosmos DB With FastAPI Tutorial Repo.Here’s a complete list of steps we are going to follow to create and test our new backend data access layer.:
- Create an Azure Cosmos DB account
- Setup the dev environment
- Creating .env file for credentials
- Connect to account, create database and container
- Define our ToDoItem data model
- Setup the API endpoint implementation
- Write our CRUD operations
- Register the API endpoints with FastAPI
- Test the endpoints
Step 1 – Create an Azure Cosmos DB account
In a new web browser window or tab, navigate to the Azure portal (portal.azure.com).
- Sign-in into the Azure Portal using the credentials associated with your subscription.
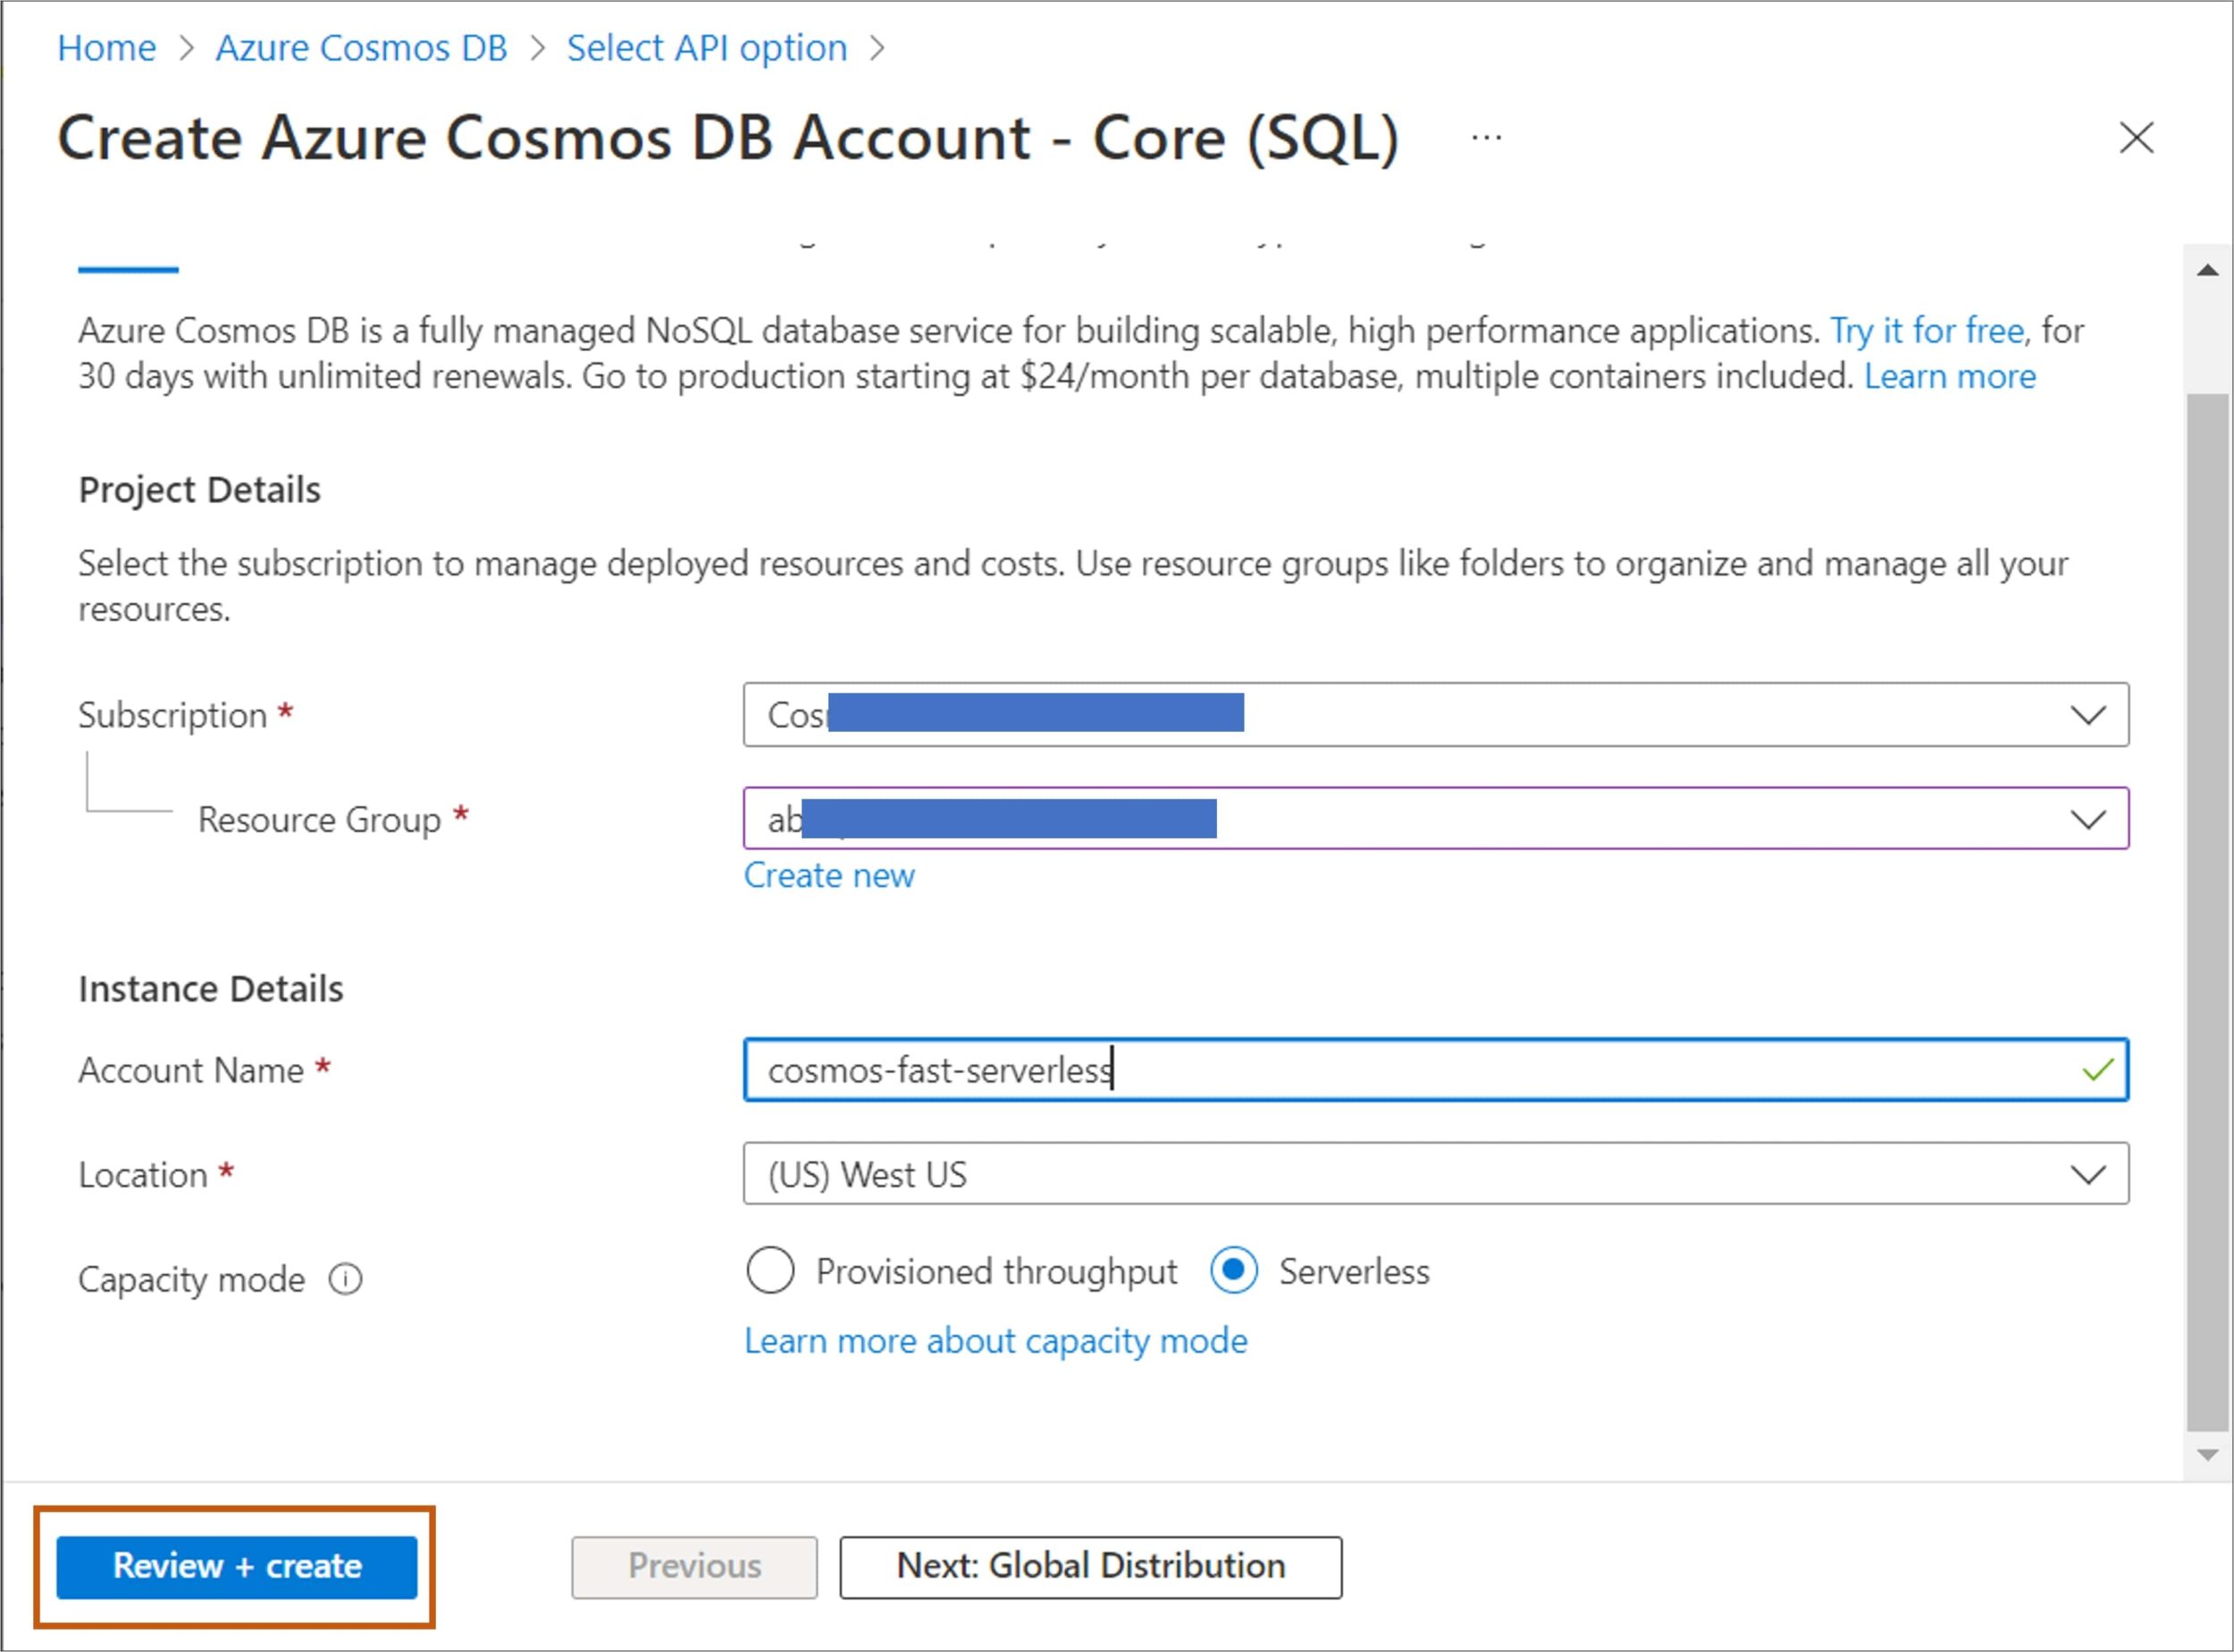
- Select Create a resource, search for Azure Cosmos DB, and then create a new Azure Cosmos DB SQL API account resource with the following settings, leaving all remaining settings to their default values:
Setting Value Subscription Your existing Azure subscription Resource group Select an existing or create a new resource group Account Name Enter a globally unique account name Location Choose any available region Capacity mode Serverless Below is a screenshot showing these settings in the Azure Portal, click Review+Create and follow subsequent process.

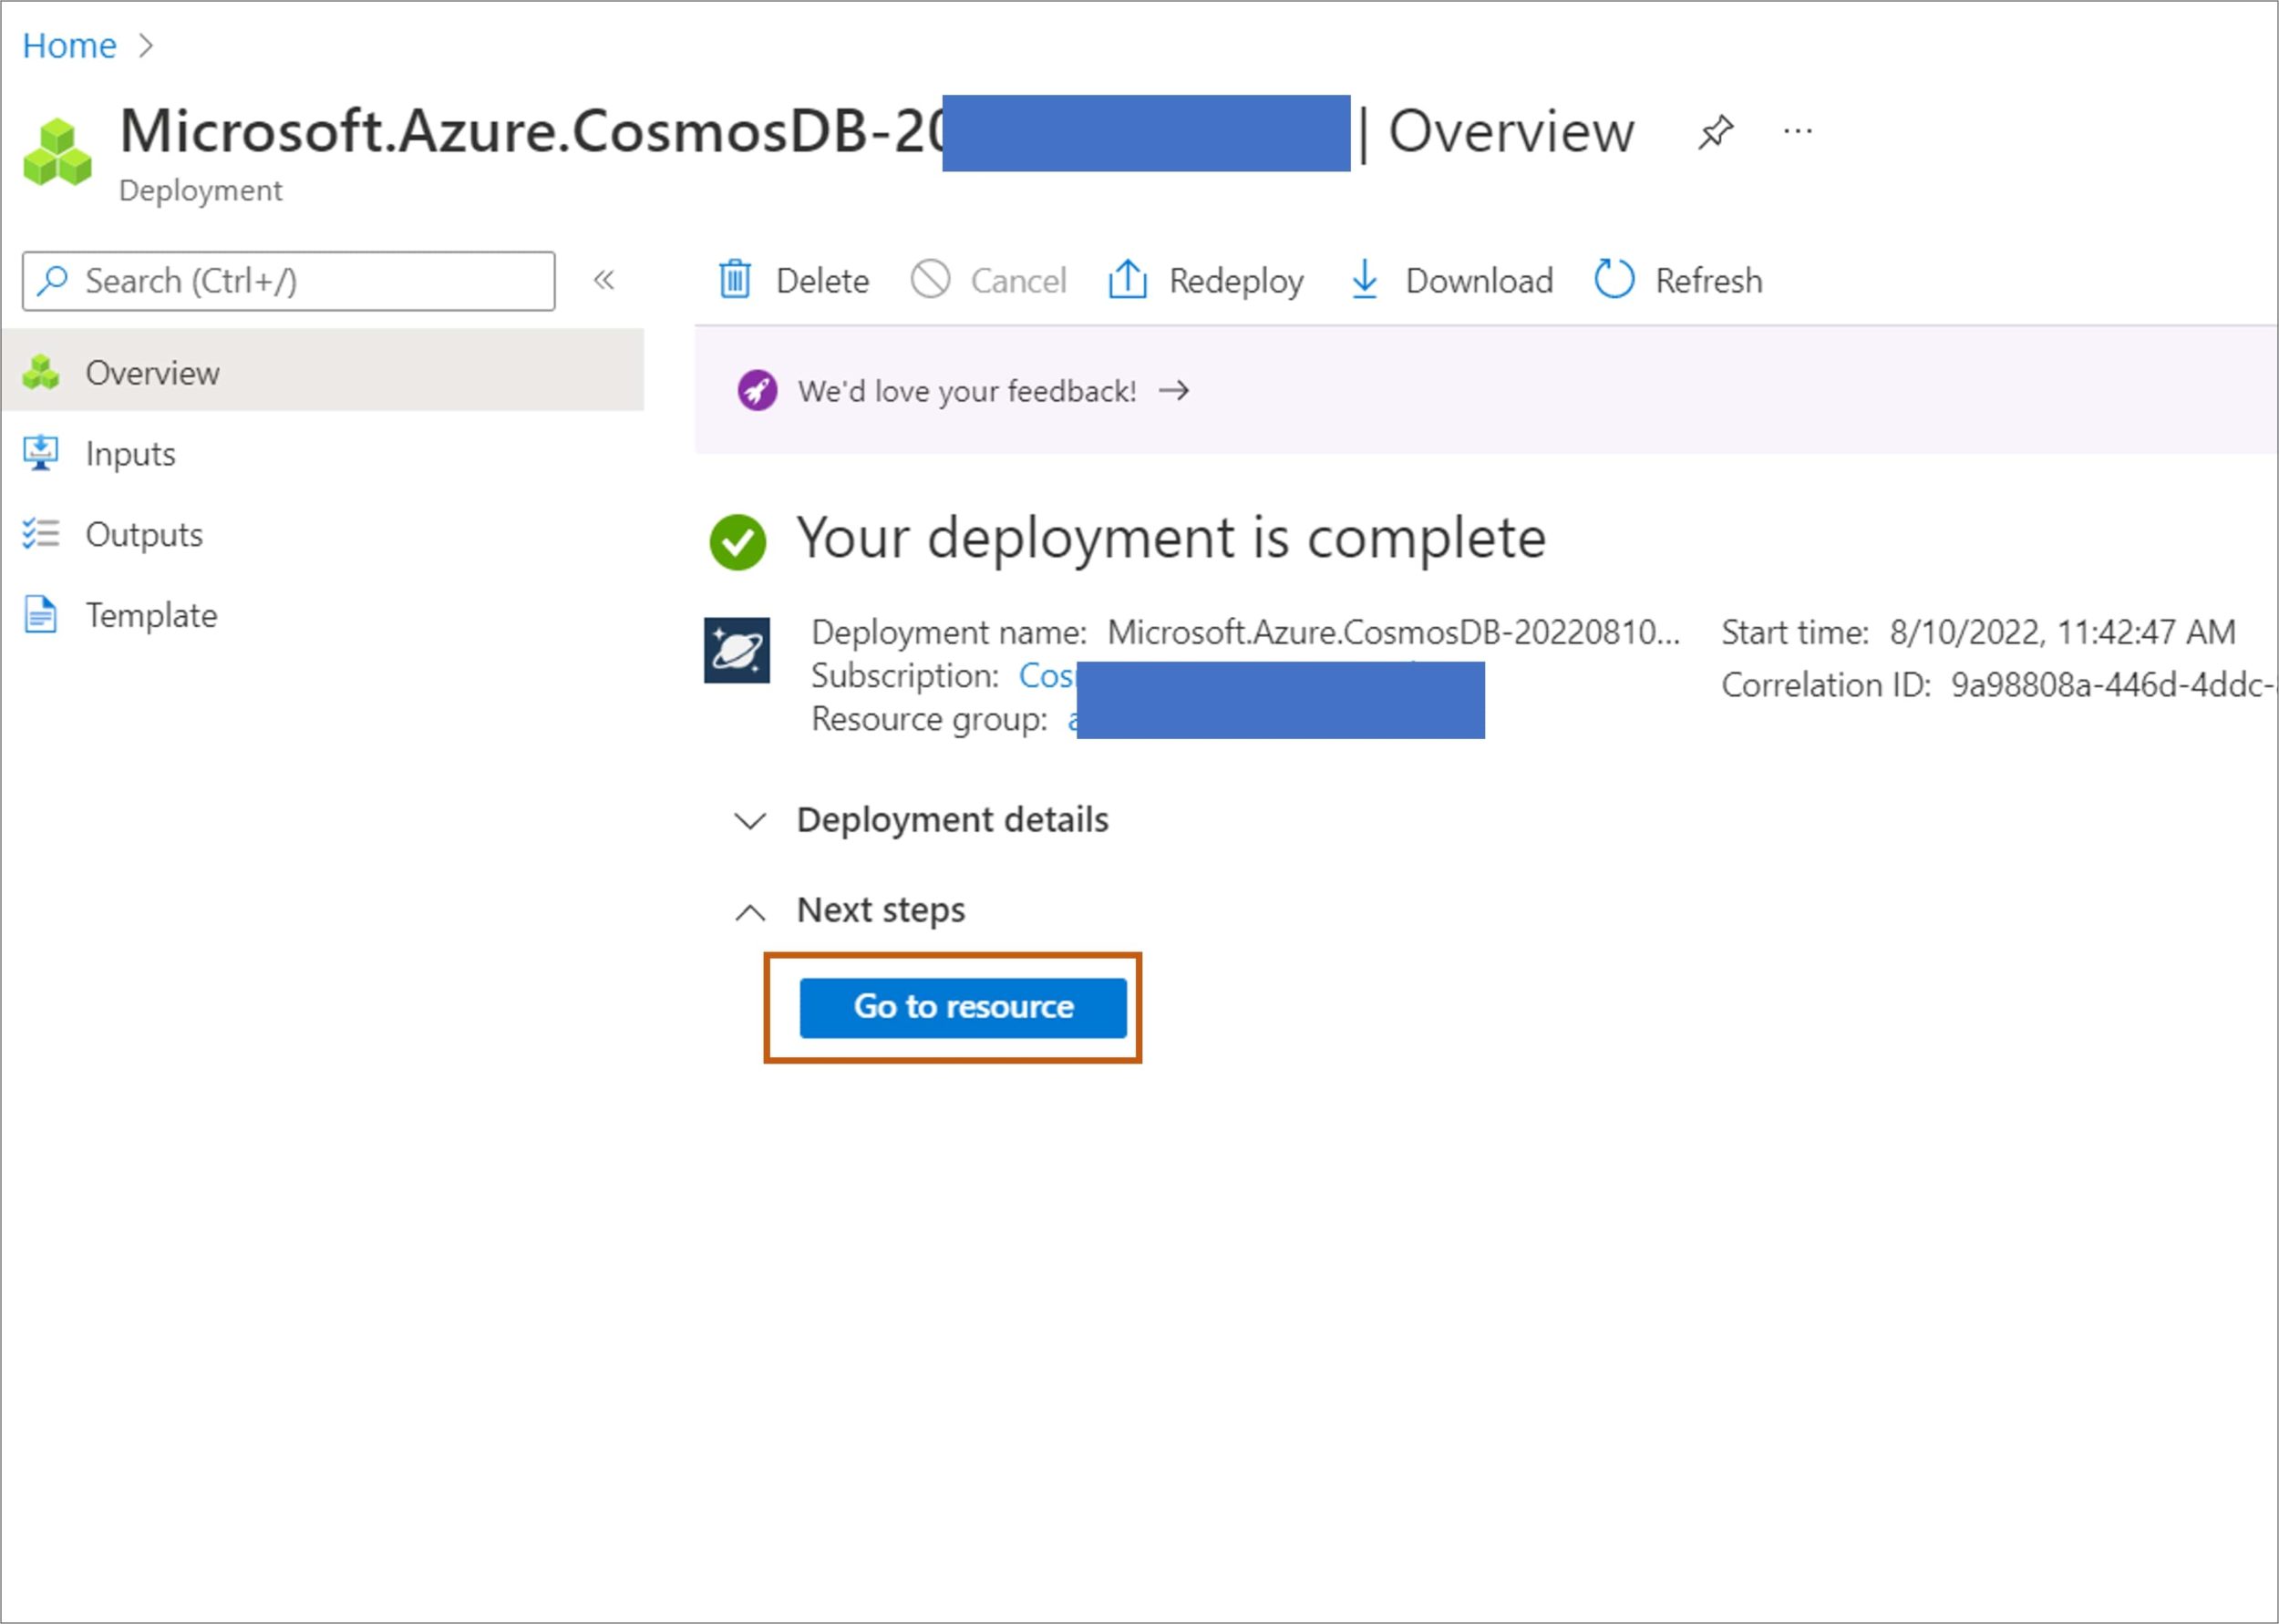
Azure Cosmos DB Account configuration - Wait for the deployment task to complete before continuing with further steps.

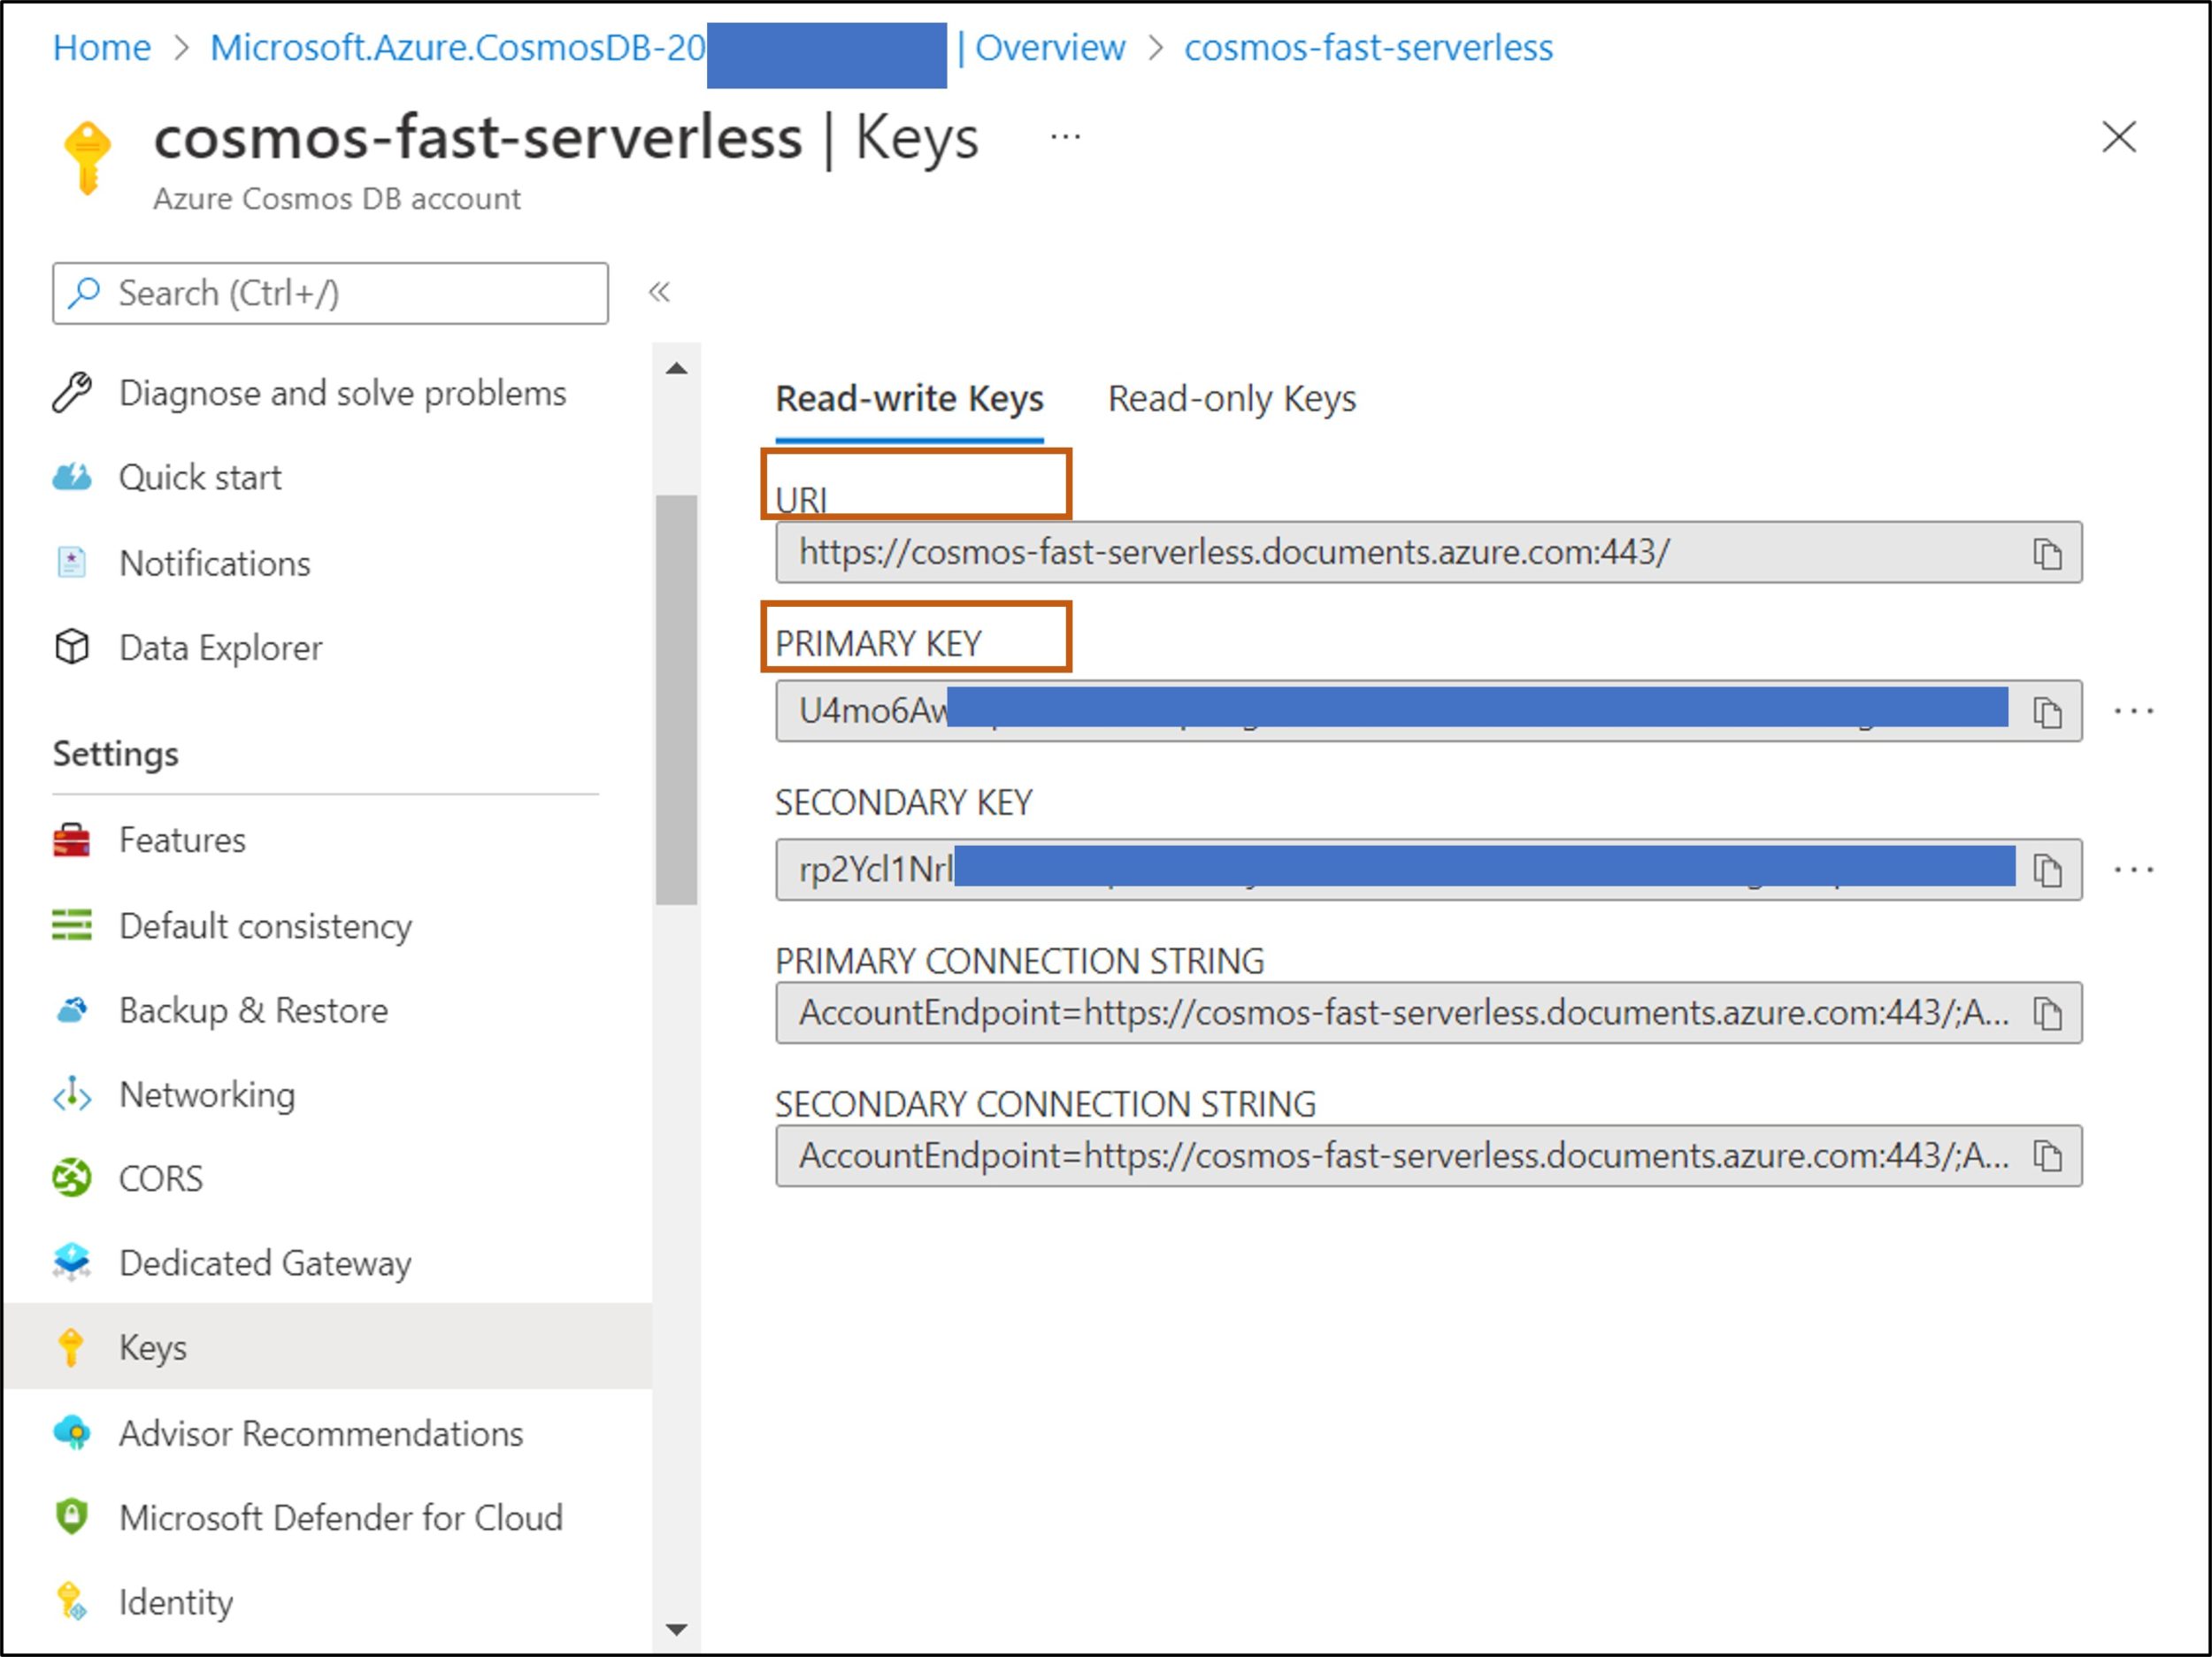
- Go to the newly created Azure Cosmos DB account resource and navigate to the Keys pane.
- The “Keys” section contains the connection details and credentials necessary to connect to the account from the SDK. Specifically:
- Record the value of the URI field. You will use this endpoint value later in this exercise.
- Record the value of the PRIMARY KEY field. You will use this key value later in this exercise.

- Close your web browser window or tab.
Step 2 – Setup the dev environment
For this application, you can use any terminal for executing your python and other commands. We’ve used VS Code as our editor here, but any editor works here. We will install FastAPI and Azure Cosmos DB Python SDK library following the steps below:
- If Python is already installed, confirm it is version 3.6 or higher by executing
python –versionin the Terminal. If not the correct version or if not installed, install Python 3.6+ version, then executepython –versionto verify correct installation. - Installing the remaining python libraries
- Fast API – Use
pip install fastapito install Fast API - Uvicorn – Uvicorn is an ASGI web server implementation for Python. Use the command
pip install fastapi uvicornto install uvicorn - Dotenv – Python-dotenv reads key-value pairs from a .env file and can set them as environment variables. Use
pip install python-dotenvto install dotenv library - Aiohttp – Asynchronous HTTP Client/Server for asyncio and Python.. Use
pip install aiohttpto install aiohttp library - Azure Cosmos DB python client – Use
pip install azure-cosmosto install azure-cosmos-db python client library.
- Fast API – Use
- You’ll need an editor to write code. We will use Visual Studio Code (VS Code) but you can use any code editor you’re comfortable with for writing Python.
- Create a directory to store our code and related assets. For example,
cosmos-fast. Then navigate to it in your terminal. - Open a terminal
- Use
cd <path to cosmos-fast>to navigate to cosmos-fast directory in the terminal/command prompt e.g.,cd "C:\Cosmos\python-todo\cosmos-fast"
Step 3 – Creating .env file for credentials
To execute CRUD operations, we need to connect to the Azure Cosmos DB account and create a database and collection for our ToDo app. To connect to Azure Cosmos DB, we need the URI and PRIMARY KEY from Step 1. Follow the below steps:
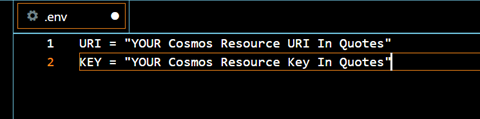
- Create and open a file
.envin the Code Editor - Write your Azure Cosmos DB URI and KEY values to the
.envfile and save it
Step 4 – Connect to Azure Cosmos DB, create database and container
To connect to our Azure Cosmos DB account, use the credentials stored in the .env file. In the below snippet, we read the URI and KEY using the dotenv library and use these to instantiate the Azure Cosmos DB client during the app start. The Azure Cosmos DB async client is a part of the azure.cosmos.aio package. We will also import PartitionKey and exceptions from the azure.cosmos package. FastAPI will be used to handle the app startup event when the app loads on the server and later it would be used for request routing. Follow the steps below:
-
- Create
main.pyfile and open it in the Code Editor. - Add the necessary imports at the top of the
main.pyfile as shown below:from fastapi import FastAPI from dotenv import dotenv_values from azure.cosmos.aio import CosmosClient from azure.cosmos import PartitionKey, exceptions
- Load the credentials in config variable, instantiate FastAPI, and define the Database and Container name.
config = dotenv_values(".env") app = FastAPI() DATABASE_NAME = "todo-db" CONTAINER_NAME = "todo-items" - Connect to the Azure Cosmos DB account by instantiating the Cosmos Client during the app startup event, store a reference to the database and container in the app object to use them later, and then close the client connection.
@app.on_event("startup")
async def startup_db_client():
     app.cosmos_client = CosmosClient(config["URI"], credential = config["KEY"])
     await get_or_create_db(DATABASE_NAME)
     await get_or_create_container(CONTAINER_NAME)
- Create
-
- Define the async
get_or_create_dbandget_or_create_containerfunctions to fetch/create the database and the container.async def get_or_create_db(db_name): try: app.database = app.cosmos_client.get_database_client(db_name) return await app.database.read() except exceptions.CosmosResourceNotFoundError: print("Creating database") return await app.cosmos_client.create_database(db_name) async def get_or_create_container(container_name): try: app.todo_items_container = app.database.get_container_client(container_name) return await app.todo_items_container.read() except exceptions.CosmosResourceNotFoundError: print("Creating container with id as partition key") return await app.database.create_container(id=container_name, partition_key=PartitionKey(path="/id")) except exceptions.CosmosHttpResponseError: raiseImportant Note On Partition Key
In the above snippet, please make a special note of the term ‘Partition Key’. Partition Key is an important concept in Azure Cosmos DB, and a good understanding of partition key best practices can help you in better data modelling for optimum utilization of your requests budget while minimizing throttling. - Launch a new terminal window and navigate to the cosmos-fast directory by using the cd command
- Now start the server that will execute your python script using the uvicorn web server by typing the below command in the Terminal
uvicorn main:app --reload
- Notice the output, you must see the “Creating Database” message when you run it for the first time
- Define the async
Step 5 – Define our ToDoItem data model
Next, define the data model for our To-Do items. It is recommended to define and use the models to make sure that we can validate that we would be storing the correct form of data in our database. FastAPI handles a lot of the tasks under the hood and takes care of data validation, mapping data types, generating API documentation, etc.
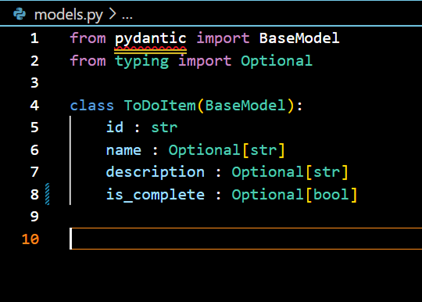
For our use case, each Todo item will have an Id (Azure Cosmos DB requires us to provide a unique id for each item that we create), name, description, and isComplete field. id, name, and description are string datatypes. isComplete is a boolean datatype. This is our model below:
- Create a
models.pyfile and open it in your Code Editor. - In
models.py, add required importsfrom pydantic import BaseModel from typing import Optional
- Define the ToDoItem Class
class ToDoItem(BaseModel): id : str name : Optional[str] description : Optional[str] is_complete : Optional[bool] - Save the
models.pyfile. At this point, the models.py file would look like the file below:
Step 6 – Setup the API endpoint implementation
Now it is time to write functions to create ToDo items in our container, fetch a list of all the ToDo items, update an existing item, and delete an item. When we make create, delete, update, fetch, or other requests from the application frontend, we need to expose the respective functions through some API endpoints so that the frontend can call these functions that are hosted on our servers.
To implement the API endpoints, we will create another file routes.py and later import it in main.py. We will make use of the APIRouter component of the FastAPI for implementing the routes. Follow the steps below:
- Create
routes.pyfile in the same folder as themain.py, and open it in the Code Editor. - In the
routes.pyfile, add the following importsfrom fastapi import APIRouter, Request from fastapi.encoders import jsonable_encoder from typing import List
- Now, we also need to import our
ToDoItem modeldefined inmodels.pyfile as we would use theToDoItem modelin our requests and responses. Add the below line to import from modelsfrom models import ToDoItem
- We also need to instantiate
APIRouter()from FastAPI to define the paths to access the defined functions. Add the below line to instantiate APIRouter:router = APIRouter()
- Save the file and move on to the next step where we discuss various endpoints.
Step 7 – API endpoint implementation
Next, we will implement the four different API endpoints around the four CRUD operations mentioned earlier. This includes a POST request to CREATE a Todo item, a GET request to FETCH a list of all Todo items, a PATCH request to update a Todo item, and a DELETE request to delete a ToDoItem. These operations will also implement json_encoder. Json_encoder converts the ToDoItem object to a json dict.
So let us start by creating an endpoint to insert a ToDo item into our container.
Step 7.1 – POST request to insert one ToDoItem
Copy and add the code below into your routes.py file.
@router.post("/insert", response_model=ToDoItem)
async def create_todo(request: Request, todo_item: ToDoItem):
    todo_item = jsonable_encoder(todo_item)
    new_todo = await request.app.todo_items_container.create_item(todo_item)
    return new_todo
Now let us understand it line by line.
- The parameters inside the
router.postbracket define the path at which the function is hosted, and the model to deserialize the resonse into. - Inside
create_todofunction, we use the jsonable_encoder function to convert thetodo_itemobject into a json dictionary as the Azure Cosmos DB client library allows only json objects increate_item. - Next, we call the
create_itemfunction on our container in which we want to insert the ToDoItem. - A successful
create_itemreturns the newly created item which is then passed as the function’s return value asnew_todo. - Since we are using the Azure Cosmos DB Python Async SDK and we need to
awaiton thecreate_item, the create_todo method must be declared asasync.
Step 7.2 – GET Request to fetch a list of all ToDo Items
We will use the read_all_items function from the Azure Cosmos DB Python client library to get a list of all the ToDo items. Define function and expose it through a GET request as below:
@router.get("/listall", response_description="List of all To-do items", response_model=List[ToDoItem])
async def list_todos(request: Request):
    todos = [todo async for todo in request.app.todo_items_container.read_all_items()]
    return todos
Step 7.3 – Delete an Item
Delete an item by specifying the id and the partition key. Define the delete function below that take id and partition key as the parameters. Define the function as below:
@router.delete("/delete")
async def delete_todo(request: Request, item_id: str, pk: str):
     await request.app.todo_items_container.delete_item(item_id, partition_key=pk)
Step 7.4 – Update an item
Update an item by passing the id and the item to be updated. Updates can be done on all properties except the partition key. In this case, that is id, which needs to be passed in order to update the correct item. In our example, we will use the same ToDoItem class to get the update fields in the request body. We will first read the item, update our properties, then call replace_item to replace the existing item with the modified item. Define the function as below:
@router.put("/update", response_model = ToDoItem, )
async def replace_todo(request: Request, item_with_update:ToDoItem):
    ````
    Update an item. Id (which is also the PartitionKey in this case) values should reference the item to be updated:

    - **id**: [Mandatory] Old Item ID
    - **name**: [Optional] The new name.
    - **description**: [Optional] The new description
    - **isComplete**: [Optional] boolean  flag to mark a Todo complete or incomplete
    ````
    existing_item = await request.app.todo_items_container.read_item(item_with_update.id,partition_key = item_with_update.id)
    existing_item_dict = jsonable_encoder(existing_item)
    update_dict = jsonable_encoder(item_with_update)
    for (k) in update_dict.keys():
        if update_dict[k]:
            existing_item_dict[k] = update_dict[k]
    updatedItem = await request.app.todo_items_container.replace_item(item_with_update.id, existing_item_dict)
    return updatedItem
Save the file.
Step 8 – Register the API endpoints with FastAPI
Next, register the routes for our API endpoints for our CRUD operations in main.py so the requests are routed to the correct paths.
In the main.py file,
- Add router import
from routes import router as todo_router
- Add below line to include router
app.include_router(todo_router, tags=[“todos”], prefix=”/todos”) - Save the file
Step 9 – Test the endpoints
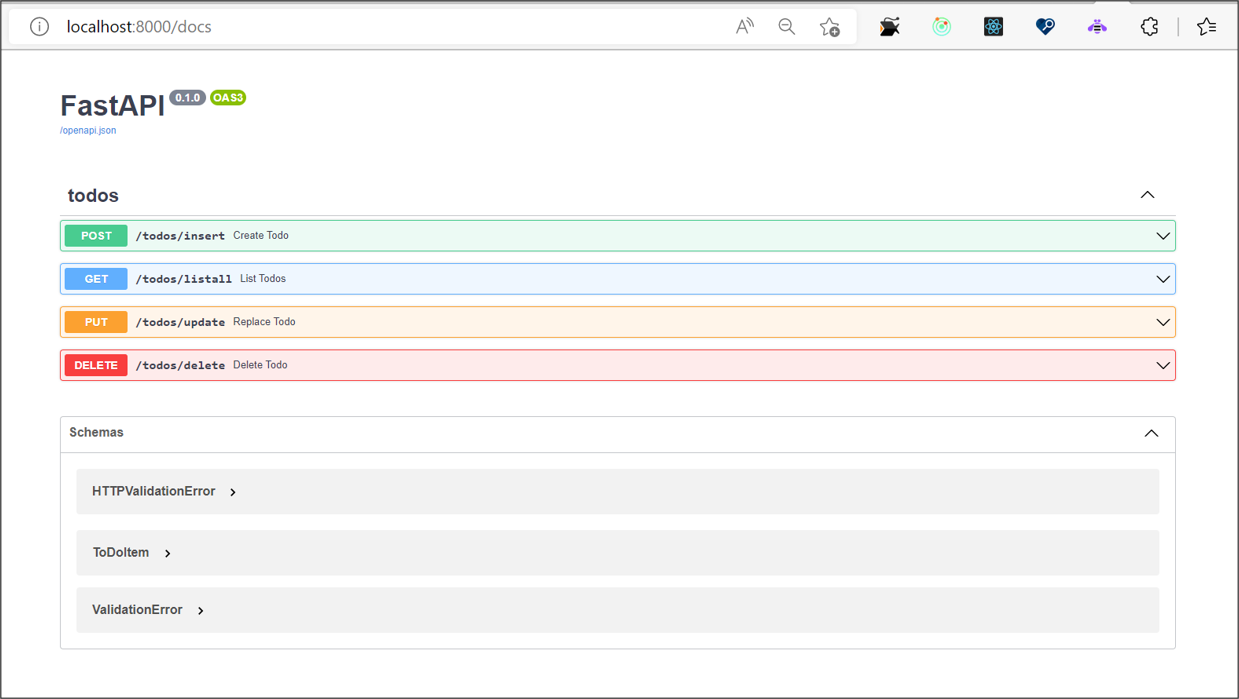
FastAPI automatically generates your API documentation and lets you test it. Follow the below steps:
- In your browser, go to http://localhost:8000/docs
- You will see all your endpoints listed there as shown in the picture below:

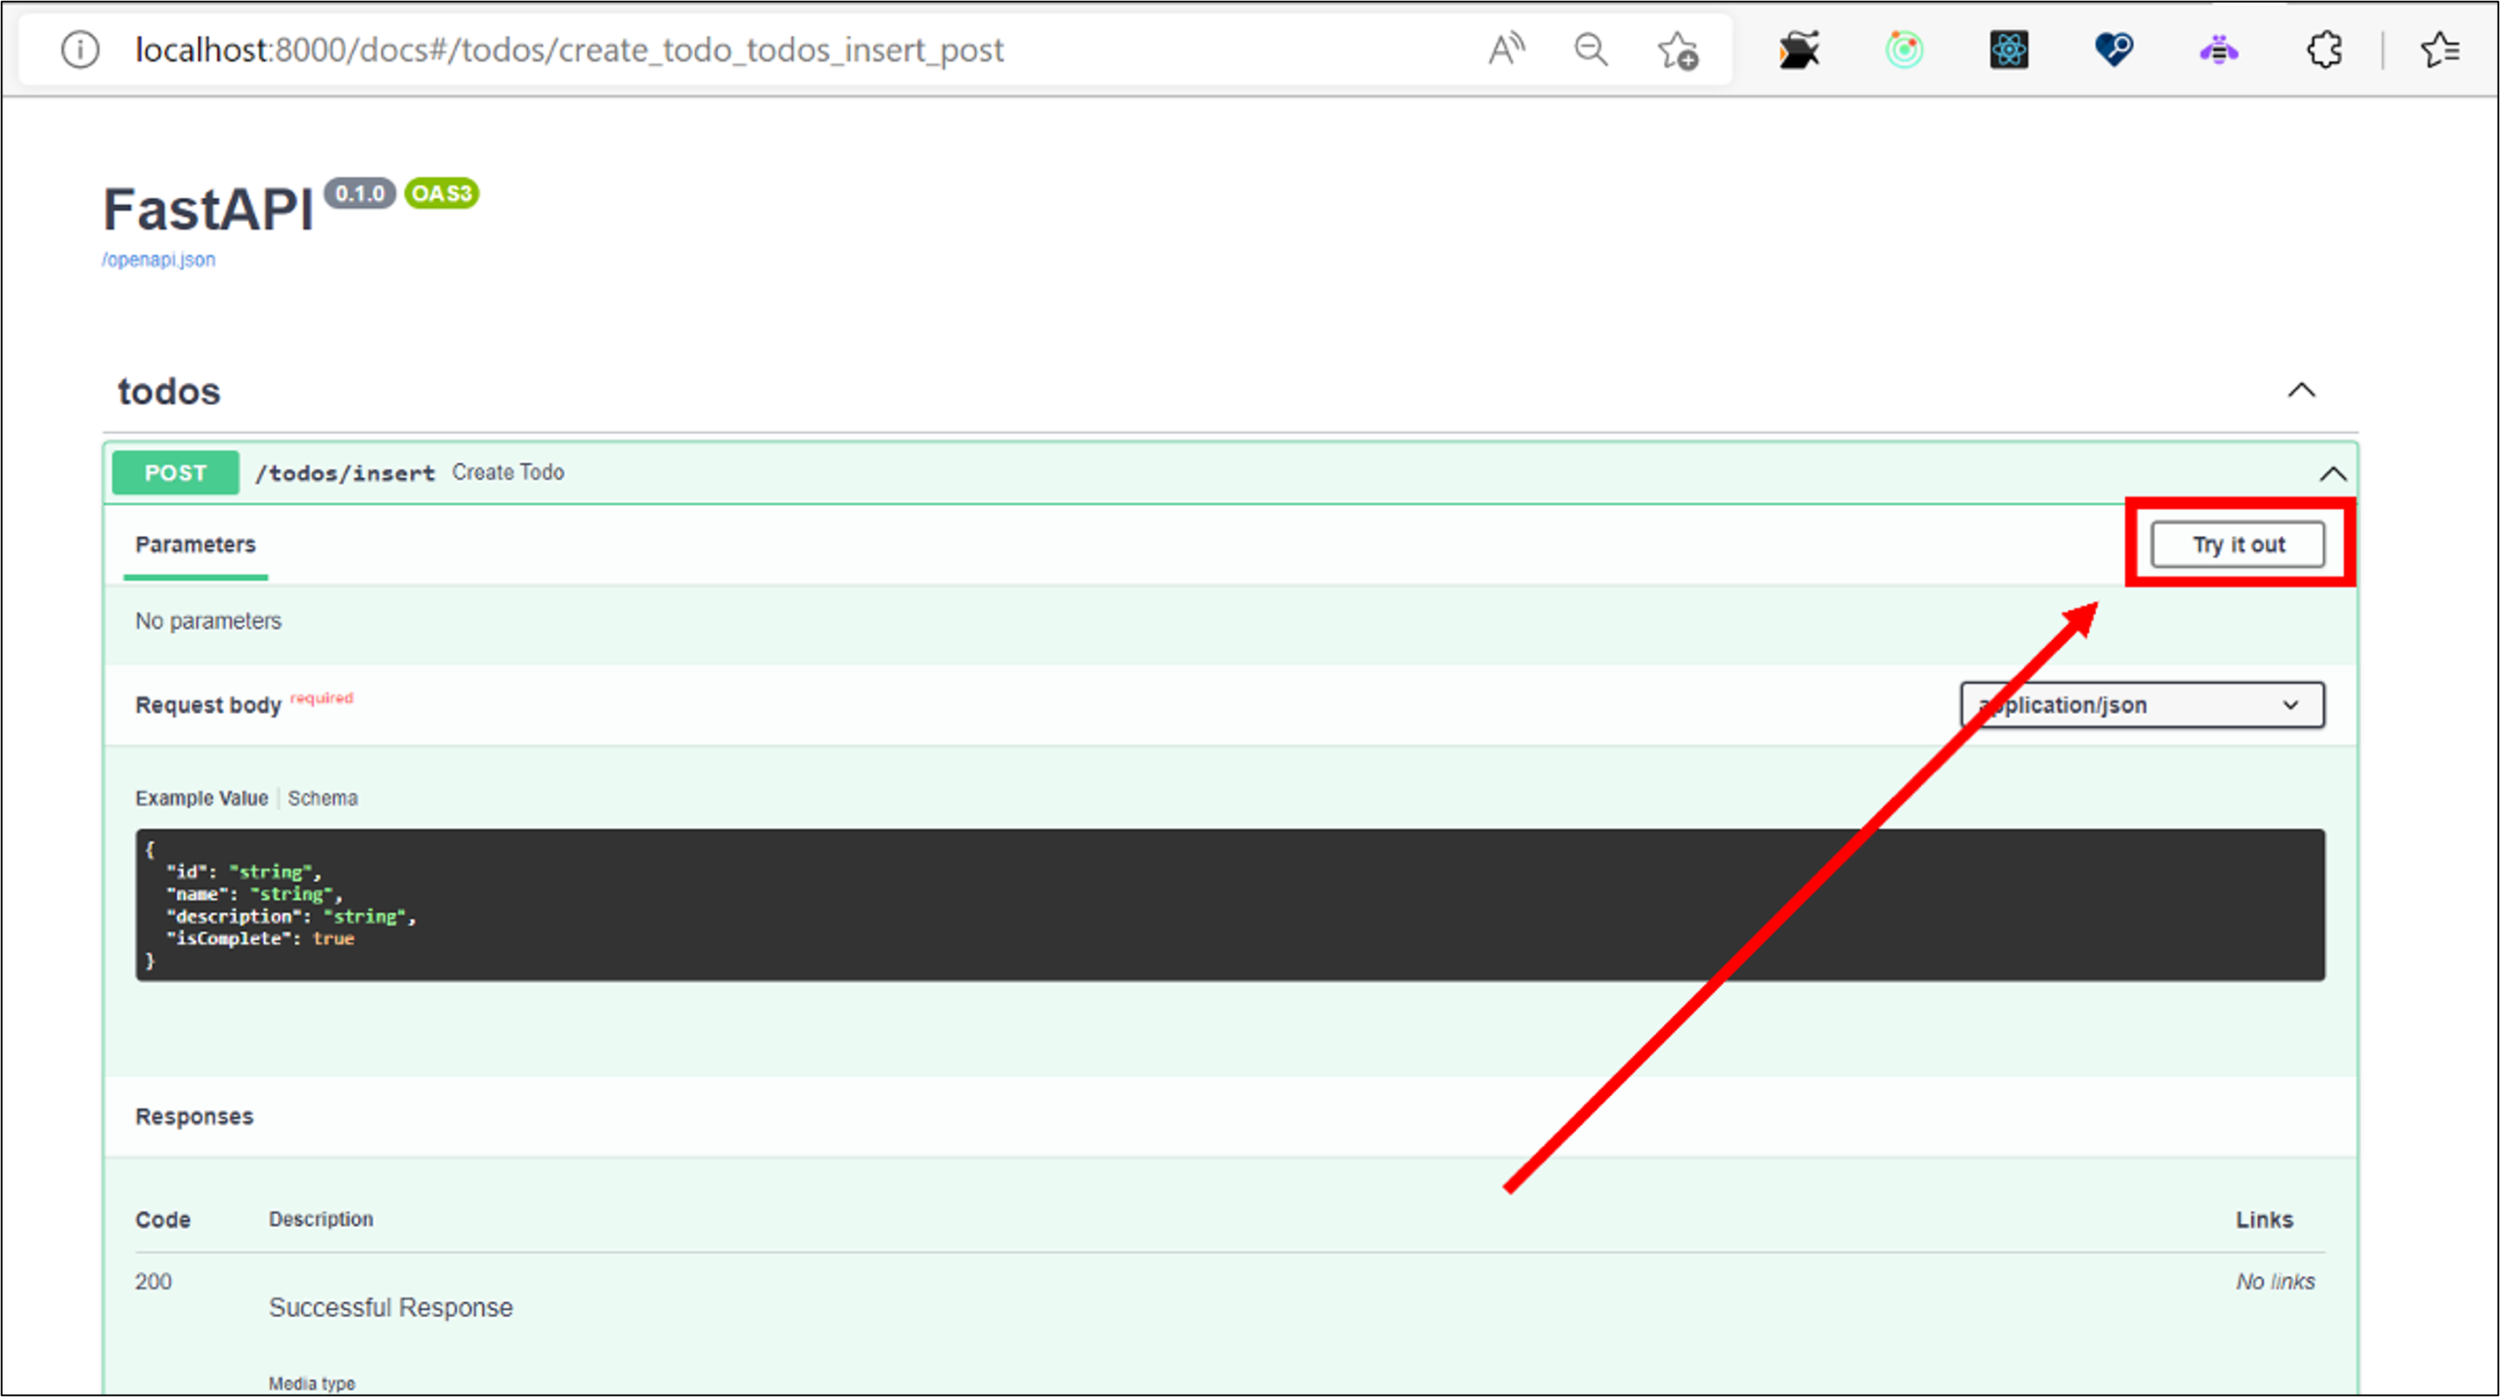
- Start testing the API endpoint by creating a ToDo Item.
- Expand the Create Todo in the FastAPI page and click on Try It Out

- Replace the “Request Body” content with the below JSON.
{
  “id”: “unique-item-id-1”,
  “name”: “To Do Title 1”,
  “description”: “Just a description of the todo”,
  “isComplete”: false
}
- Expand the Create Todo in the FastAPI page and click on Try It Out
- Click on Execute and observe the response.
- Just as we created an item, we can test the Delete, Update, and List operations by providing the required parameters and executing.
- Keep in mind that you cannot modify the id field for any item as it is the Partition Key.
Conclusion
This post demonstrated how to create a python web app backend using Azure Cosmos DB Python SDK and FastAPI. We created API endpoints to expose database CRUD operations, which can in turn be used by an application’s frontend or other services. We also tested our API endpoints by using the built-in features of FastAPI. This article touched upon the basic concepts that will help you get started. In the subsequent articles, we will cover additional and advanced concepts, including best practices for making the most of the Azure Cosmos DB.
About Azure Cosmos DB
Azure Cosmos DB is a fast and scalable cloud database for modern app development. See how to get started, dev/test, and run small production workloads free.
Get product updates, ask questions, and learn more about Azure Cosmos DB by following us on LinkedIn, YouTube, and Twitter.
When I run the code (from your repo) I get an error message as soon as there is method consumed in routes.py (like creating a todo item, or listall).
The connection to the Cosmos DB was successful and the database and container were created.
Also I had to add the package aiohttp with PIP.
Hi Michael,
You can remove the
line. It is recommended to that you close the client when your application work is done.
Also, thanks for pointing out aiohttp dependency, updating it here.