I was testing Azure Functions by creating a simple proof of concept with a Xamarin.Forms client and since there’s not much info about “using Azure Functions from Xamarin” I thought it was a good idea to publish this Getting Started or Walkthrough in my MSDN blog.
Make no mistake about it, you consume an Azure Function from a Xamarin app in the same way you’d consume a regular web service or ASP.NET Web API deployed in Azure in any other environment (Azure App Service or even Azure Service Fabric). But I think this E2E walkthrough is interesting in any case if you are not aware of Azure Functions and/or Xamarin.Forms.
With Xamarin.Forms you can create native cross-platform mobile apps with C#, targeting iOS, Android and UWP.
With Azure Functions you can create event-driven task/services with a server-less approach, just like publishing a C# function in the cloud and, ‘voila’, it’ll work right away! It is a convenient way to create small web services that you can invoke through HTTP, they can also be scheduled or triggered by events.
This is the definition you can see in azure.com:
“Azure Functions is a solution for easily running small pieces of code, or ‘functions’ in the cloud. You can write just the code you need for the problem at hand, without worrying about a whole application or the infrastructure to run it.”
You can get an Overview of Azure Functions here, and more details about how to implement Azure Functions with .NET/C# here.
Step 1 – Create the Azure Function app environment in Azure’s portal
A “function app” hosts the execution of your functions in Azure. Before you can create a function, you need to have an active Azure subscription account. If you don’t already have an Azure account, free accounts are available or even better, free benefits with VS Dev Essentials (Azure credit, $25/month for 12 months, for free).
Go to the Azure portal and sign-in with your Azure account.
If you have an existing function app to use, select it from Your function apps then click Open. To create a new function app, type a unique Name for your new function app or accept the generated one, select your preferred Region, then click Create + get started. At this point you have your Azure Function App environment where you can create as many Functions as you’d like.
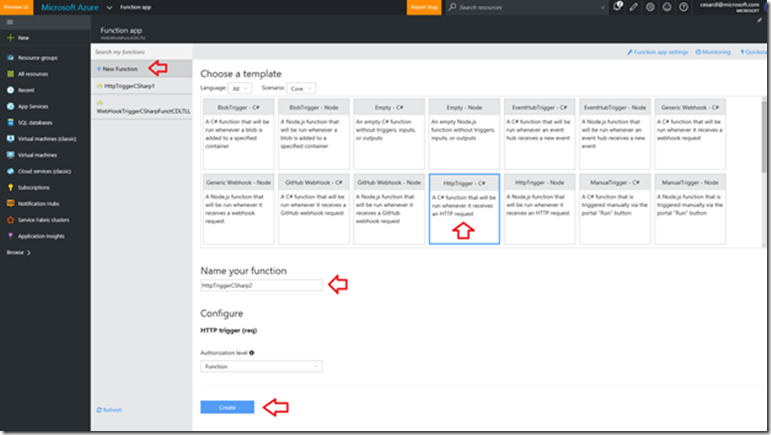
In your function app, click + New Function > HttpTrigger – C#, provide a name for the Function and hit “Create”.
This creates a function that is based on the specified template.
Step 2 – Write the code for your Azure Function in the web editor
Now write your code. Of course, in a real case, your function code might be accesing some kind of data source like Azure SQL DB, DocDB, Azure Storage, etc. In this simple case, for simplicity’s sake, I’m generating the data (a List,Vehicle>) within my code and using Linq. You can simply copy/paste the following code into your function if you want to go faster:
|
using System.Net; public static async Task<HttpResponseMessage> Run(HttpRequestMessage req, TraceWriter log) { log.Info($”C# HTTP trigger function processed a request. RequestUri={req.RequestUri}”); // parse query parameter string make = req.GetQueryNameValuePairs() .FirstOrDefault(q => string.Compare(q.Key, “make”, true) == 0) .Value; // Get request body dynamic data = await req.Content.ReadAsAsync<object>(); // Set name to query string or body data make = make ?? data?.make; if(make == null) return req.CreateResponse(HttpStatusCode.BadRequest, “Please pass a car make (make param, like make=Chevrolet) on the query string or in the request body”); List<Vehicle> listOfVehicles = new List<Vehicle>(); Vehicle vehicle1 = new Vehicle(); vehicle1.Make = “Chevrolet”; vehicle1.Model = “Camaro”; listOfVehicles.Add(vehicle1); Vehicle vehicle2 = new Vehicle(); vehicle2.Make = “Chevrolet”; vehicle2.Model = “Tahoe”; listOfVehicles.Add(vehicle2); Vehicle vehicle3 = new Vehicle(); vehicle3.Make = “Ford”; vehicle3.Model = “Mustang”; listOfVehicles.Add(vehicle3); var requestedVehicles = from vehicle in listOfVehicles where vehicle.Make == make select vehicle; IEnumerable<Vehicle> enumerableListOfVehicles = requestedVehicles; return req.CreateResponse(HttpStatusCode.OK, enumerableListOfVehicles); } public class Vehicle { public string Make { get; set; } public string Model { get; set; } } |
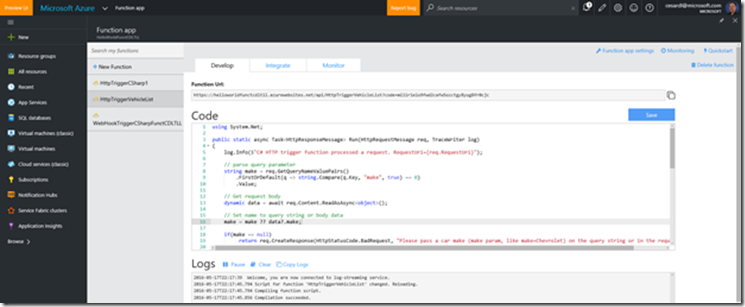
You should have something like the following:
Step 3 – Test the Azure function in Azure’s portal
Since the Azure Functions contain functional code, you can immediately test your new function.
In the Develop tab, review the Code window and notice that this C# code expects an HTTP request with a “make” value (car make) passed either in the message body or in a query string. When the function runs, this value is used to filter the data to return.
Scroll down to the Request body text box, change the value of the make property to “Chevrolet”, and click Run. You will see that execution is triggered by a test HTTP request, information is written to the streaming logs, and the function response (list of filtered cars) is displayed in the Output.
To trigger execution of the same function from another browser window or tab, copy the Function URL value from the Develop tab.
And now paste it in a browser address bar but don’t forget to append an additional parameter with “make=Chevrolet” or “make=Ford” (query string value as &make=Chevrolet) and hit enter. You’ll get the same JSON data in the browser:
You can also test it with curl or other tools like PostMan like explained in Testing Azure Functions.
Step 4 – Develop your Xamarin app and consume the Azure function
Now that our Azure Function works and is tested, let’s create our Xamarin.Forms app.
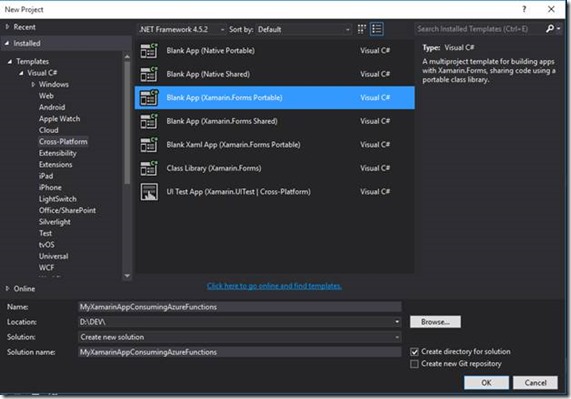
I created a plain “Blank App (Xamarin.Forms Portable)” solution using the following template:
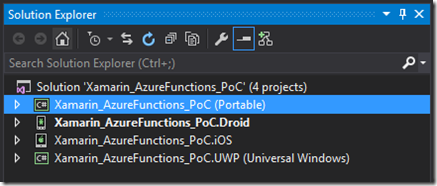
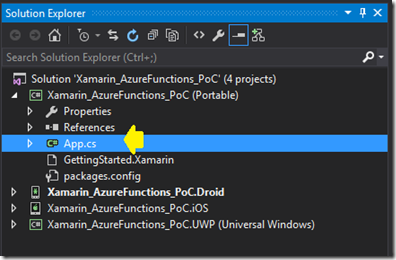
Once you have the solution, I usually get rid of the Windows 8.1 projects and just leave the Android, iOs and UWP projects plus the PCL project, of course, as I show below:
Since this is a Xamarin.Forms solution and this is a pretty straight forward sample, we’ll just need to change code in the shared PCL project.
In particular, we just need to add code in the App.cs.
Next, add the Newtonsoft.Json Nuget package to your PCL project:
Now, because I want to have a quick proof of concept, I wrote all the code as C# code. Of course, in a more elaborated Xamarin.Forms app, I usually would use XAML for my controls and views rather than by adding controls in C# like I’m doing in this example. But for the sake of brevity, I just added C# code.
Within the App.cs, add the line:
using Newtonsoft.Json;
And now paste the following code in your App.cs file within your app namespace definition:
|
public class App : Application { static ListView lstVehicles = new ListView(); static Label titleLabel = new Label(); public App() { MainPage = GetMainPage(); } public static ContentPage GetMainPage() { titleLabel.HorizontalTextAlignment = TextAlignment.Center; titleLabel.Text = “Testing Azure Functions from Xamarin!”; Button newButn = new Button() { Text = “Connect to Azure Function”, }; newButn.Clicked += newButn_Clicked; lstVehicles.ItemTemplate = new DataTemplate(typeof(TextCell)); lstVehicles.ItemTemplate.SetBinding(TextCell.TextProperty, “Model”); return new ContentPage { Content = new StackLayout() { Children = { titleLabel, newButn, lstVehicles } } }; } static async void newButn_Clicked(object sender, EventArgs e) { string previousTextValue = titleLabel.Text; titleLabel.Text = “******* Executing the Azure Function! ********”; VehiclesAzureFunction vehiclesAzureFunction = new VehiclesAzureFunction(“https://helloworldfunctcdltll.azurewebsites.net/”); //Consume the Azure Function with hardcoded method easier to see as an example var vehiclesList = await vehiclesAzureFunction.GetVehiclesHardCodedAsync(); //Consume the Azure Function with HttpClient reusable code within the Function/Service Agent //var vehiclesList = await vehiclesAzureFunction.GetVehiclesAsync(“Chevrolet”); lstVehicles.ItemsSource = vehiclesList; titleLabel.Text = previousTextValue; } } public class Vehicle { public string Make { get; set; } public string Model { get; set; } } public class VehiclesAzureFunction { public VehiclesAzureFunction() { } public async Task<List<Vehicle>> GetVehiclesHardCodedAsync() { var client = new System.Net.Http.HttpClient(); string url = $”https://helloworldfunctcdltll.azurewebsites.net/api/HttpTriggerVehicleList?code=mi11r1elo9fwd2cafw5ozctgy8yug8fr0cjc&make=Chevrolet”; var response = await client.GetAsync(url); var vehiclesJson = response.Content.ReadAsStringAsync().Result; List<Vehicle> listOfVehicles = JsonConvert.DeserializeObject<List<Vehicle>>(vehiclesJson); return listOfVehicles; } } |
Basically, I’m using the System.Net.Http.HttpClient class in order to call the Azure Function, in the same way you do when consuming regular Web API services. That code is implemented in a Function/Service agent class called VehiclesAzureFunction, and I’m running that code when the user presses the “Connect to Azure Function”.
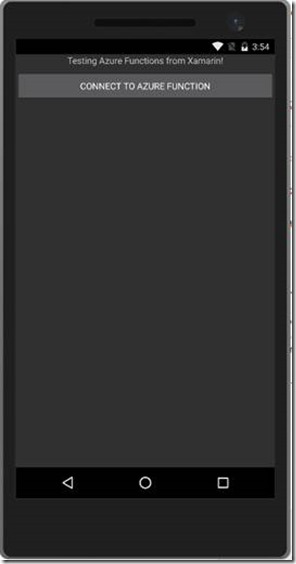
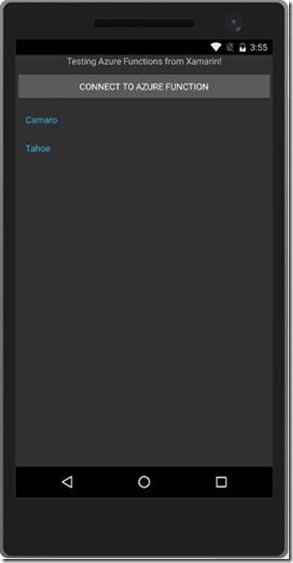
When running the Xamarin app in the Android emulator, this is what you get when starting the app and after pressing the button and calling the Azure Function:
Code available at GitHub
You can grab all the code from GitHub, as it’ll easier to see than just copying/pasting from a blog post. In the code at GitHub I’m also using some base classes with generics that are useful when you want to re-use more code in a Xamarin project.
Code download in GitHub: https://github.com/CESARDELATORRE/Xamarin_AzureFunctions_PoC
Next steps
In this blog post I simply created an Azure Function that was directly called through HTTP from a Xamarin.Forms app and I’m showing in the mobile app the returned data.
Once you have deployed you Azure Function you can learn on How to scale Azure Functions, as well.
But, there are many other possibilities you can do with Azure Functions like cool things related to events, for instance, triggering an Azure Function when a WebHook event is received (like a GitHub WebHook or a custom ASP.NET WebHook) like in this example: Azure Function triggered by a WebHook.
Another interesting scenario would be to create an Azure Function that receives a WebHook and that Azure Function generates a Mobile Push Notification to be sent to mobile devices (iOS, Android and Windows devices) through Azure Push Notifications Hub.
I also like this Azure Function example using the new Azure Cognitive Services (in this case, purely server-side related): Smart image re-sizing with Azure Functions and Cognitive Services.
At the end of the day, Azure Functions can be useful when testing small proof of concepts of code or quick actions with C# or Node.js code and you don’t want/need to deploy a whole VS project. You could use it even for building simple microservices, too. Although, for a more complex/large Microservices approach solution, you should check out this MSDN Magazine article Azure Service Fabric and the Microservices Architecture that I wrote. 🙂
Happy coding!





0 comments