


Blog Post updated targeting ML.NET 1.4 GA (Nov. 2019)
Note that this blog post was updated on Nov. 6th 2019 so it covers the updates provided in ML.NET 1.4 GA, such as Image classifier training and inference using GPU and a simplified API.
Context and background for ‘Image Classification’, ‘training vs. scoring’ and ML.NET
Image Classification, Object Detection and Text Analysis are probably the most common tasks in Deep Learning which is a subset of Machine Learning. However, for this blog post I am only focusing on Image Classification/Recognition and the multiple approaches you can take with ML.NET in order to train a Deep Learning model for image Classification/Recognition.
Run/score a pre-trained model vs. train a custom model
Before getting into the specific subject of this blog post focusing on “training a model”, I also want to highlight that in ML.NET you can also do the simplest thing which is to run/score an already pre-trained deep learning model to only run predictions. Those pre-trained models (also called ‘architectures’) are the culmination of many deep neural networks (DNN) architecture ideas developed by multiple researchers over the years and usually trained on very large datasets with many millions of images (such as the ImageNet dataset). That kind of large scale training would require too much specialized resources for most developers or even most organizations.
You can see a list of the most common pre-trained models (such as Inception v3, Resnet v2101, Yolo, etc.) at the http://modelzoo.co and in particular if focusing on computer vision (Image Classification and Object Detection) here: https://modelzoo.co/category/computer-vision
Here’s a summary of existing architectures (pre-trained models)
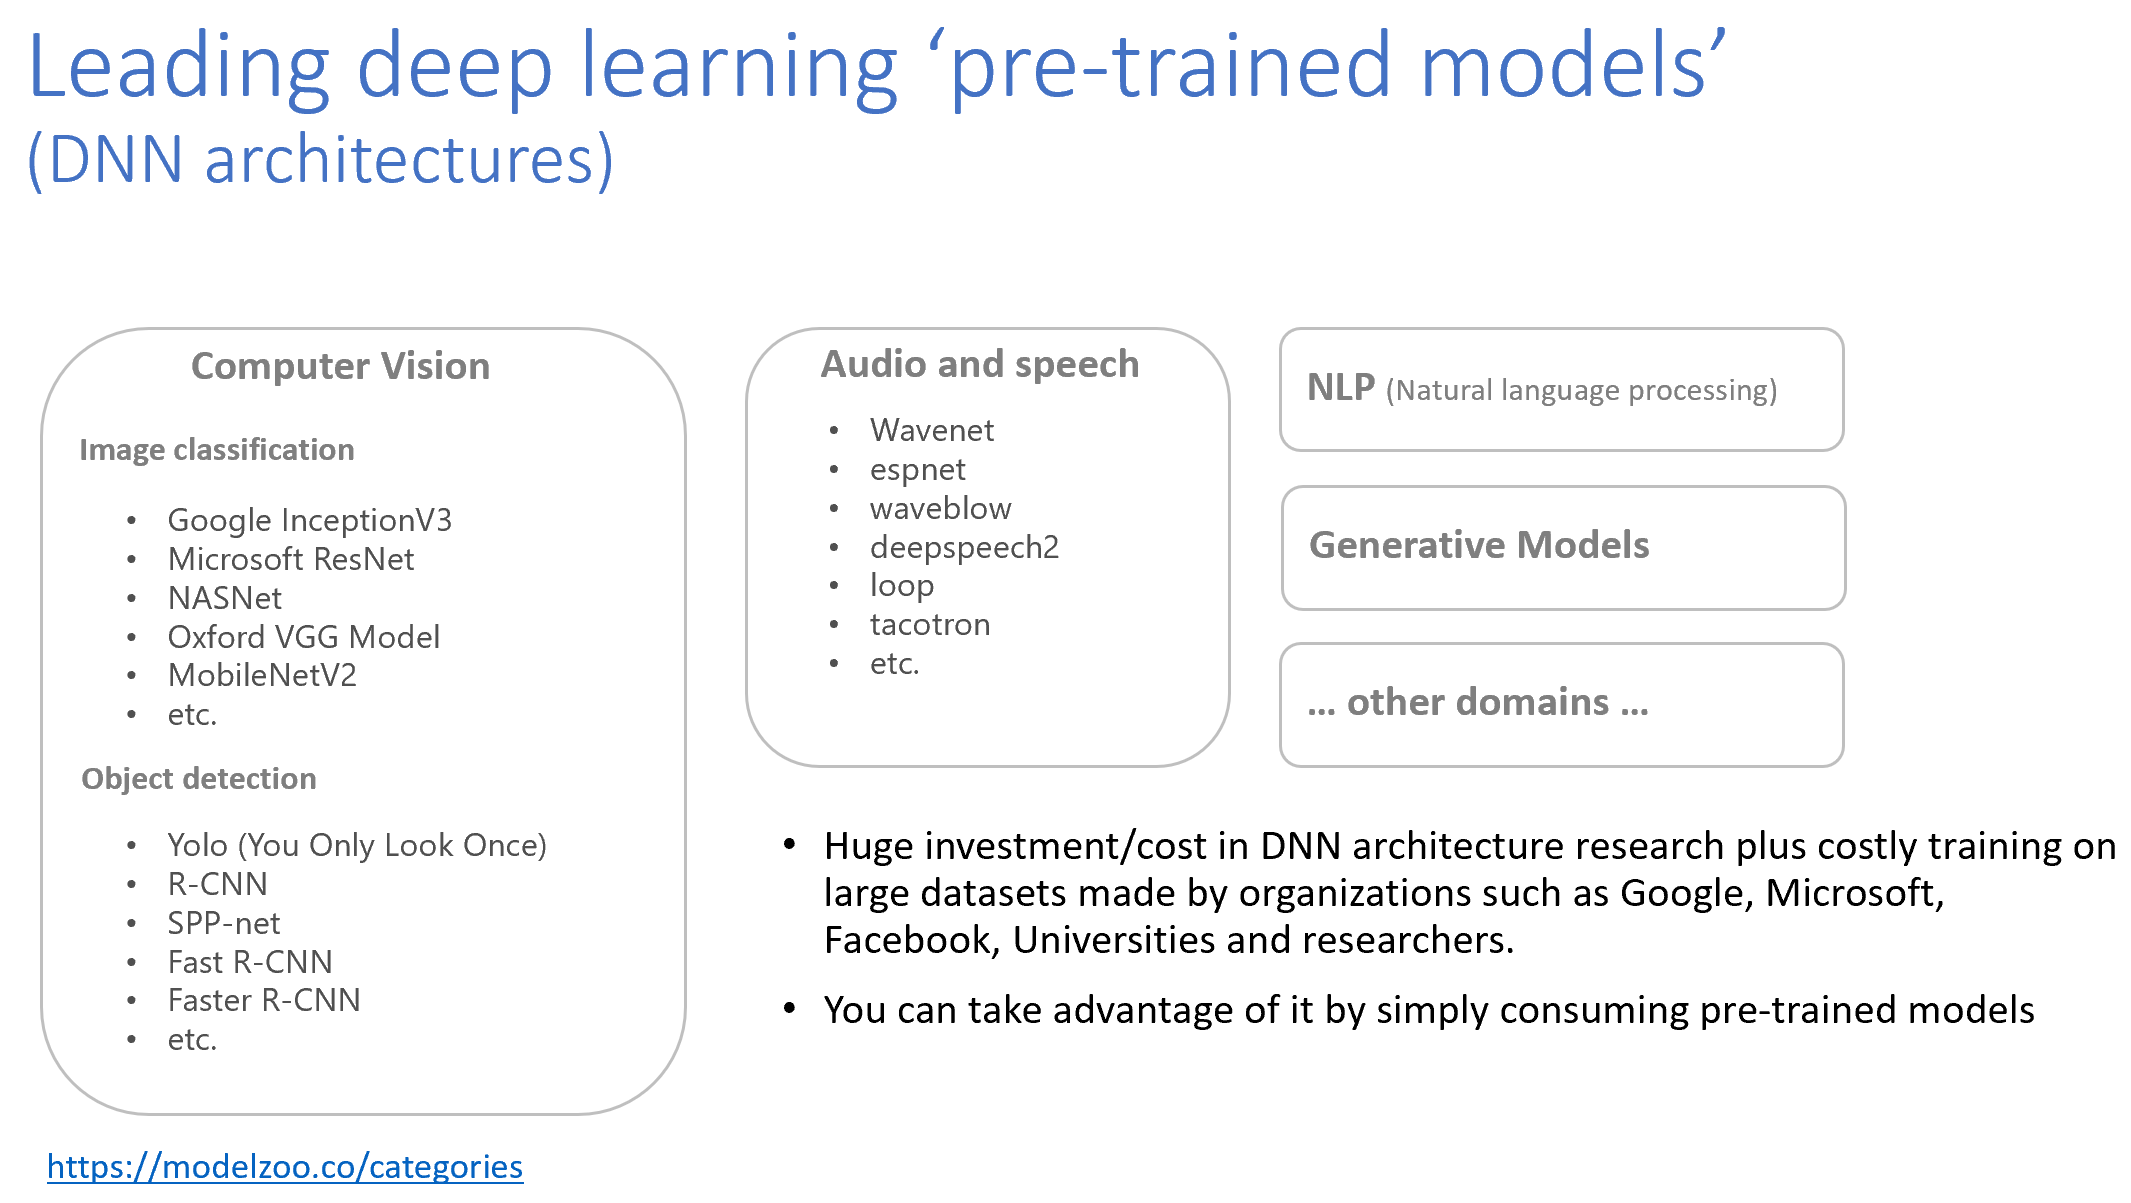
Those pre-trained models are implemented and trained on a particular deep learning framework/library such as TensorFlow, PyTorch, Caffe, etc. and might also be exported to the ONNX format (standard model format across frameworks).
As of today, ML.NET supports TensorFlow and ONNX, while Pytorch is in our long-term roadmap, though.
Therefore, the simplest approach you can take with any of those pre-trained models is to simply use them to make predictions, in this case, to classify or identify images, such as in the following illustration:

You can see some ML.NET sample apps scoring/running pre-trained TensorFlow or ONNX models here:
- Scoring/consuming a TensorFlow Image Classifier pre-trained model (InceptionV3) with ML.NET (Console app)
- Scoring/consuming a TensorFlow Image Classifier pre-trained model (exported from Azure Cognitive Services Custom Vision) with ML.NET (ASP.NET Core web app)
- Scoring/consuming an ONNX Object Detection pre-trained model (Yolo) with ML.NET (Console app)
- Scoring/consuming an ONNX Object Detection pre-trained model (Yolo) with ML.NET (ASP.NET Core web app)
However and as mentioned, that scenario (simply scoring/running a pre-trained DNN model) and those samples are NOT the goal for this blog post.
The goal for this blog post is to explain how you can train your own custom Deep Learning model with ML.NET for the Image Classification task in particular.
Why would you want to train your own custom model?
Making predictions with the previous mentioned pre-trained models can be enough if your scenario is very generic. For instance, if you want to recognize/classify a photo as a ‘person’, a ‘cat’, a ‘dog’ or a ‘flower’, then some of those pre-trained models will be enough. But what if you have your own business domain with your own image classes which are more particular? (for instance being able to differentiate between different types of flowers or different types of dogs) and even further what if you want to be able to recognize your own entities or objects? (such as very specific industrial objects which are not generic objects)? For that you will need to train a custom model with your own images and classify across your own image classes.
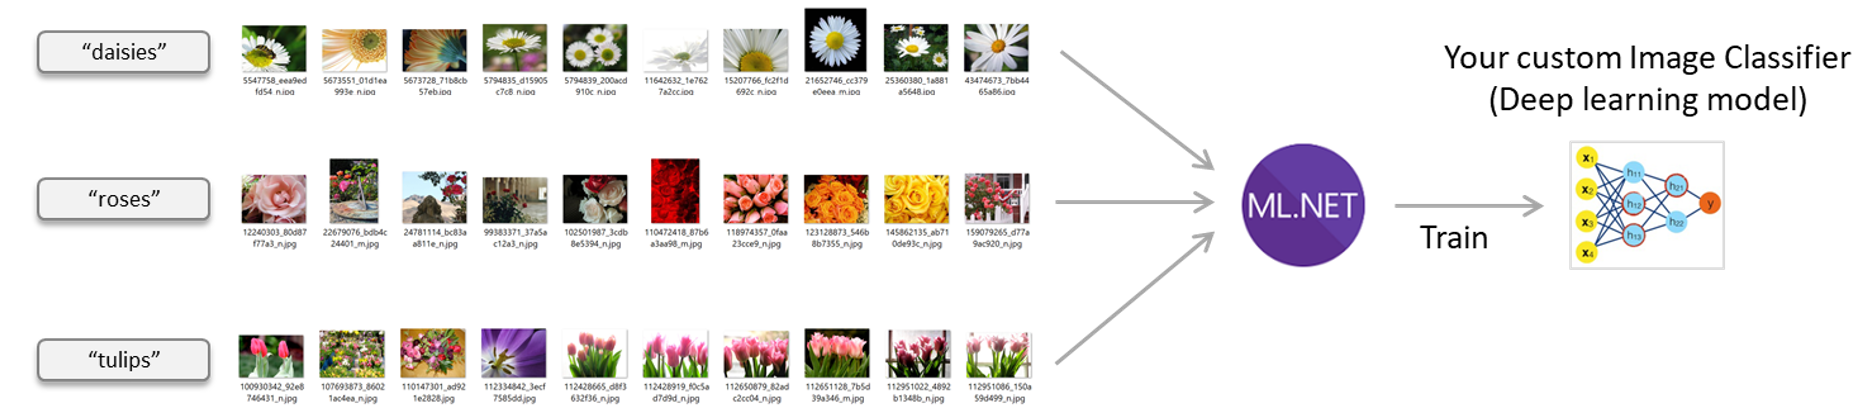
For instance, you might want to create your own custom image classifier model with your own images so instead of identifying a photo as “a flower” it’d be able to classify across multiple flower types.
Image classifier scenario – Train your own custom deep learning model with ML.NET
Possible ways of training an Image Classifier model in ML.NET
Currently (2019), there are three possible ways in ML.NET for training an Image Classifier model:
- Native Deep Learning model training (TensorFlow) for Image Classification (Easy to use high-level API , GPU support – Released with ML.NET 1.4 GA)
- Model composition of: A pretrained TensorFlow model working as image featurizer plus a ML.NET trainer as the model’s algorithm
- Model composition of: A pretrained ONNX model working as image featurizer plus a ML.NET trainer as the model’s algorithm
As highlighted above, the first approach is the one which is easier to use, more powerful as it also supports GPU and the one we’re currently investing more. The other two approaches are also possible and I will also explain them in this blog post however I want to highlight that the first approach is the one which is not only simpler to use but also the one which is more flexible and powerful because of the explanations below.
A. Native Deep Learning model training (TensorFlow) for Image Classification in ML.NET

I’m focusing on this approach first because if you don’t read the whole blog post, at least you should read the important part of the blog post which is this one because this approach is the most flexible and powerful of the three in the list above and it’ll be our long-term approach, therefore it is also the most recommended path for anyone using ML.NET.
The internal architecture stack
ML.NET uses TensorFlow through the low-level bindings provided by the Tensorflow.NET library. The advantage provided by ML.NET is that you use a high level API very simple to use so with just a couple of lines of C# code you define and train an image classification model. A comparable action when using the low level Tensorflow.NET library would need hundreds of lines of code.
The Tensorflow.NET library is an open source and low-level API library that provides the .NET Standard bindings for TensorFlow. That library is part of the open source SciSharp stack libraries.
The below stack diagram shows how ML.NET is implementing these new features on DNN training:
Microsoft (the ML.NET team) is closely working with the TensorFlow.NET library team not just for providing higher level APIs for the users in ML.NET (such as our new ImageClassification API) but also helping to improve and evolve the Tensorflow.NET library as an open source project.
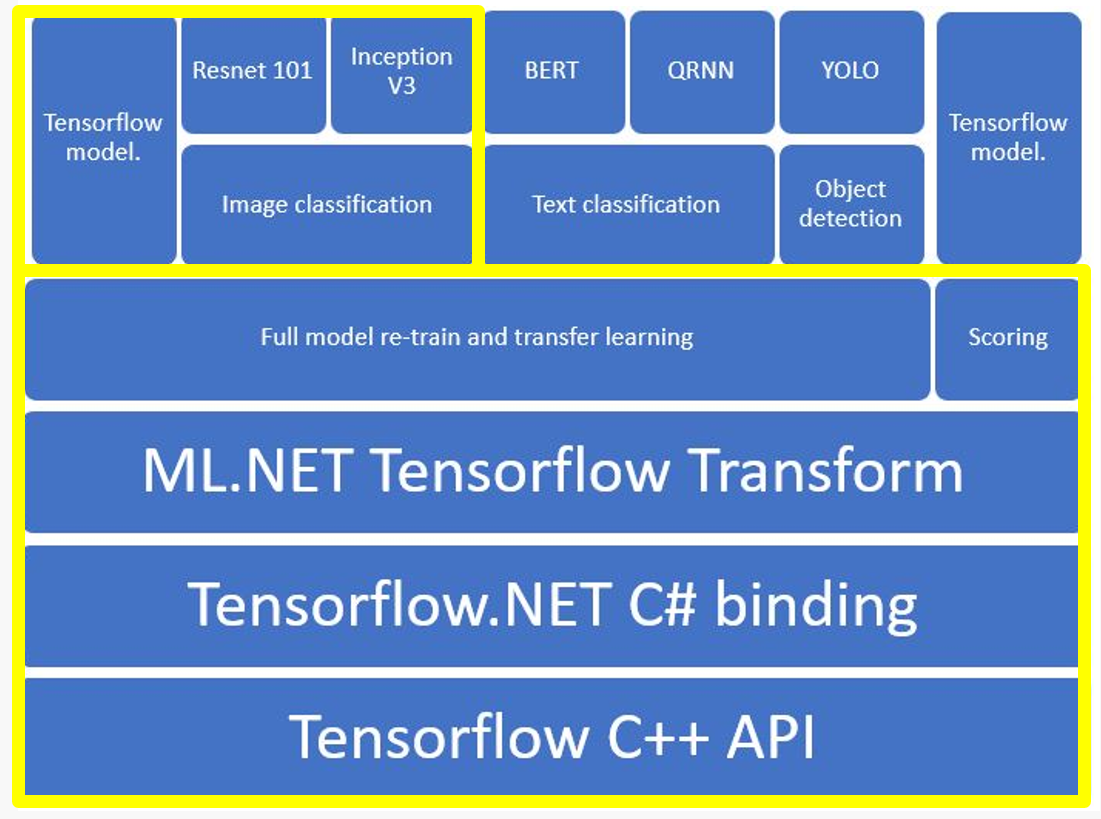
What’s highlighted in yellow is precisely this feature on ‘Image Classification’ that we released with ML.NET 1.4.
Moving forward and in upcoming releases, we’ll also add Object Detection model training support also based on native training (transfer learning) with TensorFlow.
GPU support on Windows and Linux.

GPU usage is especially important when creating a deep learning base model such as an Image Classifier model because the time for training the model with a dataset composed by thousands of images can be reduced significantly when using a GPU. When you are talking about a difference of many training hours. you really care about it.
But even for inference (making predictions with the model) it is also pretty important. For instance, in the tests I was doing, when making a prediction with an image, when using the CPU it was taking around 200 mlSecs but when using the GPU it was only needing 40 mlSecs.
GPU support is based on NVIDIA CUDA. Check hardware/software requisites and GPU requisites installation procedure here.
ML.NET uses the SciSharp TensorFlow redistributable for CPU or GPU: For CPU usage you reference SciSharp.TensorFlow.Redist. For GPU on Windows you reference SciSharp.TensorFlow.Redist-Windows-GPU and for GPU on Linux you reference SciSharp.TensorFlow.Redist-Linux-GPU.
Note that if your training machine doesn’t have a supported GPU you can always train with the CPU.
Easy to use high level API
We aim to provide an easy to use high level API that is also ‘task oriented’, meaning that each API will be targeting a different task such as Image Classification or Object Detection instead of having a more complex API that could train any kind of deep learning model.
As a comparison, code example for transfer learning by TensorFlow.NET needs hundreds of lines of code versus our high level API in ML.NET only needs a couple of lines and still we’ll simplify it further in regards the hyper-parameters and architecture selection:

Note, however, that ML.NET uses TensorFlow.NET under the covers as the low level .NET bindings for TensorFlow.
Based on Transfer Learning
Deriving from pre-trained models (DNN architectures) when doing Transfer Learning
As previously mentioned, full training from scratch of deep learning models is hard and expensive.
Specifically for predictive image classification with images as input, there are publicly available base pre-trained models (also called DNN architectures), under a permissive license for reuse, such as Google Inception v3, NASNet, Microsoft Resnet v2101, etc. which took a lot of effort from the organizations when implementing each DNN architecture.
These models can be downloaded and incorporated directly into new models that expect image data as input. That can be done based on the technique named ‘Transfer Learning‘ which allows you to take a pre-trained model on comparable images to the custom images you want to use and reuse that pre-trained model’s “knowledge” for your new custom deep learning model that you train on your new images, as illustrated in the following image:
![]()
The definition of ‘transfer learning’ is the following:
Transfer learning at Wikipedia:
“Transfer learning is a machine learning method where a model developed for an original task is reused as the starting point for a model on a second different but related task. For example, knowledge gained while learning to recognize cars could apply when trying to recognize trucks.”
Benefits of Native DNN Transfer Learning in ML.NET
The main benefit provided by the ‘Transfer Learning’ approach is:
Full optimization power within the DNN framework: Transfer Learning happens within TensorFlow DNN models, the ML.NET team will be able to optimize the retrain process with many improvements such as re-train one or more layers within the DNN graph plus any other tuning within the TensorFlow graph.
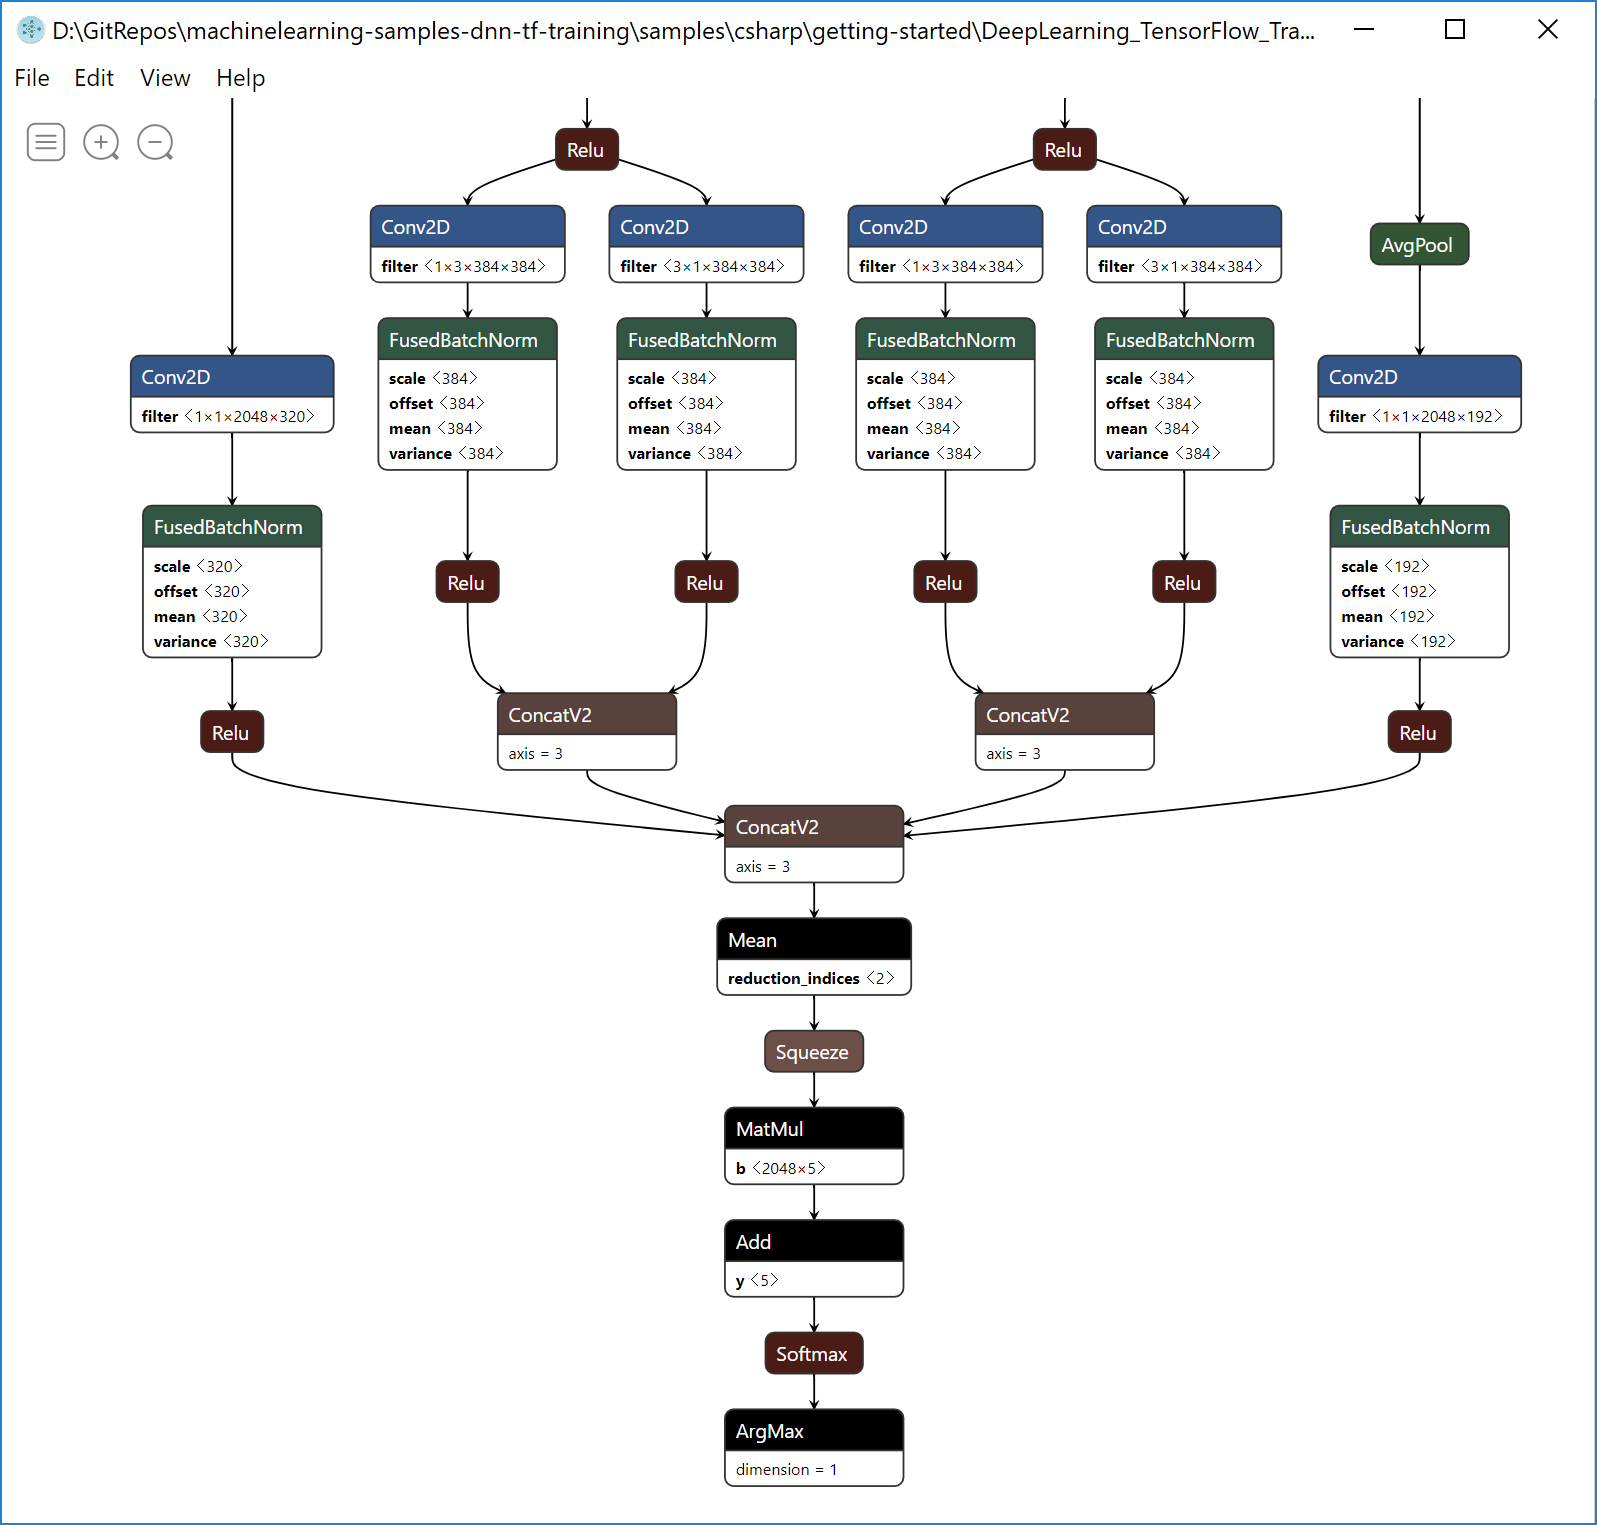
Here’s a simplified diagram on how transfer learning happens under the covers when using the ML.NET ImageClassification estimator. Those graph diagrams are simplified diagrams taken from screenshots while using the Netron tool after opening the serialized TensorFlow .pb models:
![]()
Benefit 1: Simple API encapsulating DNN transfer learning
The first main benefit of this new ImageClassification API in ML.NET is simplicity.
It is not just a scenario oriented API for image classification/recognition. We are pushing the limits and we basically shrank hundreds of lines of code using the TensorFlow.NET bindings for C# and surface a very simple and easy to use API for Image Classification meaning that in a couple of lines you can implement your model training which is internally doing a native TensorFlow training, as illustrated in the following diagram:
![]()
Benefit 2: Trains natively on TensorFlow producing a TensorFlow frozen graph/model (.pb) in addition to a ML.NET model
Flexibility and performace: Since ML.NET is internally retraining natively on Tensorflow layers, the ML.NET team will be able to optimize further and take multiple approaches like training on the last layer or training on multiple layers across the TensorFlow model and achieve better quality levels.
A second benefit of this approach which is natively training in TensorFlow is that you not only get a ML.NET model that you can consume from .NET in order to predict image classifications but you also get a native TensorFlow model (frozen graph as a .pb file) that if you want you could also consume from any other platform/language that supports TensorFlow (i.e. Python, Java/Android, Go, etc.). The following screenshot shows you an example of the generated Tensorflow .pb model after you train with your image-set:
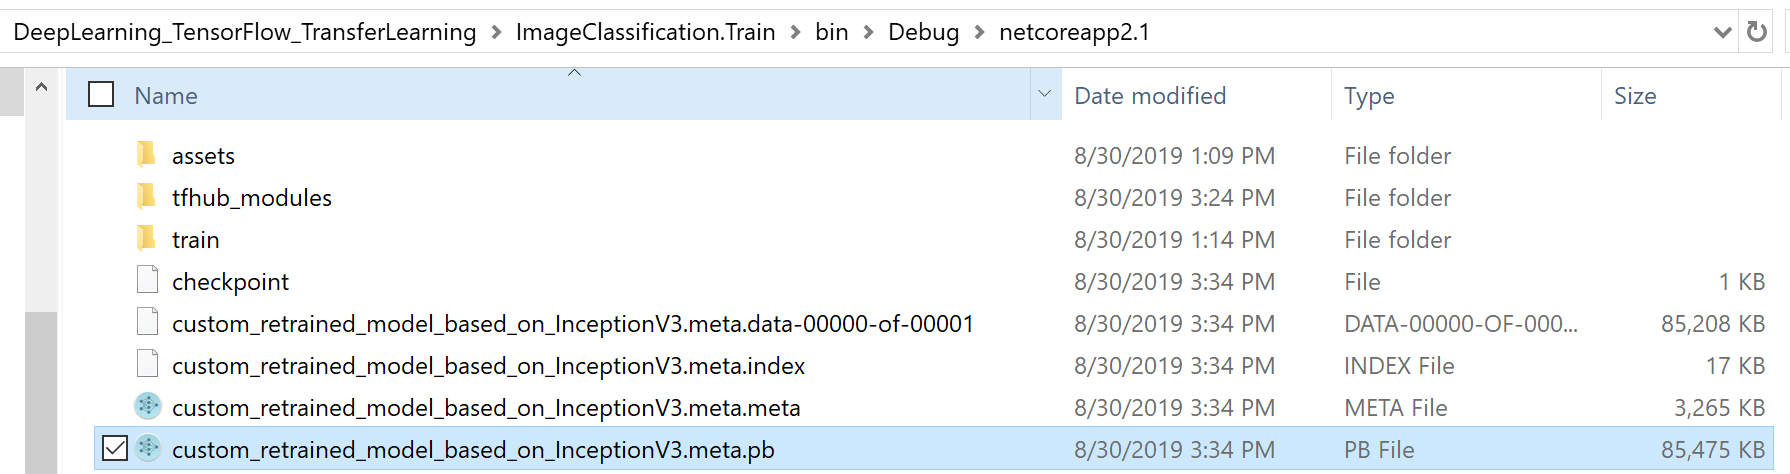
In the screenshot below you can see how you can see that retrained TensorFlow model (custom_retrained_model_based_on_InceptionV3.meta.pb) in Netron, since it is a native TensorFlow model.
By the way, note that you don’t need to understand/learn or even open the DNN model/graph with Netron in order to use it with the ML.NET API, by the way, I’m just showing it for folks familiar with TensorFlow to prove that the generated model is a native TensorFlow model:
Then, the generated ML.NET model .zip file model you use in C# is just like a wrapper around the new native retrained TensorFlow model. See the ML.NET model .ZIP file in Visual Studio:
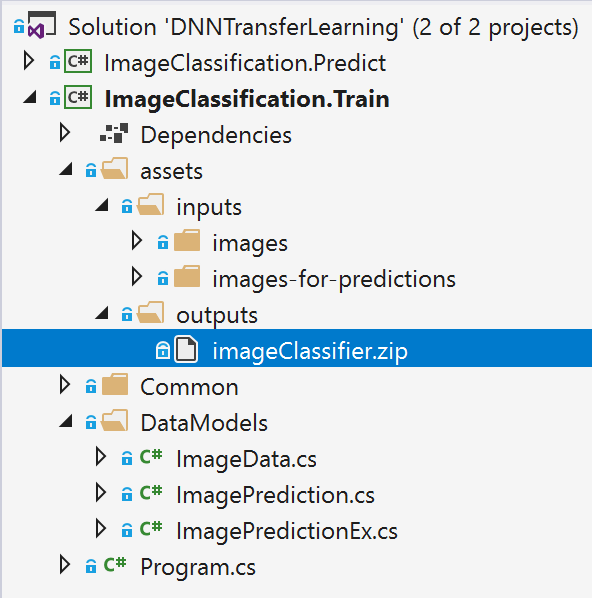
It must be highlighted though that the ML.NET model file (.zip file) is self-sufficient, meaning that it also includes the serialization of the TensorFlow .pb model inside the .zip file, so when deploying into a .NET application you only need the ML.NET model .zip file.
Implementing ‘ML.NET model training C# code’ using the ImageClassification API
Let’s stop talking about how this new feature was designed and internally implemented but show you how easy it is to use it.
The sample training app I’m showing below is publicly available at the ML.NET GitHub repo here:
Image Classification Model Training sample with ML.NET
Configure your project to use GPU or CPU
If your machine has a compatible GPU available (basically most NVIDIA GPU graphics cards), you can configure the project to use GPU.
Using CPU for training or inference/scoring
When using CPU, your project has to reference the following redist library:
SciSharp.TensorFlow.Redist(CPU training)
Sample references screenshot in training project using CPU:

Using GPU for training or inference/scoring
When using GPU, your project has to reference the following redist library (and remove the CPU version reference):
SciSharp.TensorFlow.Redist-Windows-GPU(GPU training on Windows)SciSharp.TensorFlow.Redist-Linux-GPU(GPU training on Linux)
Sample references screenshot in training project using GPU:

The dataset (Image set)
First things first. In order to train your own deep learning model you need to provide the images you want to train on. For this example, you need to have the images distributed in multiple folders and each folder’s name will be a different label (also called class).
In this example, I’m using an imageset with 200 image files you can download from here. Although that is a simplified imageset from the original which is a 3,600 files available from TensorFlow here.
The important point is that you must have a balanced dataset, meaning that you have to have the same (or very similar) number of images per image class. In my simplified dataset of 200 images I have 5 image classes and 40 images per class, as shown below:
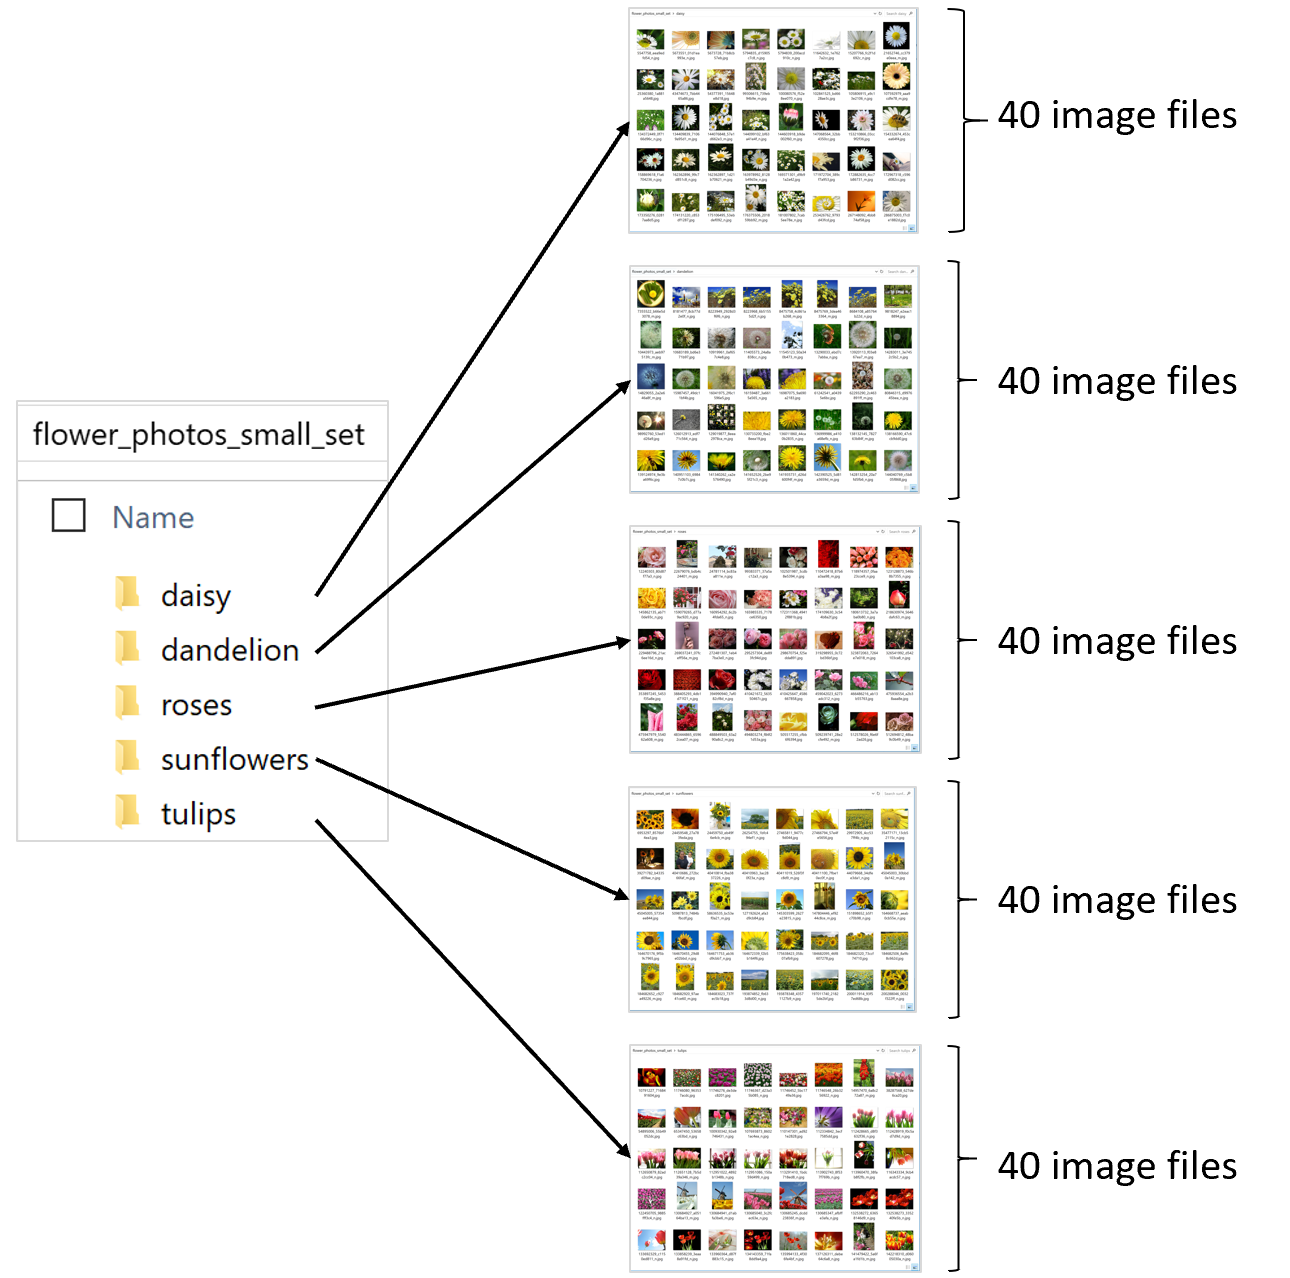
The name of each sub-folder is important because in this example that’ll be the name of each class/label the model is going to use to classify the images.
The data class
You need to have a data class with the schema so you can use it when loading the data, such as the following simple class:
    public class ImageData
    {
        [LoadColumn(0)]
        public string ImagePath;

        [LoadColumn(1)]
        public string Label;
    }
The boilerplate code: Code for downloading the image set and load into an IDataView and splitting in train/test datasets
The following code is using custom code for downloading the dataset files, unzip and finally load it into the IDataView while using each folder’s name as the image class name for each image.
// 1. Download the image set and unzip
string finalImagesFolderName = DownloadImageSet(imagesDownloadFolderPath);
string fullImagesetFolderPath = Path.Combine(imagesDownloadFolderPath, finalImagesFolderName);

MLContext mlContext = new MLContext(seed: 1);

// 2. Load the initial full image-set into an IDataView and shuffle so it'll be better balanced
IEnumerable images = LoadImagesFromDirectory(folder: fullImagesetFolderPath, useFolderNameasLabel: true);

IDataView fullImagesDataset = mlContext.Data.LoadFromEnumerable(images);
IDataView shuffledFullImagesDataset = mlContext.Data.ShuffleRows(fullImagesDataset);
You can research those custom methods (boiler code) in the sample.
In the last line of that code I’m shuffling the rows so the datasets will be better balanced (even distribution of rows per image class) when splitting in two datasets later (train/test datasets).
Now, this next step is very important. Since we want the ML model to work with in-memory images, we need to load the images into the dataset and actually do it by calling fit() and transform(). This step needs to be done in a initial and seggregated pipeline in the first place so the filepaths won’t be used by the pipeline and model to create when training.
// 3. Load Images with in-memory type within the IDataView and Transform Labels to Keys (Categorical)
IDataView shuffledFullImagesDataset = mlContext.Transforms.Conversion.
        MapValueToKey(outputColumnName: "LabelAsKey", inputColumnName: "Label", keyOrdinality: KeyOrdinality.ByValue)
    .Append(mlContext.Transforms.LoadRawImageBytes(
                                    outputColumnName: "Image",
                                    imageFolder: fullImagesetFolderPath,
                                    inputColumnName: "ImagePath"))
    .Fit(shuffledFullImageFilePathsDataset)
    .Transform(shuffledFullImageFilePathsDataset);
In addition we also transformed the Labels to Keys (Categorical) before splitting the dataset. This is also important to do it before splitting if you don’t want to deal/match the KeyOrdinality if transforming the labels in a second pipeline (the training pipeline).
Now, the dataset is split in two datasets, one for training and the second for testing/validating the quality of the mode.
// 4. Split the data 80:20 into train and test sets, train and evaluate.
TrainTestData trainTestData = mlContext.Data.TrainTestSplit(shuffledFullImagesDataset, testFraction: 0.2);
IDataView trainDataView = trainTestData.TrainSet;
IDataView testDataView = trainTestData.TestSet;
THE IMPORTANT CODE: Simple pipeline defining the model with the new ImageClassification API
As the most important step, you define the model’s training pipeline where you can see how easily you can train a new TensorFlow model which under the covers is based on transfer learning from a selected architecture (pre-trained model) such as Inception v3 or Resnet v2101.
// 5. Define the model's training pipeline using DNN default values
 var pipeline = mlContext.MulticlassClassification.Trainers
        .ImageClassification(featureColumnName: "Image",
                                labelColumnName: "LabelAsKey",
                                validationSet: testDataView)
    .Append(mlContext.Transforms.Conversion.MapKeyToValue(outputColumnName: "PredictedLabel",
                                                          inputColumnName: "PredictedLabel"));
The important line in the above code is the line using the mlContext.MulticlassClassification.Trainers.ImageClassification classifier trainer which as you can see is a high level API where you just need to provide which column has the images, the column with the labels (column to predict) and a validation dataset to calculate quality metrics while training so the model can tune itself (change internal hyper-parameters) while training.
Under the covers this model training is based on a native TensorFlow DNN transfer learning from a default architecture (pre-trained model) such as Resnet V2 50. You can also select the one you want to derive from by configuring the optional hyper-parameters.
It is that simple, you don’t even need to make image transformations (resize, normalizations, etc.). Depending on the used DNN architecture, the framework is doing the required image transformations under the covers so you simply need to use that single API.
Optional use of advanced hyper-parameters
There’s another overloaded method for advanced users where you can also specify those optional hyper-parameters such as epochs, batchSize, learningRate, a specific DNN architecture such as Inception v3 or Resnet v2101 and other typical DNN parameters, but most users can get started with the simplified API.
The following is how you use the advanced DNN parameters:
// 5.1 (OPTIONAL) Define the model's training pipeline by using explicit hyper-parameters

var options = new ImageClassificationTrainer.Options()
{
    FeatureColumnName = "Image",
    LabelColumnName = "LabelAsKey",
    // Just by changing/selecting InceptionV3/MobilenetV2/ResnetV250
    // you can try a different DNN architecture (TensorFlow pre-trained model).
    Arch = ImageClassificationTrainer.Architecture.MobilenetV2,
    Epoch = 50,       //100
    BatchSize = 10,
    LearningRate = 0.01f,
    MetricsCallback = (metrics) => Console.WriteLine(metrics),
    ValidationSet = testDataView
};

var pipeline = mlContext.MulticlassClassification.Trainers.ImageClassification(options)
        .Append(mlContext.Transforms.Conversion.MapKeyToValue(
            outputColumnName: "PredictedLabel",
            inputColumnName: "PredictedLabel"));
A few explanations of the above hyper-parameters:
- The DNN architecture (pre-trained model) such as Inception v3, or Resnet v2101: You can simply try any available DNN architectures (pre-trained models) in our API and use the one that gets better accuracy for your dataset. That will depend on the type of your images compared to the images used when training the original pre-trained model. For instance, if the base pre-trained models was trained with photos of objects, animals, plants and people versus a based model trained with black & white images or even digits/numbers (such as MINST).
- Epoch: An epoch is one learning cycle where the learner sees the whole training data set. The more learning cycles, the more accuracy you’ll get up to a point where you don’t need any more cycles. But the more learning cycles you do, the more time you’ll need to train.
- BatchSize: It sets the number of images to feed the model at a time. It needs to divide the training set evenly or the remaining part won’t be used for training. If this value is very small, it will be over-fitting (it’ll models the training data too well) and therefore when predicting on new data some images might be recognized wrong because it is trying to match the learnt data too close and the it’ll negatively impact the models ability to generalize. On the other hand if the batchsize is too large, it might underfit (model that can neither model the training data nor generalize to new data). This parameter also depends on how many images you have for training (tens vs. hundreds vs. thousands vs. millions).
Cons and pros and areas of improvements for the ImageClassification API
Pros:
- Simplicity: Even when you might not know what the mentioned parameters are (DNN architecture, epoch, batchSize), compared to low level TensorFlow API it is very much simplified. The fact that you simply need to select a DNN architecture from our ‘catalog’ means that internally it’ll make the needed image transformations (such as image resizing, normalization, etc.) for you depending on that DNN architecture. Other than that, if you where providing the DNN architecture file (pre-trained model), you’d need to know how each DNN architecture expects the size of the images plus additional configuration needed (As that is the case for the other methods explained later).
Cons:
- Limited collection of DNN architectures in the catalog: Precisely, derived from the simplicity goal and the fact that we’re doing the ‘hard work’ for you depending on the selected DNN architecture, that also means that you can only select/use an architecture provided by our catalog, at least with this high level API. We’ll have other APIs more flexible where you’ll be able to provide your selected DNN architecture, however in that case you’ll need to know many more details about it and provide those parameters.
The rest of the steps for training, evaluating and consuming your model
The rest of the steps such as training by calling trainedModel.Fit(), evaluating the model with the quality metrics and trying/consuming the model with some predictions are pretty similar to the way you do it for any other ML.NET model so I’m not going to explain it here. You can learn about it in the training sample app itself, here:
Image Classification Model Training sample with ML.NET
See it working!
When running the sample above, the console app will automatically download the image-set, unpack it, train the model with those images, validate the quality of the model my making many predictions using the test dataset (split set of images not used for training) and showing the metrics/accuracy:
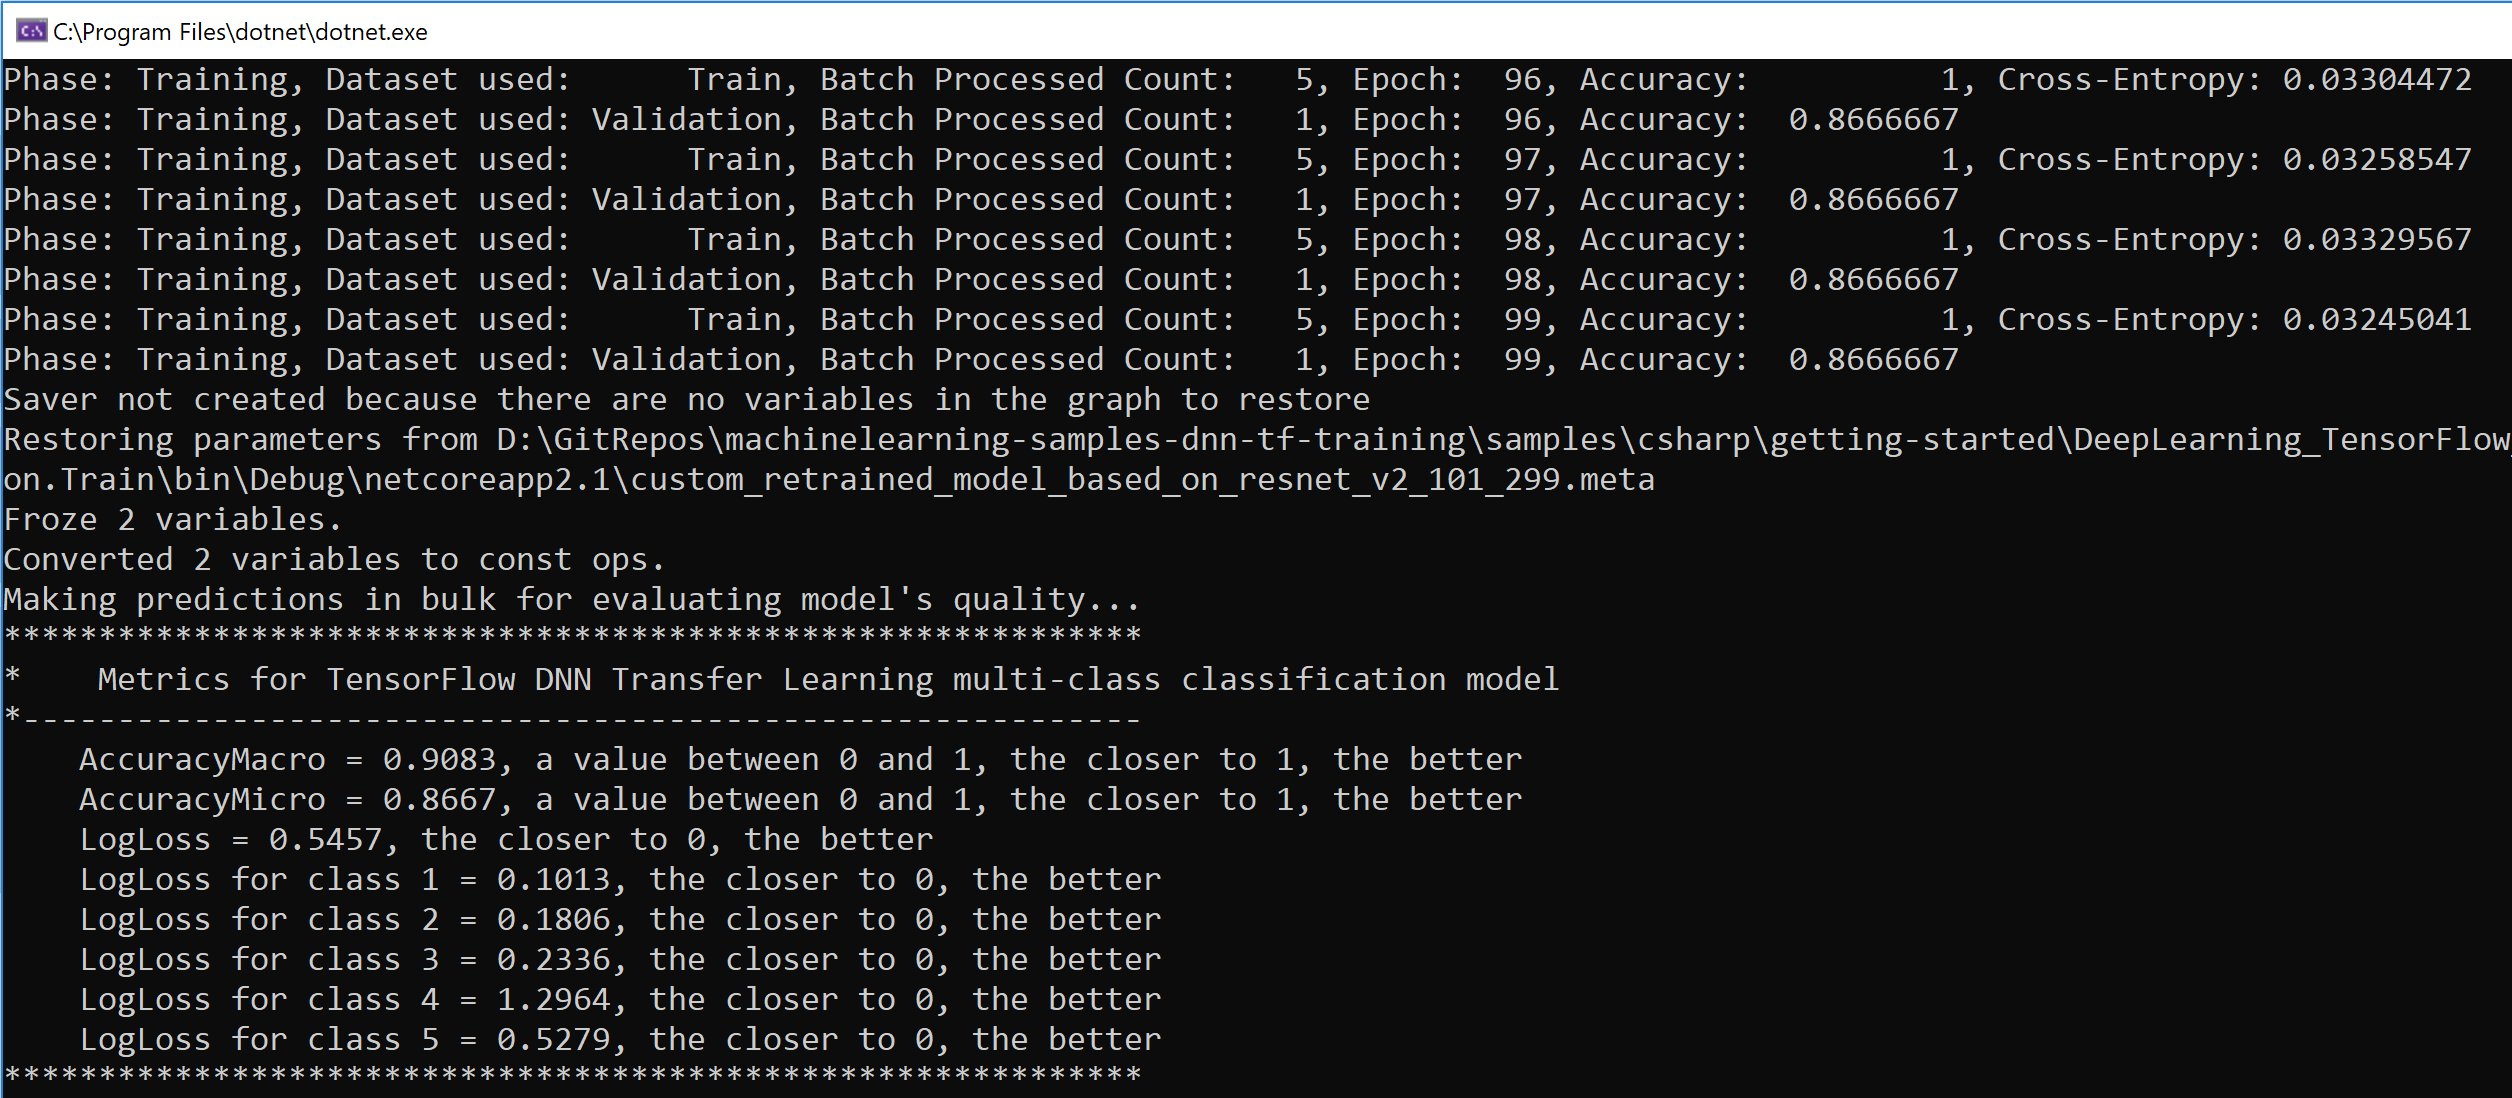
And finally it’ll show you all the test predictions used for calculating the accuracy/metrics a even a further single try/prediction with another image not used for training:

At this point, I have told you the main approach we’re currently recommending to use for Image Classification model training in ML.NET and where we’ll keep investing to improve it, so you can stop reading the Blog Post if you want unless you also want to know about the other possible ways of training a model for image classification based on a different type of transfer learning which is NOT TensorFlow DNN native (it doesn’t create a new TensorFlow model) because it uses an ML.NET trainer “on top” of the base DNN model that only works as a featurizer. Keep reading if you want to know more about it… 😉
B. Model composition of a pretrained TensorFlow model working as image featurizer plus a ML.NET trainer as the model’s algorithm
This method or approach is available in ML.NET since v1.0. It is also described in detail in this Tutorial/ Walkthrough :
Plus we also have this sample in the ML.NET GitHub repo:
Since you have detailed ste-by-step in those resources above, what I’m going to do for this blog is to highlight what this approach is doing under the covers, what are the main issues and complex details about the TensorFlow pre-trained model (DNN architecture) the user needs to know about, which is why we’re working on the previous approach trying to simplify the ‘Computer Vision’ scenarios in ML.NET while providing native DNN power and flexibility.
The problem to solve
The problem is ‘Image Classification’. Same problem than the one targeted by the previous approach.
Nothing new here.
The approach
This approach mixes a pre-trained Deep Learning model (DNN architecture) simply used used to generate features from all images with traditional ML.NET algorithms (using a multi-class classification ML Task trainer such as the LbfgsMaximumEntropy).
In more detail, you use the Inception model as a featurizer. This means that the model will process input images through the neural network, and then it will use the output of the tensor which precedes the classification. This tensor contains the image features, which allows to identify an image.
Finally, these image features will feed into an LbfgsMaximumEntropy algorithm/trainer which will learn how to classify different sets of image features.
You can see that approach in a visual illustration below:
![]()
You can see that the process and produced assets are different compared to the approach #1 where we are training a new TensorFlow model.
In this case, we are not training in TensorFlow but simply using a TensorFlow pre-trained model as featurizer to feed a regular ML.NET algorithm and therefore the only thing that is produced is a ML.NET model but not a new retrained TensorFlow model.
The code
Let’s see the code of this mentioned Sample training app: Image Classification Training (Model composition using TensorFlow Featurizer Estimator) per sections.
The boilerplate code: Code for downloading the image set and load into an IDataView and splitting in train/test datasets
That code is almost exactly the same than in the native DNN Transfer Learning explained at the begining of the blog post, so nothing new here. You can see it here:
The complex code: Code with ‘magic’ names and settings related to the TensorFlow model being used
The first thin you’ll notice when reviewing this code is that there are quite a few configuration settings that might sound pretty much like “How would I find out these parameters?“, such as in this code:
private struct ImageSettingsForTFModel
{
  public const int imageHeight = 299;    //224 for Inception v1 --- 299 for Inception v3
  public const int imageWidth = 299;     //224 for Inception v1 --- 299 for Inception v3
  public const float mean = 117;         // (offsetImage: ImageSettingsForTFModel.mean)
  public const float scale = 1/255f;     // 1/255f for InceptionV3. Not used for InceptionV1
  public const bool channelsLast = true; //false for Inceptionv1 | true for Inceptionv1
}
In fact, those values usually depend on the pre-trained TensorFlow model you are using. For instance, the values shown in the struct are the right ones when using the Inception v3 pretrained model, and the values commented on the right are the ones needed if using the InceptionV1 pretrained model. Basically, the image size needs to be different, the re-scale value, etc.
The way you can find out those configuration values is not straightforward since you need to research what are the requirements of the pre-trained TensorFlow model probably by investigating some other sample using the same model in Python or through any documentation available for that DNN architecture. Definitively not straight forward! 😉
Then it comes the ‘fun part’ which is the pipeline definition for the images transformation, as shown in this code:
var dataProcessPipeline = mlContext.Transforms.Conversion.MapValueToKey(outputColumnName: LabelAsKey, inputColumnName: "Label")
     .Append(mlContext.Transforms.LoadImages(outputColumnName: "image_object", imageFolder: imagesFolder, inputColumnName: nameof(DataModels.ImageData.ImagePath)))
     .Append(mlContext.Transforms.ResizeImages(outputColumnName: "image_object_resized",
                                               ImageSettingsForTFModel.imageWidth, ImageSettingsForTFModel.imageHeight,
                                               inputColumnName: "image_object"))
     .Append(mlContext.Transforms.ExtractPixels(outputColumnName:"input", inputColumnName:"image_object_resized",
                                                interleavePixelColors:ImageSettingsForTFModel.channelsLast,
                                                offsetImage:ImageSettingsForTFModel.mean,
                                                scaleImage:ImageSettingsForTFModel.scale))  //for Inception v3 needs scaleImage: set to 1/255f. Not needed for InceptionV1.
     .Append(mlContext.Model.LoadTensorFlowModel(inputTensorFlowModelFilePath).
                    ScoreTensorFlowModel(outputColumnNames: new[] { "InceptionV3/Predictions/Reshape" },
                                         inputColumnNames: new[] { "input" },
                                         addBatchDimensionInput: false));  // (For Inception v1 --> addBatchDimensionInput: true)  (For Inception v3 --> addBatchDimensionInput: false)
The actions (method names) transforming the images look logical although too verbose:
- Load Images
- ResizeImages
- ExtractPixels
- LoadTensorFlowModel
- ScoreTensorFlowModel
But couldn’t a higher level API do all those steps for me (That’s what we’re currently doing in the previous approach 😉 ).
And most of all, how can you find out those additional “magic strings” such as the following?:
Values for Inception V3:
- outputColumnNames: new[] { “InceptionV3/Predictions/Reshape” }
- inputColumnNames: new[] { “input” }
- addBatchDimensionInput: false
Values for Inception V1:
- outputColumnNames: new[] { “softmax2_pre_activation” }
- inputColumnNames: new[] { “input” }
- addBatchDimensionInput: true
Well, it turns out that those “magic strings” are precisely the names of the input tensor and the output tensor name of the penultimate layer (the layer that generates the image features) as named within the specific pre-trained TensorFlow model you are using (InceptionV3, InceptionV1, ResNet, etc.). If you open the TensorFlow frozen graph file (.pb file) with Netron, you can see it as shown in the following illustration (Note that in the illustration it is using the values needed for InceptionV1):
![]()
Then, the rest of the code is about adding the regular ML.NET multi-class classification trainer (in this case LbfgsMaximumEntropy), train the model by running Fit(), evaluating the model and finding out the metrics such as accuracy, etc. the same way you’d do with other ML.NET models when creating/training it, as in the following code:
//Add the ML.NET trainer/algorithm to the training pipeline
var trainer = mlContext.MulticlassClassification.Trainers.LbfgsMaximumEntropy(labelColumnName: LabelAsKey,
                                                            featureColumnName: "InceptionV3/Predictions/Reshape");  //"softmax2_pre_activation" for Inception v1
var trainingPipeline = dataProcessPipeline.Append(trainer)
                                            .Append(mlContext.Transforms.Conversion.MapKeyToValue(PredictedLabelValue, "PredictedLabel"));

// 4. Train the model
ITransformer model = trainingPipeline.Fit(trainDataView);

// 5.1 Make bulk predictions and calculate quality metrics
IDataView predictionsDataView = model.Transform(testDataView);

// 5.2 Show the performance metrics for the multi-class classification
var classificationContext = mlContext.MulticlassClassification;
var metrics = classificationContext.Evaluate(predictionsDataView, labelColumnName: LabelAsKey, predictedLabelColumnName: "PredictedLabel");
ConsoleHelper.PrintMultiClassClassificationMetrics(trainer.ToString(), metrics);

// 6. Save the model to assets/outputs
mlContext.Model.Save(model, predictionsDataView.Schema, outputMlNetModelFilePath);
Notice how you need to specify what’s the output tensor name (InceptionV3/Predictions/Reshape if using InceptionV3) providing the image features as the name of the input column name for the ML.NET trainer/algorithm.
Finally, I also want to highlight that in this approach the only output produced by the training is the ML.NET model (.zip file) since we are not retraining a new TensorFlow model as we were doing in the approach number 1 in this Blog Post, but simply using the image features produced by the TensorFlow model to train a ML.NET model, as shown in the following illustration:
![]()
So, yeah, this approach is pretty flexible. You can use any pretrained TensorFlow model (DNN architecture) you’d like, but from an usage and simplicity point of view is far from ideal, right?
That’s why we are improving the API experience with simpler approaches as the approach #1 currently in ML.NET 1.4-Preview.
C. Model composition of a pretrained ONNX model working as image featurizer plus a ML.NET trainer as the model’s algorithm
This approach is pretty similar to the previous one which was using a TensorFlow model as image featurizer and then adding a classical ML.NET trainer/algorithm at the end of the pipeline. However, in this case, instead of using a TensorFlow model as image featurizer, you use an ONNX model as image featurizing.
You can see example code for a pipeline below.
The estimators ‘LoadImages’, ‘ResizeImages’ and ‘ExtractPixels’ are the same methods than when using the TensorFlow model, but you need to provide the right parameters depending on your chosen pre-trained model or DNN architecture (such as ResNet18 selected below) because the size of the images (224×224) and other features might change depending on that:
var dataProcessPipeline = mlContext.Transforms.Conversion.MapValueToKey("Label", "Label")
.Append(mlContext.Transforms.LoadImages("ImageSource_featurized", @"C:\MyPathToImages", "ImageSource"))
.Append(mlContext.Transforms.ResizeImages("ImageSource_featurized", 224, 224, "ImageSource_featurized"))
.Append(mlContext.Transforms.ExtractPixels("ImageSource_featurized", "ImageSource_featurized"))
.Append(mlContext.Transforms.DnnFeaturizeImage("ImageSource_featurized", m => m.ModelSelector.ResNet18(mlContext, m.OutputColumn, m.InputColumn), "ImageSource_featurized"))
.Append(mlContext.Transforms.Concatenate("Features", new[] { "ImageSource_featurized" }))
.Append(mlContext.Transforms.NormalizeMinMax("Features", "Features"))
.AppendCacheCheckpoint(mlContext);

// Set the training algorithm
var trainer = mlContext.MulticlassClassification.Trainers.OneVersusAll(mlContext.BinaryClassification.Trainers.AveragedPerceptron(labelColumnName: "Label", numberOfIterations: 10, featureColumnName: "Features"), labelColumnName: "Label")
.Append(mlContext.Transforms.Conversion.MapKeyToValue("PredictedLabel", "PredictedLabel"));
var trainingPipeline = dataProcessPipeline.Append(trainer);
Therefore, the important and different estimator to use in this approach is the estimator named ‘DnnFeaturizeImage’ where you specify any of the available DNN architectures such as ResNet.
Finally, you concatenate all the input features, add a trainer algorithm of type multi-class classification (in this case I’m using OVA+AveragedPerceptron) and fit the model.
As mentioned, the result is pretty similar to the scenario where you use a TensorFlow model as image featurizer meaning that you just get an ML.NET model which is internally doing a ‘model composition’ by using in this case the ONNX model as featurizer plus the ML.NET trainer. But, similarly, in this case you are not natively training in TensorFlow or any Deep Learning library such as TensorFlow, Caffe or PyTorch as you do in the first approach explained at the beginning of the article which has significant benefits explained above.
In any case, this is a good approach, works pretty good and it is in GA release state.
In fact, the initial/early preview versions of the image classification feature in Model Builder (Visual Studio .VSIX extension) is using this ‘Model composition approach with the ONNX image featurizing’ until the native deep learning transfer learning API is finalized and stable. At that point (pretty soon) we’ll migrate the internal code in Model Builder to use the first approach (native Deep Learning Transfer Learning using TensorFlow training) explained in this blog post.
Takeaways
There are three ways to train an image classifier model in ML.NET:
- Native Deep Learning model training (TensorFlow) for Image Classification (Easy to use high-level API – In Preview)
- Model composition of: A pretrained TensorFlow model working as image featurizer plus a ML.NET trainer as the model’s algorithm
- Model composition of: A pretrained ONNX model working as image featurizer plus a ML.NET trainer as the model’s algorithm
But moving forward we encourage you to try and use the new Native Deep Learning model training (TensorFlow) for Image Classification (Easy to use high-level API – In Preview) because of the reasons explained.
Happy coding!
Hi
your tutorial was to much helpful
but now I'm face one issue.
i downloaded this sample project ( DeepLearning_ImageClassification_Training)
on training line : ITransformer trainedModel = pipeline.Fit(trainDataView);
i have one exception:
System.FormatException: 'Tensorflow exception triggered while loading model.'
Inner Exception: DllNotFoundException: Unable to load DLL 'tensorflow' or one of its dependencies: 0xC000001D
I used SciSharp.TensorFlow.Redist: v2.2.0.1, then i shifted to use SciSharp.TensorFlow.Redist: v1.14.0
but still give me the same exception.
Any advise.
My Environment:
Visual Studio 2019 community
Windows 7 professional / Service Pack1
Processor: Intel(R) Core(TM)2 Duo CPU E8500 @ 3.16GHz
RAM: 11.0 GB (10.9 GB usable)
System Type:...
Hi! Thank for this introdcution to ML. Can you please elaborate on how to learn a model from scratch? We have hyperspectral images from plants and DNN Transfer Learning provides only poor results. Can you please comment on this?
Thanks,
Jan