Setting the sample ‘MY EVENTS’ modern application up & running
Setting the ‘MY EVENTS’ demo app up and running
This demo app (MY EVENTS) is the one we made and showed in the Visual Studio 2012 Launch keynote (Modern Apps keynote), in September 12th 2012: http://www.visualstudiolaunch.com/vs2012vle/Home
The main goal of this sample modern application is to provide a sample app where you can see most of the new technologies related to Visual Studio 2012, in a practical way.
Application context: The context is about an events/conferences management system called “My Events”, with many different scenarios and client apps depending on the users’ profile.
You can download this sample application from this URL:
http://code.msdn.microsoft.com/MY-EVENTS-Modern-Sample-9a42abc6
IMPORTANT: After downloading the .ZIP file, you need to unblock it as set it as a safe file, before unpackaging the solution .ZIP file. If you don’t do that, you might get VS frozen when trying to open the solution.
So, after downloading, go to the .ZIP file properties using Windows Explorer and press the ‘Unblock button’, like it is shown below:
DEVELOPMENT ENVIRONMENT (VISUAL STUDIO 2012)
Having the solution up and running in the dev environment is really easy.
First of all, after unpackaging the .ZIP file, you’d better get rid of that long path created by the long .ZIP name. If you don’t do it, you might get errors because of having a too long path.
You just need to open the solution MyEvents.sln and select the type of the client you want to run.
If it is the first time you run it, I’d start with the Web App.
Running the MY EVENTS Web app in Visual Studio
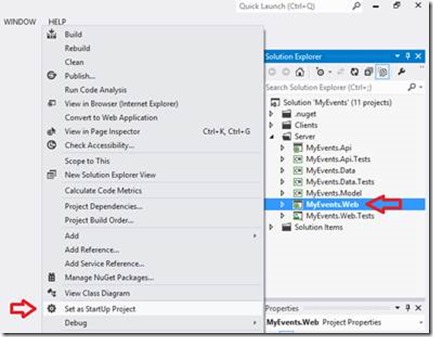
You just need to make it as the default app (‘Set as StartUp Project’), and run it!.
The database (SQL Server LocalDB) will be created for you the first time you run the app, adding a bunch of sample data (events, speakers, attendees, etc.) thanks to the Entity Framework Initializers we are using.
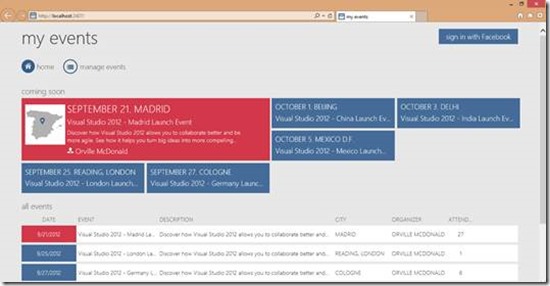
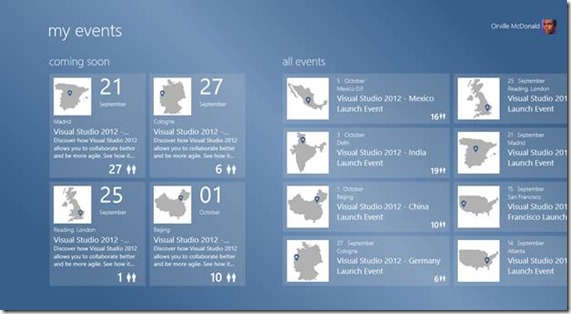
When running the web app, you should see something like the following:
Depending on the date you run it.., if you don’t see any event, you are running it quite a lot days before Sept 12th 2012 and then you’d need to take a look to our initializers (Project ‘Data’ – Initializers — Events) and change the date of most of the events to be created (VisualStudioGlobalLaunchEvent.cs, VisualStudioAtlantaLaunchEvent.cs, VisualStudioMadridLaunchEvent.cs, etc.).
TROUBLESHOOTING: If you are not getting data (the app works but shows no events, etc.), it could be because the initial data generation was stopped for any reason, then the database is empty.
You have to simple solutions:
1.- Force Entity Framework and our data initializers to generate the data:
– Go to the ‘MyEvents.Data’ project.
– Open the file MyEventsContextInitializer.cs within the Initializers folder.
– You’ll see a class called ‘MyEventsContextInitializer’. It should be deriving from ‘DropCreateDatabaseIfModelChanges’, right?
– Now, go and change that so the ‘MyEventsContextInitializer’ now derives from the class ‘DropCreateDatabaseAlways’. (You’ll see it commented in the code).
– Run again the Web Site. It should take a few minutes, as it is generating the data.
– IMPORTANT!!: After you see the data, change again that code to the original parent class (‘DropCreateDatabaseIfModelChanges’). If you don’t do that, every time you run the app, it will always generate the data!!
2.- Another workaround is to change the name of the database in the ENTITY FRAMEWORK connection string, in the Web.config file. It will detect that it doesn’t have a database, so it will generate it. But you will have it with a different name. You can check the database files within your profile folder, for instance, Users–>Administrator profile folder, if you are using the Administrator user to run Visual Studio.
Running the WINDOWS client apps from Visual Studio
If you want to run any of the Windows client app, whether it is the WPF client app, the Windows 8 Store App (XAML/C#), or the Windows 8 Store App (HTML5/WinJS), you will always need to start & run the WebAPI Services site at the same time.
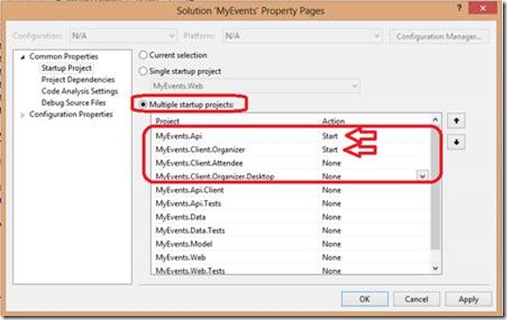
So, for instance, let’s say we want to run the Windows 8 Store App (XAML/C#). We need to go to the solution’s properties and select ‘Multiple startup projects’, and to specify the MyEvents.Api to start and then the client app you also want to run (for instance, the client.Organizer which is the Windows 8 XAML app):
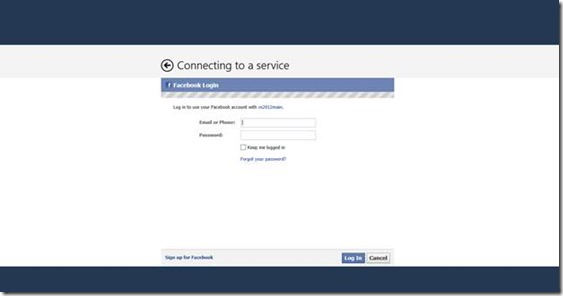
Therefore, when you start debugging/running the app, the first thing you’ll see is a Facebook auth page request, like the following:
Then, after logging into Facebook with any user ID, you’ll see the Windows Store App, like the following (but because this could be the first time you run this app and you don’t really own any event related to your Facebook credentials, you might not see any event until you create it):
Setting the Facebook configuration in your projects
When you download the code, the Facebook credentials might work (for instance, authenticating from the Web app), but only because it is based on a public Facebook App definition I created and have in the Internet. But, if I delete that definition, it won’t work.
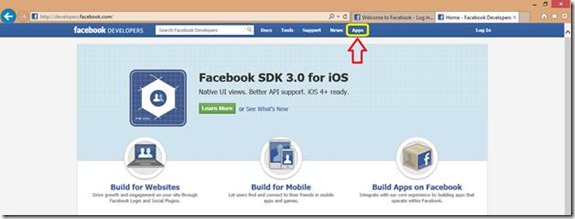
Therefore, you should create your own Facebook app definition in http://developers.facebook.com/ :
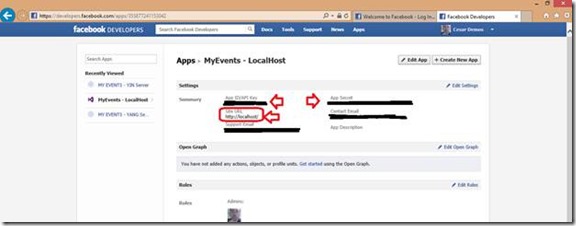
When you go to that site, you can create Facebook apps. In this case, we just need them for authentication purposes, so the only info we need to provide to those apps are the FaceBook App’s IDs (App-ID and App-Secret) and the callback URL (in this case, while running on Visual Studio, the URL would be http://localhost, but if you want to deploy it on a real server, you’ll need to create a new Facebook App with a different URL, like http://myserver.mydomain.com/ ).
After you have your own Facebook IDs, then go to Visual Studio and update the app:
Web App
1. Go to the Web Site MyEvents.Web project and open the Web.config file
2. Update the keys FacebookAppId and FacebookAppSecret with your IDs.
OPTIONAL: Configuring a “PRODUCTION” ENVIRONMENT on a Full IIS (Internet Information Server)
When deploying the application (web-app and WebAPI Services) to IIS, we need to configure quite a few more points.
Create and configure the Web Sites in IIS
We first need to create the WebSites we are going to use in IIS. We could have used the same web site for the web ASP.NET MVC app and the WebAPI Services, but in order to have the services decoupled from the web app, we chose to have a separated web site.
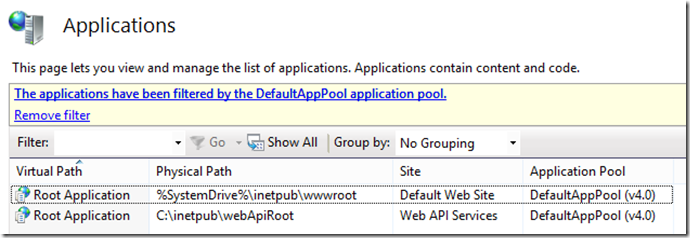
You can deploy the Web app in the default web site (port 80), and the WebAPI services in a second web site using the 8888 port, for instance:
IMPORTANT!: In order to use the same SQL Server LocalDB Database from both web sites, we must use the same Application Pool by the two WebSites. In this case, I specified that the new ‘Web API Services’ web site is also using the ‘DefaultAppPool (v4.0)’:
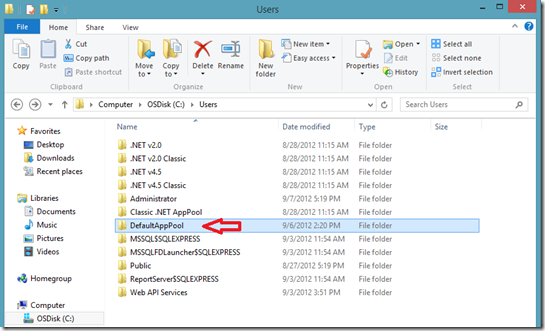
Other than that, if you use a different AppPool for each Web site, each web site will be using a different database, as LocalDB uses/creates the database within the user’s profile, in this case, the ‘DefaultAppPool’ profile. you can check that taking a look to the profiles’ forlders:
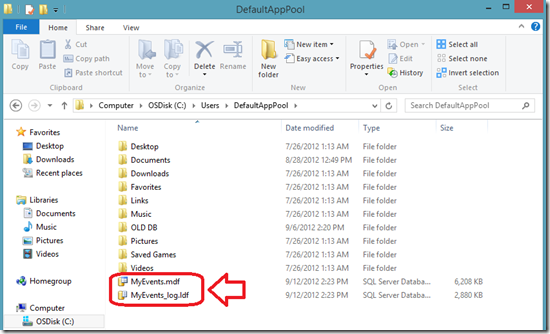
And then to the ‘DefaultApppool’ folder, where you can see the MyEvents database, if you ever executed the app properly (if you never executed this app on IIS, that folder won’t have the database, of course):
But, if you don’t use the same AppPool, you will have another database, in parallel, within the profile being used by the WebAPI Services site.
On the other hand, while executing both web sites in the development environment (Visual Studio and IIS Express) we didn’t have that problem because both are using the same identity which is the user you use to run Visual Studio (Administrator, for instance). You can check more info about SQL Server 2012 Express LocalDB, here: http://msdn.microsoft.com/en-us/library/hh510202.aspx
Btw, you can always “upgrade your system” and use a full SQL Server 2012 server. The only point you will need to change is the EF connection string.
Deploy the Web Sites (web-app and WebAPI) to IIS
This is quite traditional and easy, so I am not going how to deploy a web site to IIS. I’ll just say that my preferred way to do it is using the “Publish—>Web Deploy Package” from visual Studio, and then importing that package from IIS using the “Web Deployment Tool” in IIS MMC snapin (WebSite—>Deploy—>Import Application).
Change the WebAPI URL to be consumed
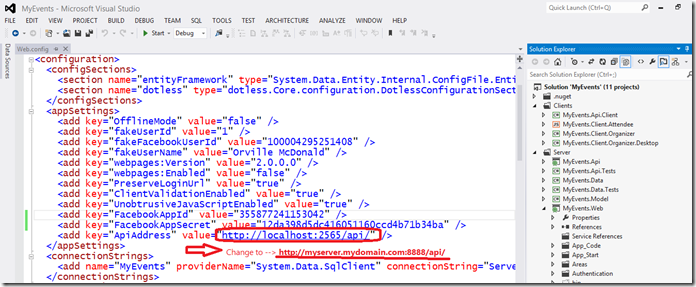
In the development version, we are consuming the WebAPI Services from this URL:
But now, in the final IIS Server web site, our URL should be this:
http://myservername.mydomain.com:8888/api/
So, you need to change that URL in the Web.config file within the MyEvents.Web project:
If you cannot have a fully qualified server name, you’ll have to put it in your client HOSTS file, just for testing purposes.
Also, this step needs to me made in order to have the SCHEDULER page working properly, so you are able to drag & drop any session, etc., as that page is consuming the WebAPI Services.
Configuring your server so LocalDB works on a full IIS
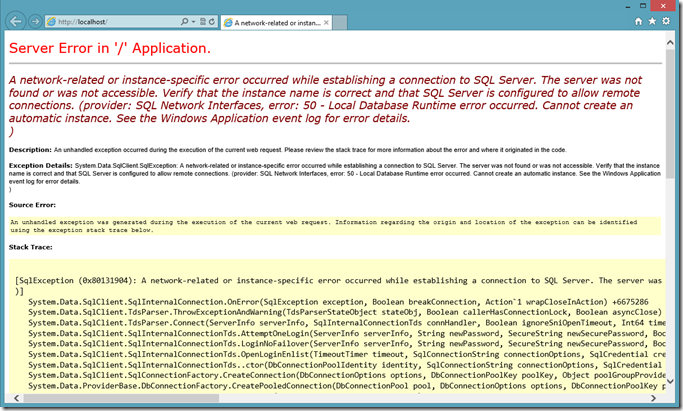
If you just went ahead running the web site MY EVENTS on IIS, you’d probably got the following error:
You can get mad checking SQL Server client config, protocols, te firewall, etc., and still it won’t work..
The issue with LocalDB and a full IIS, is that, like I already mentioned, LocalDB needs user profile to be loaded, but Profile environment is not enabled by default in IIS application pools.
Let’s take another look at the error:
System.Data.SqlClient.SqlException: A network-related or instance-specific error occurred while establishing a connection to SQL Server. The server was not found or was not accessible. Verify that the instance name is correct and that SQL Server is configured to allow remote connections. (provider: SQL Network Interfaces, error: 0 – [x89C50120])
The error message is not very helpful but LocalDB stores additional information in Windows Event Log. Looking in the Application section under Windows Logs we find the following message:
Cannot get a local application data path. Most probably a user profile is not loaded. If LocalDB is executed under IIS, make sure that profile loading is enabled for the current user.
Like I said, the problem we’re facing is that the user profile needs to be loaded. This requires editing applicationHost.config file which is usually located in C:\Windows\System32\inetsrv\config.
We can go ahead and change the default appPool config, or you could do it just for any specific AppPool. I just put it as default for all AppPools:
For more info, read KB 2547655.
Then, save the applicationHost.config file and make sure that you restart the Application Pool in order for the new settings are applied and run our Web Application again.
You should be able to run the WebApp now on IIS using you fully qualified server name. (By the way, the first time it’ll take a few minutes a sit needs to create and initialize the database in the profile).





 Light
Light Dark
Dark
0 comments