This post is an update (using Windows 10 and a newer version of Convert-WindowsImage.ps1) of a similar post I had in my blog about booting natively from a .VHDX file:
https://devblogs.microsoft.com/cesardelatorre/booting-windows-8-1-update-natively-from-a-vhdx-image/
I’m also publishing this for my own records and folks asking me about it, as it is not a super straight forward procedure..
This procedure is very useful when you need to boot Windows natively, but you need to have multiple different environments like when using BETA/RC versions of Visual Studio, dev tools or simply dual/multiple boots with different configuration and software installed but you don’t want to have any compromise in UI performance like when you use Hyper-V or any other virtual machine environment.
Doing this you don’t have to give up on performance, this is the real thing! you boot natively. This is NOT a VM (Virtual Machine) booting from Hyper-V.
This is native boot but instead of booting from files in a partition, you boot from files that are placed within a .VHDX file. But you boot natively!
Why would you want to boot natively? Here are a few reasons:
– Need to use Android emulators on top of any hypervisor like Hyper-V (Nested virtualization doesn’t have great performance..).
– If you want to deploy mobile apps from Visual Studio (Xamarin apps to Android or Windows devices, for instance), you’d need to connect those mobile devices to any USB port. But, Hyper-V VMs don’t support USB connections to devices.
– Want to get good UI/Graphics experience, as much as you PC can offer with your graphics card not being limited by any hypervisor, like Hyper-V
– In any case where you want to get good performance from your machine because what you get from a Hyper-V VM is not enough and at the same time you want to handle multiple environments within the same machine (although you’d be able to boot just one of them, of course).
Here’s some additional info if you want to know more about “Virtual Hard Disks (.VHD/.VHDX) with Native Boot”: http://technet.microsoft.com/en-us/library/hh824872.aspx
In the past, I used to follow more complex steps in order to create a Windows 8 or Windows 7 .VHD master image, then booting natively my machine by configuring the boot options with bcdedit. Here’s my old post: http://blogs.msdn.com/b/cesardelatorre/archive/2012/05/31/creating-a-windows-8-release-preview-master-vhd.aspx?wa=wsignin1.0
This is the way I currently do it. I’m using .VHDX format but you could also specify a .VHD (older) if you’d like.
Here are the steps. Pretty simple, actually!
1. You need to have any Windows .ISO image, like a “Windows 10 x64 – DVD (English)” from MSDN subscription, or any other version (any Windows 10 version and x64 or x86).
2. Download Convert-WindowsImage.ps1 from Microsoft TechNet Gallery ( https://gallery.technet.microsoft.com/scriptcenter/Convert-WindowsImageps1-0fe23a8f ) and copy it to a temporary directory. You can also download it from this .ZIP download in my Blog where I already wrote the function execution line
[Another way to create the .VHDX, that I haven’t tested, instead of using that PowerShell script is by using the DISM tool (Deployment Image Servicing and Management) from the Windows ADK) ]
3. Start the PowerShell console in administrator mode
4. Before executing the PowerShell script, you’ll need to allow scripts executions in the policies of your machine or user. If you want to allow that at a local machine scope, run the following command in the PowerShell console. IMPORTANT, run PowerShell with Admin rights (“Run as Administrator” mode):
Set-ExecutionPolicy Unrestricted -Scope LocalMachine
If you don’t run that command or you don’t have that policy in place, you’ll get an error like the following when trying to execute any PowerShell script:
For more info about those policies, read the following: http://technet.microsoft.com/library/hh847748.aspx
5. Edit the Convert-WindowsImage.ps1 file with Windows Powershel ISE (or with any editor, even NOTEPAD can work for this).
If using Windows Powershel ISE, you’d better run it with admin rights (“Run as Administrator” mode) so you can directly run the script with F5 afterwards.
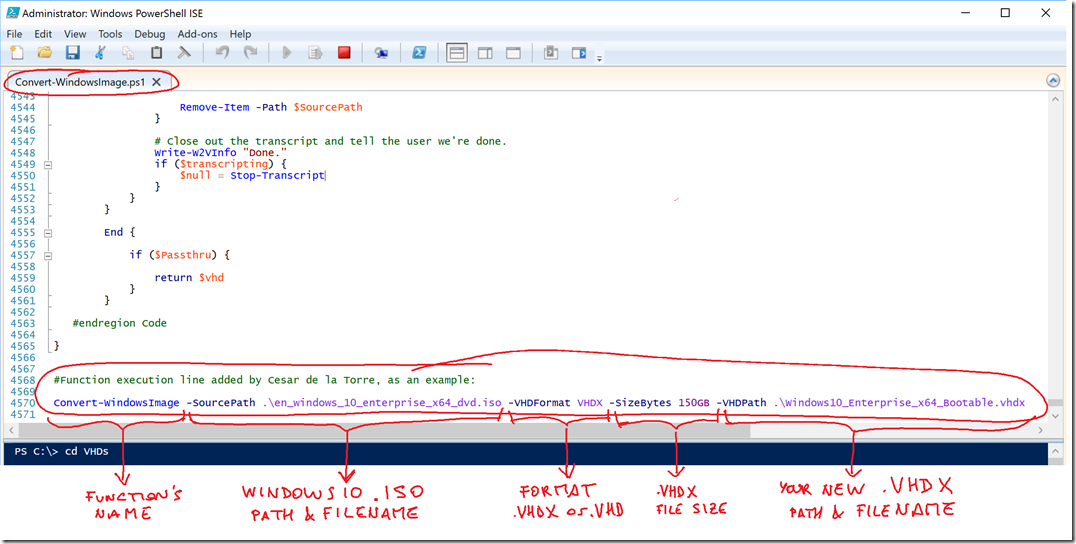
Then, add the following line at the end of the script (or update it with your .ISO image name and settings if you got my updated file:
Convert-WindowsImage -SourcePath .\en_windows_10_enterprise_x64_dvd.iso -VHDFormat VHDX -SizeBytes 150GB -VHDPath .\Windows10_Enterprise_x64_Bootable.vhdx
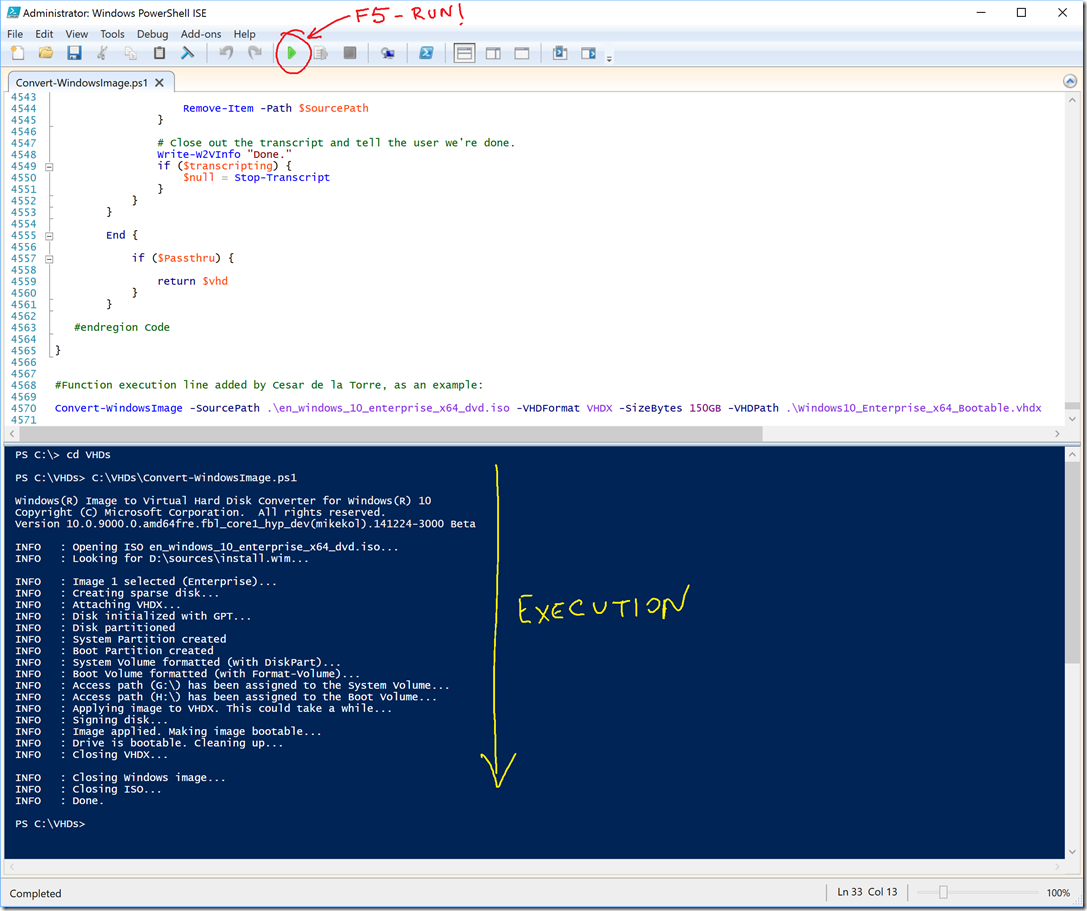
6. Now, run the script either from Windows PowerShell ISE (with F5) or running it from a plain PowerShell command-line (In both cases with Admin privileges)
It’ll be executed like the following screenshot. Be patient, it’ll take a while as it has to copy all the files from the Windows .ISO image to the logical drive based on the .VHDX file that has been created.
Since my .VHDX is Dynamic and it is still not mounted, its size was just something less than 8GB! 🙂
7. MOUNT the .VHDX as a drive in your machine
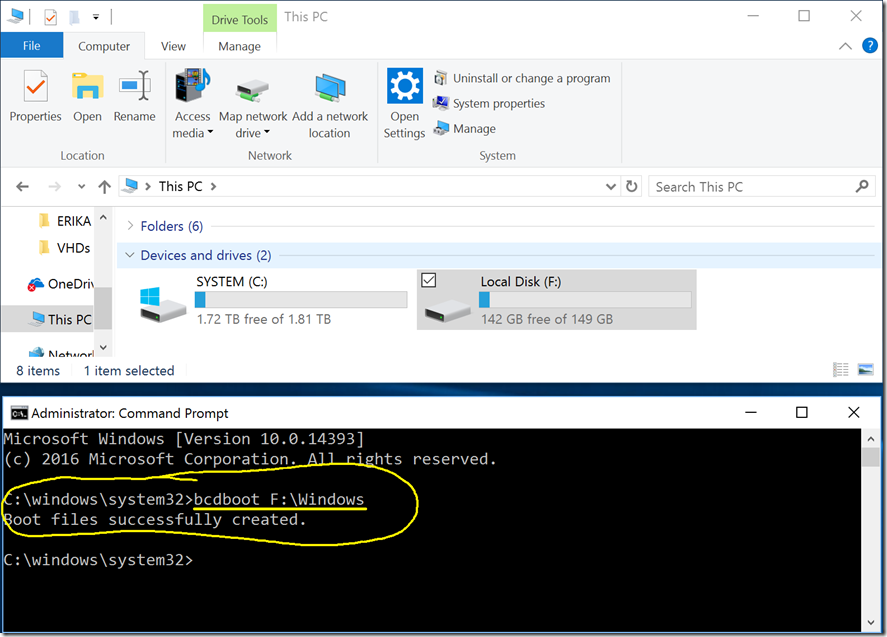
Right-click the VHDX and mount it. In my case I got the F: as my mounted drive.
8. Set the BOOT files within the .VHDX
The following steps are needed to make your computer boot from the VHDX file: a.Open an administrative command prompt via WIN+X Command Prompt (Admin) b.Type bcdboot F:\Windows in order to create the boot files in your .VHDX drive.
9. SAVE/COPY YOUR “MASTER .VHDX IMAGE FILE”!!!
At this point you have a “MASTER IMAGE .VHDX” that you could use in different machines/hardware since you still didn’t spin it up, therefore, it still doesn’t have any specific driver related to any hardware. Copy the Windows10_Enterprise_x64_Bootable.vhdx somewhere else so you’d be able to re-use it in multiple machines or in the same machine but for mutiple environments
10. Change the Boot Loader Description to the boot option’s name you’d like
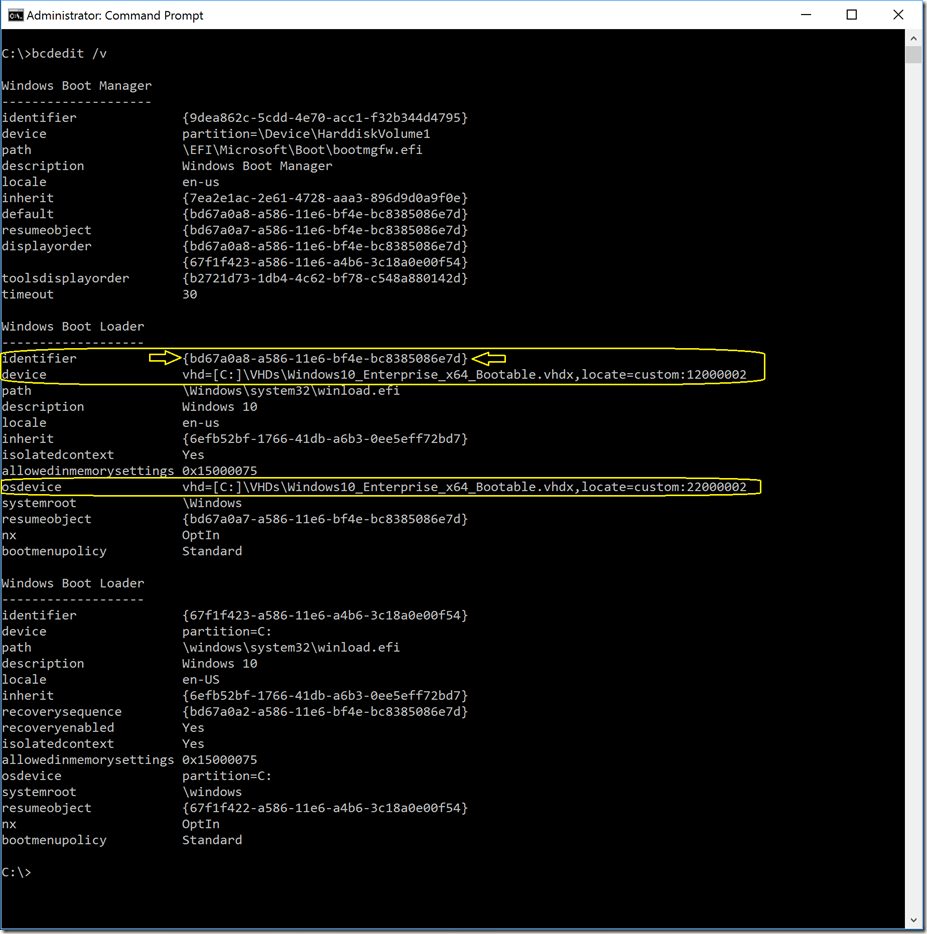
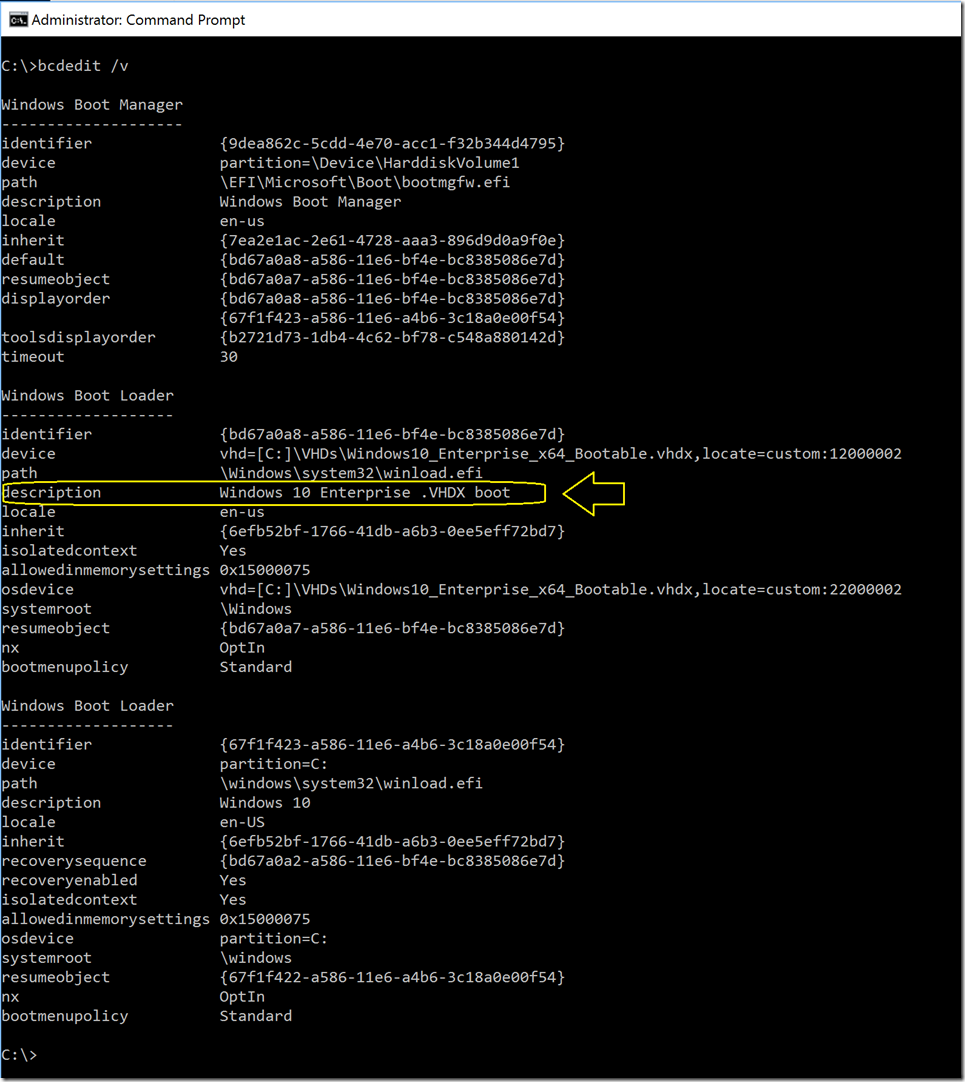
Type again bcdedit /v, search for the boot loader pointing to the .VHDX and copy its GUID.
Taking that GUID identifier you can change the description in your bootlist by typing something like:
bcdedit /set {bd67a0a8-a586-11e6-bf4e-bc8385086e7d} description “Windows 10 Enterprise – VHDX boot”
(Of course, you should have and use a different GUID..)
Check again with bcdedit /v that the descrption for your new boot loader has changed:
11. Re-enable Hyper-V if you had Hyper-V enabled in your original and normal boot partition
If you had configured Hyper-V on your Windows 8.1 computer, don’t forget to enable the hypervisor launchtype:
bcdedit /set hypervisorlaunchtype auto
When messing with the startup, it rebuilds your boot configuration data store. But it doesn’t know if Hyper-V needs to have some specific settings enabled in the boot configuration data store in order to start the hypervisor. In any case, this is not related and you just need to do it if you also have HyperV installed.
12. YOU CAN NOW RE-START YOUR COMPUTER AND FINISH THE WINDOWS INSTALLATION.
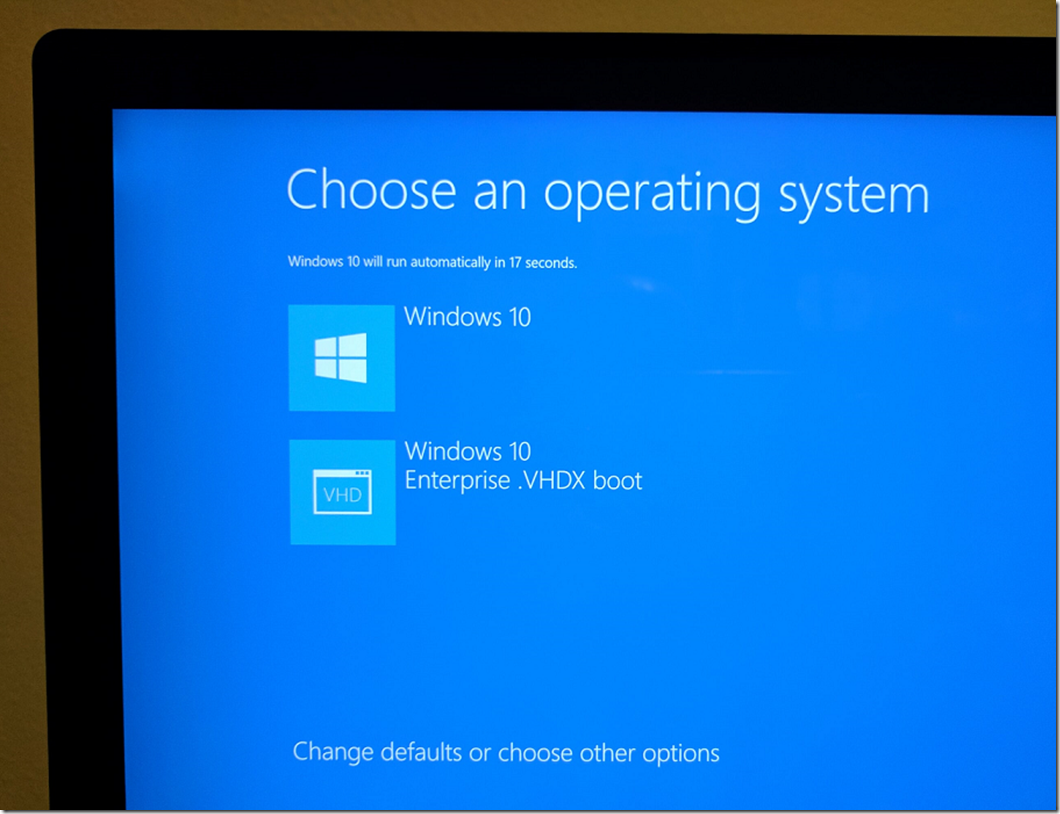
If you reboot your machine, you’ll be able to select the new NATIVE WINDOWS BOOT but from a .VHDX like in the following screenshot!
It’ll be just the final Windows installation detecting devices, applying drivers and final configuration/personalization, and YOU ARE GOOD TO GO!
Additionally, bcdedit has many useful options, like copying an entry for pointing to another .VHDX that you just copied in your hard drive, etc. Just type bcdedit /? to check it out or see other options that I explain at the end of my old post: http://blogs.msdn.com/b/cesardelatorre/archive/2012/05/31/creating-a-windows-8-release-preview-master-vhd.aspx?wa=wsignin1.0
END OF PROCEDURE
/////////////////////////////////////////////////////////////////////////////////////////////////////////////////////////////////////////////////////////////////////////////
CONFIGURING OTHER MACHINES OR MULTIPLE BOOT LOADERS FROM .VHDXs
If you copy the “MASTER .VHDX”, you could re-use it for multiple boots, even for other machines.
Here’s the procedure once you have an existing MASTER .VHDX already created.
First, copy and rename the .VHDX to a different name depending on what you will install, like “Windows_10_for_Testing_Betas.VHDX” or whatever. In my screenshots I’m still using a similar name than before, though.
1. Check initial boot loaders
You can configure the boot options of windows by using the command-line tool bcdedit.exe.
bcdedit /v
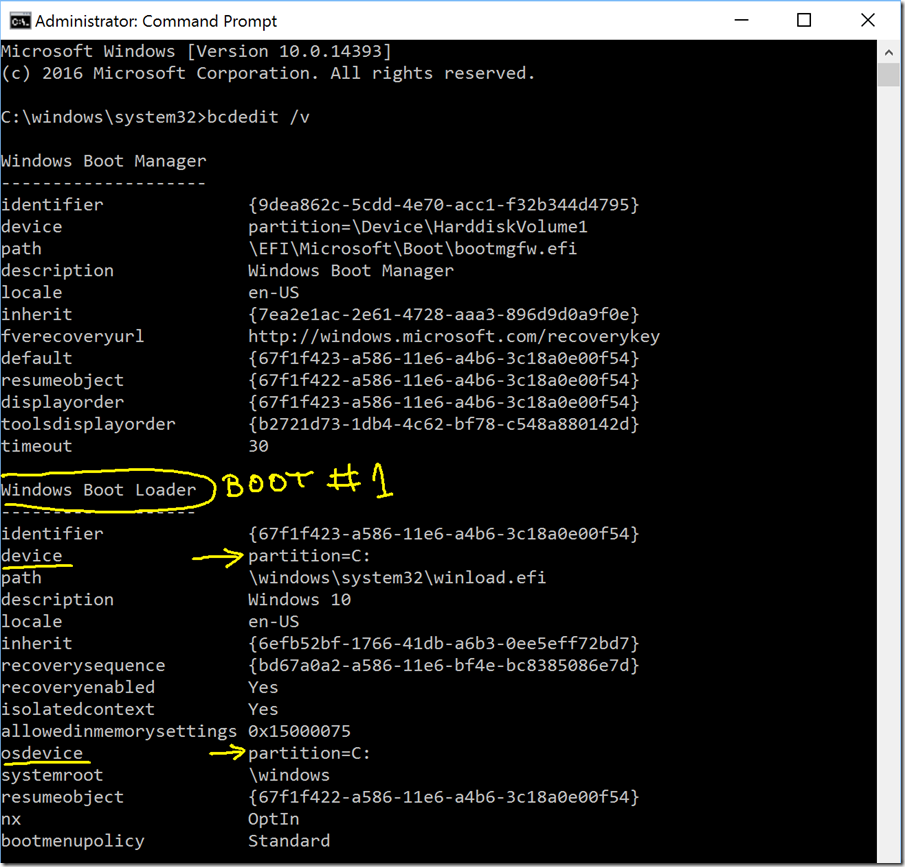
Let’s say you start in another computer with a single boot from a single regular partition, you’ll see a similar description to the following:
You can see that I currently just have a single boot loader, booting from the C: partition.
2 What we want to do is to create a second BOOT LOADER by copying the current Windows Boot Loader. Type:
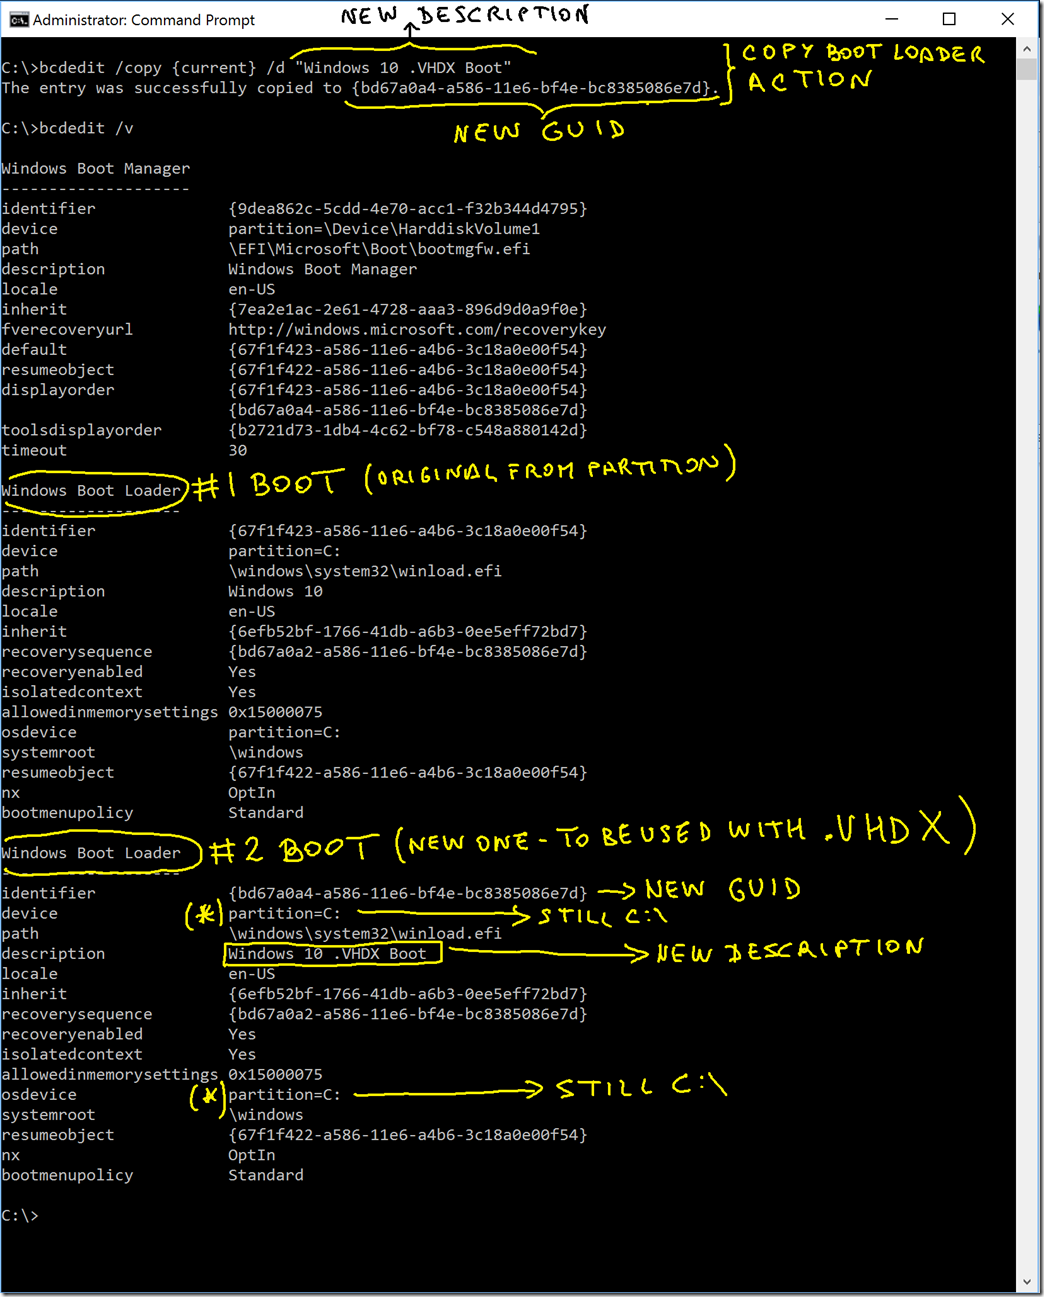
bcdedit /copy {current} /d “Windows 10 .VHDX Boot”
That line means you are copying the current Boot loader (the one I marked) but naming it with a different DESCRIPTION. And also, very important, when you copy any BOOT LOADER, the new copy will have a new GUID identifier, which is what you are going to use.
Then, type again bcdedit /v to see the new BOOT LOADER created:
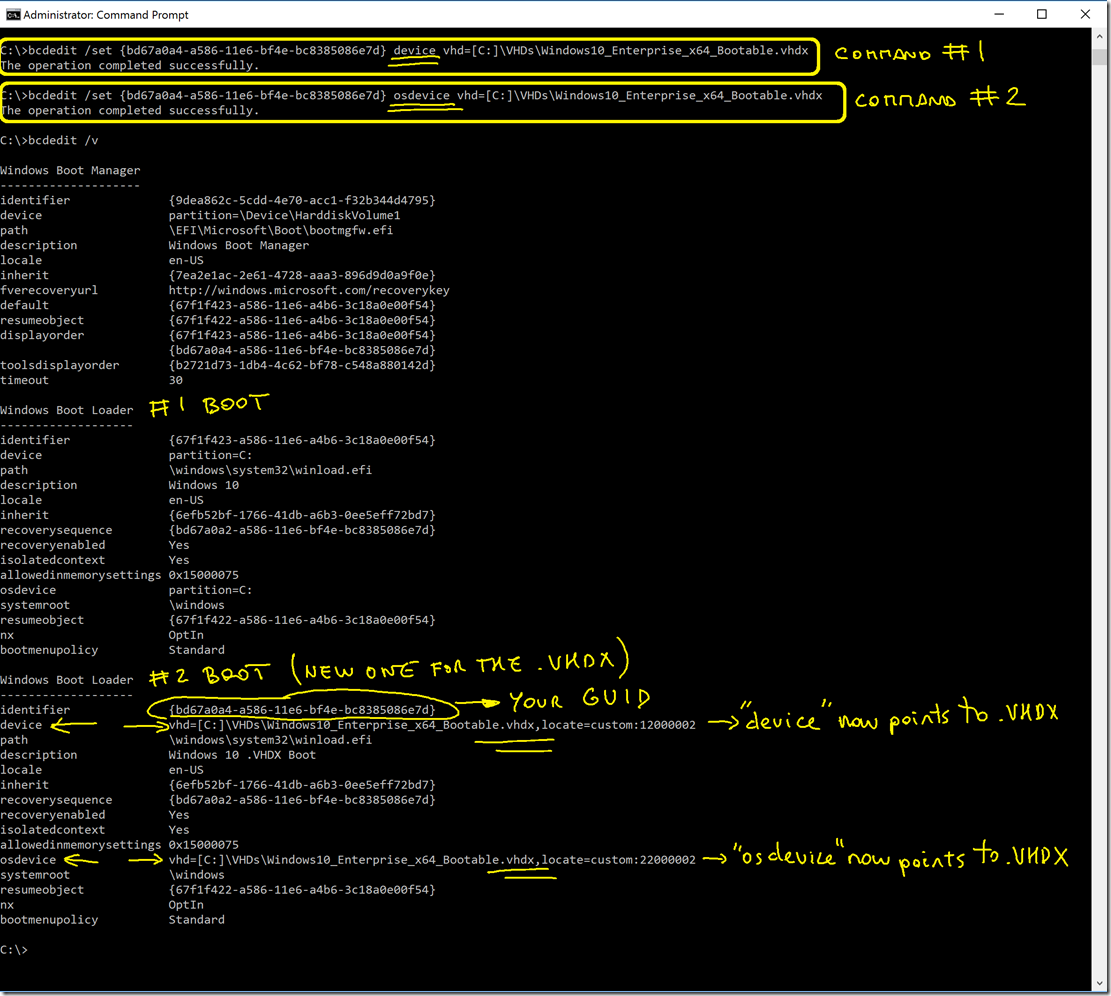
You can see how now you have a second BOOT LOADER (#2 BOOT) with a different GUID than the original (#1 BOOT).
It also has the new description applied like “Windows 10 .VHDX Boot”. You’ll see that description when selecting the Boot option when starting your machine.
However ,you are still not done, as that second BOOT LOADER is still pointing to the C:\ partition, and you want it to be pointing to the .VHDX file!
3 Copy the new GUID (from BOOT #2) with the mouse, so you can use it in the next step. In this case I copy: {bd67a0a4-a586-11e6-bf4e-bc8385086e7d}
4 In order to point BOOT LOADER #2 to your .VHDX file, type the following 2 commands:
bcdedit /set {My_new_GUID_Number} device vhd=[C:]\VHDs\Windows10_Enterprise_x64_Bootable.vhdx
bcdedit /set {My_new_GUID_Number} osdevice vhd=[C:]\VHDs\Windows10_Enterprise_x64_Bootable.vhdx
Note the difference in “device” and “osdevice”..
Now, you are done with the “hard” configuration.
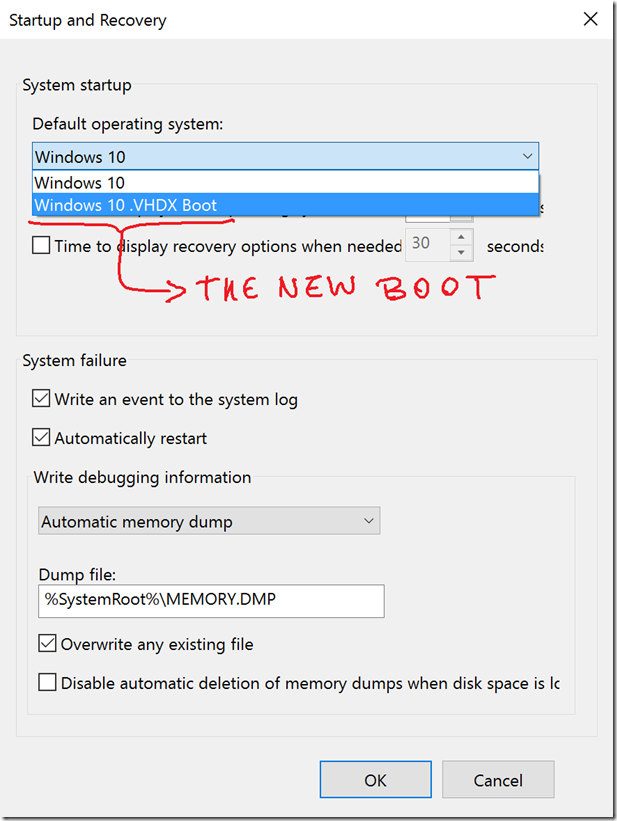
Check that you have this new boot from Computer properties –> Advanced System Settings –> Advaced –>Startup and Recvovery –>Settings button:
You can just reboot the machine and select the BOOT option for your new .VHDX, and it’ll boot natively from that .VHDX!
Other BCDEDIT configurations:
You can update your boot loaders with commands like the following using the GUID of the BOOT LOADER you want to change:
TO CHANGE THE DESCRIPTION
bcdedit /set {xxxxxxxx-xxxx-xxxx-xxxx-xxxxxxxxxxxx} description “Windows 7 .VHD Image”
COPY
bcdedit /copy {Original_GUID_Number} /d “my new description” or bcdedit /copy {current} /d “my new description” or bcdedit /copy {default} /d “my new description”




0 comments