This is the second in a six-part blog series where we will demonstrate the application of Zero Trust concepts for securing federal information systems with Microsoft Azure. In this blog we will explore how to leverage Azure Security Center for hybrid security management and threat protection in Zero Trust Architectures. Additional blogs in the series will include leveraging policy, investigating insider attacks and monitoring supply chain risk management.
This blog series is coauthored by TJ Banasik, CISSP-ISSEP, ISSAP, ISSMP, Sr. Program Manager, Azure Global Customer Engineering, Mark McIntyre, CISSP, Senior Director, Enterprise Cybersecurity Group and Adam Dimopoulos, Azure Global Customer Engineering.
Also, join us for the Microsoft Ignite Government Tour in Washington, D.C where we’ll be presenting Zero Hype: Practical Steps Towards Zero Trust on Friday, Feb. 7 at 10:30 a.m.
How is zero trust implemented in cloud workloads?
The Microsoft Zero Trust vision paper outlines three principles of Zero Trust- Verify Explicitly, Least Privilege Access and Assume Breach. These principles include strategy recommendations such as continuously measuring trust and risk.
Security architecture design is a key starting point for Zero Trust, but this model must be continually monitored throughout the enterprise security lifecycle. This can be enabled by Azure Security Center, serving as both a Cloud Protection Platform (CWPP) and Cloud Security Posture Management (CSPM) solution, facilitating continuous monitoring of security controls in dynamic environments.
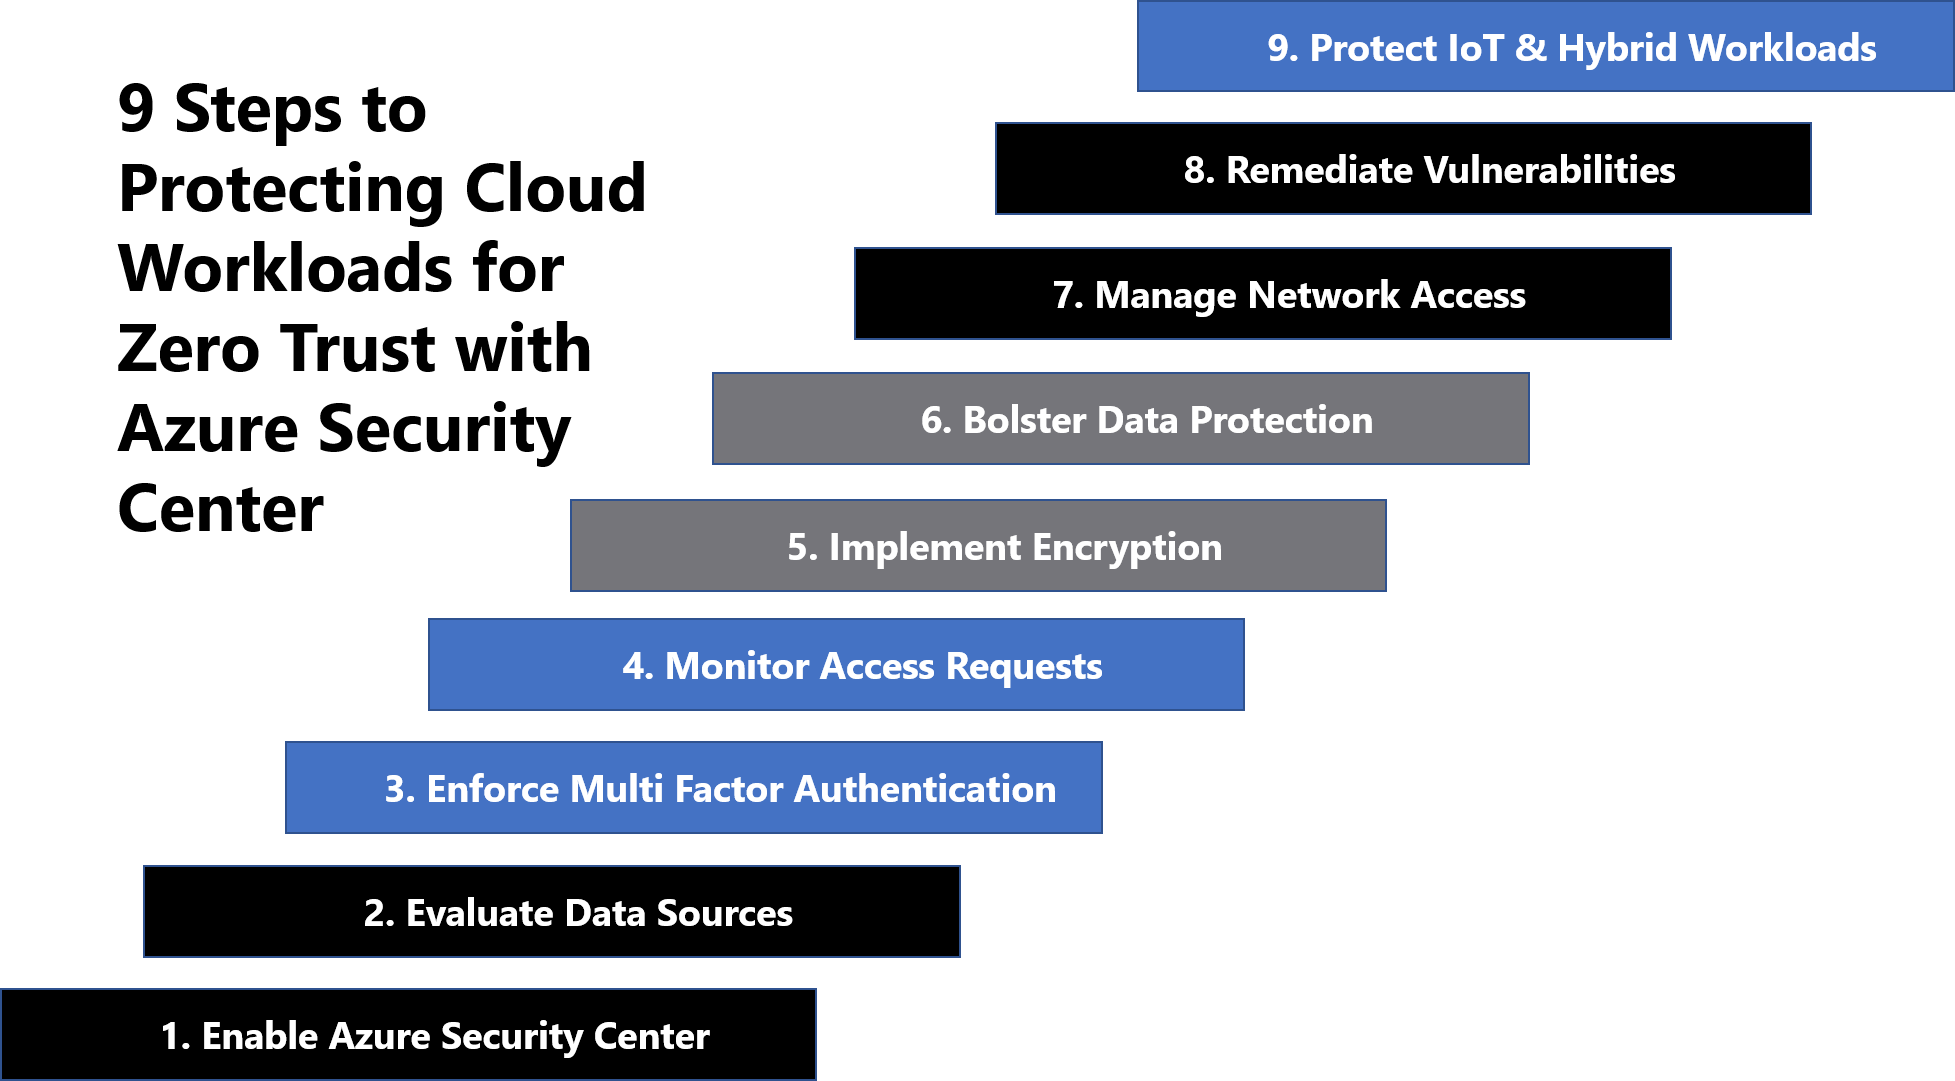
This blog first defines key concepts for Zero Trust governance based on federal frameworks, and then walks through the 9 steps to protecting cloud workloads for Zero Trust with Azure Security Center:
Defining Zero Trust governance based on federal frameworks
- The National Institute of Standards and Technology (NIST) has recently released NIST SP 800-207 which is in draft for comment. This document provides a framework for designing a zero-trust architecture (ZTA) network strategy[i].
- Trusted Internet Connections (TIC) is a federal cybersecurity initiative to enhance network and perimeter security across the United States federal government. The TIC initiative is a collaborative effort between the Office of Management and Budget (OMB), the Department of Homeland Security (DHS) Cybersecurity and Infrastructure Security Agency (CISA), and the General Services Administration (GSA). The TIC 3.0: Volume 3 Security Capabilities Handbook provides various security controls, applications and best practice for risk management in federal information systems[ii].
- Continuous Diagnostics and Mitigation (CDM) Program is led by the Cybersecurity and Infrastructure Security Agency (CISA). The CDM program delivers cybersecurity capabilities across the federal government including providing cybersecurity tools, services, reporting and best practices. The Continuous Diagnostics and Mitigation Program Fact Sheet outlines five key program areas including dashboarding, asset management, identity and access management, network security management and data protection management[iii].
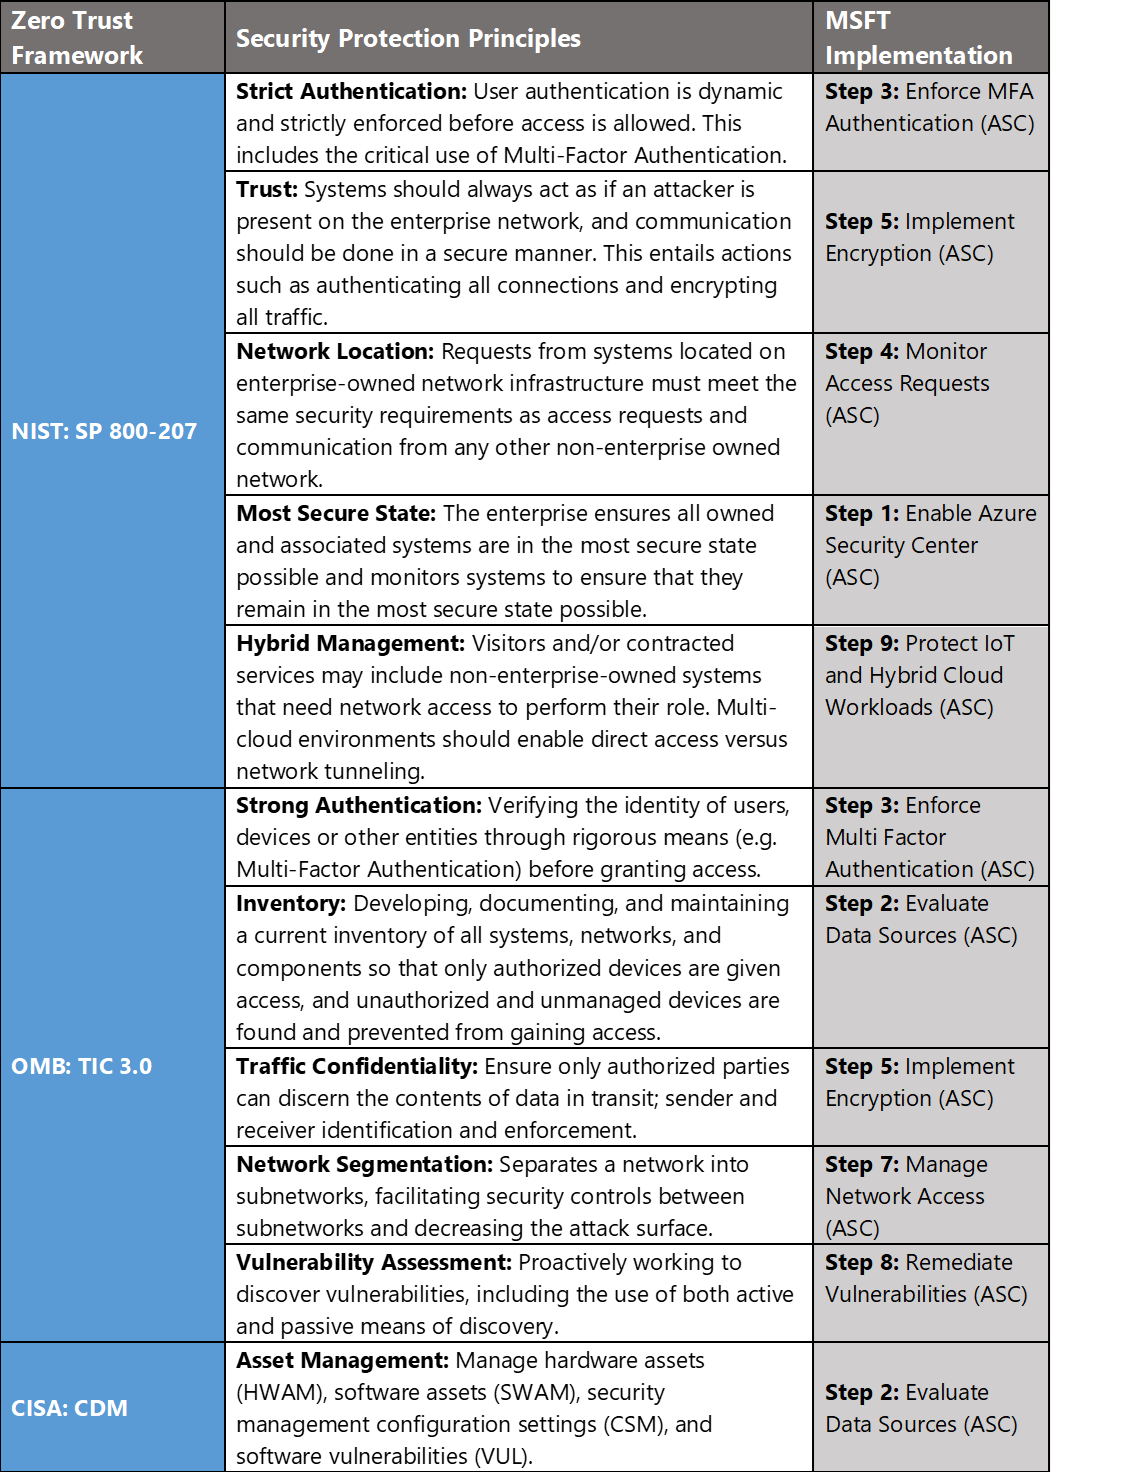
In Azure Government, we crosswalk NIST SP 800-207, OMB TIC 3.0, and CISA CDM to align requirements for implementing Zero Trust architectures. Our second focus point is protecting cloud workloads for zero trust and these documents have a wealth of information aligned to these principles. The diagram below highlights the key takeaways and requirements from the frameworks:
Protecting Cloud Workloads for Zero Trust with Azure Security Center
Microsoft Azure Government has developed a nine-step process for helping protect cloud workloads in federal information systems which is aligned with the security protection principles within the NIST, OMB, and CISA Zero Trust frameworks. Microsoft’s key offering for cloud workload protection is Azure Security Center.
Azure Security Center is a unified infrastructure security management system that helps strengthen the security posture of your data centers and provides advanced threat protection across your hybrid workloads in the cloud – whether they’re in Azure or not – as well as on premises.
Nine Steps to Protecting Cloud Workloads for Zero Trust with Azure Security Center
1) Enable Cloud Workload Protection
Azure Security Center provides unified security management and threat protection across your hybrid cloud workloads. While the Free tier offers limited security for your Azure resources only, the Standard tier extends these capabilities to on-premises and other clouds. Azure Security Center Standard helps you find and fix security vulnerabilities, apply access and application controls to block malicious activity, detect threats using analytics and intelligence, and respond quickly when under attack. Enabling Azure Security Center Standard is accomplished via the steps below:
- Under the Security Center main menu, select Getting started.
- Under Upgrade, Security Center lists subscriptions and workspaces eligible for onboarding.
- Click Start trial to start your trial on the selected subscriptions
Security Center collects data from your Azure VMs and non-Azure computers to monitor for security vulnerabilities and threats. Data is collected using the Microsoft Monitoring Agent, which reads various security-related configurations and event logs from the machine and copies the data to your workspace for analysis. By default, Security Center will create a new workspace for you. When automatic provisioning is enabled, Security Center installs the Microsoft Monitoring Agent on all supported Azure VMs and any new ones that are created. Automatic provisioning is strongly recommended. To enable automatic provisioning of the Microsoft Monitoring Agent:
- Under the Security Center main menu, select Pricing & settings.
- On the row of the subscription, click on the subscription on which you’d like to change the settings
- In the Data Collection tab, set Auto provisioning to On.
- Select Save.
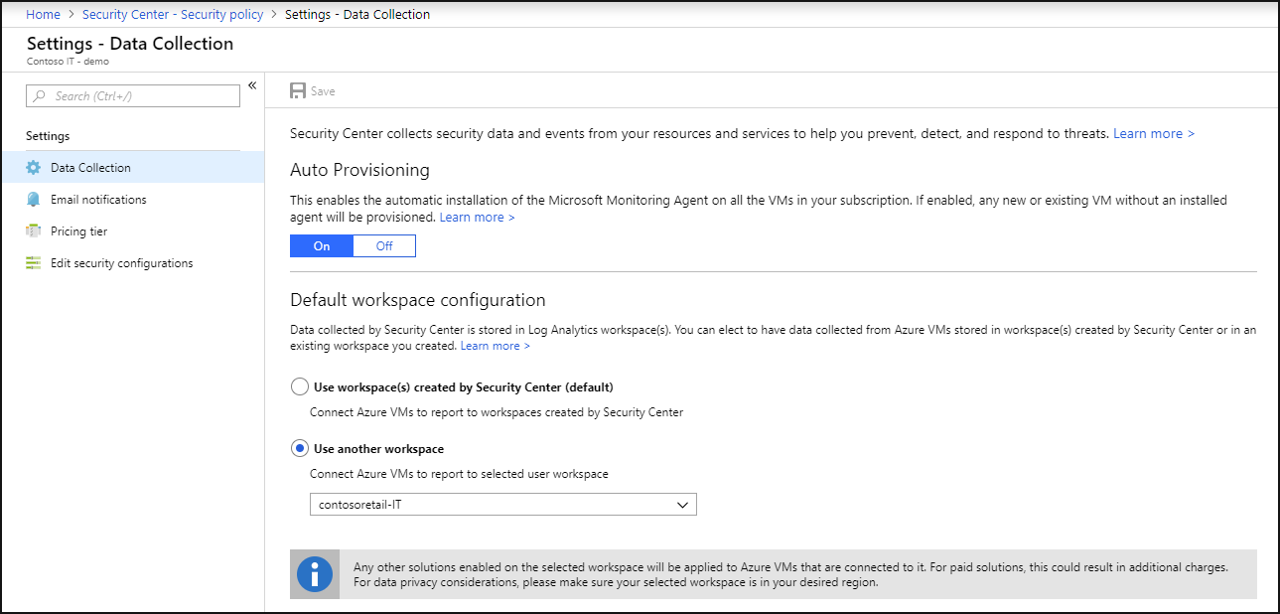
With this new insight into your Azure VMs; Azure Security Center can provide additional recommendations related to system update status, OS security configurations, and endpoint protection, as well as generate additional security alerts. For more information, see Quickstart: Onboard your Azure subscription to Security Center Standard.
2) Evaluate Data Sources
Monitoring resources and data sources is a key requirement for configuration management in the cloud. The Center for Internet Security (CIS) outlines a guide for security controls in the Top 20 Critical Security Controls (CSC). The CSC highlight the importance of configuration management in CSC1: Inventory of Authorized and Unauthorized Devices and CSC 2: Inventory of Authorized and Unauthorized software. The Security Center Overview page shows the overall security posture of your environment broken down by Compute, Networking, Storage & data, and Applications. Each resource type has an indicator showing if any potential security vulnerabilities have been identified. Clicking each tile displays a list of security issues identified by Security Center, along with an inventory of the resources in your subscription.
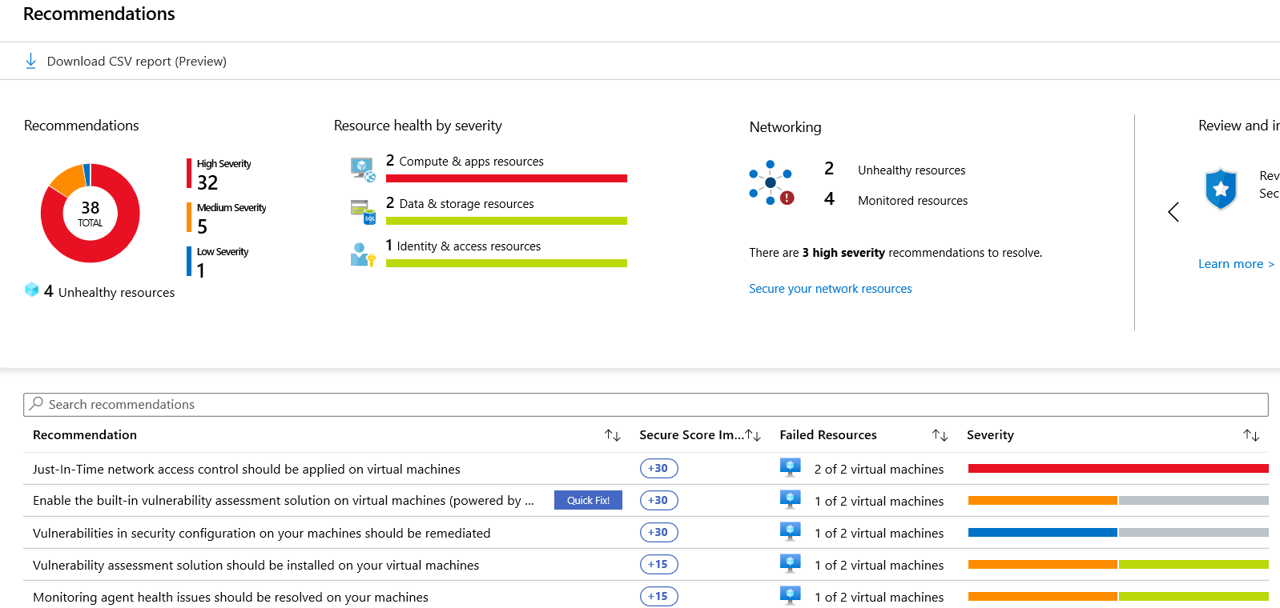
Recommendations adds a deeper visibility to your assets by organizing assets into resource types, risk severity, health and security issues. You can reduce the chances of a significant security event by configuring a security policy and then implementing the recommendations provided by Azure Security Center. Azure Security Center constantly reviews your active recommendations and calculates your overall secure score based on them, the score of a recommendation is derived from its severity and security best practices that will affect your workload security the most. Overall secure score is an accumulation of all your recommendation scores. You can view your overall secure score across your subscriptions or management groups, depending on what you select.
To check which recommendations impact your secure score most, you can view the top three most impactful recommendations in the Security Center dashboard or you can sort the recommendations in the recommendations list blade using the Secure score impact column. Accessing Azure Security Center Recommendations and Secure Score is accomplished via the steps below:
- Sign into the Azure Portal as a User administrator for the organization.
- Search for and select Security Center from any page.
- Click Secure Score
- At the top you can see Secure score highlights:
- The Overall secure score represents the score per policies, per selected subscription
- Secure score by category shows you which resources need the most attention
- Top recommendations by secure score impact provides you with a list of the recommendations that will improve your secure score the most if you implement them.
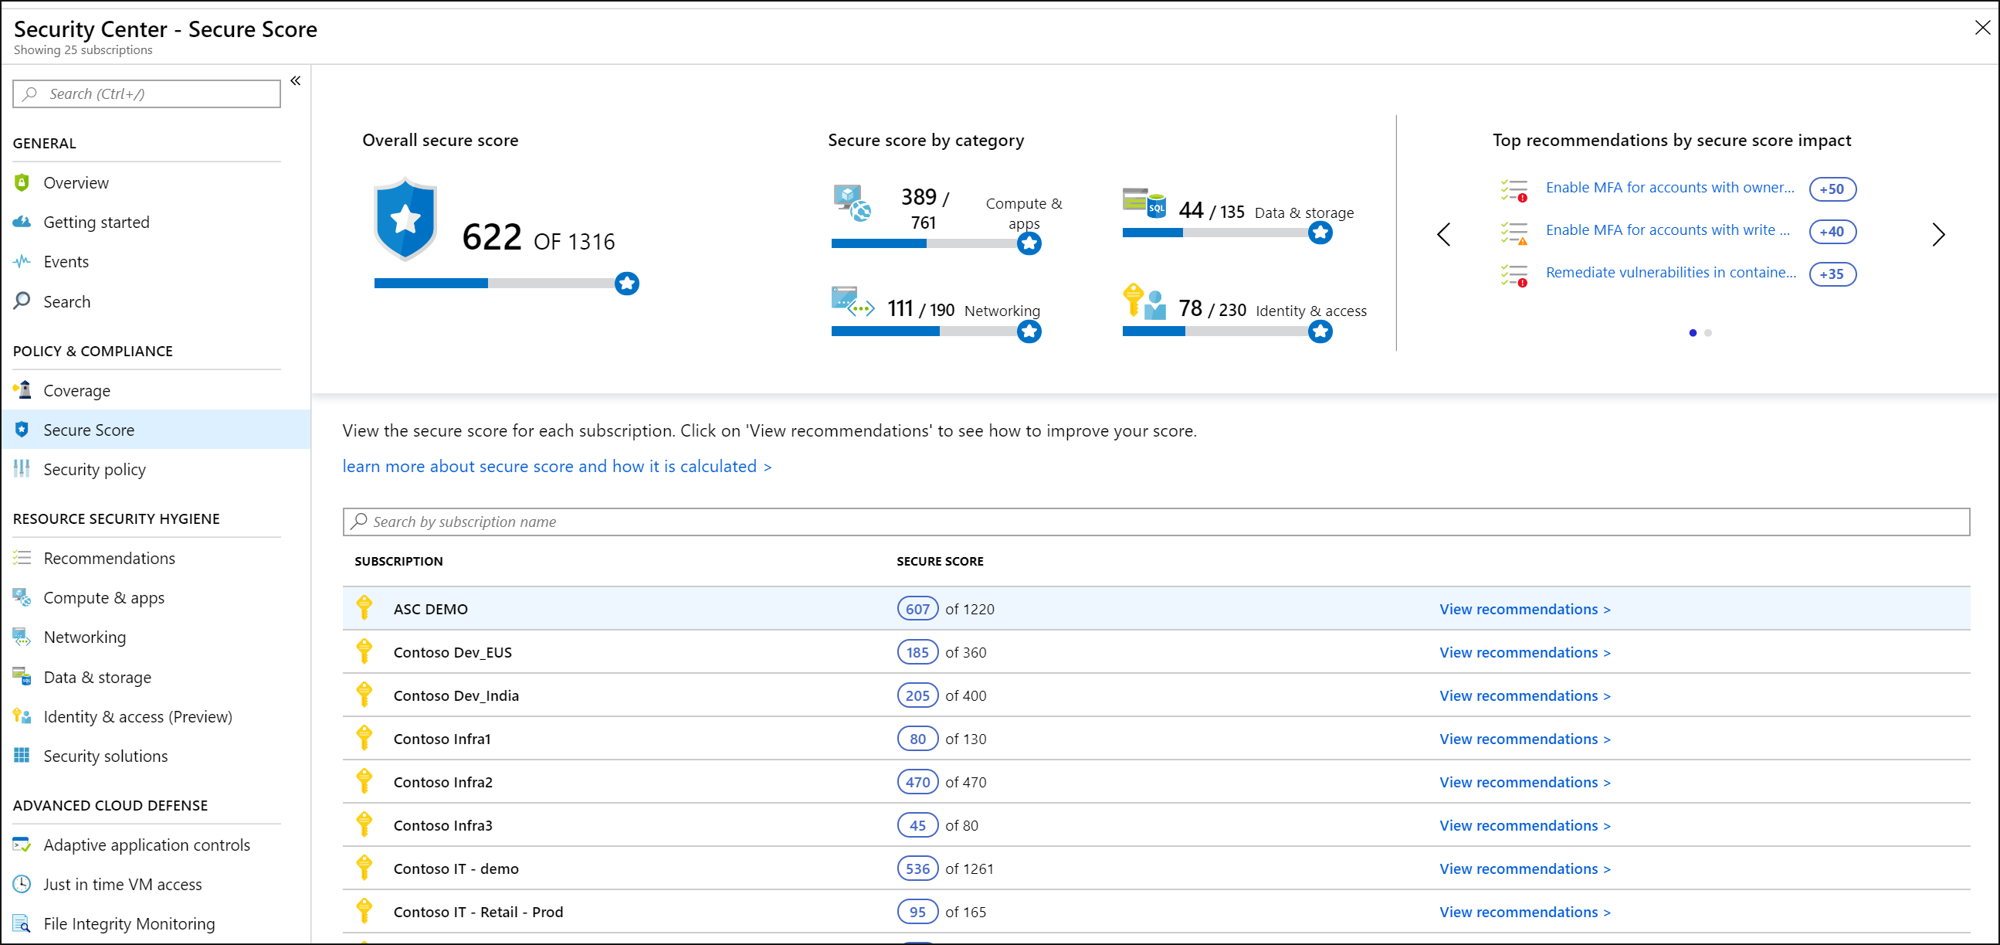
- In the table (below), you can see each of your subscriptions and the overall secure score for each.
- Click View recommendations to see the recommendations for that subscription that you can remediate to improve your secure score.
- In the list of recommendations, you can see that for each recommendation there is a column that represents the Secure score impact. This number represents how much your overall secure score will improve if you follow the recommendations. For example, in the screen below, if you Remediate vulnerabilities in container security configurations, your secure score will increase by 35 points. For more information, see Improve your Secure Score in Azure Security Center.
Azure Security Center continuously assesses the configuration of your resources to identify security issues and vulnerabilities. These assessments are presented as recommendations, which focus on improving your security hygiene. In the regulatory compliance dashboard, you can view a set of compliance standards with all their requirements, where supported requirements are mapped to applicable security assessments. This enables you to view your compliance posture with respect to the standard, based on the status of these assessments. View the regulatory and compliance dashboard via the steps below:
- Search for and select Security Center from any page.
- Click Regulatory compliance to see your overall compliance score and number of passing vs. failing assessments for each standard.
- Select a tab for a compliance standard that is relevant to you. You will see the list of all controls for that standard.
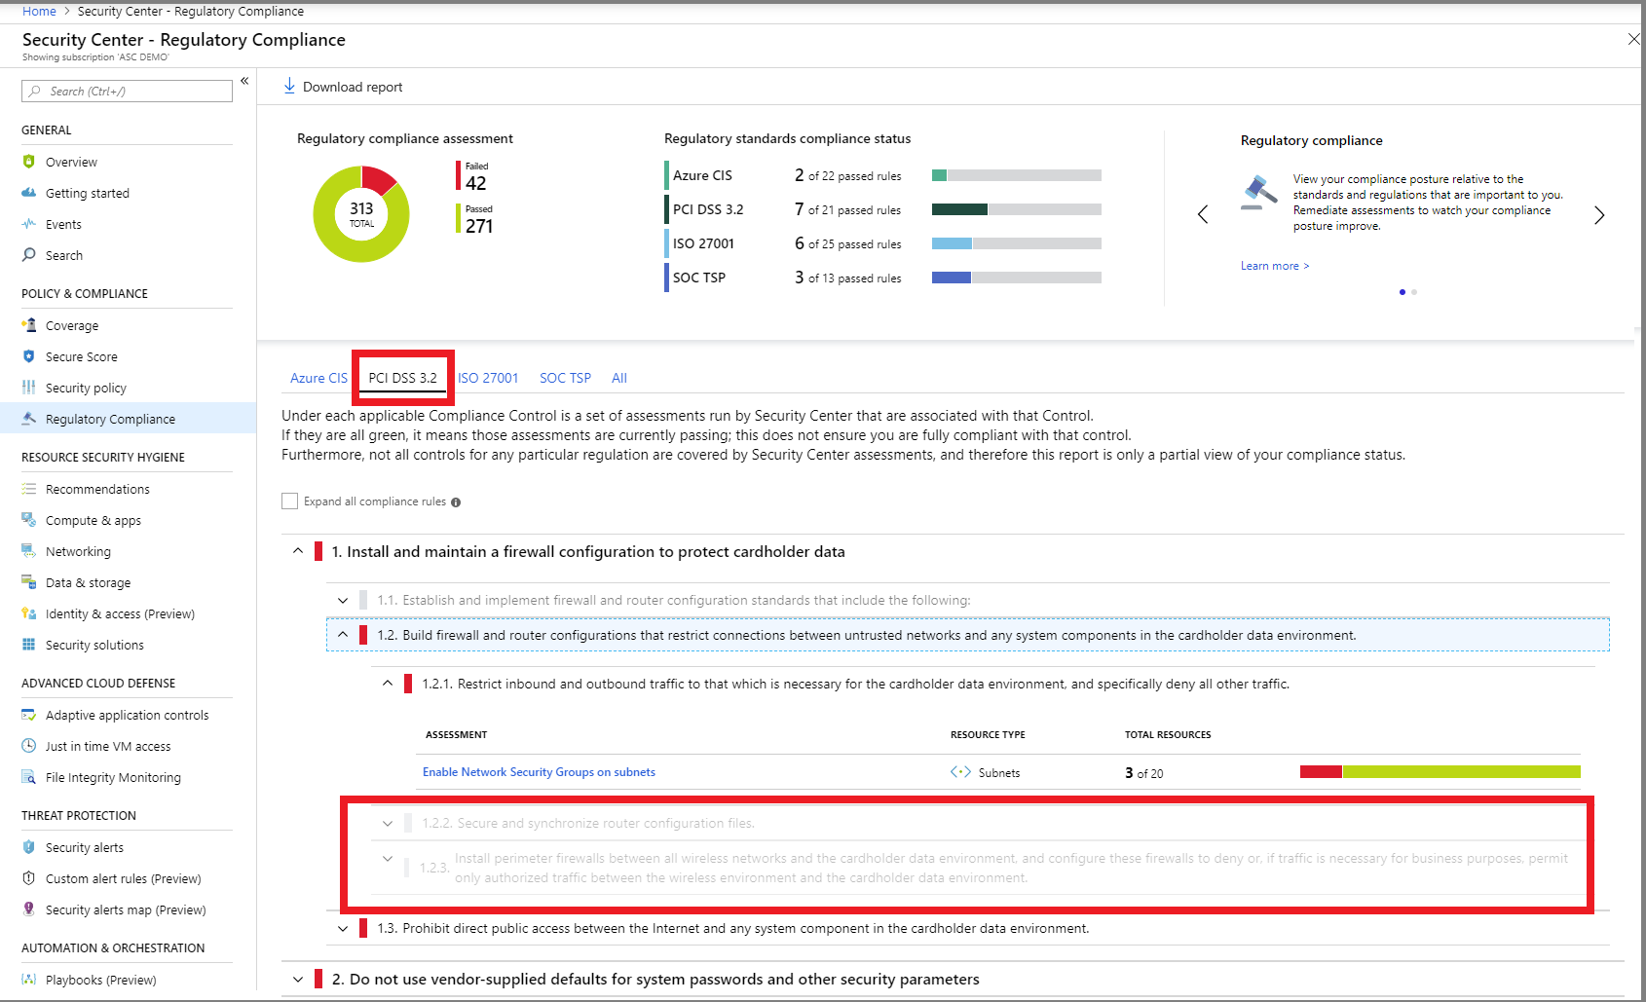
- Generate download a PDF report summarizing your current compliance status for a desired standard by clicking Download report. For more information, see Improve your regulatory compliance.
3) Enforce Multi-Factor Authentication
Identity should be the control plane for your enterprise and protecting identities should be your top priority. The security perimeter has evolved from a network perimeter to an identity perimeter. Security becomes less about defending your network and more about defending your data, as well as managing the security of your apps and users. Identity has become the new perimeter with more data and apps moving to the cloud.
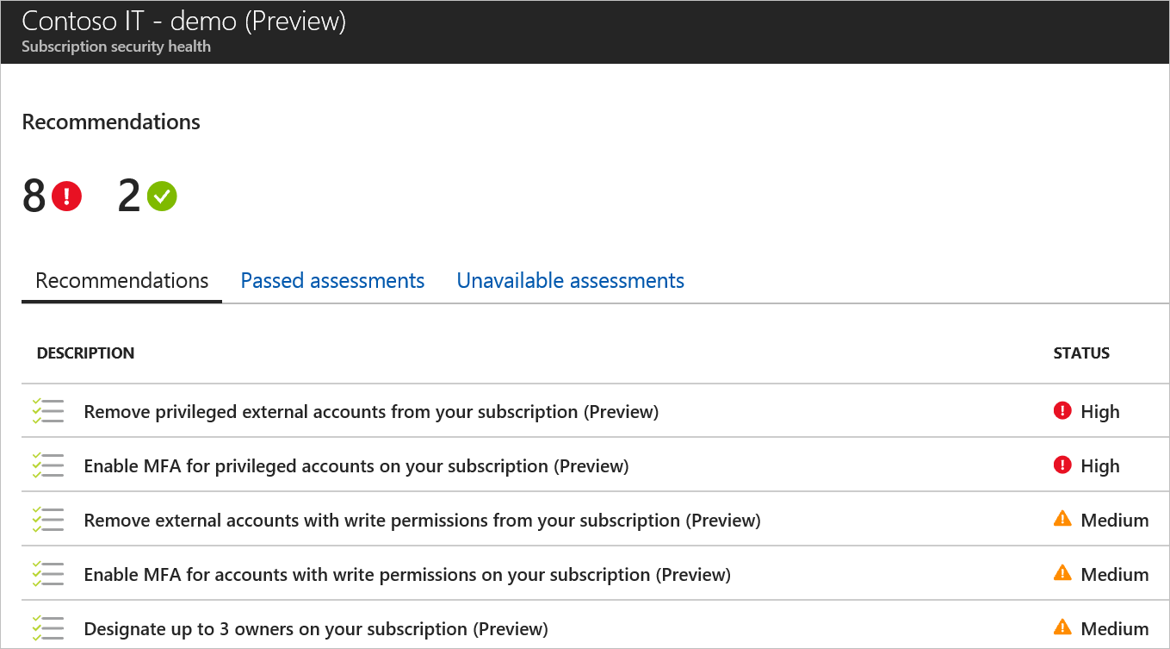
By monitoring identity activities, you can take proactive actions before an incident takes place or reactive actions to stop an attack attempt. The Identity & Access dashboard provides you with recommendations such as:
- Enable MFA for privileged accounts on your subscription
- Remove external accounts with write permissions from your subscription
- Remove privileged external accounts from your subscription
Monitor identity and access management in Azure Security Center via the steps below:
- Access Security Center
- Select Identity & Access under Resource Security Hygiene
- Click Overview
- Select Recommendations for a list of recommendations for the selected subscription and severity of each recommendation.
- Select Enable MFA recommendations for an assessment of these controls within your subscription and further steps on implementing MFA in the subscription.
Refer to the first blog in our series on Implementing Zero Trust with Microsoft Azure: Identity and Access Management for a detailed guide to implementing MFA. For more information, see Monitor Identity and Access.
4) Monitor Access Requests
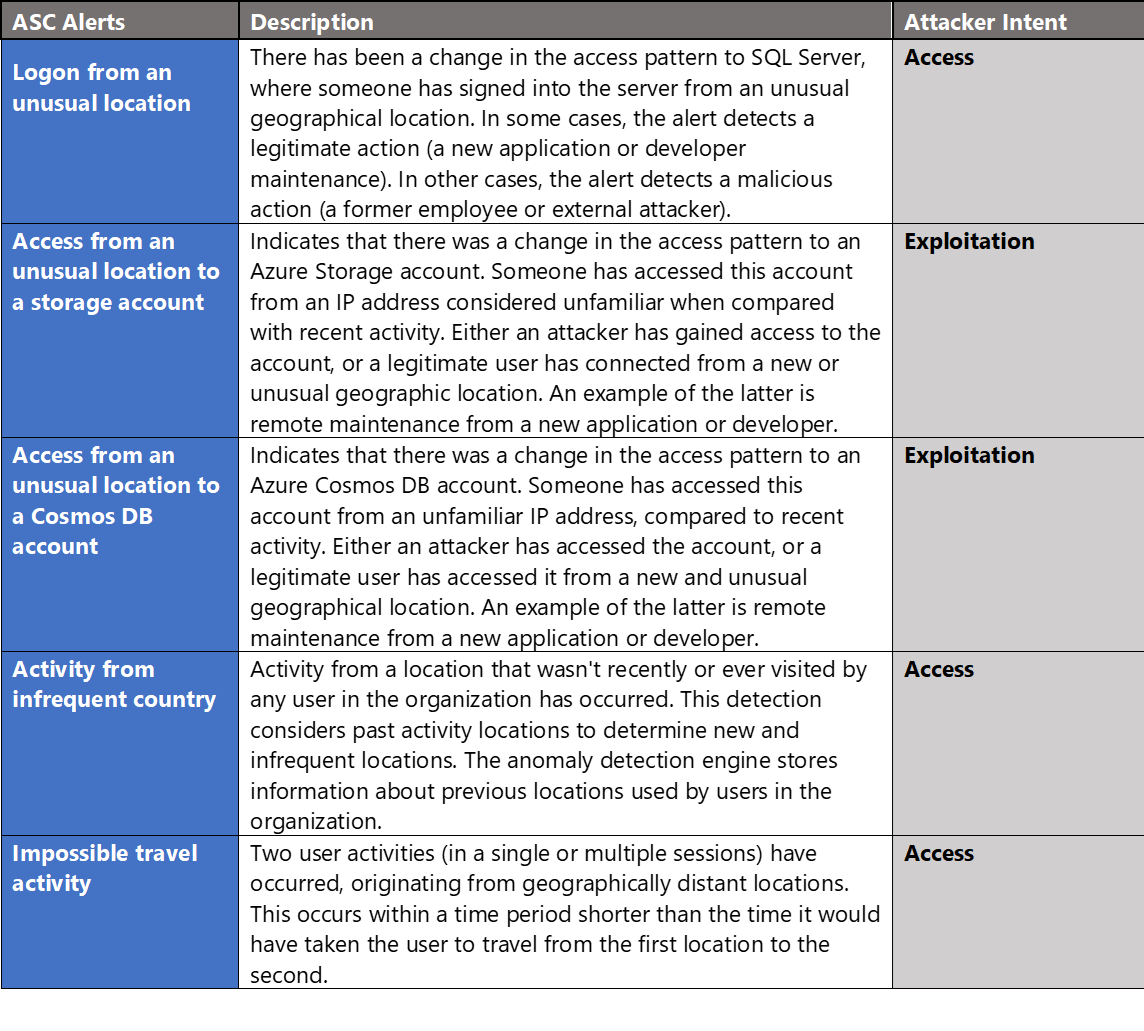
Monitoring access requests is critical in detecting unauthorized access to cloud resources. Accessing cloud-based resources from outside the network perimeter often requires more stringent access control. Azure Security Center has several built-in alerts to provide visibility into these types of events. For more information, see Security alerts – a reference guide.
5) Implement Encryption
Azure Security Center has several policies and alerts for monitoring encryption on virtual machines, applications, databases and authentication methods. Azure Security Center recommends that you apply disk encryption if you have Windows or Linux VM disks that are not encrypted using Azure Disk Encryption. Disk Encryption lets you encrypt your Windows and Linux IaaS VM disks. Encryption is recommended for both the OS and data volumes on your VM.
Disk Encryption uses the industry standard BitLocker feature of Windows and the DM-Crypt feature of Linux. These features provide OS and data encryption to help protect and safeguard your data and meet your organizational security and compliance commitments. Disk Encryption is integrated with Azure Key Vault to help you control and manage the disk encryption keys and secrets in your Key Vault subscription, while ensuring that all data in the VM disks are encrypted at rest in Azure Storage. Encrypt a Virtual Machine with Azure Security Center via the steps below:
- Access Security Center
- Select Recommendations under Resource Security Hygiene
- Click the recommendations for Disk encryption should be applied on virtual machines

- Select the virtual machine from the Affected Resources. This redirects to the virtual machine settings page for disks.
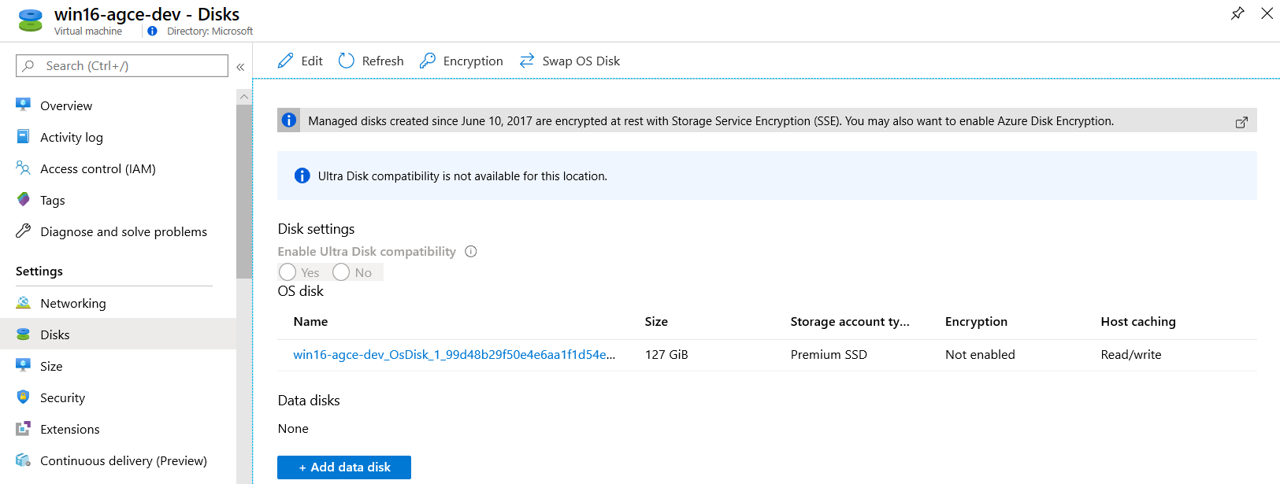
- Navigate to Disks to encrypt and select OS and data disks from the drop-down.
- Specify Key Vault, Key, and
- Select Enable key vault for disk encryption
- Click Save
- Click Yes on prompt for Enabling Azure Disk Encryption will cause the VM to reboot.
This process will trigger Azure Disk Encryption for the selected virtual machine operating system and data disks. For more information, see Apply disk encryption in Azure Security Center.
6) Bolster Data Protection
Azure Security Center enables organizations to strengthen security posture and protect data with continuous evaluation. This means it supports identify and perform the hardening tasks recommended as security best practices and implement them across your machines, data services, and apps. This includes managing and enforcing your security policies, and making sure your Azure virtual machines, non-Azure servers, and Azure PaaS services are compliant. Security Center provides you with the tools you need to have a bird’s eye view on your workloads, with focused visibility on your network security estate. For more information, see What is Azure Security Center?
7) Manage Network Access
Network segmentation is another key requirement of zero trust architectures. Network segmentation makes it more difficult for an attacker to move laterally within a target environment. Azure Security Center has several built-in recommendations for monitoring network security within a tenant subscription. Networking recommendations center around next generation firewalls, Network Security Groups, JIT VM access, overly permissive inbound traffic rules, and more.
The Networking page provides an overview of the sections you can deep dive into, to get more information about the health of your network resources:
- Network map (Azure Security Center Standard tier only)
- Adaptive Network Hardening
- Networking security recommendations.
- Legacy Networking blade (the previous networking blade)
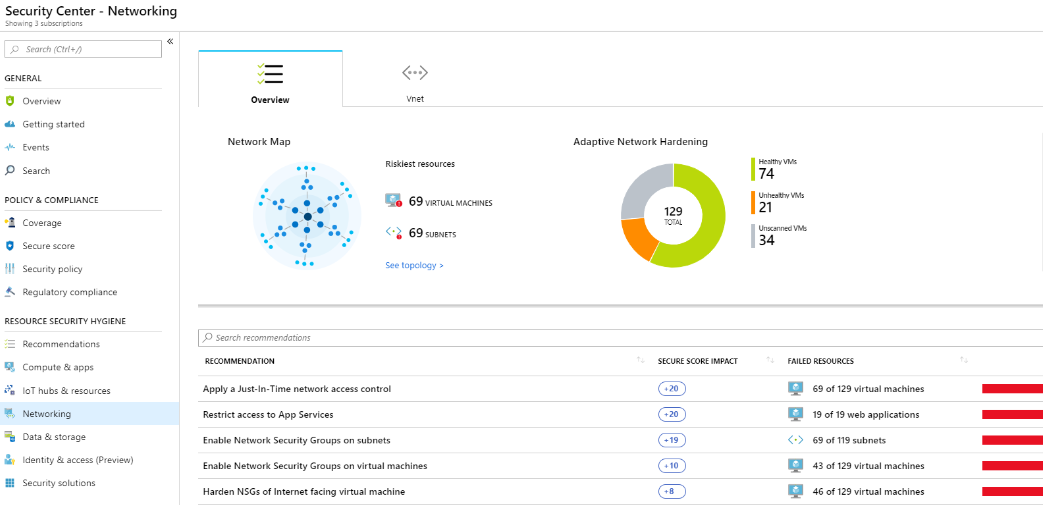
The interactive network map provides a graphical view with security overlays giving you recommendations and insights for hardening your network resources. Using the map, you can see the network topology of your Azure workloads, connections between your virtual machines and subnets, and have the capability to drill down from the map into specific resources and the recommendations for those resources. Open network map via the steps below:
- Security Center, under Resource Security Hygiene, select Networking.
- Under Network map click See topology.
The default view of the topology map displays:
- Subscriptions you selected in Azure. The map supports multiple subscriptions.
- VMs, subnets, and VNets of the Resource Manager resource type
- Peered VNets
- Only resources that have network recommendations with a high or medium severity
- Internet facing resources
- The map is optimized for the subscriptions you selected in Azure. If you modify your selection, the map is recalculated and re-optimized based on your new settings.
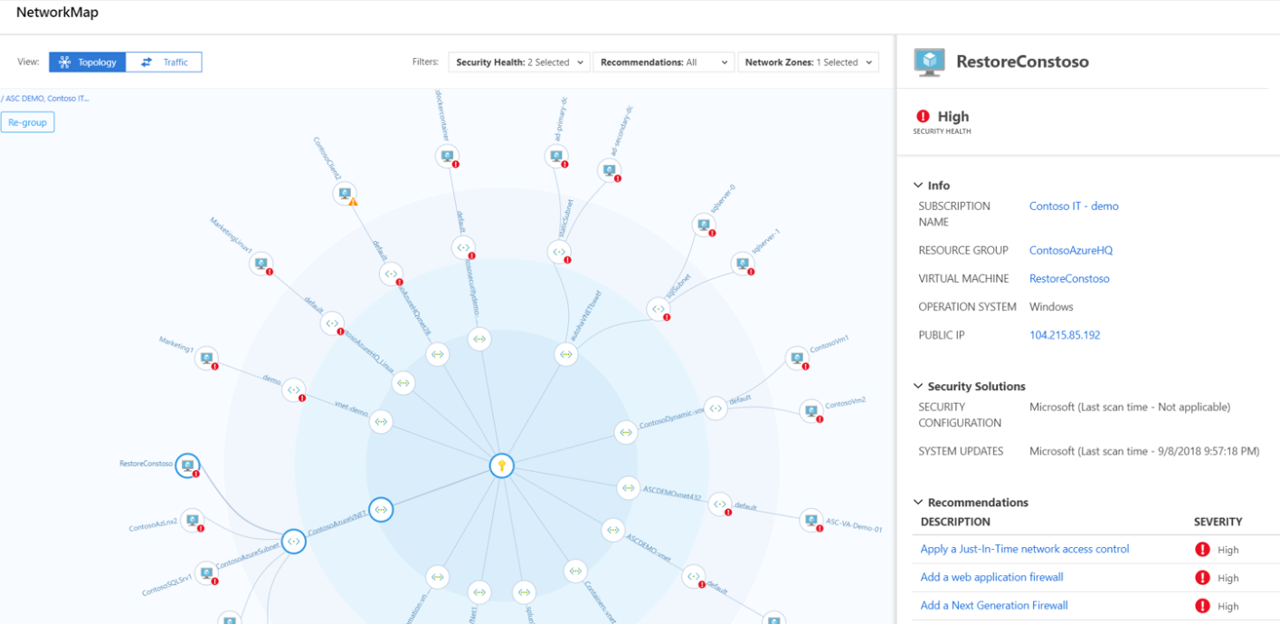
The Azure Security Center Networking page provides a powerful capability for implementing Network Security Groups, applying Just-In-Time access, restricting access to services, configuring firewall rules, visualizing traffic, and controlling network flow. For more information, see Protect your network resources.
8) Remediate Vulnerabilities
Proactively detecting and mitigating vulnerabilities is another central tenant of zero trust. Strong identity and access management requires protection of authentication resources and hardening of the attack vector. Azure Security Center has a key recommendation: Vulnerability assessment solution should be installed on your virtual machines. Selecting this option provides a quick start to deploying a vulnerability assessment platform. It’s important to note that vulnerability assessment tools will vary between respective government cloud offerings so refer to the Azure Marketplace within the respective cloud to review available offerings. Once a vulnerability assessment offering is deployed, operating system level vulnerabilities are automatically integrated into Azure Security Center for remediation. It’s also important to note that Azure Security Center provides several levels of vulnerability management:
- Endpoint Protection Visibility
- Network Security Recommendations
- Patch Management Status
- Security Orchestration
- Publicly Exposed Assets
- Vulnerability Auditing
- Malicious Communication Alerting
- Encryption Gaps
- Vulnerability Assessment Solution Integration
- Log Integration with SIEM solutions
For more information, see 10 Security Issues You Can Fix with Azure Security Center.
9) Protect IoT & Hybrid Workloads
Azure Security Center for IoT provides threat prevention and analysis for every device, IoT Edge and IoT Hub, across your IoT assets. As billions of new devices are connected to the internet, and integrated into our daily lives and our businesses, your security operations teams must ensure their security strategies evolve quickly enough to cover each new attack surface. Like any other system, to comprehensively secure your IoT solution, it requires protection at every stage of implementation.
Azure Security Center for IoT simplifies hybrid workload protection by delivering unified visibility and control, adaptive threat prevention, and intelligent threat detection and response across workloads running on edge, on-premises, in Azure, and in other clouds.
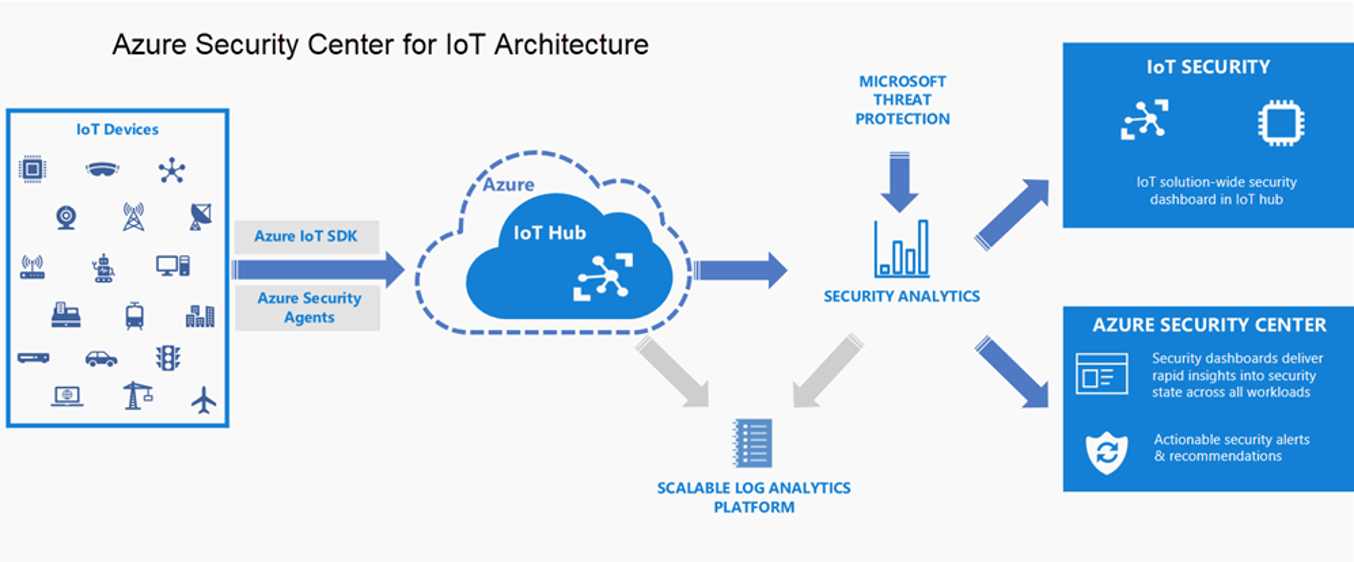
- Unified Visibility and Control: Get a unified view of security across on-premises and cloud workloads, including your Azure IoT solutions. Onboard new devices and apply security policies across your workloads (Leaf devices, Microsoft Edge devices, IoT Hub) to ensure compliance with security standards and improved security posture.
- Adaptive Threat Prevention: Use Azure Security Center for IoT to continuously monitor the security of machines, networks, and Azure services. Choose from hundreds of built-in security assessments or create your own in the central Azure Security Center for IoT Hub dashboard. Optimize your security settings and improve your security score with actionable recommendations across virtual machines, networks, apps, and data. With newly added IoT capabilities, you can now reduce the attack surface for your Azure IoT solution and remediate issues before they can be exploited.
- Intelligence Threat Detection and Response: Use advanced analytics and the Microsoft Intelligent Security Graph to get an edge over evolving cyber-attacks. Built-in behavioral analytics and machine learning identify attacks and zero-day exploits. Monitor your IoT solution for incoming attacks and post-breach activity. Streamline device investigation and remediation with interactive tools and contextual threat intelligence. For more information, see Introducing Azure Security Center for IoT.
Azure also provides capabilities for management into hybrid environments. Compute resources such as virtual machines generate data to monitor their performance and availability just like other cloud resources. Compute resources though also have a guest operating system and workloads that need to be monitored. Collecting this monitoring data from inside the resource requires an agent. Azure Monitor helps to collect, analyze, and act on telemetry data from Azure and on-premises environments. For more information, see Overview of the Azure Monitor agents.
- Azure Diagnostics Extension: Collects monitoring data from the guest operating system and workloads of Azure compute resources. It primarily collects data into Azure Storage. Azure Monitor can be configured to copy the data from storage to a Log Analytics workspace and to collect guest performance data into Azure Monitor Metrics. Azure Diagnostic Extension is often referred to as the Windows Azure Diagnostic (WAD) or Linux Azure Diagnostic (LAD) extension.
- Log Analytics Agent: Collects monitoring data from the guest operating system and workloads of virtual machines in Azure, other cloud providers, and on-premises. It collects data into a Log Analytics workspace. The Log Analytics agent is the same agent used by System Center Operations Manager, and computers are multi-homed to communicate with a management group and Azure Monitor simultaneously. The Log Analytics agent for Windows is often referred to as Microsoft Management Agent (MMA). The Log Analytics agent for Linux is often referred to as OMS agent.
- Dependency Agent: Collects discovered data about processes running on the virtual machine and external process dependencies. This agent is required for Service Map and the Map feature Azure Monitor for VMs. The Dependency agent requires the Log Analytics agent and writes data to a Log Analytics workspace in Azure Monitor.
Learn more about Zero Trust with Microsoft
Here are some of the best resource to learn more about Zero Trust in the cloud with Microsoft:
- Reach the Optimal State in your Zero Trust Journey
- The Zero Trust Maturity Model
- Zero Trust: A New Era of Security
- Implementing a Zero Trust Security Model at Microsoft
- Zero Trust Strategy: What Good Looks Like
- Securing Mobile: Designing SaaS Service Implementations to Meet Federal TIC Policy
Be sure to check out the other topics we have covered in this series:
- Implementing Zero Trust with Microsoft Azure: Identity and Access Management
- Monitoring Cloud Security for Zero Trust with Azure Sentinel
- Enforcing Policy for Zero Trust with Azure Policy
- Insider Threat Monitoring for Zero Trust with Microsoft Azure
- Supply Chain Risk Management for Zero Trust with Microsoft Azure
Also, join us for the Microsoft Ignite Government Tour in Washington, D.C where we’ll be presenting Zero Hype: Practical Steps Towards Zero Trust on Friday, February 7th at 10:30AM.
Bookmark the Security blog to keep up with our expert coverage on security matters and follow us at @MSFTSecurity or visit our website for the latest news and updates on cybersecurity.
Are you a federal government agency that needs help with cybersecurity? Reach out to TJ Banasik or Mark McIntyre for additional details on the content above, or if you have any other questions about Microsoft’s cybersecurity investments for the federal government.
[i] National Institute of Standards and Technology. (2019, September 1). Draft NIST Special Publication 800-207: Zero Trust Architecture. Retrieved January 25, 2020, from https://nvlpubs.nist.gov/nistpubs/SpecialPublications/NIST.SP.800-207-draft.pdf
[ii] Cybersecurity and Infrastructure Security Agency. (2019, December 1). Trusted Internet Connections 3.0: Volume 3 Security Capabilities Handbook. Retrieved January 22, 2020, from https://www.cisa.gov/sites/default/files/publications/Draft%20TIC%203.0%20Vol.%203%20Security%20Capabilities%20Handbook.pdf
[iii] U.S. Department of Homeland Security, Cyber+Infrastructure. (2019, April 24). Continuous Diagnostics and Mitigation (CDM) Program. Retrieved January 22, 2020, from https://www.cisa.gov/publication/continuous-diagnostics-and-mitigation-cdm-program

Hi, where is Part 1?
Good one Rob – I was about to ask…..
TJ, thanks for posting.
Patrick MBA MS Cyber Security CISSP-ISSEP
AWS Cloud Engineer / AWS Cloud Solutions Architect Pro
Cybercommand plank owner #41 – former Intelligence Officer/Cyber Security SME
Thank you for following our blog. You can find Part 1 of our blog series on Implementing Zero Trust with Microsoft Azure: Identity and Access Management (1 of 6) at the link below:
https://devblogs.microsoft.com/azuregov/implementing-zero-trust-with-microsoft-azure-identity-and-access-management-1-of-6/