I was recently working with one of our government customers that wanted to make use of a newer offering: Azure Import/Export. Now I know what you’re saying… “Chase, this has been out since 2014.” True, this isn’t a new service to Azure, but it was recently accredited and made generally available to the Azure Government space.
If you aren’t familiar with the service, it’s an easy way to transfer large amounts of data from the outside world into Azure storage. There is a very similar offering for Office 365 as well (think PSTs). The tool itself is a command line interface that copies data to a BitLocker encrypted physical hard drive which is then shipped to Azure. The Azure team will import that data into your Azure storage account and ship the drive back to you. Sounds easy right? Normally, it’s a very straight forward process. In fact, you can read more about the service and a step-by-step guide here
Government along with other security conscious industries have a stronger set of security controls that have the habit of causing additional administrative overhead. With that in mind, I’m going to help you be proactive by giving you those big insider tips at getting your system ready for our tool and avoid those headaches.
Tip#1 – The tool requires elevation
If you run ‘WAImportExport.exe’ as is, it won’t get you anywhere since it requires several parameters to run. The tool can also modify system settings, which is the key reason for running elevated with UAC. Go ahead and run the tool through an existing elevated command prompt window. It’ll output all its parameters and examples. You can retain a copy of this information to your clipboard by typing ‘WAImportExport.exe | clip’
Tip #2 – Local administrative privileges may be required
‘Failed to disable 8dot3 name creation.’
The tool will offer to make system wide such as disabling the ‘8dot3’ filename format. If you don’t manually make the system change yourself, the tool can do it so long as it’s run with local administrative privileges.
Tip #3 – BitLocker feature must be installed
| [2016/09/26 19:17:51.674][Info] Enabling BitLocker on drive…
[2016/09/26 19:17:51.892][Error] Command failed with exception: AzImportDll.AzIm portException: Please verify that BitLocker Drive Encryption has been enabled. – –> System.Management.ManagementException: Invalid namespace at System.Management.ManagementException.ThrowWithExtendedInfo(ManagementStat us errorCode) at System.Management.ManagementScope.InitializeGuts(Object o) at System.Management.ManagementScope.Initialize() at System.Management.ManagementObjectSearcher.Initialize() at System.Management.ManagementObjectSearcher.Get() at AzImportDll.WmiHelper.GetEncryptableVolume(String driveLetter) — End of inner exception stack trace — at AzImportDll.WmiHelper.GetEncryptableVolume(String driveLetter) at AzImportDll.WmiHelper.ProtectVolume(String driveLetter, String& password) at AzImportDll.PrepImportDriveCommandContext.EnableBitLockerOnTargetDrive() at AzImportDll.PrepImportDriveCommandContext.FormatAndEncryptTargetDrive() at AzImportDll.PrepImportDriveCommandContext.ExecuteCommand() at AzImportDll.BaseCommandContext`1.Execute() [2016/09/26 19:17:51.892][Info] Command failed. |
BitLocker is a requirement. However, you have the choice of either letting the tool encrypt the device or you can pre-encrypt the device and supply the encryption key (more on that later).
You can install the feature by following this TechNet guide
Tip #4 – Delete or change the journal file
‘AzImportDll.AzImportException: Last copy session session#1 was not terminated normally. Since it was the first copy session for the drive, it may be resumed but cannot be aborted.’
A journal file will be created when you run the tool. It contains all the information needed by Microsoft to import your data to your storage account. Unless you plan on resuming the copy session with ‘/resumesession’, start from scratch by deleting or changing the journal file. You will not suffer any type of loss if you haven’t already copied data to the drive.
The journal file name and location is what you specified with the ‘/J:’ parameter
Tip #5 – FIPS must be disabled
AzImportDll.AzImportException: WMI Operation failed: Method=ProtectKeyWithNumericalPassword, ReturnValue=2150694967, Win32Message=Unknown error (0x80310037)
If you chose to allow the tool to BitLocker encrypt your drive, it will set a ‘recovery password’ on the drive. The error indicates that the tool failed to set a numerical password, also known as a ‘recovery password’ on the drive. A ‘recovery password’ is a 48-digit password and is disallowed per FIPS policy.
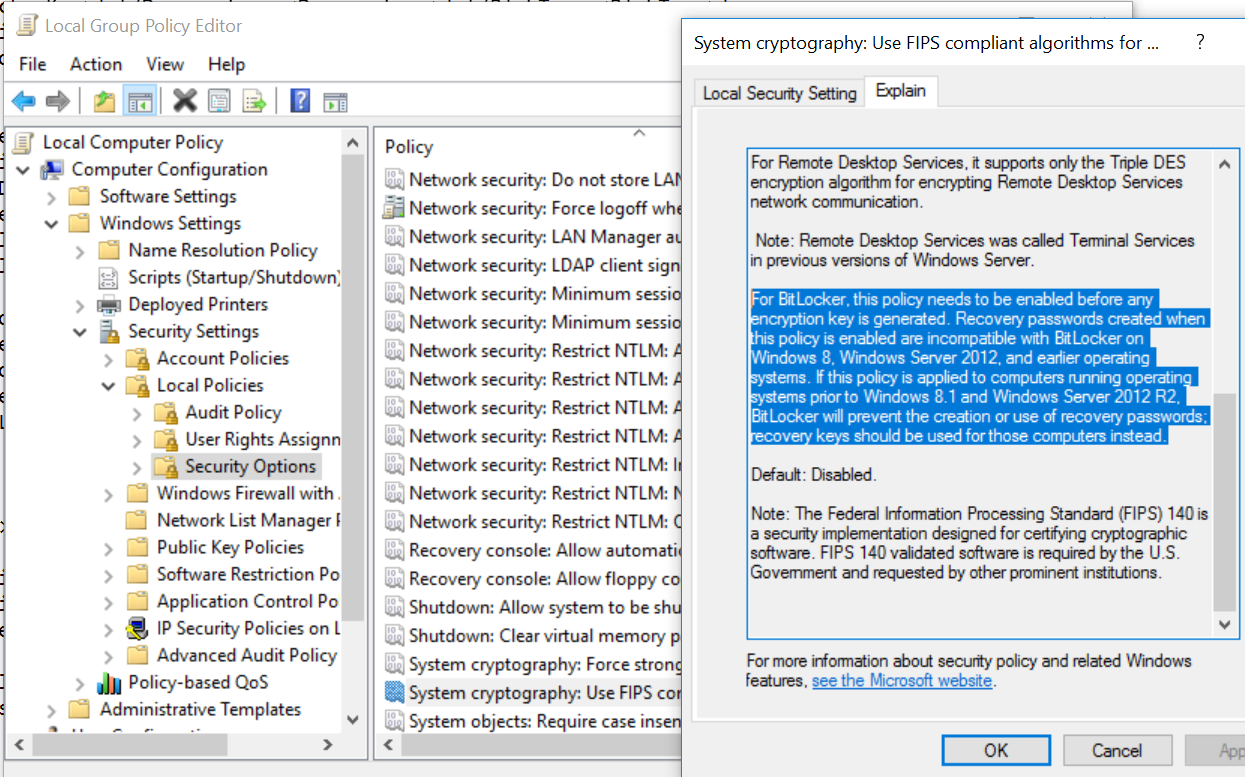
One way to disable FIPS is through the machine’s local policy- ‘System cryptography: Use FIPS compliant algorithms for encryption, hashing, and signing’
You’ll notice in the highlighted text, that once FIPS is enabled, that the type of BitLocker encryption used, recovery passwords, are disallowed.
Tip #6 – Entering the correct ‘BitLocker Key’
| [2016/10/03 14:14:20.607][Info][1] Starting new copy session session#1 …
[2016/10/03 14:14:22.308][Info][1] Verifying target drive against previous sessions… [2016/10/03 14:14:22.604][Info][1] Unlocking BitLocker on drive… [2016/10/03 14:14:24.149][Error][1] Command failed with exception: AzImportDll.AzImportException: Invalid numberical password. at AzImportDll.WmiHelper.ValidateNumericalPassword(String driveLetter, String passwordToValidate) at AzImportDll.PrepImportDriveCommandContext.UnlockBitLockerOnTargetDrive() at AzImportDll.PrepImportDriveCommandContext.FormatAndEncryptTargetDrive() at AzImportDll.PrepImportDriveCommandContext.ExecuteCommand() at AzImportDll.BaseCommandContext`1.Execute() [2016/10/03 14:14:24.164][Info][1] Command failed. |
If you chose to BitLocker encrypt the drive manually, outside of the use of the tool, you will need to enter the ‘BitLocker Key’ with the ‘/bk:’ parameter. If you entered an alphanumeric password as the value, you’ll receive the above error message. I want to emphasize and point out a typo in the error message ‘numberical’
All protection mechanisms, no matter what type, all do the same thing… unlock the drive. There are many types including ‘recovery password, ‘recovery key’, ‘password’, ‘certificate’, etc. You can find the list here. You can have more than one protection mechanism applied to a drive while still only needing one to unlock it.
The tool, at time of writing, only works with the type ‘recovery password’. Therefore, you should enter that in and not any other type of protection mechanism. It should be in this format: 000000-111111-222222-333333-444444-555555-666666-777777
Tip #7 – Retrieving the Recovery Password
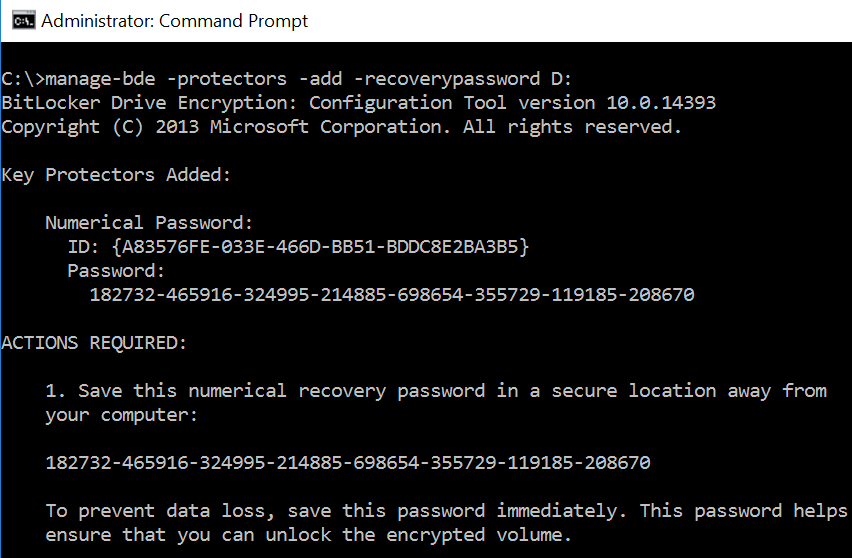
If you manually BitLocker encrypted the drive while FIPS was enabled, then there is no ‘Recovery Password’ and therefore you cannot use the tool. However, once FIPS is disabled, you can add a ‘Recovery Password’ to an already BitLocker encrypted drive by typing the following:
‘manage-bde -protectors -add -recoverypassword D:’
D: is the drive letter for the encrypted volume.
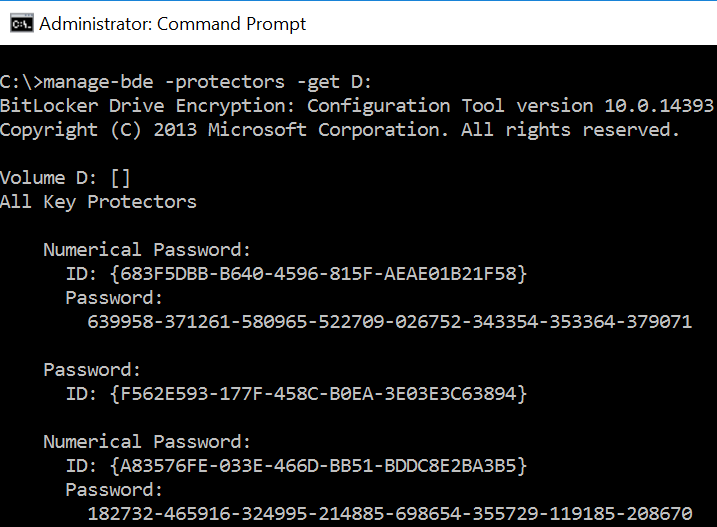
If you want to retrieve a list of all established recovery methods, including the recovery password values, type the following:
‘manage-bde -protectors -get D:’
D: is the drive letter for the encrypted volume.
You will only be able to retrieve the actual ‘recovery password’ values if the drive is already unlocked from a BitLocker perspective
In the below example, there are two numerical passwords (recovery passwords) and a single alphanumeric password. Outside of the tool, any one of those will unlock the drive.
With regards to enhancing this tool in the future… I’ve already spoken with our Product Group about the tool’s limited abilities on FIPS systems. They are actively incorporating that feedback for the tool’s future versions.
I hope that this has been informative and more importantly stopped you from getting into pickle.
We welcome your comments and suggestions to help us continually improve your Azure Government experience. To stay up to date on all things Azure Government, be sure to subscribe to our RSS feed and to receive emails, click “Subscribe by Email!” on the Azure Government Blog. To experience the power of Azure Government for your organization, sign up for an Azure Government Trial.


0 comments