

Need to save a database schema, move schema and data to another environment, or deploy a DACPAC to an existing database but find the existing options confusing? SQL Server Management Studio (SSMS) has new preview wizards that streamlines those tasks: Create bacpac/dacpac and Apply bacpac/dacpac.
The Create wizard guides you through the process of generating a bacpac or dacpac with straightforward steps based on your goal. The Apply wizard uses the package format to show the options for a schema deployment or a schema-and-data import. You can also create a new database and go straight into Apply.
Preview: The Create and Apply wizards and the Create database from bacpac/dacpac command are in preview.
Designed for the task outcome
The new wizards consolidate the previous collection of commands into outcome-oriented tasks. Instead of remembering if an extract or an export is needed, the wizard simply guides you based on your intent of generating a file that has the schema only or the schema and data. When you are ready to use the file, the Apply wizard guides you step by step in reaching your intent on the target database.
| Task | DACPAC | BACPAC |
|---|---|---|
| Create a package file | Save the database schema without table data. | Save the schema and data from the tables you select. |
| Apply a package file | Calculate schema differences and apply changes according to the selected publish options. | Import schema and data into a database with no user-defined objects. |
| Target database | Empty or populated. | Empty. Import doesn’t merge data into existing tables. |
For more about the formats, see the DACPAC and BACPAC overview.
Create a DACPAC or BACPAC
In Object Explorer, right-click the source database and select Tasks > Create bacpac/dacpac (Preview).

Choose whether to include data
On Select Contents, confirm the source server and database. Leave Include data selected to create a BACPAC, or clear it to create a schema-only DACPAC. The wizard shows the resulting file format before you continue.

Choose the file location
On Destination, choose Local disk or Azure Blob Storage. For a local file, enter a path or use Browse. For Blob Storage, connect to a storage account, select a container, and enter a file name. You need permission to read the source schema and data as applicable, and write access to the destination.

Select the export settings
On Settings, a BACPAC export lets you choose which tables’ data to include. Expand a schema to select individual tables, or use Select All. This table selection isn’t shown for a schema-only DACPAC.
The Exclude Azure SQL Database Incompatible Objects option is also available. Select it if you want to exclude objects that aren’t compatible with Azure SQL Database.

Execute and monitor progress
Select Execute and review each operation’s status. Use Save Logs to keep the operation output, including any errors. When the file is created, Close finishes the workflow.

Protect the file: DACPAC and BACPAC files aren’t encrypted. Save them in a location with appropriate access controls, especially when they contain data.
Optionally continue into Apply
If you want to use the file immediately, select Apply bacpac or Apply dacpac after creation succeeds. On Apply File, use Connect to connect to the target server and database, then select Start. The Apply wizard opens with the created file selected.

Apply a DACPAC or BACPAC
To start with a file you already have, right-click the target database in Object Explorer and select Tasks > Apply bacpac/dacpac (Preview). On Select Source, confirm the target, select Dacpac or Bacpac, and browse to the local file.
Create and Apply support databases on SQL Server, Azure SQL Database, and Azure SQL Managed Instance. Your connection needs permissions for the operation. For a BACPAC, the target must have no user-defined objects; even an existing table with no rows prevents import. The wizard disables Bacpac when user objects are present.
DACPAC: configure the schema deployment
For a DACPAC, Options displays SQLCMD Variables and searchable Publish Options. Enter the variable values defined by the package and select the publish options for your target.

Review Block on possible data loss before proceeding. Disabling it can allow changes that remove data. On Review Plan, inspect the planned changes and warnings before selecting Execute. Schema changes can create, alter, or drop objects. Back up the target before applying changes that could remove data.
If the database already matches the DACPAC, the plan reports that no changes are needed.
BACPAC: configure the import
A BACPAC has its own Options page. Configure Command timeout, Long-running command timeout, and Database lock timeout, and use the search box to find Import Options.

On Review Plan, check the tables and data sizes under Table data to import. The Total data value shows the amount of data to import. Select Execute when you’re ready.

For either format, the Progress page shows the status of each operation. Use Save Logs to capture the output. If an operation fails, review the error and logs before retrying.

Need a new database first?
On SQL Server or Azure SQL Managed Instance, right-click the Databases folder and select Create database from bacpac/dacpac (Preview).
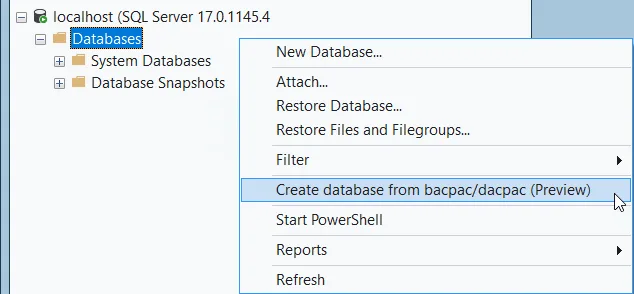
This opens the existing New Database dialog. Enter the database name and configure the owner, files, options, and filegroups.
Be sure to select the collation defined in the DACPAC or BACPAC file.
When you select OK and database creation succeeds, the Apply wizard opens with the new database selected.
The remaining steps are the same Apply flow described above. Database creation is separate from applying the package: if you cancel Apply or the operation fails, the created database remains.
This new-database command isn’t available for Azure SQL Database. For that target, create the database separately and run Apply against it.
Try the preview
Start with a development or test database and choose the task you need: save a schema, export schema and data, deploy a DACPAC, or import a BACPAC into an empty database.
The step-by-step guides cover permissions, settings, and the full workflow:
- Create a DACPAC or BACPAC file
- Apply a DACPAC or BACPAC to an existing database
- Create a database from a DACPAC or BACPAC
Tell us what works and where you run into problems through SSMS feedback. Include the package format, target platform, and any relevant error details, but don’t include credentials or sensitive data.


0 comments
Be the first to start the discussion.