

I was fortunate enough to be able to present Data API builder the week of March 20th at VS Live in Las Vegas and what an incredible group of attendees at that conference. During my session, I stepped through a live demo of Data API builder showing off REST and GraphQL endpoints on various database objects. This blog post contains the steps I performed in the demo so that you can perform them as well and create your first set of REST/GraphQL endpoints on a SQL Database. This quickstart is using 100% local components which are 100% free to use.
Remember, while this quickstart uses SQL Server/Azure SQL Database, Data API builder can also be used with Azure mySQL, Azure Cosmos DB, and Azure Postgres!
Prerequisites
Here is what you need to get started on this Data API builder quickstart demo. Ensure that they are all installed before starting.
- VS Code
- Azure Data Studio
- Azure Functions Core Tools
- .NET SDK 6+
- Go-sqlcmd
- SqlPackage
- Data API Builder
- Docker desktop
Quickstart Demo
Use dabcli to create the config file and add objects
-
Start at a command prompt/powershell and create a project directory
mkdir dabdemo
-
Enter the directory
cd dabdemo -
and create a Database Project using the new templates via .NET
dotnet new sqlproj -n "dabDB" -tp "SqlAzureV12"
-
Next, create a database locally with go-sqlcmd and DOcker Desktop. This command will grab the image from the repository and create a full SQL Server 2022 instance (Developer Editon) your local machine
sqlcmd create mssql -u dabDB --accept-eula
-
Open Azure Data Studio from the current directory when the database is done creating. Issuing this command, you will automatically be connected to the database and an entry will be created in ADS as well
sqlcmd open ads
-
Create 2 tables: a customer and address table. During the presentation, I used Table Designer but here is the resulting SQL code:
CREATE TABLE [dbo].[customer] (
    [customer_id]        INT            IDENTITY (1, 1) NOT NULL PRIMARY KEY CLUSTERED ([customer_id] ASC),
    [customer_name]      NVARCHAR (200) NOT NULL,
    [customer_email]     NVARCHAR (200) NOT NULL,
    [customer_sales_rep] NVARCHAR (200) NOT NULL
);
CREATE TABLE [dbo].[address] ( [address_id] INT IDENTITY (1, 1) NOT NULL PRIMARY KEY CLUSTERED ([address_id] ASC), [customer_id] INT NOT NULL, [address] NVARCHAR (200) NOT NULL, CONSTRAINT [FK_address_customer] FOREIGN KEY ([customer_id]) REFERENCES [dbo].[customer] ([customer_id]) ); -
Publish the tables to the local docker database in Azure Data Studio

-
Insert data into the tables
insert into dbo.customer(customer_name, customer_email, customer_sales_rep) values('Bill','bill@computer.com','Marlene');
insert into dbo.customer(customer_name, customer_email, customer_sales_rep) values('Frank', 'frank@computer.com','Riley');
select * from customer
insert into address (customer_id, address) values (1, 'Lincoln, MA');
insert into address (customer_id, address) values (2, 'Baltimore, MD');
select c.customer_name, a.address
from customer c, address a
where c.customer_id = a.customer_id;
go
-
Back at the command line, get the user/password using sqlcmd
sqlcmd config connection-strings
-
Open VS Code in this directory
code . -
Open a new terminal in VS Code
-
Create the dab config file and DB connection (to local database). Remember to fill in the USER, PASSWORD and if you are using a port other than 1433.
dab init --database-type "mssql" --connection-string "Server=localhost;Database=dabDB;User ID=USER;Password=PASSWORD;TrustServerCertificate=true" --host-mode "Development"
-
Add the customer and address tables to the dab config file by issuing these commands at the terminal as well.
dab add customer --source dbo.customer --permissions "anonymous:*"
dab add address --source dbo.address --permissions "anonymous:*"
Start dab
- Run DAB locally by running the following command in the terminal.
dab start
REST Endpoints
-
The REST examples can be done using a REST client extension in VS Code or via a REST client application such as Postman or Insomnia. All the examples will use the following endpoints:
https://localhost:5001/api/customer
https://localhost:5001/api/address
-
Get by Primary Key
https://localhost:5001/api/customers/customer_id/1
-
Filter columns using select
https://localhost:5001/api/customers?$select=customer_email
-
Operations: equals and not equals
https://localhost:5001/api/customers?$filter=customer_name eq 'bill'
https://localhost:5001/api/customers?$filter=customer_name ne 'bill'
https://localhost:5001/api/customers?$filter=customer_sales_rep eq 'Riley'
-
Sort results with orderby
https://localhost:5001/api/customers?$orderby=customer_id desc
-
Using POST to create a record. Same endpoint but instead of using a GET method, this is a POST.
POST https://localhost:5001/api/customers { "customer_name": "Joel", "customer_email": "joel@computer.com", "customer_sales_rep": "Riley" } -
Using PUT to create a record when you are using a primary key with managed identity will result in an error. In this case, it is best to use a PATCH.
-
Using a PATCH to create or update a record
PATCH https://localhost:5001/api/customers/customer_id/3 { "customer_email": "joel2@computer.com" } -
Using a DELETE to delete a record
DELETE https://localhost:5001/api/Customers/customer_id/3
GraphQL Endpoints
All examples use POST and the endpoint https://localhost:5001/graphql/
-
A simple get using GraphQL
{ customers(first: 5) { items { customer_id customer_name } }} -
Using an orderBy to sort the results
{ customers(orderBy: {customer_id: DESC} ) { items { customer_id customer_name customer_email } } } -
Get a record by primary key. Data API builder will automatically create the customers_by_pk function.
{ customers_by_pk(customer_id: 1) { customer_id customer_name customer_email customer_sales_rep } } -
Create relationship one to many. To do this, stop DAB via the terminal in VS Code and run the following command. After running the command, restart DAB with dab start and try the example.
dab update customer --relationship "address" --cardinality "many" --target.entity "address"

{
 customers
 {
   items {
     customer_id
     customer_name
     customer_email
     customer_sales_rep
     address {
       items {
         address
       }
      }
    }
  }
}
-
Create relationship many to one. To do this, stop DAB via the terminal in VS Code and run the following command. After running the command, restart DAB with dab start and try the example.
dab update address --relationship "customer" --cardinality "one" --target.entity "customer"
{ addresses { items { address customer { customer_name customer_id customer_email } } } } -
Filter results using filter
{ customers(filter: { customer_sales_rep: { contains: "Mar" } }) { items { customer_id customer_name customer_sales_rep } } } -
Filter results with a relationship you created in the previous examples
{ customers(filter: { customer_name: { contains: "ill" } }) { items { customer_id customer_name customer_sales_rep address { items { address } } } } } -
Create customer with mutation and GraphQL
mutation { createcustomers(item: { customer_name: "Elle", customer_email: "elle@computer.com" customer_sales_rep: "Riley" }) { customer_name customer_email customer_sales_rep } } -
Update customers using mutation and GraphQL
mutation { updatecustomers(customer_id: 1003, item: { customer_email: "ssss2@ssss.xxxx" }) { customer_id customer_email } } -
Delete customers using mutation and GraphQL
mutation {
  deletecustomers(customer_id: 1004)
  {
    customer_id
  }
}
Stored Procedures
-
Open a new query sheet in Azure Data Studio connected to the database running in Docker and run the following code:
create or alter procedure dbo.get_customers_by_rep
@rep nvarchar(200)
as
select * from dbo.customer where customer_sales_rep = @rep;
go
-
Run the following command to test the stored procedure in Azure Data Studio
exec dbo.get_customers_by_rep 'Marlene';
-
Stop DAB and run the following to register the stored procedure
dab add getCustomersByRep --source dbo.get_customers_by_rep --source.type "stored-procedure" --source.params "rep:" --permissions "anonymous:execute" --rest.methods "get" --graphql.operation "query"
-
Start DAB
dab start
-
Use the procedure’s REST endpoint passing in Riley into the rep parameter.
https://localhost:5001/api/getCustomersByRep?rep=Riley -
Use the procedure’s GraphQL endpoint passing in Riley into the rep parameter. DAB automatically creates the executegetCustomersByRep function for you.
https://localhost:5001/graphql/
query {
  executegetCustomersByRep(rep:"Riley")
   {
    customer_id
    customer_name
    customer_email
  }
}
Authentication and Authorization
Start by changing the provider property in the dab-config.json filer to Simulator.
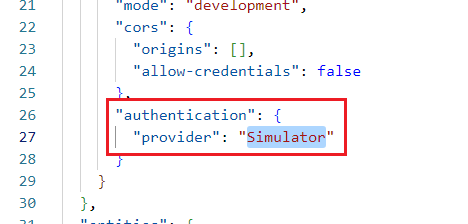
Save the file.
We can now utilize the header parameter X-MS-API-ROLE in our REST/GraphQL calls.
-
Stop DAB and change the permissions section in the customer entity to:
"permissions": [
	{
	  "role": "anonymous",
	  "actions": [ "read" ]
      },
      {
	  "role": "admin",
	  "actions": [ "*" ]
      }
      ],
SAVE THE FILE! (I have many times forgotten to do this and then wondered why this part didn’t work)What this change is saying is that when I am calling this API and do not have the admin role, I can only issue GETs, otherwise I will get a 403 response. If I have the admin role, I can use all the methods (GET/PUT/PATCH/POST/DELETE).
-
Using the REST client, call the following GET
https://localhost:5001/api/customer
-
Using the REST client, call the following POST. You should see a response of 403, forbidden.
{ "customer_name": "Tommy", "customer_email": "Tommy@computer.com", "customer_sales_rep": "Marlene" } -
Add the header info for admin and retry POST. You should see that the record was created
X-MS-API-ROLE: admin
https://localhost:5001/api/customer { "customer_name": "Tommy", "customer_email": "Tommy@computer.com", "customer_sales_rep": "Marlene" } -
You can add Database Policies which will filter or restrict results using Static Web Apps CLI. You can see this code in action in the VS Live Keynote demo repository here.
    "actions": [
	{
	    "action": "read",
	    "policy": {
		"database": "@customers.customer_sales_rep eq 'Riley'"
	    }
	}
    ]
Data API builder is an amazing tool and very simple to use. You can check out the documents here and see more samples here.
0 comments