Introduction
In this post we’ll demonstrate how we can use the NVIDIA® Jetson Nano™ device running AI on IoT edge combined with power of Azure platform to create an end-to-end AI on edge solution. We are going to use a custom AI model that is developed using NVIDIA® Jetson Nano™ device, but you can use any AI model that fits your needs. We will see how we can leverage the new Azure SDKs to create a complete Azure solution.
This post has been divided into three sections. The Architecture overview section discusses the overall architecture at a high-level. The Authentication Front-end section discusses the starting and ending points of the system flow. The Running AI on the Edge section talks about details on how the NVIDIA® Jetson Nano™ as an IoT Edge device can run AI and leverage the Azure SDK to communicate with the Azure Platform.
Architecture overview
There are two main components of the architecture:
-
The Authentication Front-end and AI on the edge run by device side code. The Authentication Front-end is responsible for creating a request, which is added to an Azure Storage Queue.
-
The device side code is running Python code that is constantly listening to Azure Storage Queue for new requests. It picks up the requests and runs AI on it according to the requests. Once the device side code detects the object, it captures the image of the detected object and posts the captured image to Azure Storage Blob.
The underlying core of the architecture is the use of te new Azure SDKs by the Authentication Front-end and the AI running on the edge. This is done by adding requests to Azure Storage Queue by Authentication Front-end for AI processing and updating the Azure Storage Blob with captured image by the device side Python code.
Control flow
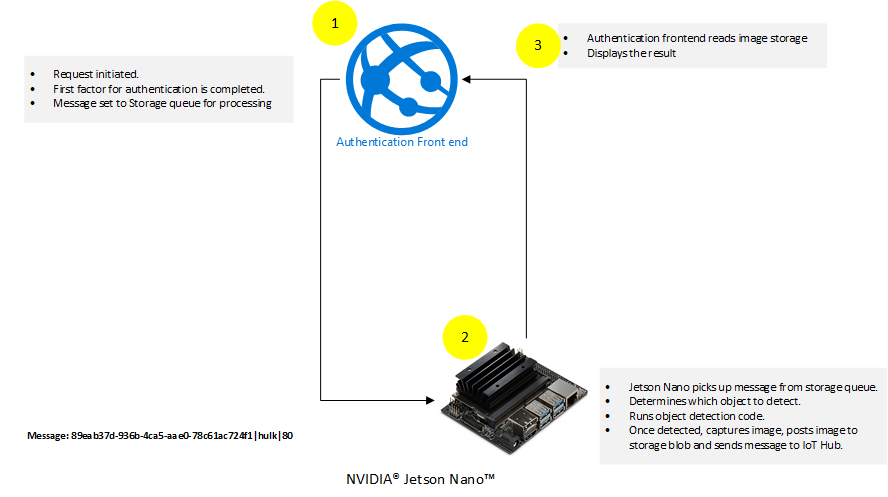
At a high-level, the following actions are taking place:
- Authentication Front-end initiates flow by completing the first factor authentication. Once first factor authentication is complete the flow is passed to NVIDIA® Jetson Nano™ device.
- NVIDIA® Jetson Nano™ device runs custom AI model using code mentioned in following sections. The result of this step is completion of the second factor of authentication.
- The control is passed back to Authentication Front-end which validates the results that came from NVIDIA® Jetson Nano™ device.
Authentication Front-end
The role of the Authentication Front-end is to initiate the two-factor flow and interact with Azure using the new Azure SDKs.
Code running on Authentication Front-end
The code running on Authentication Front-end is mainly comprised of two controllers.
The following describes the code for each of those controllers.
SendMessageController.cs
The SendMessageController.cs’s main job is to complete the first factor of the authentication. The code simulates the completion of the first factor by just ensuring that the username and passwords are the same. In a real world implementation, this should be done by a valid secure authentication mechanism. An example of how to implement secure authentication mechanism is mentioned in the article Authentication and authorization in Azure App Service and Azure Functions. The second task that SendMessageController.cs is doing is to queue the messages up for the second factor. This is done using the new Azure SDKs.
Here is the code snippet for SendMesssageController.cs:
        [HttpPost("sendmessage")]
        public IActionResult Index()
        {
            string userName = string.Empty;
            string password = string.Empty;

            if (!string.IsNullOrEmpty(Request.Form["userName"]))
            {
                userName = Request.Form["userName"];
            }

            if (!string.IsNullOrEmpty(Request.Form["password"]))
            {
                password = Request.Form["password"];
            }

            // Simulation of first factor authentication presented here.
            // For real world example visit: https://docs.microsoft.com/azure/app-service/overview-authentication-authorization
            if(!userName.Equals(password, StringComparison.InvariantCultureIgnoreCase))
            {
                return View(null);
            }

            var objectClassificationModel = new ObjectClassificationModel()
            {
                ClassName = userName,
                RequestId = Guid.NewGuid(),
                ThresholdPercentage = 70
            };

            _ = QueueMessageAsync(objectClassificationModel, storageConnectionString);

            return View(objectClassificationModel);
        }

        public static async Task QueueMessageAsync(ObjectClassificationModel objectClassificationModel, string storageConnectionString)
        {
            string requestContent = $"{objectClassificationModel.RequestId}|{objectClassificationModel.ClassName}|{objectClassificationModel.ThresholdPercentage.ToString()}";


            // Instantiate a QueueClient which will be used to create and manipulate the queue
            QueueClient queueClient = new QueueClient(storageConnectionString, queueName);

            // Create the queue
            var createdResponse = await queueClient.CreateIfNotExistsAsync();
            if (createdResponse != null)
            {
                Console.WriteLine($"Queue created: '{queueClient.Name}'");
            }

            await queueClient.SendMessageAsync(requestContent);
        }
In the code snippet mentioned above, the code is simulating the first factor by comparing username and password. After the simulation of first factor, the code is sending a message to an Azure Storage Queue using the new Azure SDK.
ObjectClassificationController.cs
The ObjectClassificationController.cs is initiated after the custom code on AI at the Edge has completed. The code validates if the request has been completed by the NVIDIA® Jetson Nano™ device and then shows the resultant captured image of the detected object.
Here is the code snippet:
        public IActionResult Index(string requestId, string className)
        {
            string imageUri = string.Empty;
            Guid requestGuid = default(Guid);
            if (Guid.TryParse(requestId, out requestGuid))
            {
                BlobContainerClient blobContainerClient = new BlobContainerClient(storageConnectionString, containerName);
                foreach (BlobItem blobItem in blobContainerClient.GetBlobs(BlobTraits.All))
                {
                    if (string.Equals(blobItem?.Name, $"{requestId}/{imageWithDetection}", StringComparison.InvariantCultureIgnoreCase))
                    {
                        imageUri = $"{blobContainerClient.Uri.AbsoluteUri}/{blobItem.Name}";
                    }
                }

                ObjectClassificationModel objectClassificationModel = new ObjectClassificationModel()
                {
                    ImageUri = new Uri(imageUri),
                    RequestId = requestGuid,
                    ClassName = className
                };

                return View(objectClassificationModel);
            }

            return View(null);
        }

        [HttpGet("HasImageUploaded")]
        [Route("objectclassification/{imageContainerGuid}/hasimageuploaded")]
        public async Task<IActionResult> HasImageUploaded(string imageContainerGuid)
        {

            BlobContainerClient blobContainerClient = new BlobContainerClient(storageConnectionString, "jetson-nano-object-classification-responses");
            await foreach(BlobItem blobItem in blobContainerClient.GetBlobsAsync(BlobTraits.All))
            {
                if (string.Equals(blobItem?.Name, $"{imageContainerGuid}/{imageWithDetection}", StringComparison.InvariantCultureIgnoreCase))
                {
                    return new Json($"{blobContainerClient.Uri.AbsoluteUri}/{blobItem.Name}");
                }
            }
            return new Json(string.Empty);
        }
The above mentioned code snippet shows two methods that are using the new Azure SDK. The HasImageUploaded method queries the Azure Storage Blob to find if the image has been uploaded or not. The Index method simply gets the image reference from Azure Storage Blob. For more information on how to read Azure Blob Storage using the new Azure SDK visit Quickstart: Azure Blob Storage client library v12 for .NET.
The following steps are taken on the Authentication Front-end:
- User initiates login by supplying username and password.
- User is authenticated on the first factor using the combination of username and password.
- On successful completion of the first factor, the web interface creates a request and sends that to Azure Storage as shown below:
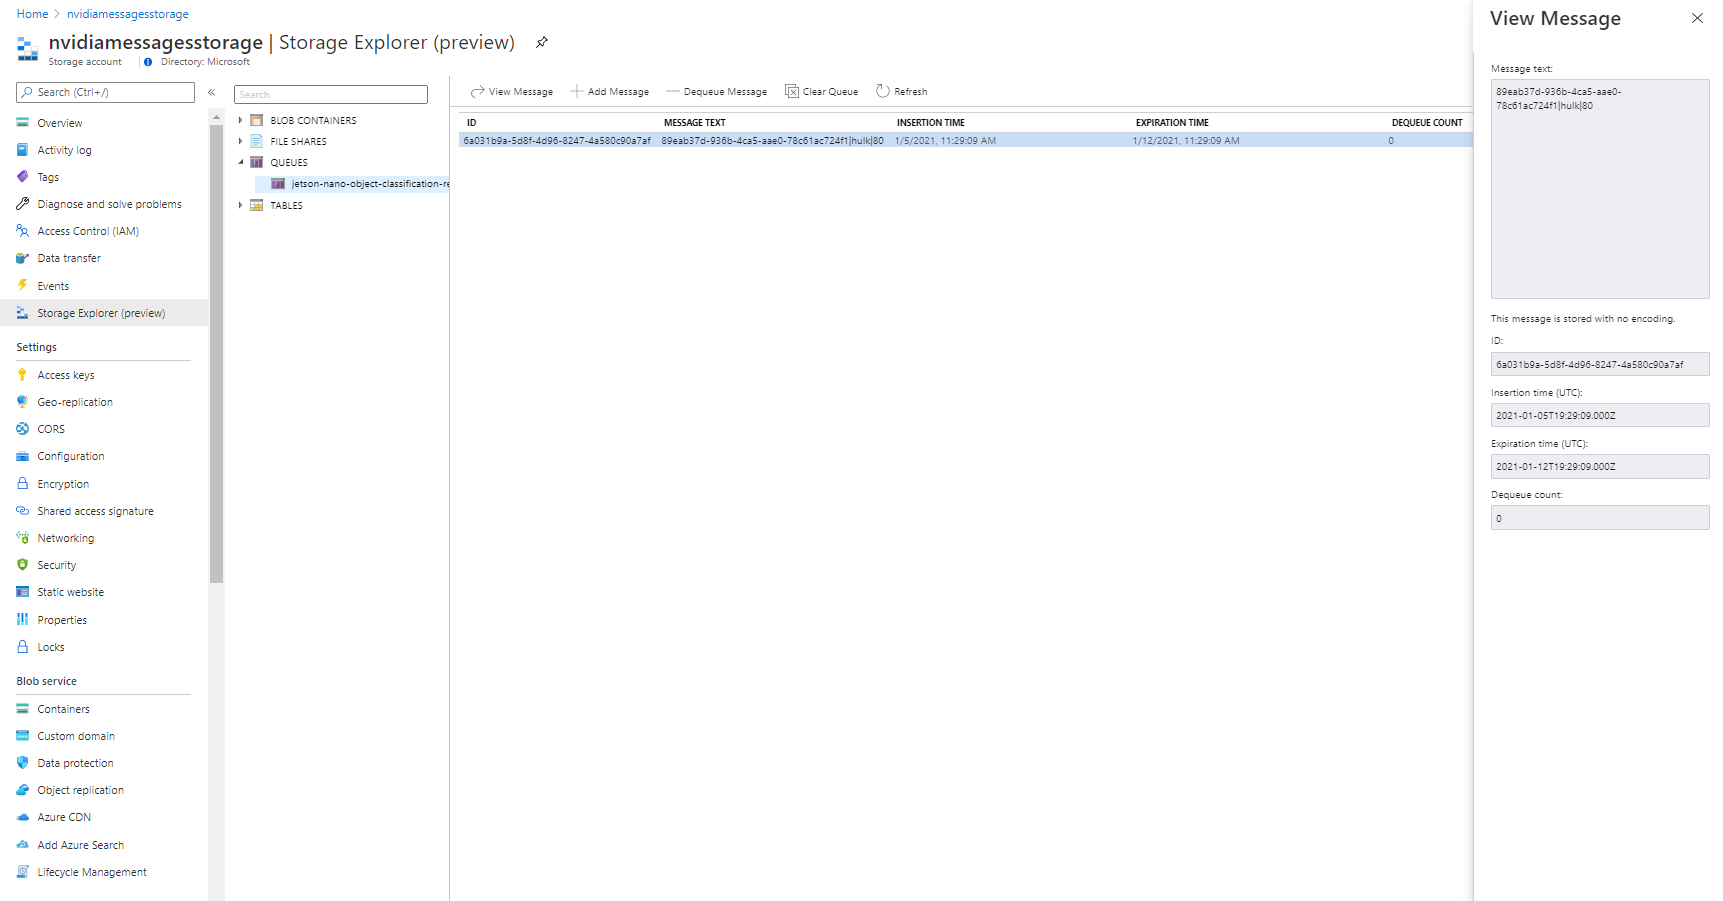
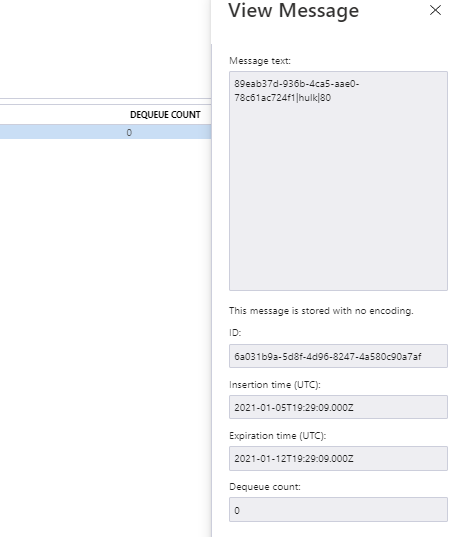
- The NVIDIA® Jetson Nano™ device, which is listening to Azure Storage Queue, initiates the second factor and completes the second factor.
- Once the second factor is completed, the NVIDIA® Jetson Nano™ device posts the captured image for the second factor to Azure Storage Blob as shown below:
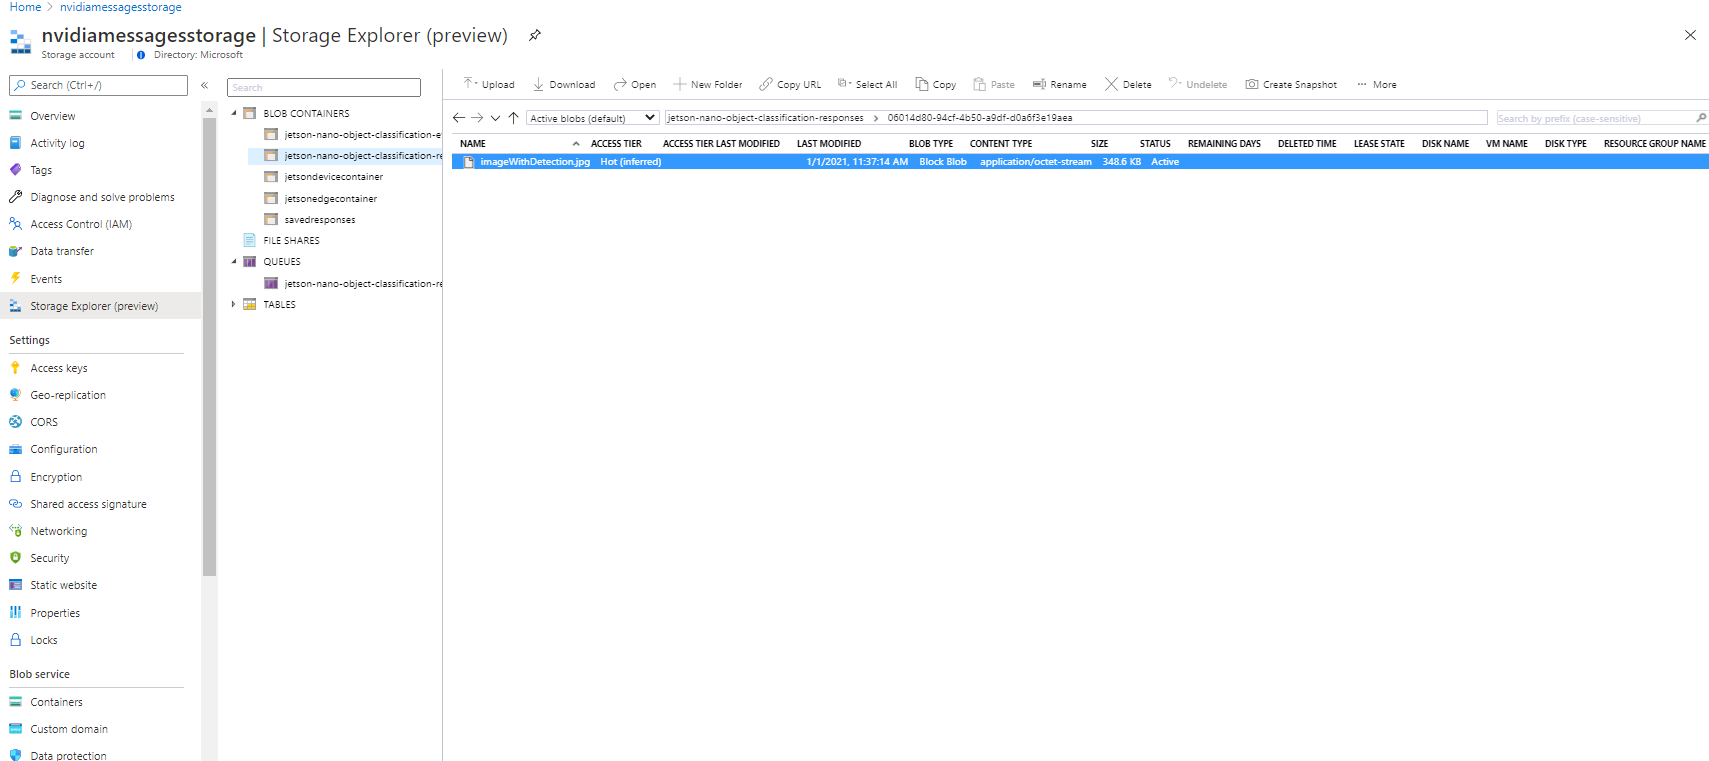
- The web interface shows the captured image, completing the flow as shown below:
Running AI on the Edge
Device pre-requisites
- NVIDIA® Jetson Nano™ device with camera attached to capture video image.
- Custom pre-training model deployed on the device.
- Location path to the custom model file (.onnx file). This information is presented as –model parameter to the command mentioned in Steps section. For this tutorial we have prepared a custom model and saved as “~/gil_background_hulk/resenet18.onnx”.
- Location path to the classification text file (labels.txt). This information is presented as –labels parameter to the command mentioned in Steps section.
- Class name of the object that is target object that needs to be detected. This is presented as –classNameForTargetObject.
- Azure IoT Hub libraries for Python. Install the azure-iot-device package for IoTHubDeviceClient.
pip install azure-iot-device
Code running AI on the Edge
If we look at the technical specifications for NVIDIA® Jetson Nano™ device, we will notice that it is based on ARM architecture running Ubuntu (in my case it was release: 18.04 LTS). With that knowledge it became clear that Python would be good choice of language running at device side. The device side code is shown below:
#!/usr/bin/python

import jetson.inference
import jetson.utils

import argparse
import sys

import os
import asyncio
from azure.iot.device.aio import IoTHubDeviceClient
from azure.storage.queue.aio import QueueClient
from azure.storage.blob.aio import BlobServiceClient, BlobClient, ContainerClient

# A helper class to support async blob and queue actions.
class StorageHelperAsync:
    async def block_blob_upload_async(self, upload_path, savedFile):
        blob_service_client = BlobServiceClient.from_connection_string(
            os.getenv("STORAGE_CONNECTION_STRING")
        )
        container_name = "jetson-nano-object-classification-responses"

        async with blob_service_client:
            # Instantiate a new ContainerClient
            container_client = blob_service_client.get_container_client(container_name)

            # Instantiate a new BlobClient
            blob_client = container_client.get_blob_client(blob=upload_path)

            # Upload content to block blob
            with open(savedFile, "rb") as data:
                await blob_client.upload_blob(data)
                # [END upload_a_blob]

    # Code for listening to Storage queue
    async def queue_receive_message_async(self):
        # from azure.storage.queue.aio import QueueClient
        queue_client = QueueClient.from_connection_string(
            os.getenv("STORAGE_CONNECTION_STRING"),
            "jetson-nano-object-classification-requests",
        )

        async with queue_client:
            response = queue_client.receive_messages(messages_per_page=1)
            async for message in response:
                queue_message = message
                await queue_client.delete_message(message)
                return queue_message


async def main():

    # Code for object detection
    # parse the command line
    parser = argparse.ArgumentParser(
        description="Classifying an object from a live camera feed and once successfully classified a message is sent to Azure IoT Hub",
        formatter_class=argparse.RawTextHelpFormatter,
        epilog=jetson.inference.imageNet.Usage(),
    )
    parser.add_argument(
        "input_URI", type=str, default="", nargs="?", help="URI of the input stream"
    )
    parser.add_argument(
        "output_URI", type=str, default="", nargs="?", help="URI of the output stream"
    )
    parser.add_argument(
        "--network",
        type=str,
        default="googlenet",
        help="Pre-trained model to load (see below for options)",
    )
    parser.add_argument(
        "--camera",
        type=str,
        default="0",
        help="Index of the MIPI CSI camera to use (e.g. CSI camera 0)nor for VL42 cameras, the /dev/video device to use.nby default, MIPI CSI camera 0 will be used.",
    )
    parser.add_argument(
        "--width",
        type=int,
        default=1280,
        help="Desired width of camera stream (default is 1280 pixels)",
    )
    parser.add_argument(
        "--height",
        type=int,
        default=720,
        help="Desired height of camera stream (default is 720 pixels)",
    )
    parser.add_argument(
        "--classNameForTargetObject",
        type=str,
        default="",
        help="Class name of the object that is required to be detected. Once object is detected and threshhold limit has crossed, the message would be sent to Azure IoT Hub",
    )
    parser.add_argument(
        "--detectionThreshold",
        type=int,
        default=90,
        help="The threshold value 'in percentage' for object detection",
    )

    try:
        opt = parser.parse_known_args()[0]
    except:
        parser.print_help()
        sys.exit(0)

    # load the recognition network
    net = jetson.inference.imageNet(opt.network, sys.argv)

    # create the camera and display
    font = jetson.utils.cudaFont()
    camera = jetson.utils.gstCamera(opt.width, opt.height, opt.camera)
    display = jetson.utils.glDisplay()
    input = jetson.utils.videoSource(opt.input_URI, argv=sys.argv)

    # Fetch the connection string from an environment variable
    conn_str = os.getenv("IOTHUB_DEVICE_CONNECTION_STRING")

    device_client = IoTHubDeviceClient.create_from_connection_string(conn_str)
    await device_client.connect()

    counter = 1
    still_looking = True
    # process frames until user exits
    while still_looking:
        storage_helper = StorageHelperAsync()
        queue_message = await storage_helper.queue_receive_message_async()

        print("Waiting for request queue_messages")
        print(queue_message)
        if queue_message:
            has_new_message = True
            queue_message_array = queue_message.content.split("|")
            request_content = queue_message.content
            correlation_id = queue_message_array[0]
            class_for_object_detection = queue_message_array[1]
            threshold_for_object_detection = int(queue_message_array[2])

            while has_new_message:
                # capture the image
                # img, width, height = camera.CaptureRGBA()
                img = input.Capture()

                # classify the image
                class_idx, confidence = net.Classify(img)

                # find the object description
                class_desc = net.GetClassDesc(class_idx)

                # overlay the result on the image
                font.OverlayText(
                    img,
                    img.width,
                    img.height,
                    "{:05.2f}% {:s}".format(confidence * 100, class_desc),
                    15,
                    50,
                    font.Green,
                    font.Gray40,
                )

                # render the image
                display.RenderOnce(img, img.width, img.height)

                # update the title bar
                display.SetTitle(
                    "{:s} | Network {:.0f} FPS | Looking for {:s}".format(
                        net.GetNetworkName(),
                        net.GetNetworkFPS(),
                        opt.classNameForTargetObject,
                    )
                )

                # print out performance info
                net.PrintProfilerTimes()
                if (
                    class_desc == class_for_object_detection
                    and (confidence * 100) >= threshold_for_object_detection
                ):
                    message = request_content + "|" + str(confidence * 100)
                    font.OverlayText(
                        img,
                        img.width,
                        img.height,
                        "Found {:s} at {:05.2f}% confidence".format(
                            class_desc, confidence * 100
                        ),
                        775,
                        50,
                        font.Blue,
                        font.Gray40,
                    )
                    display.RenderOnce(img, img.width, img.height)
                    savedFile = "imageWithDetection.jpg"
                    jetson.utils.saveImageRGBA(savedFile, img, img.width, img.height)

                    # Create the BlobServiceClient object which will be used to create a container client
                    blob_service_client = BlobServiceClient.from_connection_string(
                        os.getenv("STORAGE_CONNECTION_STRING")
                    )
                    container_name = "jetson-nano-object-classification-responses"

                    # Create a blob client using the local file name as the name for the blob
                    folderMark = "/"
                    upload_path = folderMark.join([correlation_id, savedFile])

                    await storage_helper.block_blob_upload_async(upload_path, savedFile)

                    await device_client.send_message(message)
                    still_looking = True
                    has_new_message = False

    await device_client.disconnect()


if __name__ == "__main__":
    # asyncio.run(main())
    loop = asyncio.get_event_loop()
    loop.run_until_complete(main())
    loop.close()
Here is the link for code to try out: https://gist.github.com/nabeelmsft/f079065d98d39f271b205b71bc8c48bc
Code flow
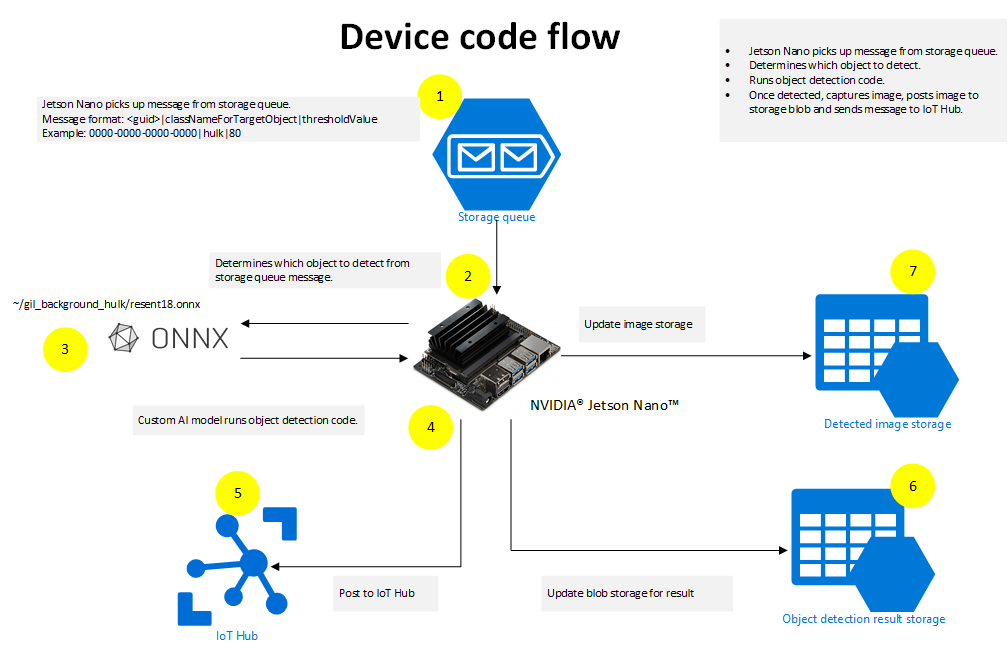
The following actions take place in python code running on the device side:
- The device code is constantly reading the request coming to Azure Storage Queue.
- Once request is received; code extracts out which object to detect and what threshold to use for object detection. The example mentioned in the diagram shows the message as: 0000-0000-0000-0000|hulk|80. The code will extract “hulk” as the object that needs to be detected and “80” as threshold value. This format is just an example that is used to provide input values to device side code.
- Using the custom AI model (example: ~/gil_background_hulk/resenet18.onnx) running on Jetson Nano device, object is searched based on the request.
- As soon as object is detected, the python code running on Jetson Nano device posts captured image to Azure Blob storage.
- In addition, the code running on Jetson Nano device sends message to Azure IoT hub informing of correct match for the request.
Once the device side code completes the flow, the object detected image is posted to Azure Storage blob along with posting to Azure IoT Hub. The web interface then takes control and completes the rest of the steps.
Conclusion
In this post we have seen how simple it is for running AI on edge using Nvidia Jetson nano device leveraging Azure platform. Azure SDKs are designed to work great with a python on linux based IoT devices. We have also seen how Azure SDK plays the role of stitching different components together for a complete end to end solution.
Azure SDK Blog Contributions
Thank you for reading this Azure SDK blog post! We hope that you learned something new and welcome you to share this post. We are open to Azure SDK blog contributions. Please contact us at azsdkblog@microsoft.com with your topic and we’ll get you set up as a guest blogger.
Azure SDK Links
- Azure SDK Website: aka.ms/azsdk
- Azure SDK Intro (3 minute video): aka.ms/azsdk/intro
- Azure SDK Intro Deck (PowerPoint deck): aka.ms/azsdk/intro/deck
- Azure SDK Releases: aka.ms/azsdk/releases
- Azure SDK Blog: aka.ms/azsdk/blog
- Azure SDK Twitter: twitter.com/AzureSDK
- Azure SDK Design Guidelines: aka.ms/azsdk/guide
- Azure SDKs & Tools: azure.microsoft.com/downloads
- Azure SDK Central Repository: github.com/azure/azure-sdk
- Azure SDK for .NET: github.com/azure/azure-sdk-for-net
- Azure SDK for Java: github.com/azure/azure-sdk-for-java
- Azure SDK for Python: github.com/azure/azure-sdk-for-python
- Azure SDK for JavaScript/TypeScript: github.com/azure/azure-sdk-for-js
- Azure SDK for Android: github.com/Azure/azure-sdk-for-android
- Azure SDK for iOS: github.com/Azure/azure-sdk-for-ios
- Azure SDK for Go: github.com/Azure/azure-sdk-for-go
- Azure SDK for C: github.com/Azure/azure-sdk-for-c
- Azure SDK for C++: github.com/Azure/azure-sdk-for-cpp


0 comments