Last week we rolled out some updates for our Visual Studio 2010 Web Publishing Experience. This post will give you an overview of the new features which we released. In the coming weeks there will be more posts getting into more details regarding individual features.
You can get these updates in the Windows Azure SDK for Visual Studio 2010. When you download that package there you will also get the latest tools for Azure development.
The new high level features include the following.
- Updated Web Publish dialog
- Support to import publish profiles (.publishSettings files)
- Support to configure EF Code First migrations during publish
- Support to create web packages in the publish dialog
- Publish profiles now a part of the project and stored in version control by default
- Publish profiles are now MSBuild files
- Profile specific web.config transforms
Overview
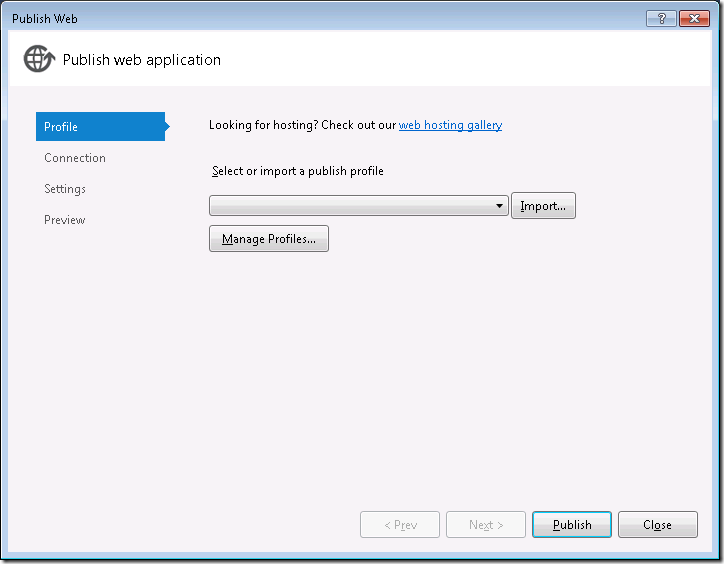
When you right click on your Web Application Project (WAP) you will now see the new publish dialog.
On this tab you can import a .publishSettngs file, which many web hosts provide, and you can also manage your publish profiles. If you are hosting your site on Windows Azure Web Sites then you can download the publish profile on the dashboard of the site using the Download publish profile link. After you import this publish profile you will be brought to the Connection tab automatically.
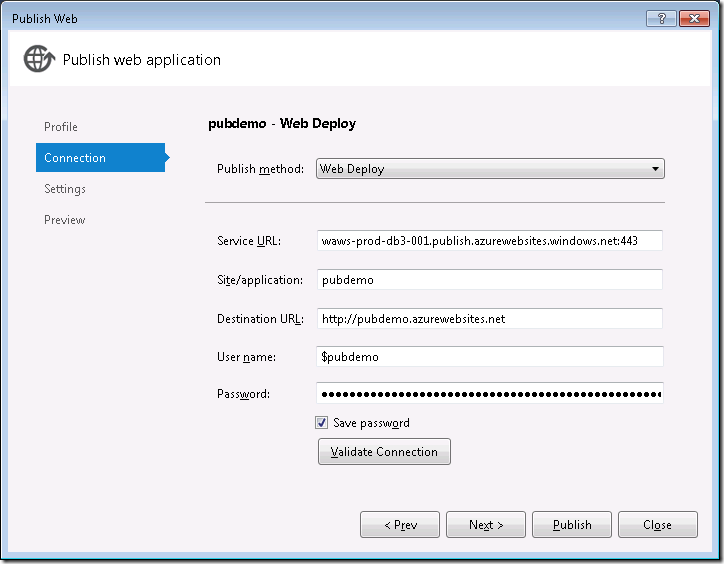
On this tab you can see all the server configuration values which are needed for your client machine to connect to the server. Typically you don’t have to worry about the details of these values. Next you’ll go to the Settings tab.
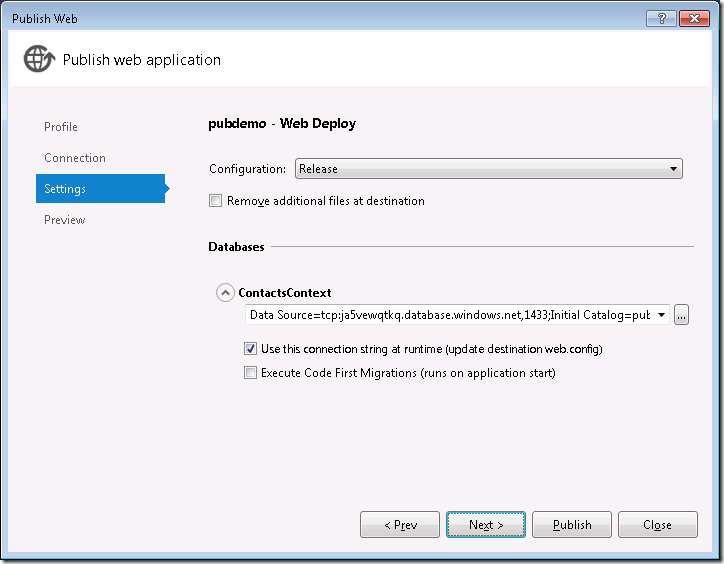
On the Settings tab you can set the build configuration which should be used for the publish process, the default value here is Release. There is also a checkbox to enable you to delete any files on the server which do not exist in the project.
Below that checkbox you will see a section for databases. The sample project shown has an Entity Framework Code First model, named ContactsContext, and it uses Code First Migrations to manage the database schema. If you have any non-EF Code First connection strings in web.config then those databases will show up as well but the support for incrementally publishing the schema for those has not yet been finalized. We are currently working on that. You can visit my previous blog entry for more info on that.
If you imported a .publishSettings file with a connection string then that connection string would automatically be inserted in the textbox/dropdown for the connection string. If you did not then you can use the … button to create a connection string with the Connection String Builder dialog or you can simply type/paste in a connection string. For the EF Code First contexts you will see the Execute Code Frist Migrations checkbox. When you check this when your site is published the web.config will be transformed to enable the Code First migrations to be executed the first time that the context is accessed. Now you can move to the Preview tab.
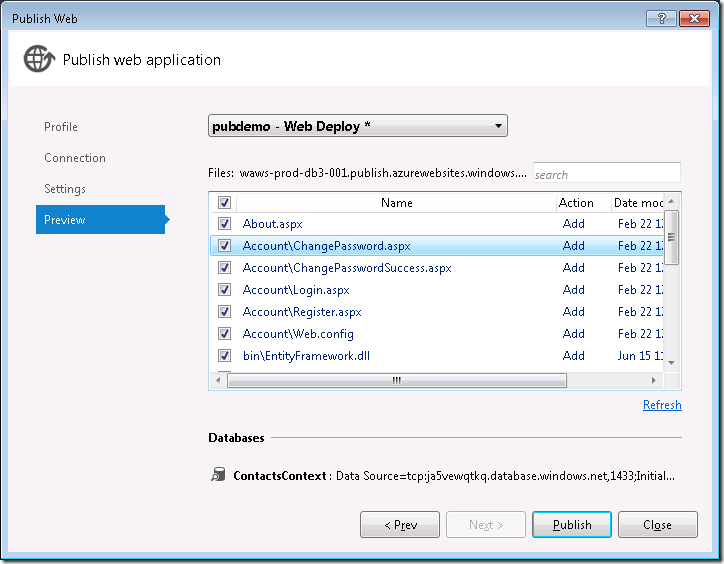
When you first come to the Preview tab you will see a Start Preview button. Once you click this button you will see the file operations which would be performed once you publish. Since this site has never been published all the file operations are Add, as you can see in the image below. The other Action values include; Update and Delete.
Once you are ready to publish you can click the Publish button. You can monitor the progress of the publish process using the Output Window. If your publish profile had a value for the Destination URL then the site will automatically be opened in the default browser after the publish has successfully completed.
Publish Profiles
One of the other changes in the publish experience is that publish profiles are now stored as a part of your project. They are stored under the folder PropertiesPublishProfiles (for VB projects its My ProjectPublishProfiles) and the extension is .pubxml. You can see this in the image below.
These .pubxml files are MSBuild files and you can modify these files in order to customize the publish process. If you do not want the publish profile to be checked into version control you can simply exclude it from the project. The publish dialog will look at the files in the PublishProfiles folder so you will still be able to publish using that profile. You can also leverage these publish profiles to simply publishing from the command line. For example you can use the following syntax to publish from the command line.
msbuild.exe WebApplication2.csproj /p:DeployOnBuild=true;PublishProfile="pubdemo – Web Deploy";Password={INSERT-PASSWORD}
Resources
- Windows Azure SDK for Visual Studio 2010 (this contains the new Web Publish experience)
- Tutorial: Deploying an ASP.NET Web Application to a Windows Azure Web Site and SQL Database
- Visual Studio 2012 RC Deployment Documentation Published (the publish experience in VS2012 RC is nearly identical to the VS 2010 Web Publish updates)
- Sayed’s blog
If you have any questions please feel free to directly reach out to me at sayedha(at){MicrosoftDOTCom}.
Sayed Ibrahim Hashimi @SayedIHashimi
Cross posted at: http://sedodream.com/2012/06/15/VisualStudio2010WebPublishUpdates.aspx


0 comments