The ADO.NET Entity Data Model Designer (Entity Designer) is a GUI tool for editing Entity Framework models. You can use the Entity Designer to visually create and modify entities, associations, mappings, and inheritance relationships. You can also use the tool to validate the model.
When you build the Entity Framework models, Entity Designer in Visual Studio 2013 generates a DbContext based container with the associated T4 template. These context files do not carry any metadata information for the target EDMX files. They are generated to always throw the UnintentionalCodeFirstException as follows:
- protected override void OnModelCreating(DbModelBuilder modelBuilder)
- {
- throw new UnintentionalCodeFirstException();
- }
Note:
See http://blog.oneunicorn.com/2012/02/26/dont-use-code-first-by-mistake/, for more information about UnintentionalCodeFirstException.
Instead, the metadata information that you described in Entity Designer is embedded into the target assemblies as resources when the Metadata Artifact Processing property of the EDMX file is set to Embed in Output Assembly, which is default. If the property is set to Copy to Output Directory, it is copied to separate files. For both cases, Entity Designer adds an EntityConnection connection string into the Web.config file of the target Web project as follows:
- <configuration>
- <connectionStrings>
- <add name="Northwind_Entities"
- connectionString="metadata=res://*/Northwind.csdl|
- res://*/Northwind.ssdl|
- res://*/Northwind.msl;
- provider=System.Data.SqlClient;
- provider connection string="Data Source=.\sqlexpress;nitial Catalog=Northwind;Integrated Security=True;MultipleActiveResultSets=True""
- providerName="System.Data.EntityClient"/>
- </connectionStrings>
- </configuration>
Entity Designer also creates a DbContext constructor to have DbContext use the connection string to retrieve the metadata information by passing the connection string name. For example:
- public class NorthwindContext : DbContext
- {
- public NorthwindContext()
- : base("name=Northwind_Entities")
- {
- }
- }
Note: to see more information about how Entity Framework uses connection strings, see http://msdn.microsoft.com/en-US/data/jj592674.
To scaffold the models with the connection strings, you have to choose the generated container for the data context classes. In this walkthrough, you will scaffold the EDMX generated models for Model First approach. You should be able to use the same tool for Database First approach in a similar way.
1. Open an existing MVC 5 project in Visual Studio 2013 or create a new MVC 5 project. In this walkthrough, we will use the MVC project template with the default options.
2. Create a sample model with Entity Designer
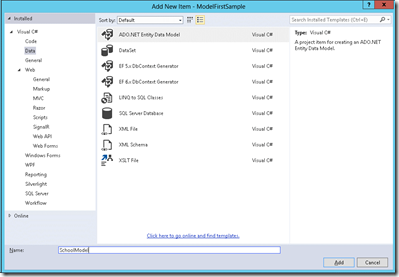
a. In Solution Explorer, under the Models folder, add a new ADO.NET Entity Data Model item called BloggingModel.
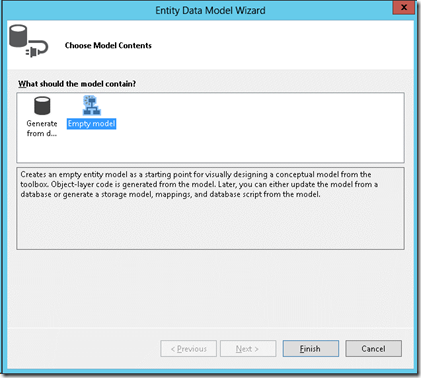
b. In the following Entity Data Model Wizard, select Empty model, and then click Finish.
3. The Entity Designer is opened with a blank model. Now we can start adding entities, properties and associations to the model.
a. Right-click on the design surface and select Properties.
b. In the Properties window change the Entity Container Name to BloggingContext.
This is the name of the derived context that will be generated for you, the context represents a session with the database, allowing us to query and save data.
c. Right-click on the design surface and select Add New -> Entity.
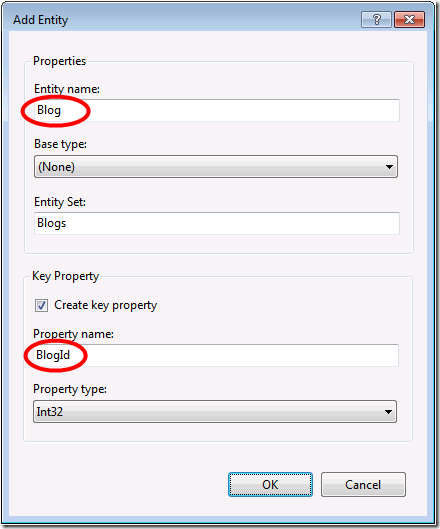
d. Enter Blog as the entity name and BlogId as the key name and click OK.
e. Right-click on the new entity on the design surface and select Add New -> Scalar Property, enter Name as the name of the property.
f. Repeat this process to add a Url property.
g. Right-click on the Url property on the design surface and select Properties, in the Properties window change the Nullable setting to True
This allows us to save a Blog to the database without assigning it a Url.h. Using the same steps used to create the Blog entity, add a Post entity with a PostId key property.
i. Add Title and Content scalar properties to the Post entity.
4. Now that we have a couple of entities, add an association (or relationship) between them.
a. Right-click on the design surface and select Add New -> Association.
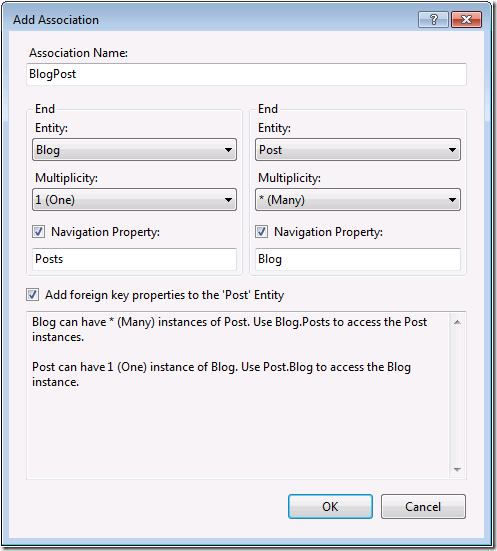
b. Make one end of the relationship point to Blog with a multiplicity of One and the other end point to Post with a multiplicity of Many.
This means that a Blog has many Posts and a Post belongs to one Blog.c. Ensure the Add foreign key properties to ‘Post’ Entity box is checked and click OK.
5. Given our model, Entity Framework can calculate a database schema that will allow us to store and retrieve data using the model. To do that, we should map the model to the physical database. For Model First Approach, we will generate a database from the model.
Note:
You do not need to perform this step in Database First Approach because your models are already mapped to the database. For more information about how to use Entity Designer for Database First approach, see http://msdn.microsoft.com/en-us/data/jj206878.aspx.
a. Right-click on the design surface and select Generate Database from Model.
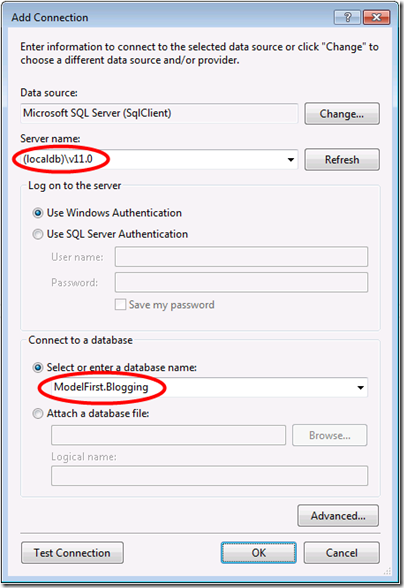
b. Click New Connection, select Microsoft SQL Server for Data source, specify (localdb)v11.0, and then enter ModelFirst.Blogging as the database name.
c. Select OK and you will be asked if you want to create a new database, select Yes. Make sure that the Save entity connection settings in Web.Config check box is selected.
d. Select Next and the Entity Framework Designer will calculate a script to create the database schema.
e. Once the script is displayed, click Finish and the script will be added to your project and opened
f. Right-click on the script and select Execute, you will be prompted to specify the database to connect to, specify (localdb)v11.0.
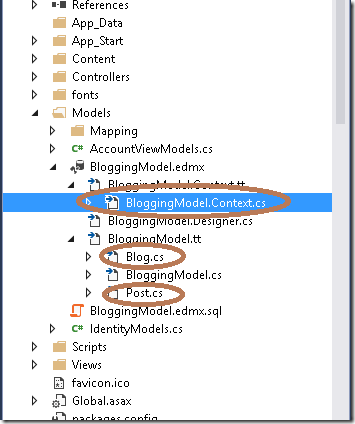
6. Build the project. The Entity Designer generates two entity classes, Blog and Post, and the database context file as follows:
a. Open the Web.config file to verify the connection string that Entity Designer adds. The name of the generated connection string should have the same name that you set for the Entity Container Name property. In this walkthrough, it is BloggingContext.
Code Snippet
- <add name="BloggingContext"
- connectionString="metadata=res://*/BloggingModel.csdl|res://*/BloggingModel.ssdl|res://*/BloggingModel.msl;provider=System.Data.SqlClient;provider connection string="data source=(localdb)\v11.0;initial catalog=ModelFirst.Blogging;integrated security=True;MultipleActiveResultSets=True;App=EntityFramework""
- providerName="System.Data.EntityClient" />
b. Open BloggingModel.Context.cs to verify the constructor generated to use the connection string.
Code Snippet
- public partial class BloggingContext : DbContext
- {
- public BloggingContext()
- : base("name=BloggingContext")
- {
- }
- protected override void OnModelCreating(DbModelBuilder modelBuilder)
- {
- throw new UnintentionalCodeFirstException();
- }
- public virtual DbSet<Blog> Blogs { get; set; }
- public virtual DbSet<Post> Posts { get; set; }
- }
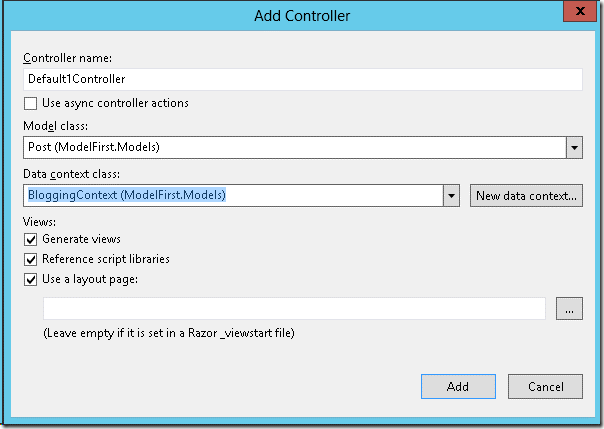
7. Build your project again to make sure everything works fine. You can now use new ASP.NET Scaffolding as usual for the EDMX generated models, Blog and Post. Just do not forget to select the newly generated BloggingContext for Data context class while scaffolding as follows:
Note:
For more information on how to use new MVC5 ASP.NET Scaffolding, see http://www.asp.net/visual-studio/overview/2013/aspnet-scaffolding-overview.

0 comments