The Microsoft ASP.NET WebHooks preview is moving forward! We have received two very cool source contributions adding support for Kudu (Azure Web App Deployment) and Bitbucket. There is a sample for Bitbucket, but here we will focus on Kudu as well as Azure Alerts which just announced support for WebHooks.
Kudu provides a ton of functionality for deploying, managing, and inspecting Azure Web Apps (formerly known as Azure Web Sites). The source code for Kudu is available on GitHub along with documentation describing all the cool things it can do. One way you can use Kudu WebHooks is to get notified when an update has been deployed, which is what we will show in this post.
Azure Alerts allow you to monitor a wide variety of your Azure resources including Azure Web Apps, Azure SQL, and more. For each resource you can add an alert rule detailing a condition for when you want to get notified. For an Azure Web App, this may be if the number of HTTP 500 status codes suddenly increases, or the CPU spikes. For your Azure SQL Server, this may be if the number of broken connections spikes, or the total DB size increases dramatically.
Configuring Kudu and Azure Alert Handlers
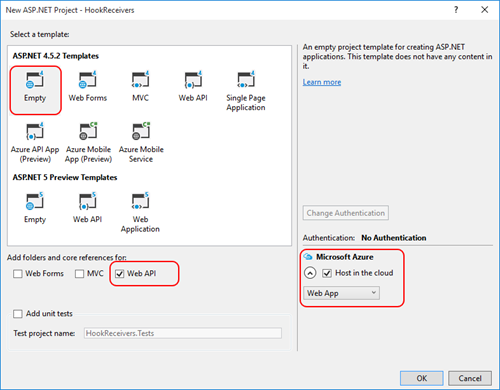
Let’s first create an empty Web Application with Web API in Visual Studio which we will use for receiving WebHooks from Kudu and Azure Alerts. Set it up for deployment in Azure by checking Host in the cloud:
Install the Microsoft.AspNet.WebHooks.Receivers.Azure Nuget package. Then the registration happens exactly like in the blog Introducing Microsoft ASP.NET WebHooks Preview by adding these two lines to the WebApiConfig.Register method:
public static class WebApiConfig
{
    public static void Register(HttpConfiguration config)
    {
        // Web API configuration and services

        // Web API routes
        config.MapHttpAttributeRoutes();

        config.Routes.MapHttpRoute(
            name: "DefaultApi",
            routeTemplate: "api/{controller}/{id}",
            defaults: new { id = RouteParameter.Optional }
        );

        config.InitializeReceiveKuduWebHooks();
        config.InitializeReceiveAzureAlertWebHooks();
    }
}
public class KuduWebHookHandler : WebHookHandler
{
    public KuduWebHookHandler()
    {
        Receiver = "kudu";
    }

    public override Task ExecuteAsync(string generator, WebHookHandlerContext context)
    {
        // Convert to POCO type
        KuduNotification notification = context.GetDataOrDefault<KuduNotification>();

        // Get the notification message
        string message = notification.Message;

        // Get the notification author
        string author = notification.Author;

        return Task.FromResult(true);
    }
}
public class AzureAlertWebHookHandler : WebHookHandler
{
    public AzureAlertWebHookHandler()
    {
        Receiver = "azurealert";
    }

    public override Task ExecuteAsync(string generator, WebHookHandlerContext context)
    {
        // Convert to POCO type
        AzureAlertNotification notification = context.GetDataOrDefault<AzureAlertNotification>();

        // Get the notification status
        string status = notification.Status;

        // Get the notification name
        string name = notification.Context.Name;

        // Get the name of the metric that caused the event
        string author = notification.Context.Condition.MetricName;

        return Task.FromResult(true);
    }
}
Finally, add two application settings with two secrets so that we can validate that the WebHook requests indeed come from Kudu and Azure Alerts respectively. As always, use high-entropy values such as a SHA256 hash or similar, which you can get from FreeFormatter Online Tools For Developers. Also, set them through the Azure Portal instead of hard-coding them in the Web.config file.
<appSettings>
  <add key="MS_WebHookReceiverSecret_Kudu" value="32-128 bytes of high entropy data" />
  <add key="MS_WebHookReceiverSecret_AzureAlert" value="32-128 bytes of high entropy data" />
</appSettings>
That’s it for the receiver Web App – it is now ready to deploy to Azure. Note the URI of the site as you will use it when setting up the WebHooks.
Configuring Kudu WebHook
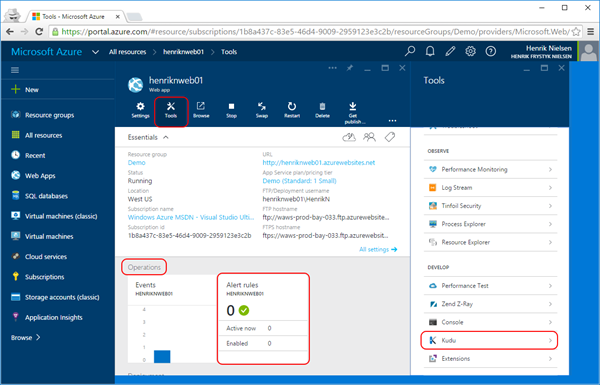
To show both Kudu and Azure Alerts WebHooks in action, let’s set up another Azure Web App and then use WebHooks to get information from Kudu and Azure Alerts about new deployments and changes in how the Web App operates. Go to the Azure Portal and create a Web App, it should look something like this:
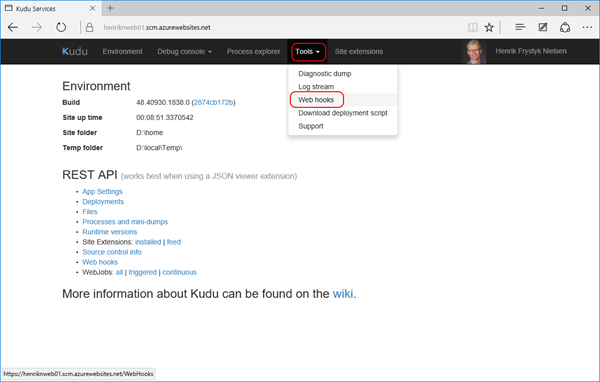
For now, we just leave the site completely empty. To get to the associated Kudu site, go to Tools and then Kudu which will take you to a site looking like this:
Select Tools and then WebHooks and enter a PostDeployment URI of your Kudu WebHook handler:
https://<host>/api/webhooks/incoming/kudu?code=<secret hash from above>
https://<host>/api/webhooks/incoming/kudu/{id}?code=<secret hash from above>
<appSettings>
  <add key="MS_WebHookReceiverSecret_Kudu" value="{id}=32-128 bytes of high-entropy data" />
</appSettings>
Configuring Azure Alert WebHook
https://<host>/api/webhooks/incoming/azurealert?code=<secret hash from above>
Trying it Out
We are now ready to try things out. If you want to follow along then attach the debugger to the receiver project, you deployed before.
Remember that we didn’t actually add any content to the first Web App we created? That is the Web App that we want to monitor and have set up WebHooks for. Let’s now add some by doing a deployment so that we can see that the WebHooks trigger. There is a lot of great information in the blog Continuous deployment using GIT in Azure App Service for how to get set up. Here we use a very simple local repository using the following commands:
git init
git remote add azure https://<username>@<host>.scm.azurewebsites.net:443
echo hello! > index.html
git add index.html
git commit -m "First commit!"
git push azure master
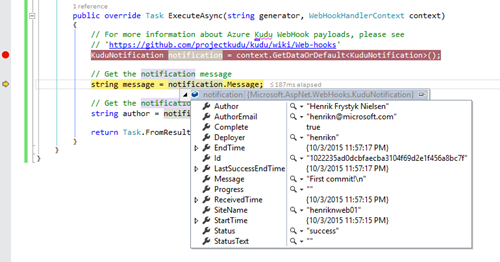
Once you push, you should get called in your Kudu handler looking something like this:
Try and hit the site a few times and wait for 5 minutes or so. You should now get called in the Azure Alert handler as a result of the alert firing:
That’s it – you can now listen for events from both Kudu and Azure Alerts.
Have fun!
Henrik


0 comments