We just released a new update of ASP.NET WebHooks with a couple of interesting new features on the WebHooks sender side – that is, when you want to send WebHooks to others when some event happens – including:
- Sending events to all users registered for a particular event.
- Scaling out and load balancing events using persistent queues.
You can get the update from nuget.org by looking for the packages under Microsoft.AspNet.WebHooks.* with ‘preview’ filter enabled. If you haven’t heard about ASP.NET WebHooks then you may want to look at Introducing Microsoft ASP.NET WebHooks Preview. As this blog is about the sending side, the blog Sending WebHooks with ASP.NET WebHooks Preview also provides good background.
Sending Events to All Users
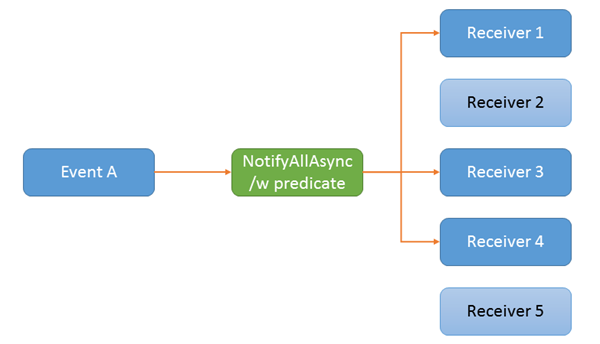
In addition to sending events in the form of WebHooks to individual users, it is now possible to send WebHooks to all users who have registered for a particular event. We now expose the method NotifyAllAsync in the same places where you could use NotifyAsync to send notifications to all active registered WebHooks.
Also, you can use a predicate as a filter if you want to control which users get the WebHook notification. For example, in the below illustration, Receiver 2 and 5 don’t get this particular event due to the predicate.
Using NotifyAllAsync is very similar to using NotifyAsync and it is available in the same places. Assuming you have a project already set up to support WebHooks as described in the blog entry Sending WebHooks with ASP.NET WebHooks Preview or using this sample, here’s how you can use NotifyAllAsync in an MVC controller:
[Authorize]
public class NotifyController : Controller
{
    [HttpPost]
    public async Task<ActionResult> Submit()
    {
        // Create an event with action 'event1' and additional data
        await this.NotifyAsync("event1", new { P1 = "p1" });

        // Send event1 to all users not called 'henrik'
        await this.NotifyAllAsync("event1",
            new { P1 = "p1" }, (webHook, user) => { return user != "henrik" });

        return new EmptyResult();
    }
}
The model looks exactly the same in a Web API controller:
[Authorize]
public class NotifyApiController : ApiController
{
    public async Task<IHttpActionResult> Post()
    {
        // Create an event with 'event2' and additional data
        await this.NotifyAsync("event2", new { P1 = "p1" });

        // Send event2 to all users not called 'henrik'
        await this.NotifyAllAsync("event2",
            new { P1 = "p1" }, (webHook, user) => { return user != "henrik" });

        return Ok();
    }
}
Sending WebHooks: Scaling Out and Load Balancing
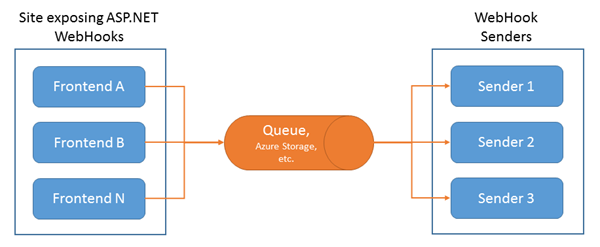
We have introduced a new IWebHookSender abstraction which allows you to scale-out and load-balance the act of sending out WebHooks. That is, instead of having the Web server directly sending out WebHooks, it is now possible to have an architecture like this allowing you to both persist WebHooks on the sender side and to scale up and out as you want:
To illustrate this, we provide out of the box support for sending WebHooks via an Azure Storage Queue but you can hook in any kind of queue. Once you have a project already set up to support WebHooks (like this sample) as described in the blog entry Sending WebHooks with ASP.NET WebHooks Preview, configuring it to support Azure Storage Queues is quite simple:
- On the frontend side, you register a special IWebHookSender implementation which simply submits all WebHooks to an Azure Storage Queue.
- On the sender side, you use the AzureWebHookDequeueManager class which dequeues messages from the Azure Storage Queue and then sends them out as WebHooks.
To register the queue IWebHookSender implementation (part of the Microsoft.AspNet.WebHooks.Custom.AzureStorage nuget package) on the frontend, simply add this line to the initialization:
public static class WebApiConfig
{
    public static void Register(HttpConfiguration config)
    {
        // Web API routes
        config.MapHttpAttributeRoutes();

        config.Routes.MapHttpRoute(
            name: "DefaultApi",
            routeTemplate: "api/{controller}/{id}",
            defaults: new { id = RouteParameter.Optional }
        );

        // Load basic support for sending WebHooks
        config.InitializeCustomWebHooks();

        // Load Azure Storage (or SQL) for persisting subscriptions
        config.InitializeCustomWebHooksAzureStorage();

        // Load Azure Queued Sender for enqueueing outgoing WebHooks to an Azure Storage Queue
        config.InitializeCustomWebHooksAzureQueueSender();

        // Load Web API controllers for managing subscriptions
        config.InitializeCustomWebHooksApis();
    }
}
To configure the frontend, you need to set the Azure Storage connection string, that it should use, for example:
<connectionStrings>
  <add name="MS_AzureStoreConnectionString" connectionString="UseDevelopmentStorage=true;" />
</connectionStrings>
On the sender side, you now need a process that can dequeue messages from the Azure Storage Queue and send them out to the targeted WebHook recipients. This can be a simple command line program (like this sample):
internal class Program
{
    private const string QueueConnectionString = "MS_AzureStoreConnectionString";

    public static void Main(string[] args)
    {
        CancellationTokenSource cancellationTokenSource = new CancellationTokenSource();
        Task.Run(() => DequeueAndSendWebHooks(cancellationTokenSource.Token));

        Console.WriteLine("Hit ENTER to exit!");
        Console.ReadLine();

        cancellationTokenSource.Cancel();
    }

    private static async Task DequeueAndSendWebHooks(CancellationToken cancellationToken)
    {
        // Create the dequeue manager
        string connectionString =
            ConfigurationManager.ConnectionStrings[QueueConnectionString].ConnectionString;
        ILogger logger = CommonServices.GetLogger();
        AzureWebHookDequeueManager manager = new AzureWebHookDequeueManager(connectionString, logger);

        // Start the dequeue manager
        await manager.Start(cancellationToken);
    }
}
The two highlighted lines are the key ones – the first creates the AzureWebHookDequeueManager using the given connection string pointing to the queue. The second line starts an event loop returning a Task that you can cancel when you are done. The AzureWebHookDequeueManager will periodically poll for new messages in the queue and send them out as WebHooks.
If the WebHook requests either succeed or return HTTP status code 410 Gone, then we consider the message delivered and delete it from the queue. Otherwise we leave it in the queue ensuring that it will get another chance of being sent out after a couple of minutes. After 3 attempts we give up and delete the message from the queue regardless. For more information about Azure Storage Queues, please see the blog How to use Queue storage from .NET.
Like for the sender side, we can provide the Azure Storage connection string in the config file, for example:
<connectionStrings>
  <add name="MS_AzureStoreConnectionString" connectionString="UseDevelopmentStorage=true;" />
</connectionStrings>
Happy New Year!
Henrik


0 comments