
.NET Core 3.0 Preview 6 is now available and it includes a bunch of new updates to ASP.NET Core and Blazor.
Here’s the list of what’s new in this preview:
- New Razor features:
@attribute,@code,@key,@namespace, markup in@functions - Blazor directive attributes
- Authentication & authorization support for Blazor apps
- Static assets in Razor class libraries
- Json.NET no longer referenced in project templates
- Certificate and Kerberos Authentication
- SignalR Auto-reconnect
- Managed gRPC Client
- gRPC Client Factory
- gRPC Interceptors
Please see the release notes for additional details and known issues.
Get started
To get started with ASP.NET Core in .NET Core 3.0 Preview 6 install the .NET Core 3.0 Preview 6 SDK
If you’re on Windows using Visual Studio, you also need to install the latest preview of Visual Studio 2019.
For the latest client-side Blazor templates also install the latest Blazor extension from the Visual Studio Marketplace.
Upgrade an existing project
To upgrade an existing an ASP.NET Core app to .NET Core 3.0 Preview 6, follow the migrations steps in the ASP.NET Core docs.
Please also see the full list of breaking changes in ASP.NET Core 3.0.
To upgrade an existing ASP.NET Core 3.0 Preview 5 project to Preview 6:
- Update Microsoft.AspNetCore.* package references to 3.0.0-preview6.19307.2
- In Blazor apps:
- Rename
@functionsto@code - Update Blazor specific attributes and event handlers to use the new directive attribute syntax (see below)
- Remove any call to
app.UseBlazor<TStartup>()and instead add a call toapp.UseClientSideBlazorFiles<TStartup>()before the call toapp.UseRouting(). Also add a call toendpoints.MapFallbackToClientSideBlazor<TStartup>("index.html")in the call toapp.UseEndpoints().
- Rename
Before
app.UseRouting();

app.UseEndpoints(endpoints =>
{
    endpoints.MapDefaultControllerRoute();
});

app.UseBlazor<Client.Startup>();
After
app.UseClientSideBlazorFiles<Client.Startup>();

app.UseRouting();

app.UseEndpoints(endpoints =>
{
    endpoints.MapDefaultControllerRoute();
    endpoints.MapFallbackToClientSideBlazor<Client.Startup>("index.html");
});
New Razor features
We’ve added support for the following new Razor language features in this release.
@attribute
The new @attribute directive adds the specified attribute to the generated class.
@attribute [Authorize]
@code
The new @code directive is used in .razor files (not supported in .cshtml files) to specify a code block to add to the generated class as additional members. It’s equivalent to @functions, but now with a better name.
@code {
    int currentCount = 0;

    void IncrementCount()
    {
        currentCount++;
    }
}
@key
The new @key directive attribute is used in .razor files to specify a value (any object or unique identifier) that the Blazor diffing algorithm can use to preserve elements or components in a list.
<div>
    @foreach (var flight in Flights)
    {
        <DetailsCard @key="flight" Flight="@flight" />
    }
</div>
To understand why this feature is needed, consider rendering a list of cards with flight details without this feature:
<div>
    @foreach (var flight in Flights)
    {
        <DetailsCard Flight="@flight" />
    }
</div>
If you add a new flight into the middle of the Flights list the existing DetailsCard instances should remain unaffected and one new DetailsCard should be inserted into the rendered output.
To visualize this, if Flights previously contained [F0, F1, F2], then this is the before state:
- DetailsCard0, with Flight=F0
- DetailsCard1, with Flight=F1
- DetailsCard2, with Flight=F2
… and this is the desired after state, given we insert a new item FNew at index 1:
- DetailsCard0, with Flight=F0
- DetailsCardNew, with Flight=FNew
- DetailsCard1, with Flight=F1
- DetailsCard2, with Flight=F2
However, the actual after state this:
- DetailsCard0, with Flight=F0
- DetailsCard1, with Flight=FNew
- DetailsCard2, with Flight=F1
- DetailsCardNew, with Flight=F2
The system has no way to know that DetailsCard2 or DetailsCard3 should preserve their associations with their older Flight instances, so it just re-associates them with whatever Flight matches their position in the list. As a result, DetailsCard1 and DetailsCard2 rebuild themselves completely using new data, which is wasteful and sometimes even leads to user-visible problems (e.g., input focus is unexpectedly lost).
By adding keys using @key the diffing algorithm can associate the old and new elements or components.
@namespace
Specifies the namespace for the generated class or the namespace prefix when used in an _Imports.razor file. The @namespace directive works today in pages and views (.cshtml) apps, but is now it is also supported with components (.razor).
@namespace MyNamespace
Markup in @functions and local functions
In views and pages (.cshtml files) you can now add markup inside of methods in the @functions block and in local functions.
@{ GreetPerson(person); }

@functions {
    void GreetPerson(Person person)
    {
        <p>Hello, <em>@person.Name!</em></p>
    }
}
Blazor directive attributes
Blazor uses a variety of attributes for influencing how components get compiled (e.g. ref, bind, event handlers, etc.). These attributes have been added organically to Blazor over time and use different syntaxes. In this Blazor release we’ve standardized on a common syntax for directive attributes. This makes the Razor syntax used by Blazor more consistent and predictable. It also paves the way for future extensibility.
Directive attributes all follow the following syntax where the values in parenthesis are optional:
@directive(-suffix(:name))(="value")
Some valid examples:
<!-- directive -->
<div @directive>...</div>
<div @directive="value"></div>

<!-- directive with key/value arg-->
<div @directive:key>...</div>
<div @directive:key="value"></div>

<!-- directive with suffix -->
<div @directive-suffix></div>
<div @directive-suffix="value"></div>

<!-- directive with suffix and key/value arg-->
<div @directive-suffix:key></div>
<div @directive-suffix:key="value"></div>
All of the Blazor built-in directive attributes have been updated to use this new syntax as described below.
Event handlers
Specifying event handlers in Blazor now uses the new directive attribute syntax instead of the normal HTML syntax. The syntax is similar to the HTML syntax, but now with a leading @ character. This makes C# event handlers distinct from JS event handlers.
<button @onclick="@Clicked">Click me!</button>
When specifying a delegate for C# event handler the @ prefix is currently still required on the attribute value, but we expect to remove this requirement in a future update.
In the future we also expect to use the directive attribute syntax to support additional features for event handlers. For example, stopping event propagation will likely look something like this (not implemented yet, but it gives you an idea of scenarios now enabled by directive attributes):
<button @onclick="Clicked" @onclick:stopPropagation>Click me!</button>
Bind
<input @bind="myValue">...</input>
<input @bind="myValue" @bind:format="mm/dd">...</input>
<MyButton @bind-Value="myValue">...</MyButton>
Key
<div @key="id">...</div>
Ref
<button @ref="myButton">...</button>
Authentication & authorization support for Blazor apps
Blazor now has built-in support for handling authentication and authorization. The server-side Blazor template now supports options for enabling all of the standard authentication configurations using ASP.NET Core Identity, Azure AD, and Azure AD B2C. We haven’t updated the Blazor WebAssembly templates to support these options yet, but we plan to do so after .NET Core 3.0 has shipped.
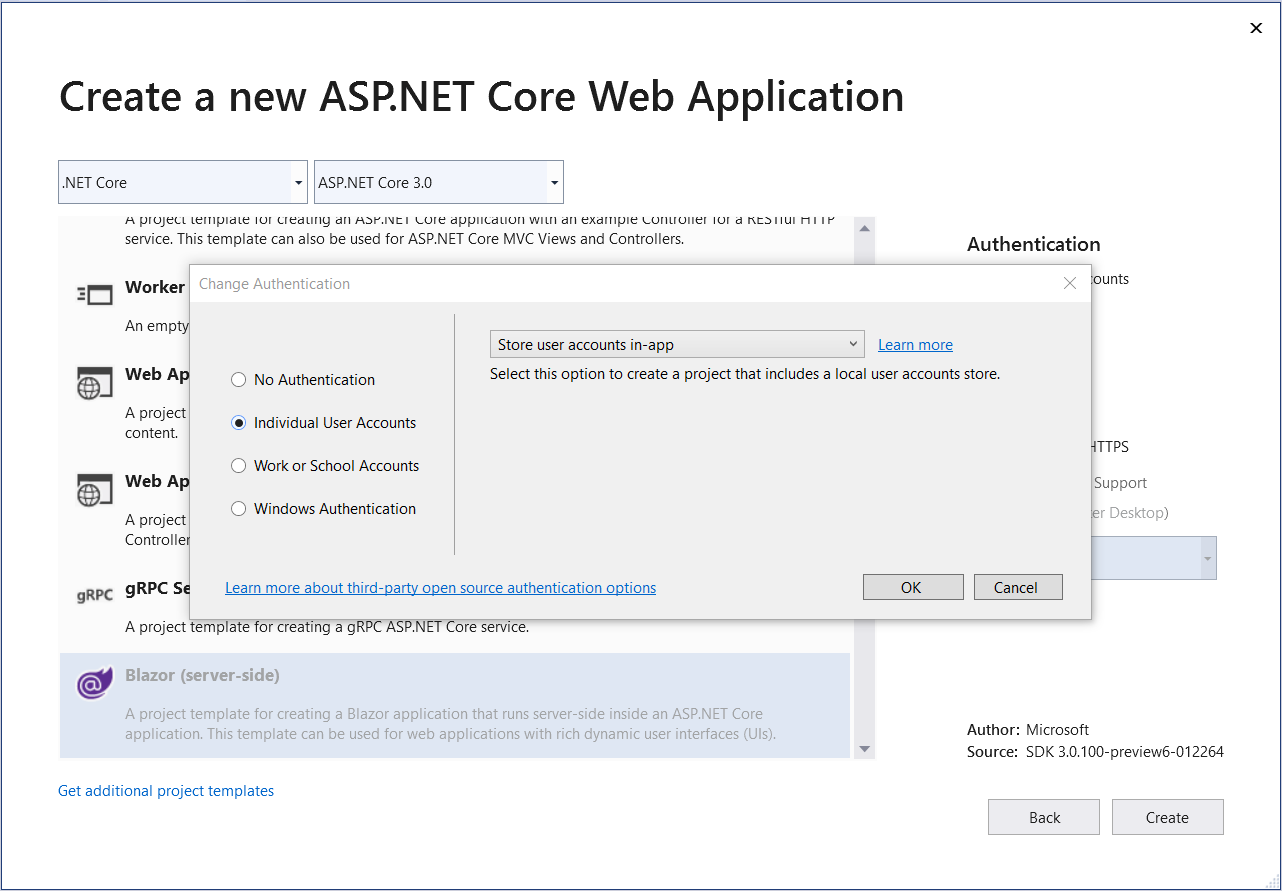
To create a new Blazor app with authentication enabled:
-
Create a new Blazor (server-side) project and select the link to change the authentication configuration. For example, select “Individual User Accounts” and “Store user accounts in-app” to use Blazor with ASP.NET Core Identity:
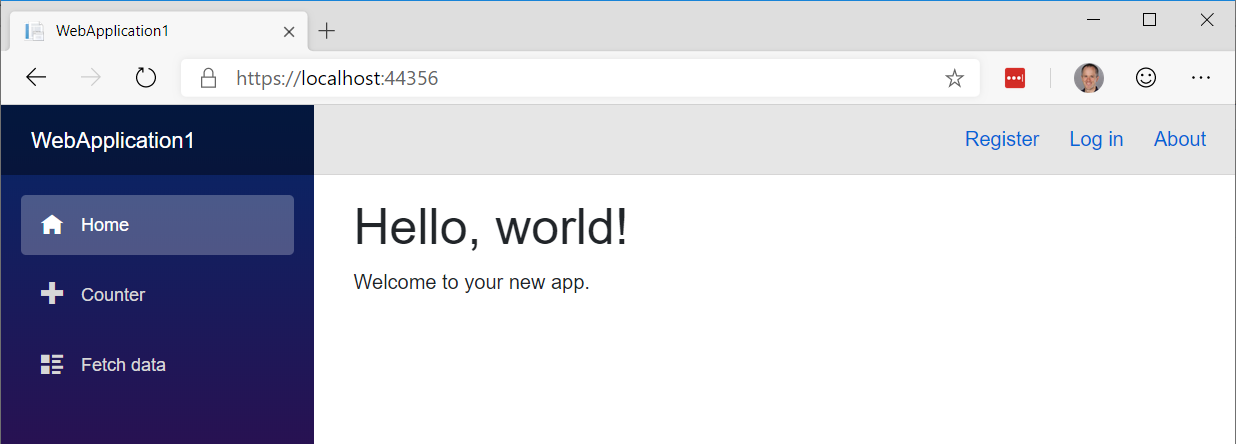
-
Run the app. The app includes links in the top row for registering as a new user and logging in.
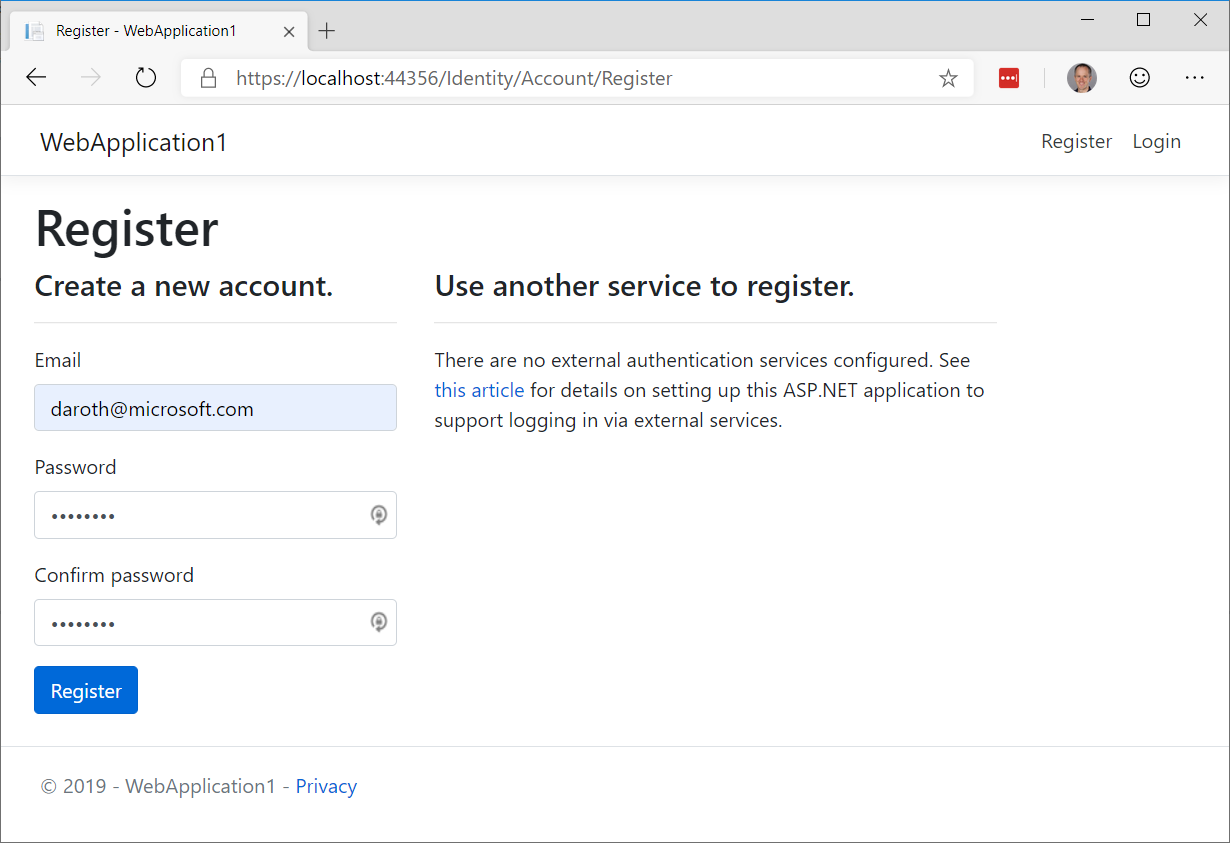
-
Select the Register link to register a new user.
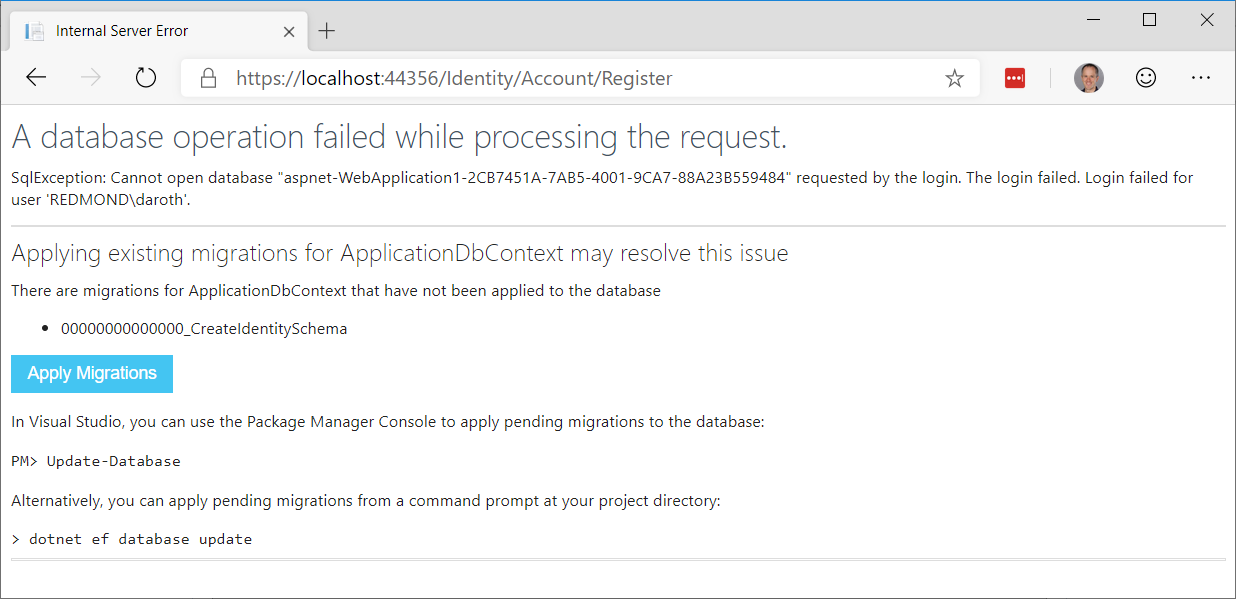
-
Select “Apply Migrations” to apply the ASP.NET Core Identity migrations to the database.
-
You should now be logged in.

-
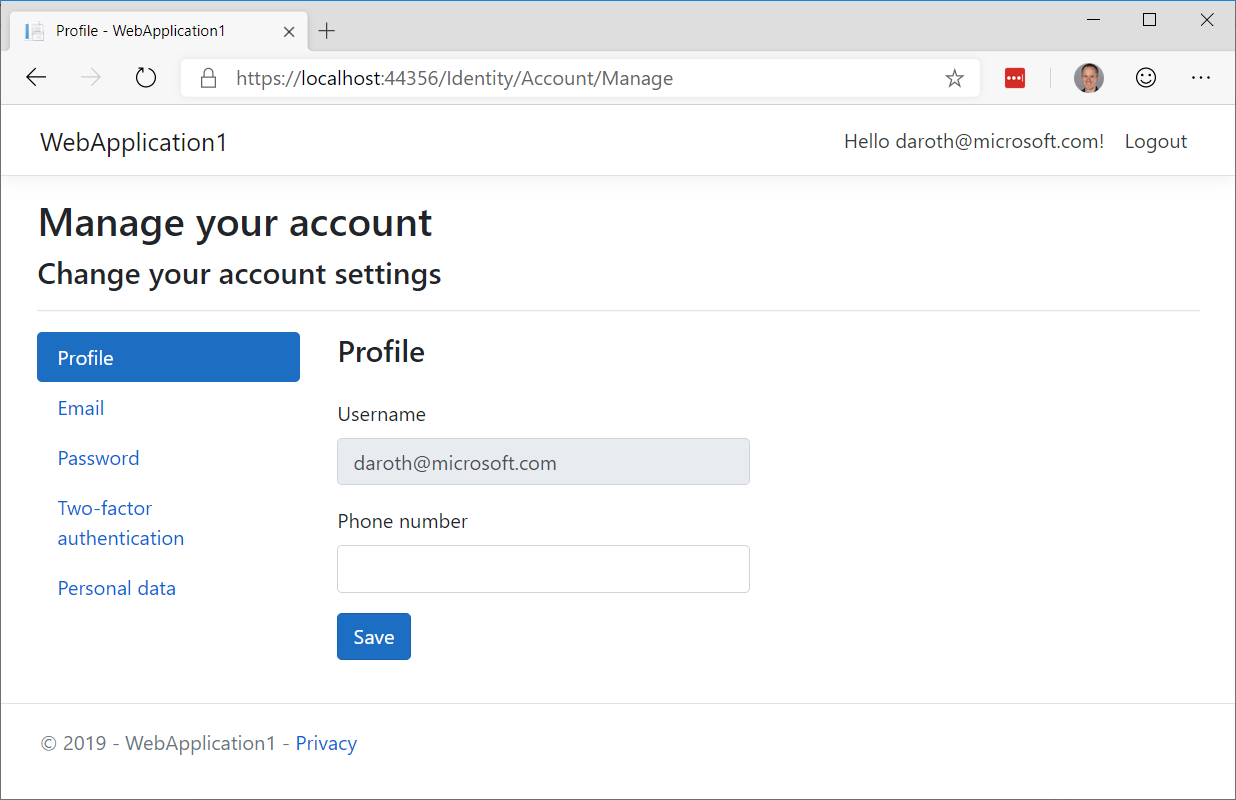
Select your user name to edit your user profile.
In the Blazor app, authentication and authorization are configured in the Startup class using the standard ASP.NET Core middleware.
app.UseRouting();

app.UseAuthentication();
app.UseAuthorization();

app.UseEndpoints(endpoints =>
{
    endpoints.MapControllers();
    endpoints.MapBlazorHub();
    endpoints.MapFallbackToPage("/_Host");
});
When using ASP.NET Core Identity all of the identity related UI concerns are handled by the framework provided default identity UI.
services.AddDefaultIdentity<IdentityUser>()
    .AddEntityFrameworkStores<ApplicationDbContext>();
The authentication related links in top row of the app are rendered using the new built-in AuthorizeView component, which displays different content depending on the authentication state.
LoginDisplay.razor
<AuthorizeView>
    <Authorized>
        <a href="Identity/Account/Manage">Hello, @context.User.Identity.Name!</a>
        <a href="Identity/Account/LogOut">Log out</a>
    </Authorized>
    <NotAuthorized>
        <a href="Identity/Account/Register">Register</a>
        <a href="Identity/Account/Login">Log in</a>
    </NotAuthorized>
</AuthorizeView>
The AuthorizeView component will only display its child content when the user is authorized. Alternatively, the AuthorizeView takes parameters for specifying different templates when the user is Authorized, NotAuthorized, or Authorizing. The current authentication state is passed to these templates through the implicit context parameter. You can also specify specific roles or an authorization policy on the AuthorizeView that the user must satisfy to see the authorized view.
To authorize access to specific pages in a Blazor app, use the normal [Authorize] attribute. You can apply the [Authorize] attribute to a component using the new @attribute directive.
@using Microsoft.AspNetCore.Authorization
@attribute [Authorize]
@page "/fetchdata"
To specify what content to display on a page that requires authorization when the user isn’t authorized or is still in the processing of authorizing, use the NotAuthorizedContent and AuthorizingContent parameters on the Router component. These Router parameters are only support in client-side Blazor for this release, but they will be enabled for server-side Blazor in a future update.
The new AuthenticationStateProvider service make the authentication state available to Blazor apps in a uniform way whether they run on the server or client-side in the browser. In server-side Blazor apps the AuthenticationStateProvider surfaces the user from the HttpContext that established the connection to the server. Client-side Blazor apps can configure a custom AuthenticationStateProvider as appropriate for that application. For example, it might retrieve the current user information by querying an endpoint on the server.
The authentication state is made available to the app as a cascading value (Task<AuthenticationState>) using the CascadingAuthenticationState component. This cascading value is then used by the AuthorizeView and Router components to authorize access to specific parts of the UI.
App.razor
<CascadingAuthenticationState>
    <Router AppAssembly="typeof(Startup).Assembly">
        <NotFoundContent>
            <p>Sorry, there's nothing at this address.</p>
        </NotFoundContent>
    </Router>
</CascadingAuthenticationState>
Static assets in Razor class libraries
Razor class libraries can now include static assets like JavaScript, CSS, and images. These static assets can then be included in ASP.NET Core apps by referencing the Razor class library project or via a package reference.
To include static assets in a Razor class library add a wwwroot folder to the Razor class library and include any required files in that folder.
When a Razor class library with static assets is referenced either as a project reference or as a package, the static assets from the library are made available to the app under the path prefix _content/{LIBRARY NAME}/. The static assets stay in their original folders and any changes to the content of static assets in the Razor class libraries are reflected in the app without rebuilding.
When the app is published, the companion assets from all referenced Razor class libraries are copied into the wwwroot folder of the published app under the same prefix.
To try out using static assets from a Razor class library:
-
Create a default ASP.NET Core Web App.
dotnet new webapp -o WebApp1 -
Create a Razor class library and reference it from the web app.
dotnet new razorclasslib -o RazorLib1 dotnet add WebApp1 reference RazorLib1 -
Add a wwwroot folder to the Razor class library and include a JavaScript file that logs a simple message to the console.
cd RazorLib1
mkdir wwwroot
hello.js
console.log("Hello from RazorLib1!"); -
Reference the script file from Index.cshtml in the web app.
<script src="_content/RazorLib1/hello.js"></script> -
Run the app and look for the output in the browser console.
Hello from RazorLib1!
Projects now use System.Text.Json by default
New ASP.NET Core projects will now use System.Text.Json for JSON handling by default. In this release we removed Json.NET (Newtonsoft.Json) from the project templates. To enable support for using Json.NET, add the Microsoft.AspNetCore.Mvc.NewtonsoftJson package to your project and add a call to AddNewtonsoftJson() following code in your Startup.ConfigureServices method. For example:
services.AddMvc()
    .AddNewtonsoftJson();
Certificate and Kerberos authentication
Preview 6 brings Certificate and Kerberos authentication to ASP.NET Core.
Certificate authentication requires you to configure your server to accept certificates, and then add the authentication middleware in Startup.Configure and the certificate authentication service in Startup.ConfigureServices.
public void ConfigureServices(IServiceCollection services)
{
    services.AddAuthentication(
        CertificateAuthenticationDefaults.AuthenticationScheme)
            .AddCertificate();
    // All the other service configuration.
}

public void Configure(IApplicationBuilder app, IHostingEnvironment env)
{
    app.UseAuthentication();
    // All the other app configuration.
}
Options for certificate authentication include the ability to accept self-signed certificates, check for certificate revocation, and check that the proffered certificate has the right usage flags in it. A default user principal is constructed from the certificate properties, with an event that enables you to supplement or replace the principal. All the options, and instructions on how to configure common hosts for certificate authentication can be found in the documentation.
We’ve also extended “Windows Authentication” onto Linux and macOS. Previously this authentication type was limited to IIS and HttpSys, but now Kestrel has the ability to use Negotiate, Kerberos, and NTLM on Windows, Linux, and macOS for Windows domain joined hosts by using the Microsoft.AspNetCore.Authentication.Negotiate nuget package. As with the other authentication services you configure authentication app wide, then configure the service:
public void ConfigureServices(IServiceCollection services)
{
    services.AddAuthentication(NegotiateDefaults.AuthenticationScheme)
        .AddNegotiate();
}

public void Configure(IApplicationBuilder app, IHostingEnvironment env)
{
    app.UseAuthentication();
    // All the other app configuration.
}
Your host must be configured correctly. Windows hosts must have SPNs added to the user account hosting the application. Linux and macOS machines must be joined to the domain, then SPNs must be created for the web process, as well as keytab files generated and configured on the host machine. Full instructions are given in the documentation.
SignalR Auto-reconnect
This preview release, available now via npm install @aspnet/signalr@next and in the .NET Core SignalR Client, includes a new automatic reconnection feature. With this release we’ve added the withAutomaticReconnect() method to the HubConnectionBuilder. By default, the client will try to reconnect immediately and after 2, 10, and 30 seconds. Enlisting in automatic reconnect is opt-in, but simple via this new method.
const connection = new signalR.HubConnectionBuilder()
    .withUrl("/chatHub")
    .withAutomaticReconnect()
    .build();
By passing an array of millisecond-based durations to the method, you can be very granular about how your reconnection attempts occur over time.
.withAutomaticReconnect([0, 3000, 5000, 10000, 15000, 30000])
//.withAutomaticReconnect([0, 2000, 10000, 30000]) yields the default behavior
Or you can pass in an implementation of a custom reconnect policy that gives you full control.
If the reconnection fails after the 30-second point (or whatever you’ve set as your maximum), the client presumes the connection is offline and stops trying to reconnect. During these reconnection attempts you’ll want to update your application UI to provide cues to the user that the reconnection is being attempted.
Reconnection Event Handlers
To make this easier, we’ve expanded the SignalR client API to include onreconnecting and onreconnected event handlers. The first of these handlers, onreconnecting, gives developers a good opportunity to disable UI or to let users know the app is offline.
connection.onreconnecting((error) => {
    const status = `Connection lost due to error "${error}". Reconnecting.`;
    document.getElementById("messageInput").disabled = true;
    document.getElementById("sendButton").disabled = true;
    document.getElementById("connectionStatus").innerText = status;
});
Likewise, the onreconnected handler gives developers an opportunity to update the UI once the connection is reestablished.
connection.onreconnected((connectionId) => {
    const status = `Connection reestablished. Connected.`;
    document.getElementById("messageInput").disabled = false;
    document.getElementById("sendButton").disabled = false;
    document.getElementById("connectionStatus").innerText = status;
});
Learn more about customizing and handling reconnection
Automatic reconnect has been partially documented already in the preview release. Check out the deeper docs on the topic, with more examples and details on usage, at https://aka.ms/signalr/auto-reconnect.
Managed gRPC Client
In prior previews, we relied on the Grpc.Core library for client support. The addition of HTTP/2 support in HttpClient in this preview has allowed us to introduce a fully managed gRPC client.
To begin using the new client, add a package reference to Grpc.Net.Client and then you can create a new client.
var httpClient = new HttpClient() { BaseAddress = new Uri("https://localhost:5001") };
var client = GrpcClient.Create<GreeterClient>(httpClient);
gRPC Client Factory
Building on the opinionated pattern we introduced in HttpClientFactory, we’ve added a gRPC client factory for creating gRPC client instances in your project. There are two flavors of the factory that we’ve added: Grpc.Net.ClientFactory and Grpc.AspNetCore.Server.ClientFactory.
The Grpc.Net.ClientFactory is designed for use in non-ASP.NET app models (such as Worker Services) that still use the Microsoft.Extensions.* primitives without a dependency on ASP.NET Core.
In applications that perform service-to-service communication, we often observe that most servers are also clients that consume other services. In these scenarios, we recommend the use of Grpc.AspNetCore.Server.ClientFactory which features automatic propagation of gRPC deadlines and cancellation tokens.
To use the client factory, add the appropriate package reference to your project (Grpc.AspNetCore.Server.Factory or Grpc.Net.ClientFactory) before adding the following code to ConfigureServices().
services
    .AddGrpcClient<GreeterClient>(options =>
    {
        options.BaseAddress = new Uri("https://localhost:5001");
    });
gRPC Interceptors
gRPC exposes a mechanism to intercept RPC invocations on both the client and the server. Interceptors can be used in conjunction with existing HTTP middleware. Unlike HTTP middleware, interceptors give you access to actual request/response objects before serialization (on the client) and after deserialization (on the server) and vice versa for the response. All middlewares run before interceptors on the request side and vice versa on the response side.
Client interceptors
When used in conjunction with the client factory, you can add a client interceptor as shown below.
services
    .AddGrpcClient<GreeterClient>(options =>
    {
        options.BaseAddress = new Uri("https://localhost:5001");
    })
    .AddInterceptor<CallbackInterceptor>();
Server interceptors
Server interceptors can be registered in ConfigureServices() as shown below.
services
    .AddGrpc(options =>
    {
        // This registers a global interceptor
        options.Interceptors.Add<MaxStreamingRequestTimeoutInterceptor>(TimeSpan.FromSeconds(30));
    })
    .AddServiceOptions<GreeterService>(options =>
    {
        // This registers an interceptor for the Greeter service
        options.Interceptors.Add<UnaryCachingInterceptor>();
    });
For examples on how to author an interceptors, take a look at these examples in the grpc-dotnet repo.
Give feedback
We hope you enjoy the new features in this preview release of ASP.NET Core and Blazor! Please let us know what you think by filing issues on GitHub.
Thanks for trying out ASP.NET Core and Blazor!
The link to the grpc Server examples does not work. I would really love to find some better examples of implementing Interceptors.
Thanks Michael for bringing this to our attention. The link should be fixed now to point to https://github.com/grpc/grpc-dotnet/tree/master/examples/Logger.
Hi Daniel,
I think the code snippet in section “Markup in
@functionsand local functions”for preview 6 should be:
@{ GreetPerson(builder, person); }@functions {
void GreetPerson(RenderTreeBuilder builder, Person person)
{
<p>Hello, <em>@person.Name!</em></p>
}
}
Otherwise I’m getting “Error CS0103 The name ‘builder’ does not exist in the current context …razor.g.cs” since builder is not accessible from GreetPerson method.
The syntax shown in this blog post is specific to MVC views and Razor Pages (.cshtml files). You are correct that additional code is needed to use the same feature in Razor components (.razor) files.
Hey Daniel,
Any plans for getting somethig like Identity Scaffolding to generate *.razor components or similar?
Cheers, John
Not at present. There is quite a bit of cost associated with maintaining multiple versions of the Identity UI.
Hey Dan,
Are there plans for ‘IdentityScaffolding’ but in *.razor instead of *.cshtml?
Cheers, John
Installed VS 2019 (SDK: latest version).Create a test project with Blazor.Run. Everything's in order.Open the MainLayout (razor file) and make a simple change.Replace the English word "Above" with the Cyrillic word (translate).Run. Everything's in order.Open the NavMenu (razor file) and make a simple change. Replace the English word " Counter "with the Cyrillic word (translate).Run. Instead of the desired result, we see question marks on the screen.A similar situation is with the translation of words into Cyrillic in the authorization.In other words, Blazor incorrectly handles Cyrillic characters starting from the second level of nesting.How do I fix this?
Installed VS 2019 (SDK:Latest version).Create a test project with Blazor.Run. That is all right.Open the MainLayout.razor file and make a simple change.Replace the English word "Above" with the Russian word "О нас".Run. That is all right.Open the NavMenu.razor file and make a simple change. Replace the English word "Counter" on the Russian word "Счетчик".Run. Instead of the desired result on the screen we see question marks.The situation is similar in the translation of words into Russian in the authorization.In other words Blazor does not properly handle the Cyrillic alphabet, starting from the second level of nesting.How is this problem solved?
I suspect this may be related to a known issue in the Razor compiler: https://github.com/aspnet/AspNetCore/issues/11225. Even so, please open an issue on GitHub (https://github.com/aspnet/aspnetcore/issues) with these steps to reproduce the problem and we’ll make sure that it gets resolved.
Very nice news. I’m glad to see all the good progress with Blazor. I’m trying to convince my working place to move from KnockOut.js/Angular to Blazor. I really hope this Blazor technology goes mainstream.
> I’m trying to convince my working place to move from KnockOut.js/Angular to Blazor.
Awesome! Let us know if you think there is anything we can do to make the pitch for Blazor more compelling.
I like the changes so far, however the new binding method broke my intellisense. With the new changes, when I bind to an internal method of an object, Intellisense will show the object name => but after hitting “enter” or selecting the object name, the intenal components do not become avaiable.
Hi Dwayne. Thanks for trying out Blazor! It sounds like you may have identified a regression in behavior. Could you please report this problem (if you haven’t already) by opening an issue at https://github.com/aspnet/aspnetcore/issues with detailed information on the problem and how to reproduce it?
Hey Daniel, does “Static assets in Razor class libraries” works when you disable server pre-rendering?
endpoints.MapBlazorHub().AddComponent(typeof(App), selector: “app”);endpoints.MapFallbackToFile(“index.html”);
Yes, support for static assets in Razor Class Libraries is independent of prerendering.
Daniel, I discovered the issue, my Razor Class library assembly name has points, example: RazorLib1.Test it doensn’t work this way. Should I open an issue on github?
Ah, right, currently we strip out the dots from the Razor class library name. We’ve fixed this for the upcoming Preview 7 release.
Hi Daniel, my question is about Deployment to Azure Web App. For .Net Core Preview 5 there is an extention provided in Azure whereas for preview 6 is none provided (yet). So I tried to deploy self-contained. I used the project template "Blazor (ASPNet Core hosted)". The startup target is "xxxx.Server" When I try to publish I get the following error:
Severity Code Description Project File Line Suppression StateError Assets file '....Client\obj\project.assets.json' doesn't have a target for '.NETStandard,Version=v2.0'. Ensure that restore has run and that you have included 'netstandard2.0' in the TargetFrameworks for your project. xxx.Server 0
I tried to remove / reinstall the preview (.net core and...
Unfortunately there is an issue that has blocked us from deploying the preview6 site extension to Azure. We are working to resolve this issue as soon as possible. To work around the issue you can instead publish your app as a “self-contained” app.
Thank you for your answer! Unfortunately “self-contained” doesn’t work either for the .server project. My run-target is the .server project. The compiler complaints about “….Client\obj\project.assets.json” doesn’t have target for ‘.NETStandard,Version=v2.0’. This used to work in preview5 but not in preview6. If you try to deploy the out-of-the-box ASP.Net hosted app (self -contained) you can easily simulate this issue.
PS: I can deploy the client target, but then the server-side won’t work (as expected).
Thank you. Br. Dimitri
Publishing ASP.NET Core hosted client-side Blazor apps to Azure with 3.0 Preview 6 is unfortunately blocked on https://github.com/aspnet/websdk/issues/604. I apologize for the inconvenience!