Continuous Integration for iOS Apps with Visual Studio Team Services
Visual Studio Team Services (VSTS) delivers services for teams to share code, track work, and ship software, including all of their mobile applications built with Xamarin. In the first post in this series, we automated a Xamarin.Android app in VSTS. We created our account, connected to our GitHub account, built and signed the app, and delivered it to HockeyApp for beta testers to start testing it. Today, we’re going to continue to automate the Coffee Tipper application, but this time for iOS.

Getting Started
At this point we’ve already created our first project and have connected to our source code repository. If you haven’t gotten this far, be sure to read through the first post in the series. We’ll continue to edit our existing projects in VSTS, but first there are a few prerequisites.
Preparing an iOS Build Agent
Since Xamarin.Android applications can be completely built and packaged on a Windows machine, we were able to leverage VSTS’ hosted solution to build our application. iOS applications must be built and compiled on a macOS device. Within VSTS, we have a few solutions available.
- MacinCloud Build Agent: Fully hosted with Xamarin support (paid plan)
- Utilize an on premise macOS machine with VSTS build agent installed
For this post, I’m going to utilize a Mac mini that I have on-premise as my build agent. You’ll only have to set up the agent once, as it can be used by multiple applications in VSTS. It can be a bit tricky to set up since it will require installing Homebrew, .NET Core, and npm on your macOS device, so here’s a quick rundown:
New Agent Pool
Create new “On Premise” Agent Pool under the projects Settings -> Agent Pools:

Install VSTS Build Agent
Before we can install the VSTS Build agent we must install a few prerequisites on our macOS machine.
- Install Homebrew package manager for macOS
- Install .NET Core
- Install npm by running the following command in the terminal: brew install npm
- Create a Personal Access Token for the Build Agent. Select the Scope: Agent Pools (read, manage)
- On the Agent Pool page where we created the new pool, tap Download agent and follow the setup steps to properly configure the Build agent.
Tip: after calling brew install openssl be sure to call:
mkdir -p /usr/local/lib/
This will ensure that the /user/local/lib folder is created before linking files.

With that, the build agent should be sitting in an open terminal window listening for jobs to come in.

iOS Build Definition
Heading back to our Build Definitions, it’s time to create our new iOS definition, which tells VSTS how to go about building our iOS app. Tap on the new icon and then select Xamarin.iOS from the template list.

The next step is the settings for source repository. Coffee Tipper is hosted on GitHub, which is already configured, so we’ll select that and then check the Continuous Integration check box and select the new On Premise agent queue.

This will create our definition with a few build steps set up for us. Before we configure the steps, let’s finalize the repository settings to point to the Coffee Tipper repository, which can be set up under the Repository tab:

Back on the Build we can start to fill in our steps. Similar to our Android setup in VSTS, we can disable the Activate, Deactivate, and Test Cloud steps for now. I like to keep them in the definition in case I need to go back and toggle them on. We’re going to focus the rest of the time on the Build Xamarin.iOS Solution step.
This step has two main parts to configure. First is pointing to the actual solution to build. It’s important to point it to the .sln and NOT the .csproj as xbuild will take over and build the iOS projects in the solution. You’ll also notice that there is no NuGet restore step, but don’t fear—as part of this step, xbuild will automatically call NuGet restore on the entire solution.

Configuring Solution
Note here that the default build configuration is set to Release under the Variables tab. You can adjust this at any time, but this is what I’ll use for this example. To ensure that the build is successful, go into the solution’s Build Configuration in Visual Studio or Xamarin Studio, where we’ll configure the Release/iPhone and Release/iPhoneSimulator builds to ONLY build the projects we need.

Signing and Provisioning
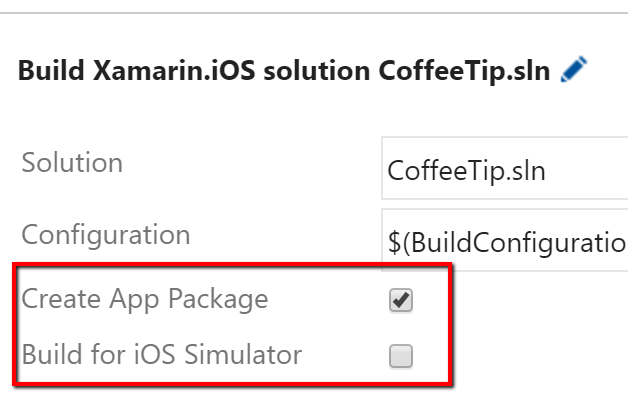
At this point, if we wanted to build for the iPhoneSimulator and not generate an .ipa package, we could go ahead and build. This would be good for a smoke test of the build, but we want to do a full app package build.

Only one of these check boxes should be checked, and if we are creating the app package then we must ensure that our P12 Certificate and Provisioning Profile are installed on the machine or are temporarily installed on the machine. There are a few ways to accomplish this:
- If using MacinCloud, simply follow the configuration steps here.
- For on-premise, we could simply use a machine that has the P12 Cert and Provisioning Profiles installed and there is nothing else to configure.
- Specify the Certificate and Profile locations in the Signing & Provisioning section
I went for the latter option, as I’m using a build machine that doesn’t have anything installed on it yet. I have exported my P12 Certificate and downloaded the Provisioning Profile for my app following these directions. We’ll store it in secure blob storage and use the command line build step to download it with a curl command much like we did for the keystore in the Android build. Since we have the actual machine we are building on, we can simply copy and paste them into the root directory from where the VSTS Agent was extracted and running from. Here are my settings:

Ensure that you specify the P12 Password and have it encrypted in the Variables tab.
Copy and Publish Artifacts
Before we can run, we want to make sure we can capture all of the artifacts we need to deploy to testers. Let’s add two more steps: the Copy File step and then the Publish Artifacts step.

Copy Files
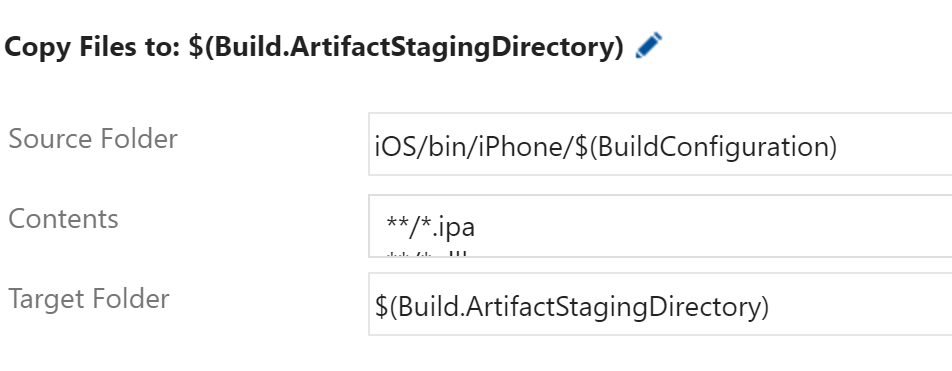
We know that all of the build artifacts that we want will be in our bin/iPhone/$(BuildConfiguration) folder and can then specify to find all of our .ipa and .dll files by using the following:
**/*.ipa **/*.dll
Then we can copy them to the built in staging directory with $(Build.ArtifactStagingDirectory) (a predefined variable).

Finally, we can publish the artifacts so they can be used during release management by specifying the same staging directory and the name of the artifact to create.

Queue a New Build
It’s now time to queue our very first build. This will pull down all of the sources, attempt to build the app, sign it, and publish the artifacts. We should see a full build readout that will tell us if anything has gone wrong or if a file can’t be found for signing. Once complete, we can tap on the build and explore all of the artifacts that are ready for publishing.

Deploy to Testers with HockeyApp
 To go one step further, we can get the app into our testers hands by deploying to HockeyApp. In the last post we saw how to add in the free HockeyApp VSTS Extension from the marketplace, which adds a new HockeyApp step into VSTS. This enables us to configure a new HockeyApp connection and specify the .ipa file to publish after the build is successful.

Learn More
Just like that, we now have our iOS and Android applications building in Visual Studio Team Services completely signed and shipped to our testers utilizing HockeyApp. For further details on VSTS and Xamarin, be sure to read through the full documentation on setting up Xamarin projects. Then take it a step further and send your app along with test scripts up to the Xamarin Test Cloud in one simple step.
Looking for more? Checkout The Xamarin Show on Channel 9:

 Light
Light Dark
Dark
0 comments