


If you work with multiple monitors like I do, you’ve probably grown to love floating tool windows and documents in Visual Studio. Being able to pull out Solution Explorer, the debugger, or your code files onto a second (or third) screen can be a huge productivity boost.
But there’s always been a bit of friction with how these floating windows behave.
By default, floating windows are “owned” by the main Visual Studio window. That means they don’t show up as separate buttons in your Windows taskbar, they disappear when you minimize the main IDE, and they always stay on top of everything else — even when you don’t want them to.
For some workflows that’s exactly what you want. For others, it gets annoying fast.
Fortunately, there’s a little-known setting that lets you decide exactly how much control Visual Studio has over your floating windows.
The setting is here: Tools > Options > Environment > Windows > Floating Windows
You’ll see this dialog:
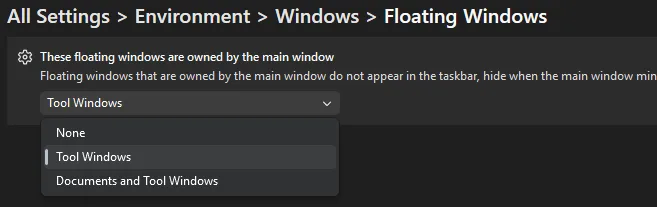
The dropdown is labeled “These floating windows are owned by the main window” and gives you three choices:
- None
- Tool Windows (the default)
- Documents and Tool Windows
Changing this one setting can completely transform how you work with floating windows.
My favorite scenario: PowerToys FancyZones
This setting really shines when you combine it with Microsoft PowerToys and its excellent FancyZones feature.
I like to set it to None and then use FancyZones to create custom layouts across my monitors. Suddenly all my floating tool windows and documents behave like normal application windows — they appear in the taskbar, stay visible even if I minimize the main Visual Studio window, and I can snap them perfectly into my FancyZones layouts without them forcing themselves to the front all the time.
It feels much more natural and gives me the clean multi-monitor setup I’ve always wanted.
When to choose each option
- None: Maximum independence. Everything gets its own taskbar entry and full window behavior. Perfect for heavy multi-monitor users with PowerToys.
- Tool Windows: A nice middle ground — keep your documents floating freely while tool windows stay tied to the IDE.
- Documents and Tool Windows: The classic Visual Studio behavior.
Pro tip: Combine this with the Ctrl + double-click trick on any tool window title bar (see our earlier post on easily docking and floating tool windows) for lightning-fast layout switching. No restart required.
Have you played with this setting before? What option do you prefer: None, Tool Windows, or the default? Let me know in the comments. I’m always curious how other developers set up multi-monitor workspaces.
Happy coding!
Great tip. PowerToys is awesome 😉
The None setting should absolutely be the default for the Test Explorer window, or it should simply not be classed as a Tool Window. When parented to the main VS window, it’s always popping to the front when clicking back into the source to debug.
Wish I’d known this sooner!
Nit, you a word in this sentence: “This setting really shines when you combine it with Microsoft and its excellent FancyZones feature.”
Yeah, he meant to say Microsoft PowerToys
Thanks. Fixed it
That’s so handy, thanks for the tip!
In my VS version (Visual Studio Professional 2022 17.14.27) the option looks a little different, but I found it:
Environment > Tabs and Windows > Floating Windows, and then de-select the checkbox for ‘Floating tool windows always stay on top of the main window’.
Thanks. Yes, VS 2022 doesn’t have the new settings system. Thanks for showing where to find it in VS 2022