Visual Studio has a small but extremely useful feature that allows you to hook external tools directly into the IDE’s Tools menu. All you have to do is click Tools->External Tools… and then you can add your own custom menu items that will launch a specified program.
On a typical day I’ll probably fire up Reflector and/or ildasm a few times, and I’ve always found it annoying to have to leave the IDE to launch the program, then navigate to the folder where my .dll is. Adding them to the menu once simplifies things and saves a lot of time.
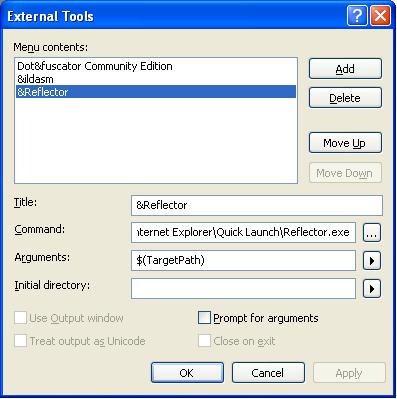
Let’s take a look at how we would do this for Reflector:
1. Click Tools->External Tools…
2. Click Add
3. For Title enter “&Reflector”
4. For Command just navigate to the path for Reflector.exe
5. For Arguments click the arrow on the right side and select “Target Path”

Now when you click the new menu item it’ll fire up Reflector with your current project in the list of assemblies. Same thing works for ildasm as well. $(TargetPath) represents the fully-qualified path to your project’s output (i.e. your .exe or .dll file). If you want to preview what all the different variables (such as $(TargetName), $(BinDir), etc…) will be for your project you can examine these in the Build Events dialog:
1. Double-click “My Project”
2. Click on the Compile tab
3. Click on Build Events in the bottom-right corner
4. Click Edit Pre-build
5. Click Macros >>
6. Resize the window and grid and you can now see the value of each variable
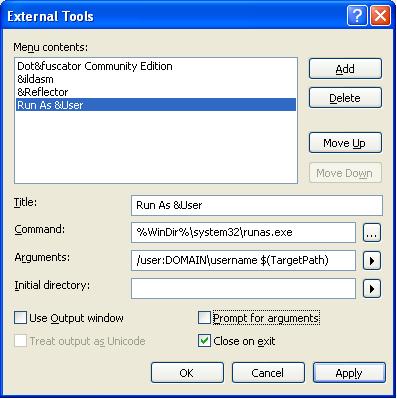
Where this can come in really handy is if you want to test your application using different user credentials. This is especially important when accessing a database using Windows Authentication. What if the permissions are set incorrectly on a stored procedure? How do you verify that your application’s authorization logic is doing the right thing based on the user’s permission level? Just because the application works for you in VS doesn’t mean it’ll work in production under a normal user’s credentials.
One way to do this type of testing is by using runas.exe and passing in a sample user with the /user switch. We use $(TargetPath) again to launch our actual .exe, and now when we click the menu item we’ll be prompted for the user’s password. After that your application is now running under that user’s credentials, and you can verify that everything works as expected.

You’ll either want to make one of these commands for each user-access level (i.e. “Limited User”, “Manager”, “Administrator” etc…), or alternatively just have one command and select “Prompt for arguments” to type in the user ID each time.
Other situations that might be useful include launching a VS command prompt (vcvarsall.bat) or invoking a batch file that backs up your project. If you find yourself constantly leaving the IDE to run a certain tool, it’s probably a good candidate to add to the menu. Best of all, this functionality works in Visual Studio 2003, 2005, and also the recently-released 2008.

0 comments
Be the first to start the discussion.