Hello game developers!
We’ve covered Jetpack Window Manager in the docs, and previously blogged about how to integrate the DisplayMask API into a Unity sample. In this post I’ll describe how to extend a Unity project to integrate native Android code and configuration to include the Jetpack Window Manager package and provide dual-screen and foldable device information to your Unity app or game.
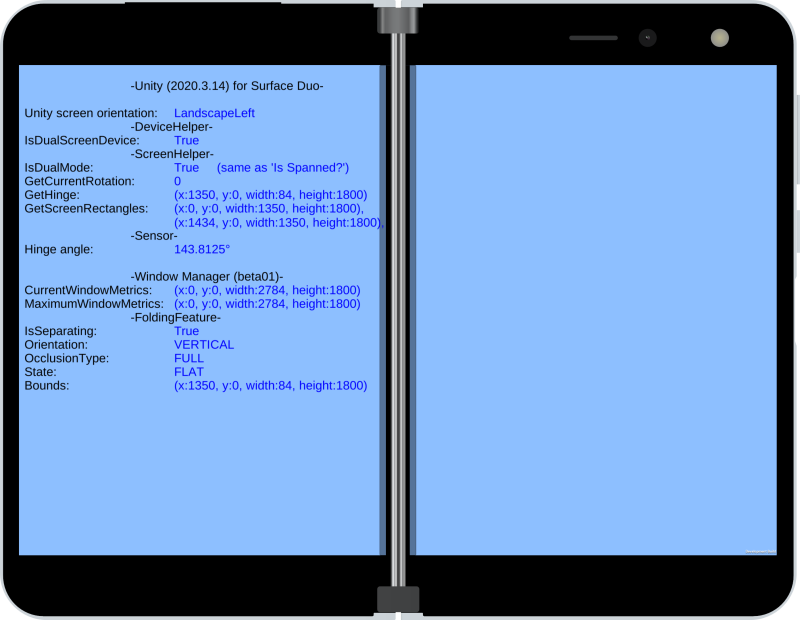
By providing folding feature information you can adapt your Unity code to move user interface elements away from the hinge, adapt gameplay for foldable devices, or even incorporate device features like the device hinge angle sensor in your user interactions.

Figure 1: Unity demo showing Window Manager Folding Feature data (as well as legacy DisplayMask data and the hinge angle)
This blog post explains how to incorporate the latest Jetpack Window Manager package into a Unity project. These instructions are also available in the dual-screen developer documentation.
Extending the Unity Activity
To customize the relevant Android build files, go to Edit > Project Settings… > Player > (Android) > Publishing Settings and check these Build options:

This will place new items in the Project’s Assets/Plugins/Android folder (plus a Java file that is added manually):

The purpose of each file is explained below:
- mainTemplate.gradle – This file allows for customization of various build options for the Android app. It contains placeholders like
**APIVERSION**so that Unity can insert values from the project’s configuration but allows for user-entered items as well. To include Jetpack Window Manager in the project, we need to add the following:dependencies { implementation "androidx.window:window:1.0.0-beta02" implementation "androidx.window:window-java:1.0.0-beta02" implementation "org.jetbrains.kotlin:kotlin-stdlib-jdk7:1.3.61" implementation 'androidx.appcompat:appcompat:1.2.0' implementation 'androidx.core:core-ktx:1.3.2' } - gradleTemplate.properties – Once again allows placeholders for Unity (such as
**ADDITIONAL_PROPERTIES**) but also allows for customization. For Jetpack Window Manager, we need to add the following line:android.useAndroidX = true
- AndroidManifest.xml – Unity will generate an AndroidManifest.xml using project properties set in the development environment. To customize elements not exposed in the Project Settings dialog, you can create this file and the Unity build system will merge everything together. Because we want to specify our own activity class, the custom XML just contains the <activity> element with our custom classname, leaving all other important things to the IDE properties:
<activity android:name>="com.microsoft.device.dualscreen.unity.FoldablePlayerActivity"
- FoldablePlayerActivity.java – This is where we write the code to implement Jetpack Window Manager and make it available for the Unity app to access via C#. See the next section for implementation details – you can just copy and paste this file into your game project, and then access the information it provides in your code.
FoldablePlayerActivity.java
Review the FoldablePlayerActivity sample code for an example of how you can access Window Manager – you can copy this file directly into your game code. Most apps will not need to access all the values available – just choose the information that works for your use case. The high-level features of the code are:
- Package name – This must match the AndroidManifest class name.
- Imports – We need to ensure all the classes required by Window Manager are included.
- Activity extends UnityPlayerActivity – The base class provided by Unity must be implemented so that the main Unity code is started.
- Window Manager – Follow the documentation to implement Window Manager and extract the information needed for your Unity project.
- Properties – Expose the Window Manager values via a public API so they can be consumed in Unity.
Thanks to Unity’s native integration this file can be placed in the Assets/Plugins/Android folder, and it will be compiled as part of the Android build process (including the references to the UnityPlayerActivity class, as well as the libraries added to gradle). It’s important that the AndroidManifest.xml file is updated to reference the new class (as shown above, and in the sample project).
WindowManagerHelper.cs
To access the native API from C#, use the interop features of Unity to get the values set by Jetpack Window Manager. The example WindowManagerHelper.cs shows how to use OnPlayer.Run and the AndroidJavaObject class to query the native code – you can copy this file directly into your game code.
The static constructor for WindowManagerHelper caches a reference to the FoldablePlayerActivity in its constructor:
  foldablePlayerActivity = OnPlayer.Run(p =>
  {
      return p.GetStatic<AndroidJavaObject>("currentActivity");
  });
NOTE: the FoldablePlayerActivity is the “currentActivity” for the Unity app because we configured it in the AndroidManifest.xml
Methods matching each of the different properties in Window Manager can then use the activity reference to retrieve information such as isSeparating, orientation, occlusionType, or the folding feature bounds. Here’s an example method that retrieves one of the values from native Java code:
  public static bool IsSeparating() {}
      var foldingFeatureObject = foldablePlayerActivity.Call<AndroidJavaObject>("getFoldingFeature");
      if (foldingFeatureObject == null)
      {
          return false;
      }
      else
      {
          return foldingFeatureObject.Call<bool>("isSeparating");
      }
  }
Feedback and resources
The sample duo-screenhelper project is available on GitHub.
If you have any questions, or would like to tell us about your games, use the feedback forum or message us on Twitter @surfaceduodev.
Finally, please join us for our dual screen developer livestream at 11am (Pacific time) each Friday – mark it in your calendar and check out the archives on YouTube.

0 comments