
This blog post is an introduction to the data binding capabilities for Silverlight 3 we first added for Silverlight 2 in Data Services v1.5 CTP1 and have updated to Silverlight 3 in CTP2. We also took the feedback we received in CTP1 and made some updates to the feature. Since this is a CTP release of this is a CTP release of this feature we eagerly look forward to hearing your feedback.
Introduction to Data Binding
In a previous post I introduced a new feature we included in ADO.NET Data Services v1.5 CTP2 that enables data binding. I outlined the feature and then showed how it can be used in WPF to create a client application that uses two-way data binding with WPF controls. The following blog post is a variance on the first blog post that shows how a similar application can be created using Silverlight 3. For more information on the new binding feature, you should go read the introduction to that post; found here.
Walkthrough
The following is a walkthrough of using data binding in a Silverlight 3 application.
To get started, you’ll want to download all of the required software I use in the walkthrough:
- Visual Studio 2008 SP1 (here)
- ADO.NET Data Services v1.5 CTP2 (here)
- Silverlight 3 SDK (here)
- Silverlight tools for Visual Studio SP1 (here)
Step 1 and 2: Create an ADO.NET Data Service v1.5
The service you will use for this walkthrough is identical to the service I created in my introduction to databinding and WPF. For this step, go to this blog post and follow step 1 and 2 of the walkthrough and then come back here and continue with step 3.
Step 3: Create client proxy code with binding enabled.
After setting the environment variable in step 2, open the solution you created in step 1 and create a new Silverlight project.

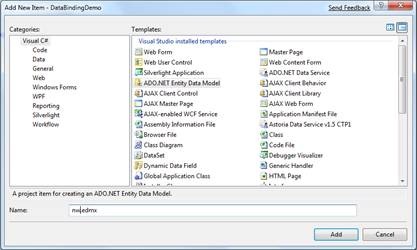
Once you have created a SL client project, the next step is to generate client side types. To do this, find the DatabindingSLClient project in the solution explorer, right-click the project and select Add Service Reference… In the Add Service Reference dialog, click the Discover button. The northwind.svc service will show up in the Service window. Enter NorthwindService as the Namespace value and select OK. This wizard will generate a set of client side types that can be used to interact with the service created in step 1.

If this step is done correctly, you will see a new NorthwindService node under the Service References Node in the solution explorer. As well, you will see a reference to Microsoft.Data.Services.Client in the references node; if you do not see the reference to Microsoft.Data.Services.Client or you see a reference to System.Data.Services.Client go to the ADO.NET Data Services blog and read this post about enabling ADO.NET Data Services v1.5 features in Visual Studio and then repeat the Add Service Reference Step.

When the above references are correctly showing the Silverlight project, right click the Microsoft.Data.Services.Client reference and select Properties. In the properties window, change the Copy Local property to True.

The next part of this step is to create a new instance of the ADO.NET Data Services client context and connect to the service created in step 1. To do this, add the following code to the Page.xaml.cs file to create a connection to the service.
NorthwindEntities nwsvc = new NorthwindEntities(new Uri(“/Northwind.svc”, UriKind.Relative));
public MainPage()
{
InitializeComponent();
}
Now, create an interface that you can bind the result of a query to. The service you created in step 1 exposes a set of Suppliers and a set of Products from the Northwind database with a one-to-many relationship between them. The XAML code below will create a datagrid to display the suppliers. It will also create a RowDetailsTemplate inside each row of the datagrid to display the supplier’s products. This type of binding is called master-detail binding.
The code below uses standard Silverlight binding semantics. The columns of the supplier datagrid are each bound to a property of the supplier object through the Binding="{Binding ProductID}"tag.
Paste the following code snippet into the mainPage.xaml file:
<Grid x:Name=”supplierGrid” Background=”White” Width=”750″ Height=”400″>
<data:DataGrid x:Name=”dgSuppliers” Height=”300″ Width=”749″ AutoGenerateColumns=”False”
VerticalAlignment=”Top” RowDetailsVisibilityMode=”VisibleWhenSelected” RowDetailsVisibilityChanged=”dgSuppliers_RowDetailsVisibilityChanged”>
<data:DataGrid.RowDetailsTemplate>
<DataTemplate>
<data:DataGrid x:Name=”dgSupplierProduct” Width=”700″ AutoGenerateColumns=”False”
HeadersVisibility=”Column” HorizontalAlignment=”Right”
SelectionChanged=”dgSupplierProduct_SelectionChanged”
ItemsSource=”{Binding Products}”>
<data:DataGrid.Columns>
<data:DataGridTextColumn Header=”ID” Binding=”{Binding ProductID}”/>
<data:DataGridTextColumn Header=”Name” Binding=”{Binding ProductName}”/>
<data:DataGridTextColumn Header=”QuantityPerUnit” Binding=”{Binding QuantityPerUnit}”/>
<data:DataGridTextColumn Header=”Price” Binding=”{Binding UnitPrice}”/>
<data:DataGridTextColumn Header=”InStock” Binding=”{Binding UnitsInStock}”/>
</data:DataGrid.Columns>
</data:DataGrid>
</DataTemplate>
</data:DataGrid.RowDetailsTemplate>
<data:DataGrid.Columns>
<data:DataGridTextColumn Header=”ID” Binding=”{Binding Path=SupplierID}”/>
<data:DataGridTextColumn Header=”Name” Binding=”{Binding Path=CompanyName}”/>
<data:DataGridTextColumn Header=”Address” Binding=”{Binding Path=Address}”/>
<data:DataGridTextColumn Header=”City” Binding=”{Binding Path=City}”/>
<data:DataGridTextColumn Header=”Region” Binding=”{Binding Path=Region}”/>
</data:DataGrid.Columns>
</data:DataGrid>
</Grid>
Edit the following attributes of your window: Width="750" Height="400" to properly display the controls.
The next step to enable binding to these Silverlight controls is to set the ItemsSource of the datagrid in the page you just created to the result of a query for suppliers from the service created in step 1. This is done by executing an asynchronous ADO.NET Data Services query on the context for the set of suppliers and loading the query result into a DataServiceCollection. The entities in this collection will implement INotifyPropertyChanged and INotifyCollectionChanged. To do this, add the following code to the constructor for the page:
public MainPage()
{
InitializeComponent();
var q = nwsvc.Suppliers;
//create an asynchronous query to get the set of suppliers
q.BeginExecute(
delegate (IAsyncResult asyncResult)
{
Dispatcher.BeginInvoke(
() =>
{
DataServiceQuery<Supplier> query = asyncResult.AsyncState as DataServiceQuery<Supplier>;
if (query != null)
{
//create a tracked DataServiceCollection from the result of the asynchronous query.
suppliers = DataServiceCollection.CreateTracked<Supplier>(nwsvc, query.EndExecute(asyncResult));
//set the items source of the grid to the DataServiceCollection of suppliers. This collection
//will be tracked and all changes made will be reflected on the DataServiceContext
this.dgSuppliers.ItemsSource = suppliers;
}
}
);
},
q
);
}
The final step is to implement the RowDetailsVisibilityChanged event handler that executes when a new row is selected in the grid. This method will dynamically load in the products to display in-line for the currently selected supplier using a call to loadProperty. Insert the following code into the event handler:
private void dgSuppliers_RowDetailsVisibilityChanged(object sender, DataGridRowDetailsEventArgs e)
{
if (e.Row.DataContext is Supplier)
{
//get the currently selected item in the grid
Supplier supplier = e.Row.DataContext as Supplier;
//ensure the entity is not new or we won’t be able to query for it’s products
if (nwsvc.GetEntityDescriptor(supplier).State != EntityStates.Added)
{
//create an async call to load the products property of the current supplier
Dispatcher.BeginInvoke(
() =>
{
nwsvc.BeginLoadProperty(supplier, “Products”,
delegate(IAsyncResult asyncResult)
{
//this delegate will execute when the results of the async query have returned
nwsvc.EndLoadProperty(asyncResult);
}, supplier);
}
);
}
}
}
Once this is complete, compile the project and run it. This datagrid in this example takes advantage of the RowDetailsTemplate in Silverlight to display the products directly inline when a supplier is selected. The result will be:

Step 4: Two-way Binding
Up to this point in the walkthrough, you have created a Silverlight client and bound the result of a query to the service to a pair of listview controls in the client. This type of binding you have done so far has all been one-way binding. The DataServiceCollection you used at the end of step 3 also supports two-way binding. This means that any changes made to the collection or items in the collection will propagate to the service after a call to BeginSaveChanges() has completed executing.
This final step will walk you through adding buttons that will add items to the collection of products and take advantage of two-way binding to have those changes propagate to the service and the backing northwind database.
To start, add the following XAML code to the window1.xaml file to create two buttons to that will add a product from the list of products and save the changes to the service.
<Button x:Name=”saveBtn” Width=”90″ Height=”25″ Margin=”600, 315, 50, 50″ Click=”saveBtn_Click” Content=”Save”></Button>
<Button x:Name=”addProductBtn” Width=”90″ Height=”25″ Margin=”400, 315, 50, 50″ Click=”addProductBtn_Click” Content=”Add Product”></Button>
<Button x:Name=”addSupplierBtn” Width=”90″ Height=”25″ Margin=”200, 315, 50, 50″ Click=”addSupplierBtn_Click” Content=”Add Supplier”></Button>
After adding this code the client application will be:

The final part of this step is to handle the add and save button click events.
Add the following code to the add supplier buttons click event. This method will create a new supplier object and add it to the collection of suppliers.
private void addSupplierBtn_Click(object sender, RoutedEventArgs e)
{
//create a new supplier and add it to the supplier collection
suppliers.Add(new Supplier());
}
Add the following code to the addProductBtn_Click event to create a new product when the add button is selected. The following code creates a new Product object and adds it to the list of products for the currently selected supplier.
private void addProductBtn_Click(object sender, RoutedEventArgs e)
{
//get the currently selected supplier entity
Supplier supplier = this.dgSuppliers.SelectedItem as Supplier;
//add a new product to the supplier
//because the collection of products is a tracked collection this operation
//will be translated into an insert operation on the DataServiceContext
if (supplier != null)
supplier.Products.Add(new Product());
}
Add the following code to handle the save button click. This button calls BeginSaveChanges on the context which will cause any operations that have been performed on the context to be sent to the service. As with all network calls in Silverlight the SaveChanges call need to be asynchronous.
private void saveBtn_Click(object sender, RoutedEventArgs e)
{
//create an asynchronous save call
nwsvc.BeginSaveChanges(SaveChangesOptions.Batch,
delegate(IAsyncResult asyncResult)
{
Dispatcher.BeginInvoke(
() =>
{
nwsvc.EndSaveChanges(asyncResult);
}
);
}, nwsvc
);
}
Your project is now complete. When you make a change you then click the save button to persist the changes to the service.
Providing Feedback
We have created a new forum dedicated to providing feedback on "pre-release" versions of data services such as this CTP. Please direct all your questions and comments about this feature this new forum which is available at: (http://social.msdn.microsoft.com/Forums/en-US/dataservices/threads).
Note: The forum intended for questions on currently shipping versions of ADO.NET Data Services is still available at: (http://social.msdn.microsoft.com/Forums/en-US/adodotnetdataservices/threads/ )
We look forward to hearing your feedback.
Shayne Burgess
ADO.NET Data Services, Program Manager
0 comments