

User preferences and settings are fundamental components of modern web applications. When developing SharePoint Framework (SPFx) solutions, the ability to store and manage user-specific configurations across devices and sessions becomes crucial for delivering personalized experiences. This article explores a robust, enterprise-ready pattern for handling user settings in SharePoint Framework applications. There is also a companion sample available on the Community Sample Solution Gallery.
You can simply download the source code of the sample and then follow this article to understand how it works.
Understanding the Challenge
The Need for Persistent User Settings
In SharePoint Framework development, we frequently encounter scenarios where web parts or extensions require the ability to store user-specific information, options, or preferences. Traditional client-side storage mechanisms, such as localStorage or sessionStorage, fall short when we need:
- Cross-device synchronization: Settings available across multiple devices
- Per-user isolation: Secure storage ensuring users can only access their own settings
- Enterprise scalability: Solutions that can handle multiple web parts and applications
- Technology resilience: Independence from client-side storage limitations
Limitations of Traditional Approaches
Relying solely on local user settings presents several challenges:
- Device-specific storage: Settings remain confined to individual browser sessions
- Limited cross-application support: Difficulty sharing preferences between multiple web parts
- Security concerns: Potential exposure of sensitive user preferences
- Technology dependency: Vulnerability to changes in client-side storage technologies
Architecture Overview
Solution Components
The proposed architecture leverages the Microsoft 365 ecosystem to deliver a comprehensive user settings management solution:
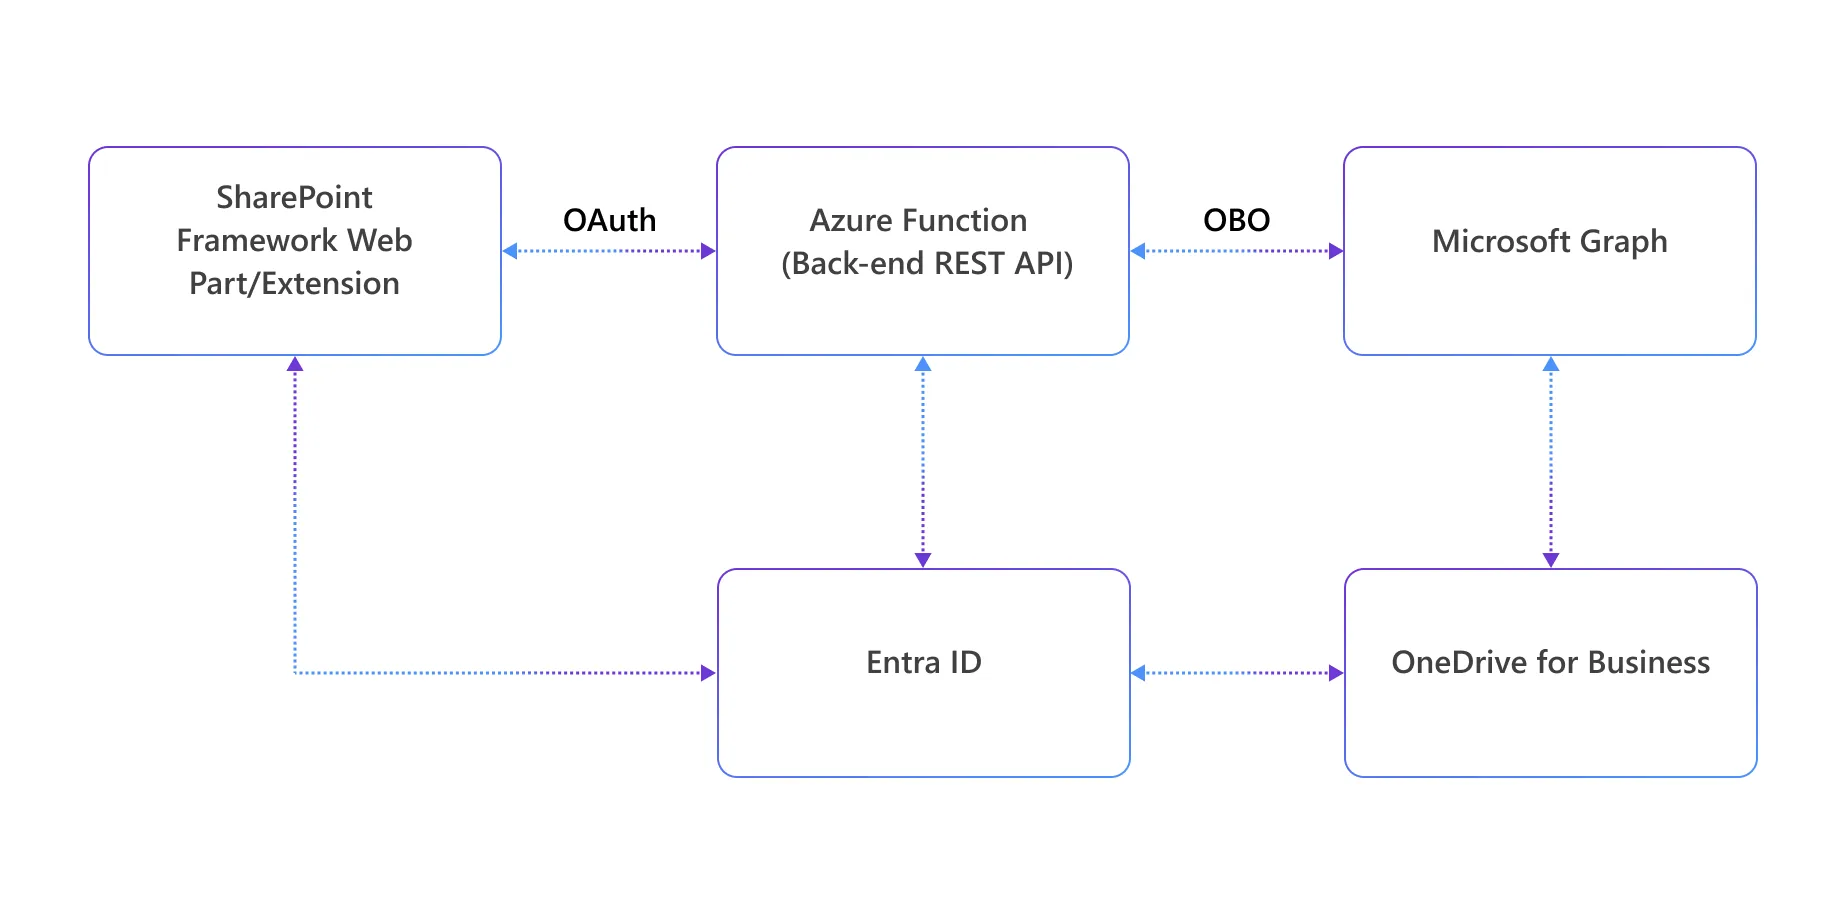
Security Framework
The solution implements enterprise-grade security through:
- Entra ID Authentication: Leveraging Microsoft’s identity platform
- OAuth 2.0 Authorization: Secure token-based authentication
- On-Behalf-Of (OBO) Flow: Enabling the backend to act on behalf of authenticated users
- Microsoft Graph Integration: Utilizing official Microsoft APIs for data access
The Special Folder Concept
Understanding App-Specific Folders
Microsoft Graph provides access to special folders in each user’s OneDrive for Business through the endpoint:
/me/drive/special/{folderName}The approot special folder is particularly valuable for application-specific storage:
/me/drive/special/approotIt can be used to store files and settings specific to a particular application and user.
Per-Application Isolation
In fact, each Entra ID application registration receives a dedicated folder structure:
OneDrive for Business/
└── Apps/
    └── {Application Display Name}/
        └── {User Settings Files}
This architecture ensures:
- Complete isolation between different applications
- Per-user storage with automatic user context
- Secure access through Microsoft Graph APIs
Implementation Deep Dive
Accessing the API from within SharePoint Framework
One option that you have is to access the Microsoft Graph special folder API from within your SharePoint Framework web part or extension. It is simple and it just works.
However, from an architectural standpoint it is better to have a backend API taking care of security, caching, business logic, etc. to have better decoupling of code, maintenance, and monitoring of the solution. That’s why in the solution illustrated in this article we explain you the main steps to go through in order to create such an enterprise-level scenario application.
Entra ID Application Configuration and permission scopes
In order to being able to access an AppRoot folder via Microsoft Graph, you need to register an Entra ID application and to grant specific permissions to that app.
Browse to the Microsoft Entra admin center, select App Registrations and then select + New registration in the upper left side of the screen. Provide a name for the application, select to target your current tenant only (Accounts in this organizational directory only), and select the Register command at the end of the registration page. You can refer to the article Register an application in Microsoft Entra ID for further details about registering an Entra ID application.
Then move to the API permissions configuration panel of the new application and configure the specific Files.ReadWrite.AppFolder delegated permission for Microsoft Graph access. This permission enables the application to read and write files specifically within the app folder, maintaining security boundaries and under the identity of currently connected user.
Using a tenant admin account select the Grant admin consent for … command, to grant the selected permission to the application.
You can learn more about granting API permissions to an Entra ID application reading the article Configure app permissions for a web API
API Exposure to SharePoint Framework
To make the application accessible to SharePoint Framework web parts and extensions, you also need to expose an API in the configuration of the Entra ID application. While still in the Microsoft Entra admin center, select the Expose an API panel. Now, follow the instructions available here to expose a custom API with a dedicated permission scope from your application. For the sake of completeness, you can for example create a permission scope with name UserSettings.Manage. Keep track of the Application ID URI (it should look like api://application-client-id) value configured for the application because you will need it later.
SharePoint Framework Implementation
You are now ready to implement the actual SharePoint Framework web part or extension in order to access the backend API.
HTTP Client Configuration
The SPFx web part or extensions leverage the built-in AadHttpClientFactory to create authenticated HTTP clients. For example, in a web part you can create a new instance of the AadHttpClient using syntax like the following one and providing the object instance to the React components rendering the user experience of your customization.
import { AadHttpClient, AadHttpClientFactory } from '@microsoft/sp-http';

export default class UserSettingsWebPart extends BaseClientSideWebPart<IUserSettingsWebPartProps> {
  private _httpClient: AadHttpClient;

  protected async onInit(): Promise<void> {
    this._httpClient = await this.context.aadHttpClientFactory
      .getClient('api://application-client-id');

    return super.onInit();
  }

  public render(): void {
    const element: React.ReactElement<IUserSettingsProps> = React.createElement(
      UserSettings,
      {
        httpClient: this._httpClient,
        apiUrl: this.properties.apiUrl
      }
    );

    ReactDom.render(element, this.domElement);
  }
}
In the above code excerpt, the value of api://application-client-id needs to be the Application ID URI that you configured while exposing an API from within the Entra ID application.
You can find additional details about securely consuming a REST API in SharePoint Framework reading the article Connect to Entra ID-secured APIs in SharePoint Framework solutions.
Consuming the Backend API
Once you have the AadHttpClient instance, you can use it to consume the Azure Function REST endpoints. The methods of the AadHttpClient class allow you to make authenticated HTTP requests to the backend API. Here’s an example of how to implement the CRUD operations in your React component:
const fetchSettings = async (): Promise => {
  if (!aadHttpClient) return;
  setLoading(true);
  setMessage('');
  try {
    const res = await aadHttpClient.get(apiUrl, AadHttpClient.configurations.v1);
    if (!res.ok) throw new Error('Failed to list settings');
    const data = await res.json();
    setSettings(Array.isArray(data) ? data : []);
  } catch (err) {
    setMessage((err as Error).message);
  } finally {
    setLoading(false);
  }
};

const handleAdd = async (): Promise => {
  if (!aadHttpClient || !key) return;
  setLoading(true);
  setMessage('');
  try {
    const res = await aadHttpClient.fetch(`${apiUrl}/${encodeURIComponent(key)}`, AadHttpClient.configurations.v1, {
      method: 'POST',
      headers: { 'Content-Type': 'application/json' },
      body: JSON.stringify(value)
    });
    if (!res.ok) throw new Error('Failed to add setting');
    setKey('');
    setValue('');
    await fetchSettings();
  } catch (err) {
    setMessage((err as Error).message);
  } finally {
    setLoading(false);
  }
};

const handleUpdate = async (): Promise => {
  if (!aadHttpClient || !editKey) return;
  setLoading(true);
  setMessage('');
  try {
    const res = await aadHttpClient.fetch(`${apiUrl}/${encodeURIComponent(editKey)}`, AadHttpClient.configurations.v1, {
      method: 'PUT',
      headers: { 'Content-Type': 'application/json' },
      body: JSON.stringify(value)
    });
    if (!res.ok) throw new Error('Failed to update setting');
    setEditKey(null);
    setKey('');
    setValue('');
    await fetchSettings();
  } catch (err) {
    setMessage((err as Error).message);
  } finally {
    setLoading(false);
  }
};

const handleRemove = async (removeKey: string): Promise => {
  if (!aadHttpClient) return;
  setLoading(true);
  setMessage('');
  try {
    const res = await aadHttpClient.fetch(`${apiUrl}/${encodeURIComponent(removeKey)}`, AadHttpClient.configurations.v1, {
      method: 'DELETE'
    });
    if (!res.ok) throw new Error('Failed to remove setting');
    await fetchSettings();
  } catch (err) {
    setMessage((err as Error).message);
  } finally {
    setLoading(false);
  }
};
In the code above, the AadHttpClient.configurations.v1 configuration ensures that the client automatically includes the OAuth access token in the Authorization header of each request. The apiUrl parameter is the base URL of your Azure Function endpoint, and the key is appended to the URL to identify the specific setting to manage.
Web API Permissions Declaration
However, in order to being able to consume the custom API from SharePoint Framework, you also need to customize the package-solution.json file of the SharePoint Framework solution. In fact, you need to declare the required permissions to consume your custom API:
{
  "solution": {
    "webApiPermissionRequests": [
      {
        "resource": "your-application-display-name",
        "scope": "UserSettings.Manage"
      }
    ]
  }
}
Where the value of the resource attribute is the name of the application that you registered in Entra ID, while the value of the scope attribute is the name you gave to the permission scope that you registered while exposing an API with your Entra ID application.
Azure Function Backend Implementation
Now that SharePoint Framework can securely consume your back-end API, you need to implement the actual API. In this section we will focus only on key features like authentication, token validation, and consumption of Microsoft Graph on behalf of the current user.
Token Validation and OBO Flow
The Azure Function implements secure token validation through an open source library created by Waldek Mastykarz. You can find the implementation of the token validation logic here on the GitHub repository of the sample solution associated with this article. Right after validating the token, the Azure Function retrieves a new access token to consume Microsoft Graph on behalf of the current user. To do so, the Azure Function relies on the On-Behalf-Of flow, which is described here.
Microsoft Graph Integration
In the companion sample for this article, the user’s settings are stored in a file with name settings.json under the AppRoot special folder. Here follows an excerpt of the implementation of the service class used to access the special folder and the settings file.
// Helper: Get approot folder id
async function getAppRootFolderId(graphToken: string) {
  const fetch = (await import("node-fetch")).default;
  const res = await fetch("https://graph.microsoft.com/v1.0/me/drive/special/approot", {
    headers: { Authorization: `Bearer ${graphToken}` }
  });
  if (!res.ok) throw new Error("Failed to get approot folder");
  const data = await res.json();
  if (!data || typeof data !== "object" || !('id' in data)) throw new Error("No id property in approot folder response");
  return (data as { id: string }).id;
}

// Helper: Read settings JSON from approot
async function readSettingsFile(graphToken: string, approotId: string) {
  const res = await fetch(`https://graph.microsoft.com/v1.0/me/drive/items/${approotId}:/settings.json:/content`, {
    headers: { Authorization: `Bearer ${graphToken}` }
  });
  if (res.status === 404) return {}; // No file yet
  if (!res.ok) throw new Error("Failed to read settings file");
  return await res.json();
}

// Helper: Write settings JSON to approot
async function writeSettingsFile(graphToken: string, approotId: string, settings: any) {
  const res = await fetch(`https://graph.microsoft.com/v1.0/me/drive/items/${approotId}:/settings.json:/content`, {
    method: "PUT",
    headers: { Authorization: `Bearer ${graphToken}`, "Content-Type": "application/json" },
    body: JSON.stringify(settings)
  });
  if (!res.ok) throw new Error("Failed to write settings file");
}
API Endpoint Design
SharePoint Framework can consume the Azure Function via a set of REST API endpoints to list, get, add, update, or delete settings. Behind the scenes, the Azure Function reads and writes the settings leveraging the settings.json file.
RESTful Interface
The REST API endpoints in the Azure Function are defined as follows:
export async function userSettings(request: HttpRequest, context: InvocationContext): Promise {
  try {
    if (request.method === "OPTIONS") {
      // CORS preflight support (skip OAuth)
      return withCorsHeaders({ status: 204 });
    }

    // Require OAuth2 Bearer token
    const authHeader = request.headers.get("authorization");
    if (!authHeader?.startsWith("Bearer ")) {
      return withCorsHeaders({ status: 401, body: "Missing or invalid Authorization header" });
    }
    const userToken = authHeader.replace("Bearer ", "");

    // Validate the token
    if (!await validateToken(userToken)) {
      return withCorsHeaders({ status: 401, body: "Unauthorized - Token missing or not valid" }); // Token is invalid
    }

    // Get OBO token for Graph API
    const graphToken = await getOboToken(userToken);

    // Get approot folder ID
    const approotId = await getAppRootFolderId(graphToken);

    // Read current settings
    let settings = await readSettingsFile(graphToken, approotId);

    // Parse key from URL (for PUT/DELETE)
    const urlParts = request.url.split("/");
    const key = decodeURIComponent(urlParts[urlParts.length - 1] || "");

    if (request.method === "GET") {
      // List all settings
      const response = Object.entries(settings).map(([k, v]) => ({ key: k, value: v }));
      return withCorsHeaders({ status: 200, jsonBody: response });
    }

    if (request.method === "POST") {
      // Add new setting
      const value = await request.json();
      if (!key || typeof value !== "string") return withCorsHeaders({ status: 400, body: "Missing key or value" });
      if (settings[key]) return withCorsHeaders({ status: 409, body: "Key already exists" });
      settings[key] = value;
      await writeSettingsFile(graphToken, approotId, settings);
      return withCorsHeaders({ status: 201, body: "Setting added" });
    }

    if (request.method === "PUT") {
      // Update setting
      const value = await request.json();
      if (!key || typeof value !== "string") return withCorsHeaders({ status: 400, body: "Missing key or value" });
      if (!settings[key]) return withCorsHeaders({ status: 404, body: "Key not found" });
      settings[key] = value;
      await writeSettingsFile(graphToken, approotId, settings);
      return withCorsHeaders({ status: 200, body: "Setting updated" });
    }

    if (request.method === "DELETE") {
      // Remove setting
      if (!key) return withCorsHeaders({ status: 400, body: "Missing key" });
      if (!settings[key]) return withCorsHeaders({ status: 404, body: "Key not found" });
      delete settings[key];
      await writeSettingsFile(graphToken, approotId, settings);
      return withCorsHeaders({ status: 200, body: "Setting removed" });
    }

    return withCorsHeaders({ status: 405, body: "Method not allowed" });
  } catch (err: any) {
    context.error(err);
    return withCorsHeaders({ status: 500, body: err.message || "Internal server error" });
  }
}
You can clearly see that all the CRUD (Create, Read, Update, Delete) functionalities are offered through the corresponding REST endpoints (POST, GET, PUT, DELETE).
Conclusion
This comprehensive approach to user settings management in SharePoint Framework provides a robust, secure, and scalable solution that leverages the full power of the Microsoft 365 ecosystem. By implementing this pattern, developers can create enterprise-ready applications that offer personalized experiences while maintaining the highest security standards.
The solution’s architecture ensures cross-device synchronization, per-user data isolation, and enterprise scalability, making it an ideal choice for organizations seeking to deliver sophisticated SharePoint Framework solutions.
0 comments
Be the first to start the discussion.