The ASP.NET MVC 1.0 Release Candidate (RC) is finally out, and we wanted to give returning MVC users as well as new MVC users an overview of what the tooling in Visual Studio provides.
The MVC 1.0 RC can be downloaded right now here (Release Notes). Please note that this release will work with both Visual Studio 2008 and Visual Web Developer Express 2008 SP1 (free download).
In case you missed it, be sure to also read ScottGu’s blog post on the RC for some great information (including runtime changes!): http://weblogs.asp.net/scottgu/archive/2009/01/27/asp-net-mvc-1-0-release-candidate-now-available.aspx
Project Templates
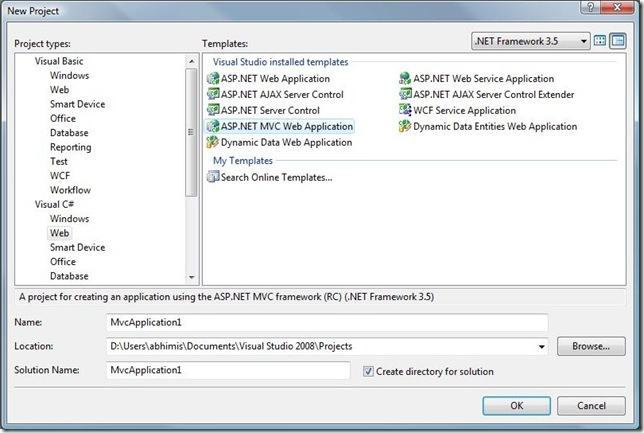
The MVC installer provides project templates for use in Visual Studio. If you visit the new project dialog (File –> New –> Project) you will see under the ‘Web’ section, an option labeled ‘ASP.NET MVC Web Application’. This will create a web application project that includes appropriate references to various assemblies (such as System.Web.Mvc) as well as a default set of controllers and views to get you started.
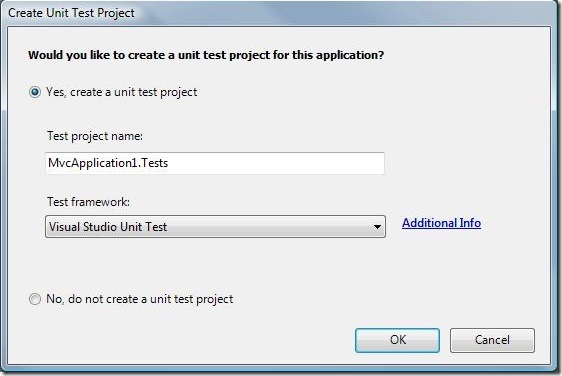
When you create a new project you also will see a dialog that lets you create a new Test project to go along with your new web application. This test project can be used to create a suite of tests for your web application, or guide your development if you are following the test-driven-development model. This dialog will also surface third-party testing frameworks such as NUnit, in addition to the default Visual Studio Test Project option. Check out the following previous blog posts for more information on the test framework integration:
Test Framework Integration: http://blogs.msdn.com/webdevtools/archive/2008/02/18/asp-net-mvc-test-framework-integration.aspx
Test Framework Integration Walkthrough: http://blogs.msdn.com/webdevtools/archive/2008/03/06/asp-net-mvc-test-framework-integration-demo.aspx
Add Controller
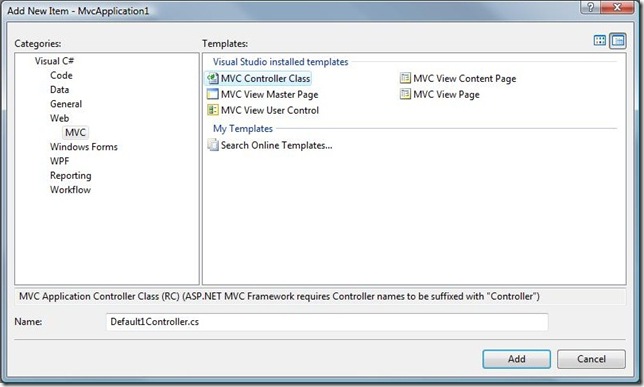
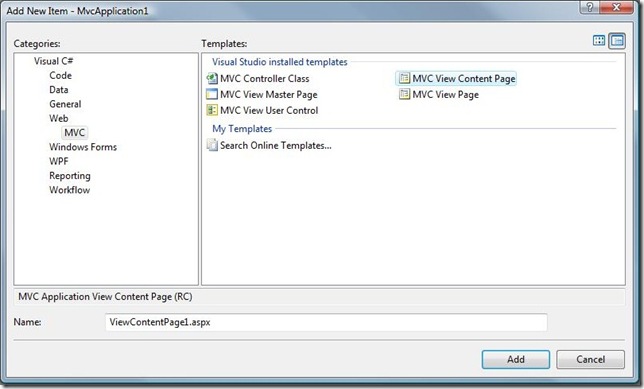
To make the process of adding a controller simpler, Visual Studio surfaces a few different ways for users to add a new controller to their MVC project. The first method is probably the most familiar to Visual Studio users – through the Add New Item dialog. Simply right-click any folder (or the top-level project node) in the Solution Explorer and go to Add –> New Item to invoke the dialog and navigate to the Web –> MVC node to view item templates available for MVC projects. The ‘MVC Controller Class’ template will add a basic controller class to the location you have chosen.
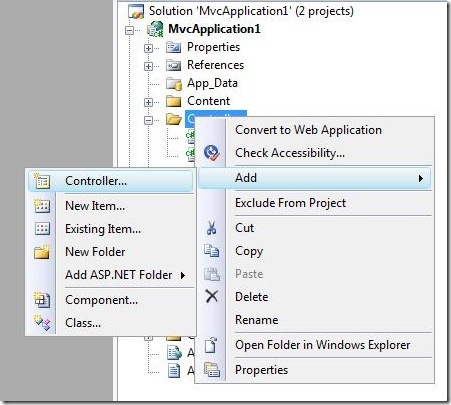
You can also add a controller through the Add Controller dialog, which can be accessed by right-clicking the ‘Controllers’ folder (or a sub-folder under there) and choosing the ‘Controller…’ option under the ‘Add’ sub-menu.
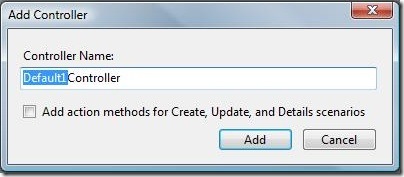
This will bring up a simple dialog box where you can type in the name of the controller you want to use. There is also a checkbox to add additional Action Methods named Details, Create, and Edit, to speed up controller authoring for common database-oriented situations. The Add Controller dialog is also accessible using keyboard shortcut Ctrl-M Ctrl-C.
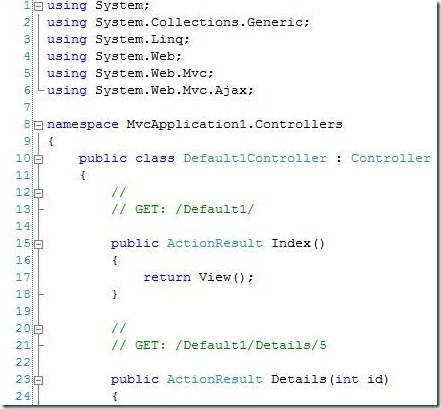
Hit Add and a new Controller class will be added to the project.
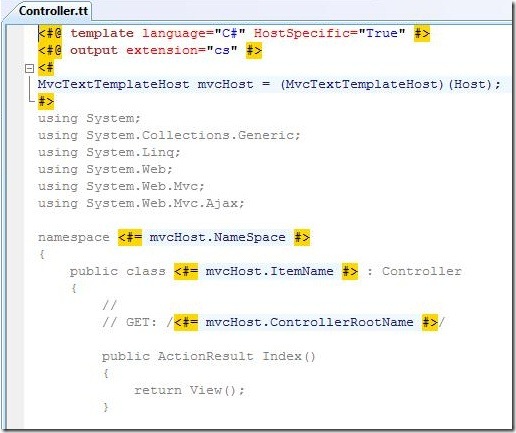
The contents of the controllers generated using the Add New Item dialog or the Add Controller dialog all come from a template located under the Visual Studio install directory (under the install directory, navigate to Common7\IDE\ItemTemplates\[CSharp | VisualBasic]\Web\MVC\CodeTemplates\AddController\).
This template is a T4 (.tt) file that uses the same T4 technology Scott Hanselman recently blogged about. You can edit this template in your favorite editor to customize the code that is generated by our tools (Note: we will be talking more about T4 templating in a follow-up post soon).
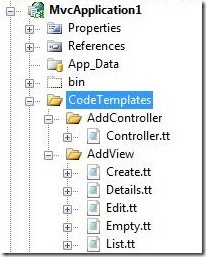
If you want to customize the code-generation on a per-project basis, you can copy the ‘CodeTemplates’ folder into your project and edit the .tt file within your project. Our tools will automatically pick up on this and respect the precedence of the template in your project over the global template.
Note: Adding a .tt file to a project in Visual Studio automatically sets the Custom Tool for the file to be ‘TextTemplatingFileGenerator’ – a convenience feature that allows a user to have .tt files in their project to do one-off code generation. However, our T4 templates are made to work only with our tooling and hence running them will generate errors. We suggest you hit ‘Cancel’ if asked permission to run the T4 file generator when you copy the ‘CodeTemplates’ folder into your project. You should also clear out the ‘Custom Tool’ property on any T4 templates relating to Add Controller or Add View to prevent changes to the template from triggering the default T4 file generator.
Add View
An MVC application of course needs Views to go with the Controllers, and to make that process a little easier we provide a few different ways for a user to quickly add a view. The first method is to go through the Add New Item dialog as with Add Controller above.
There are four options provided through this dialog relevant to Views:
- MVC View Master Page – adds a master page that inherits from ‘System.Web.Mvc.ViewMasterPage’ so as to provide master and content page style organization with MVC applications
- MVC View Content Page – adds a view that references a master page and contains appropriate asp:Content tags to go along with the content placeholder’s in the master page. Derives from ‘System.Web.Mvc.ViewPage’

- MVC View Page – this adds a regular MVC view that derives from ‘System.Web.Mvc.ViewPage’
- MVC View User Control – adds a partial view, which derives from ‘System.Web.Mvc.ViewUserControler’
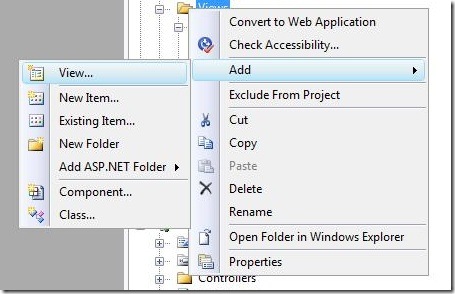
You can also right-click the ‘Views’ folder (or a sub-folder thereof) and click on ‘View…’ option under the ‘Add’ sub-menu to bring up the Add View dialog.
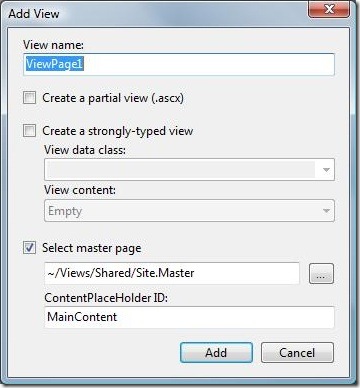
This dialog is a powerful code-generation tool that lets you add any type of view that you can add through the Add New Item dialog, along with a couple extras (explained below).
One of the more intuitive ways to access this dialog is from within an Action Method in a Controller class. Right-clicking anywhere within an Action Method brings up a context menu that has an extra option – ‘Add View’. This will bring up the Add View dialog and automatically name the view based on the name of the action method. You can also use the keyboard shortcut Ctrl-M Ctrl-V from within an Action Method in the editor to bring up the Add View Dialog.
Add View Dialog
As mentioned above, the Add View Dialog lets you create any type of view that you can add through the Add New Item dialog:
- View User Control – simply check the first checkbox labeled ‘Create a partial view’ in the above dialog to create a view user control instead of a regular view page
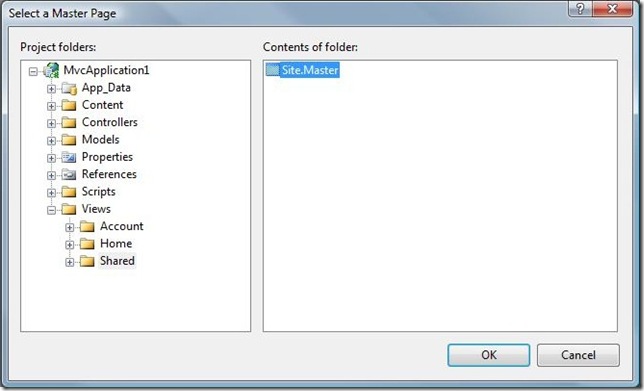
- View Content Page – to create a content page, check the box labeled ‘Select master page’ and choose a master page. You can navigate to a master page by clicking the button labeled ‘…’ to bring up the master page browser, or you can type a path in. The ‘ContentPlaceHolder ID’ textbox lets you specify which content placeholder from the master page the newly generate code should be placed into.
- View Page – to create a regular view page ensure that the ‘Select master page’ and ‘Create a partial view’ checkboxes are unchecked
The Add View Dialog also provides a feature called Data Scaffolding. The basic idea around data scaffolding is that code-generation is performed based on some data to which a given view is tied. For example, a view tied to a table of Products should figure out what the columns in the Products table are and generate appropriate markup.
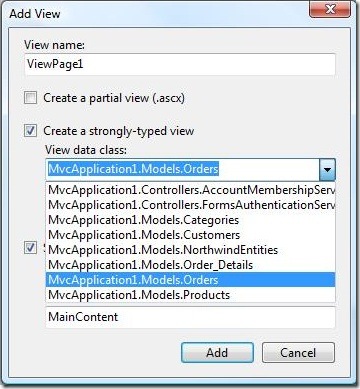
To enable data-scaffolding for a view, check the checkbox labeled ‘Create a strongly-typed view’. This will enable the two drop-downs nested underneath the checkbox. The ‘View data class’ drop-down enumerates all the .NET types visible in your project and lets you choose one of them (NOTE: you must build your project for types to be visible through this drop-down). The generated view will inherit from System.Web.Mvc.ViewPage except that it will also provide the chosen type as a generic parameter in its inherits clause (see screenshot of generated code below).
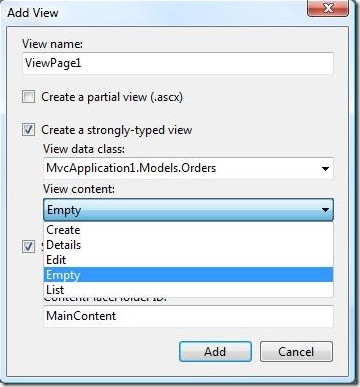
The ‘View content’ drop-down lets you choose a template that will be used to perform code-generation. By default we provide five templates – Empty, Create, Details, Edit, and List.
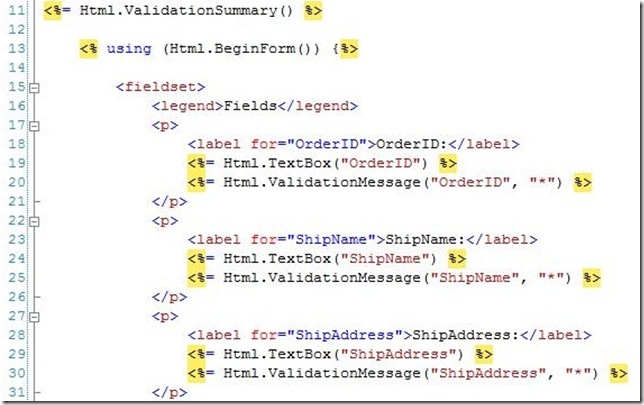
Different templates perform different forms of code-generation based on the data type specified. As an example, choosing the ‘Create’ option will produce the following code. Note that the template iterated properties on the data type that we chose and created an input form using those properties, as one might expect for data insertion.
The code-generation performed by the Add View Dialog all come from T4 (.tt) templates that are located under the Visual Studio sub-tree (under the install directory, navigate to Common7\IDE\ItemTemplates\[CSharp | VisualBasic]\Web\MVC\CodeTemplates\AddView\), like the Add Controller template.
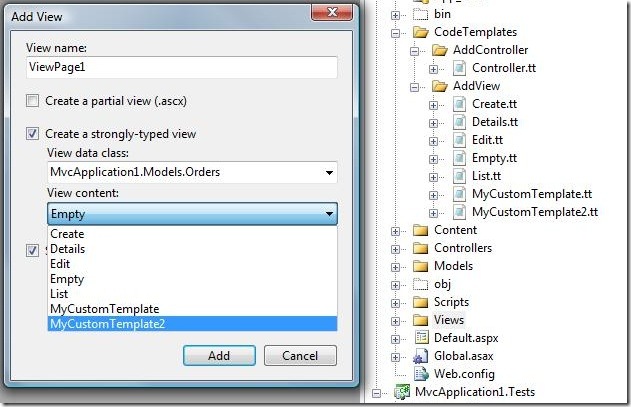
These templates can be edited at their location here to get customized output, or you can copy the ‘CodeTemplates’ folder into your project’s root to override the global templates and have project-specific code-generation. You can also add your own templates to either the global location or the templates override folder in your project and the Add View Dialog will automatically pick up on them and provide them as choices in the View Content drop-down.
Go to View / Go to Controller
The MVC tooling also provides two convenient code navigation features to quickly move between a view and a controller. From an Action Method within a Controller class, you can go to the matching view for that Action Method by right-clicking anywhere in the action method and choosing ‘Go to View…’ This will try to find a matching view for the given Action Method using the ASP.NET MVC convention of having a folder named ‘Views’ below which are folders for each Controller, below which are individual views. It uses the same logic as the runtime routing engine to find the view and open it in the editor’s source view. You can also quickly navigate to a View from an Action Method using the keyboard shortcut Ctrl-M Ctrl-G.
Similarly, you can go from a view to a controller by right-clicking anywhere in markup in the editor and choosing ‘Go to Controller…’ . This will look for a matching controller using the convention of naming Controller classes with names ending in ‘Controller’ and locating them under the ‘Controllers’ folder. You can also use the keyboard shortcut Ctrl-M Ctrl-G (same as Go to View) to navigate to the matching Controller.
File Refactoring
Because MVC applications use routing, naming conventions are important to follow. To this end, in any MVC project, refactor-renames of Controllers and Action Methods will cause renames of appropriate folders and views. For example, renaming a controller class named ‘HomeController’ to ‘MainController’ would look for a folder named ‘Home’ under the ‘Controllers’ folder and rename it to ‘Main’. An undo of the refactor-rename action will undo the file refactoring as well.
Similarly, renaming an action method named ‘About’ to ‘ContactUs’ will search for the matching view as per ASP.NET MVC conventions and rename the file appropriately.
Please note that only refactor-renames originating from the original definition of the Controller class or the Action Method will trigger file refactoring – doing so on a reference to a Controller class or Action Method will not.
Summary
We hope that this post has given you an idea of how the MVC tooling provided in Visual Studio can guide you in bringing an MVC Application to life and increase your productivity. We look forward to any feedback you may have so PLEASE leave your comments and suggestions. Thanks for reading!
Abhishek Mishra | Software Design Engineer | Visual Studio Web Developer






0 comments