Web Packaging: Creating web packages using MSBuild
This post is next in the series of VS 2010 articles that we have been putting together to dive into the Web Deployment improvements with VS 2010 and IIS. I would recommend reading the the preceding posts to get an overview of all the scenarios supported:
In this post I will cover web package creation using MSBuild command line. Many medium to large sized teams plan on automating their build process for various good reasons like predictability for QA team, time saving as compared to on-demand manual build, early bug detection with Build Verification Tests (BVTs), knowing the current state of project integration, etc… Many argue that setting up the build system is not worth the trouble for a small project running only a few months; I would suggest otherwise, believe me setting up an automated build process once will pay you back enough just within a few weeks and will get you into a mode where in the future doing this will be so much more easier…
Anyways, if you choose to automate your build process there are various tools and technologies available out there, some of the popular ones are:
You can certainly take your build automation process to its best by using Continuous Integration model which we will discuss in subsequent posts.
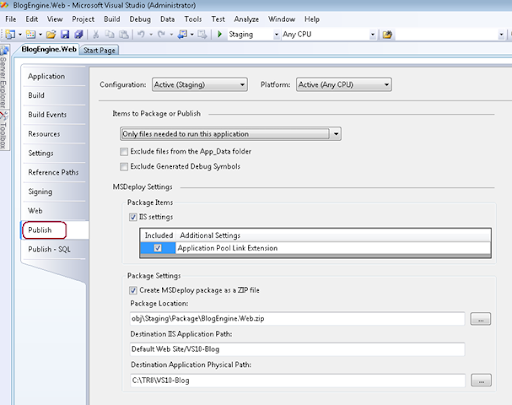
In anycase, the entire Web Deployment story in VS 2010 uses MSBuild behind the scene which means that all the UI features in Visual Studio are actually wrappers over the underlying MSBuild Targets, Tasks and Properties. In the previous post we talked about “Creating a Web Package using VS 2010” where we discussed setting up the Package properties in “Package Tab” of the project’s property pages as shown below:

All the properties that you set up in this UI are stored in your .vbproj or .csproj file. We also talked about this tab being “Configuration” aware, which means that you can set different properties per build environment like Debug, Testing, Staging, Release/Production etc and all of these properties will be saved in your project file.
Now if you would like to create a web package using MSBuild it is much more simpler than you can imagine:
All you have to do is open command prompt which has MSBuild path preset (e.g. Visual Studio Command Prompt which is available under Visual Studio 2010 –> Visual Studio Tools) and type the below command:
MSBuild “YourFullyQualifiedProjectName.csproj/vbproj” /T:Package
/T:Package is the MSBuild Target named Package which we have defined as part of implementation of the Web Packaging infrastructgure.
Interestingly, when you do not specify any MSBuild target, then for most projects “Build” is the default target hence just providing below command line simply builds your project
MSBuild “YourProject.csproj”
Also note that there can be various dependencies set between targets and our “Package” target has an explicit dependency on “Build” target which means that if the “Build” was not successful then “Packaging” will not even begin, this ensures that during your automated packaging you do not land up spending resources on creating faulty web packages.
By default MSBuild uses the “Debug” configuration but if you would like to create a package for your Staging configuration all you would have to do is:
MSBuild “ProjectName.csproj/vbproj” /T:Package /P:Configuration=Staging
/P:Configuration represents the Property named Configuration which you are setting to Staging…
Diving a tiny bit deeper – If you open your project file in a text editor then you should be able to see all the properties which we talked about from UI perspective in our previous post “Creating a Web Package using VS 2010”… All these properties will not be visible in the project file until their default values are modified (just a tiny optimization to keep the files smaller and agile :-)). These same properties are optionally settable from command line as well… Also there are certain properties which are not manifested in the UI or in the project file by default, but are still available behind the scene to provide extensibility and fine grain control that many expect, we will go into the details of those properties in later posts as well.
Anyways, most of the time you should be able to set most of your properties in the UI and use them without much modification in the command line scenario, although it is conceivable that some of the properties may require frequent modification during automated builds e.g. “Package Location”. Below is a sample command of how you will set up the PackageLocation property along with the Configuration property:
MSBuild “MyProjectName.csproj” /T:Package /P:Configuration=Staging;PackageLocation=”D:VishalPackage.zip”
When I run the above command then my package for “Staging” configuration will be created in “D:VishalPackage.zip”
It is important to note that items passed via command line override the values set in the project file, this ensures that most common values of the properties can be stored in the project file and eventually shared by the entire team… The ones which need to be momentarily overridden during build time can be set from the command line.
Also it is good to remember that if you like to pass more than one property to MSBuild command then you can do so by separating multiple properties by semicolon ; as shown above for Configuration and PackageLocation.
The above command line examples can very easily be plugged into automated build systems like CC.Net, TFS, etc, we will look into the process of setting some of these environments in later posts as well.
For now, I hope you will be able to envision the prospects of creating these Web Packages in an automated fashion and share them across your teams on regular basis.
Vishal R. Joshi | Program Manager | Visual Studio Web Developer

 Light
Light Dark
Dark
0 comments