


The AI App Templates let you spin up a working chat application in minutes, complete with AI integration, custom data ingestion, and all the pieces you need to get started. It’s a cool and solid foundation.
But here’s the thing: what if you want to go beyond basic chat? What if you want to build AI agents that can actually reason, make decisions, use tools, and orchestrate complex workflows? That’s where Microsoft Agent Framework comes into play.
In this post, I’m going to show you how I took a standard AI chat app—generated using the .NET AI templates—and enhanced it with Microsoft Agent Framework. Let’s start!
What is Microsoft Agent Framework?
Microsoft Agent Framework is Microsoft’s preview framework for building AI agents in .NET. Think of it as the next evolution beyond simple chatbots. An AI agent can:
- Reason and plan through multi-step workflows
- Use tools and functions to interact with your APIs, databases, and services
- Maintain context across entire conversations
- Make autonomous decisions based on instructions and data
- Coordinate with other agents in multi-agent scenarios
What I really like about it is that it’s built on patterns we already know and love as .NET developers: dependency injection, middleware, telemetry—all integrated with Microsoft.Extensions.AI. Check out Luis’ great post about AgentFx for all the details.
Prerequisites
Before we start, you’ll need:
- .NET 9 SDK installed
- Visual Studio or Visual Studio Code with C# Dev Kit
- An Azure account with access to Azure OpenAI, or use it with GitHub Models
- The .NET AI App Templates installed (we’ll do this in the next section)
- Basic familiarity with .NET, Blazor, and AI concepts
Step 1: Creating the Base AI Chat Application
Let’s start by creating a baseline chat app using the official .NET AI templates. First, we need to install the templates:
dotnet new install Microsoft.Extensions.AI.TemplatesCreating the Project
Now let’s create the app. You can do this through Visual Studio or the CLI:
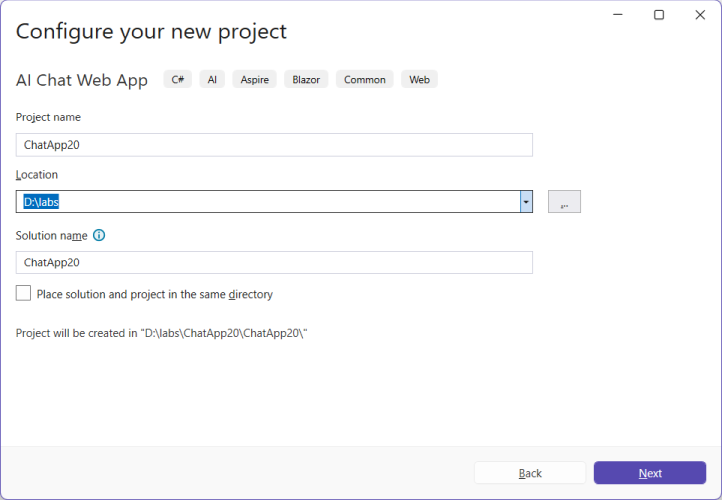
Using Visual Studio:
- Open Visual Studio 2022
- Select Create a new project
- Search for “AI Chat Web App”
- Configure your project name (e.g.,
ChatApp20) and location - Select Azure OpenAI as your AI provider
- Choose Local on-disk for the vector store
- Choose .NET Aspire for the orchestration
Using Visual Studio Code or the .NET CLI:
If you prefer VS Code or the command line, check out the official documentation for step-by-step instructions. The process is similar—you’ll use dotnet new commands to scaffold the project with the same configuration options.
Understanding the Project Structure
The template generates a solution with three projects:
ChatApp20/
├── ChatApp20.Web/              # Blazor Server app with chat UI
├── ChatApp20.AppHost/          # .NET Aspire orchestration
└── ChatApp20.ServiceDefaults/  # Shared service configurations
We’ll be working mainly in ChatApp20.Web, which includes:
- Components/Pages/Chat/ – The Blazor chat interface
- Services/ – Data ingestion and semantic search services
- Program.cs – Where all the AI magic gets wired up
- wwwroot/Data/ – Sample PDF files (survival kit and GPS watch examples)
Initial Program.cs Configuration
Let’s look at what the template sets up for us in Program.cs. This is where all the AI pieces come together:
using Microsoft.Extensions.AI;
using ChatApp20.Web.Components;
using ChatApp20.Web.Services;
using ChatApp20.Web.Services.Ingestion;

var builder = WebApplication.CreateBuilder(args);
builder.AddServiceDefaults();
builder.Services.AddRazorComponents().AddInteractiveServerComponents();

// Configure Azure OpenAI with chat client and embeddings
var openai = builder.AddAzureOpenAIClient("openai");
openai.AddChatClient("gpt-4o-mini")
    .UseFunctionInvocation()
    .UseOpenTelemetry(configure: c =>
        c.EnableSensitiveData = builder.Environment.IsDevelopment());
openai.AddEmbeddingGenerator("text-embedding-3-small");

// Configure vector storage for semantic search
var vectorStorePath = Path.Combine(AppContext.BaseDirectory, "vector-store.db");
var vectorStoreConnectionString = $"Data Source={vectorStorePath}";
builder.Services.AddSqliteCollection<string, IngestedChunk>("data-chatapp20-chunks", vectorStoreConnectionString);
builder.Services.AddSqliteCollection<string, IngestedDocument>("data-chatapp20-documents", vectorStoreConnectionString);
builder.Services.AddScoped<DataIngestor>();
builder.Services.AddSingleton<SemanticSearch>();

var app = builder.Build();

// ... middleware configuration ...

// Ingest PDF files on startup
await DataIngestor.IngestDataAsync(
    app.Services,
    new PDFDirectorySource(Path.Combine(builder.Environment.WebRootPath, "Data")));

app.Run();
The Basic Chat Component
The initial Chat.razor component uses IChatClient directly:
@inject IChatClient ChatClient
@inject SemanticSearch Search

@code {
    private async Task AddUserMessageAsync(ChatMessage userMessage)
    {
        messages.Add(userMessage);

        var responseText = new TextContent("");
        currentResponseMessage = new ChatMessage(ChatRole.Assistant, [responseText]);

        await foreach (var update in ChatClient.GetStreamingResponseAsync(
            messages.Skip(statefulMessageCount),
            chatOptions,
            currentResponseCancellation.Token))
        {
            messages.AddMessages(update, filter: c => c is not TextContent);
            responseText.Text += update.Text;
            ChatMessageItem.NotifyChanged(currentResponseMessage);
        }

        messages.Add(currentResponseMessage);
    }

    [Description("Searches for information using a phrase or keyword")]
    private async Task<IEnumerable<string>> SearchAsync(
        [Description("The phrase to search for.")] string searchPhrase,
        [Description("If possible, specify the filename to search.")] string? filenameFilter = null)
    {
        var results = await Search.SearchAsync(searchPhrase, filenameFilter, maxResults: 5);
        return results.Select(result =>
            $"<result filename=\"{result.DocumentId}\" page_number=\"{result.PageNumber}\">{result.Text}</result>");
    }
}
This works great for getting started! But as your app grows, you’ll want more flexibility:
- Better separation of concerns – Moving tool functions out of UI components
- Easier testing – Testing agent behavior independently from the UI
- More sophisticated patterns – Support for complex reasoning and multi-step workflows
- Agent orchestration – Coordinating multiple specialized agents
- Richer telemetry – Better observability into how your AI makes decisions
That’s exactly what Microsoft Agent Framework brings to the table. Let’s see how!
Step 2: Adding Microsoft Agent Framework
Now for the fun part—let’s upgrade this chat app into a proper agent system!
Installing the Required Packages
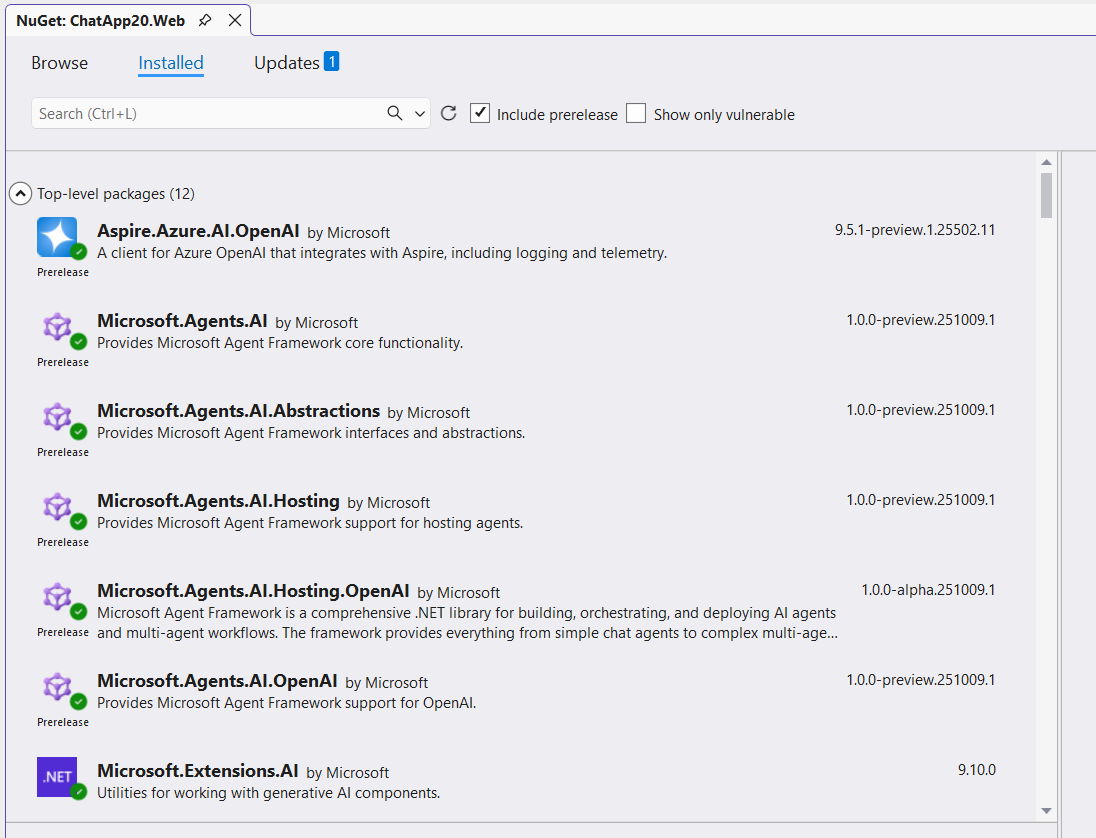
First, we need to add the Microsoft Agent Framework packages to ChatApp20.Web.csproj:
<ItemGroup>
  <!-- Keep existing packages -->
  <PackageReference Include="Aspire.Azure.AI.OpenAI" Version="9.5.1-preview.1.25502.11" />
  <PackageReference Include="Microsoft.Extensions.AI.OpenAI" Version="9.10.0-preview.1.25513.3" />
  <PackageReference Include="Microsoft.Extensions.AI" Version="9.10.0" />
  <PackageReference Include="Microsoft.SemanticKernel.Core" Version="1.66.0" />

  <!-- Add Microsoft Agent Framework packages -->
  <PackageReference Include="Microsoft.Agents.AI" Version="1.0.0-preview.251009.1" />
  <PackageReference Include="Microsoft.Agents.AI.Abstractions" Version="1.0.0-preview.251009.1" />
  <PackageReference Include="Microsoft.Agents.AI.Hosting" Version="1.0.0-preview.251009.1" />
  <PackageReference Include="Microsoft.Agents.AI.Hosting.OpenAI" Version="1.0.0-alpha.251009.1" />
  <PackageReference Include="Microsoft.Agents.AI.OpenAI" Version="1.0.0-preview.251009.1" />

  <!-- Keep other existing packages -->
  <PackageReference Include="PdfPig" Version="0.1.12-alpha-20251015-255e7" />
  <PackageReference Include="System.Linq.Async" Version="7.0.0-preview.1.g24680b5469" />
  <PackageReference Include="Microsoft.SemanticKernel.Connectors.SqliteVec" Version="1.66.0-preview" />
</ItemGroup>
The key Agent Framework packages are:
- Microsoft.Agents.AI – Core agent abstractions and implementations
- Microsoft.Agents.AI.Abstractions – Base interfaces and types
- Microsoft.Agents.AI.Hosting – Dependency injection and hosting extensions
- Microsoft.Agents.AI.Hosting.OpenAI – OpenAI-specific hosting support
- Microsoft.Agents.AI.OpenAI – OpenAI integration for agents
Creating a Dedicated Search Functions Service
To promote better separation of concerns and testability, create a new SearchFunctions.cs service that wraps the semantic search functionality:
using System.ComponentModel;

namespace ChatApp20.Web.Services;

/// <summary>
/// Functions exposed to the AI Agent. Wraps SemanticSearch so we can inject dependencies via DI.
/// </summary>
public class SearchFunctions
{
    private readonly SemanticSearch _semanticSearch;

    public SearchFunctions(SemanticSearch semanticSearch)
    {
        _semanticSearch = semanticSearch;
    }

    [Description("Searches for information using a phrase or keyword")]
    public async Task<IEnumerable<string>> SearchAsync(
        [Description("The phrase to search for.")] string searchPhrase,
        [Description("If possible, specify the filename to search that file only. If not provided or empty, the search includes all files.")] string? filenameFilter = null)
    {
        // Perform semantic search over ingested chunks
        var results = await _semanticSearch.SearchAsync(searchPhrase, filenameFilter, maxResults: 5);

        // Format results as XML for the agent
        return results.Select(result =>
            $"<result filename=\"{result.DocumentId}\" page_number=\"{result.PageNumber}\">{result.Text}</result>");
    }
}
Why this is important:
- The
SearchFunctionsclass is now a dedicated service that can be injected into the agent - It’s testable in isolation from the UI
- The
[Description]attributes provide metadata that helps the AI understand when and how to use the tool - The agent can invoke this function automatically when it needs to search for information
Registering the AI Agent in Program.cs
Now, let’s configure the AI agent in Program.cs using the Agent Framework’s hosting extensions:
using ChatApp20.Web.Components;
using ChatApp20.Web.Services;
using ChatApp20.Web.Services.Ingestion;
using Microsoft.Agents.AI;
using Microsoft.Agents.AI.Hosting;
using Microsoft.Extensions.AI;
using System.ComponentModel;

var builder = WebApplication.CreateBuilder(args);
builder.AddServiceDefaults();
builder.Services.AddRazorComponents().AddInteractiveServerComponents();

// Configure Azure OpenAI
var openai = builder.AddAzureOpenAIClient("openai");
openai.AddChatClient("gpt-4o-mini")
    .UseFunctionInvocation()
    .UseOpenTelemetry(configure: c =>
        c.EnableSensitiveData = builder.Environment.IsDevelopment());

// Register the AI Agent using the Agent Framework
builder.AddAIAgent("ChatAgent", (sp, key) =>
{
    // Get required services
    var logger = sp.GetRequiredService<ILogger<Program>>();
    logger.LogInformation("Configuring AI Agent with key '{Key}' for model '{Model}'", key, "gpt-4o-mini");

    var searchFunctions = sp.GetRequiredService<SearchFunctions>();
    var chatClient = sp.GetRequiredService<IChatClient>();

    // Create and configure the AI agent
    var aiAgent = chatClient.CreateAIAgent(
        name: key,
        instructions: "You are a useful agent that helps users with short and funny answers.",
        description: "An AI agent that helps users with short and funny answers.",
        tools: [AIFunctionFactory.Create(searchFunctions.SearchAsync)]
        )
    .AsBuilder()
    .UseOpenTelemetry(configure: c =>
        c.EnableSensitiveData = builder.Environment.IsDevelopment())
    .Build();

    return aiAgent;
});

// Configure embeddings and vector storage
openai.AddEmbeddingGenerator("text-embedding-3-small");

var vectorStorePath = Path.Combine(AppContext.BaseDirectory, "vector-store.db");
var vectorStoreConnectionString = $"Data Source={vectorStorePath}";
builder.Services.AddSqliteCollection<string, IngestedChunk>("data-chatapp20-chunks", vectorStoreConnectionString);
builder.Services.AddSqliteCollection<string, IngestedDocument>("data-chatapp20-documents", vectorStoreConnectionString);
builder.Services.AddScoped<DataIngestor>();
builder.Services.AddSingleton<SemanticSearch>();

// Register SearchFunctions for DI injection into the agent
builder.Services.AddSingleton<SearchFunctions>();

var app = builder.Build();

// ... rest of the configuration ...
Key points about the agent registration:
- Keyed Service Registration: The agent is registered with the key
"ChatAgent"usingbuilder.AddAIAgent(). This allows you to register multiple agents in the same application. - Agent Configuration: The agent is created with:
- A name for identification
- Instructions (system prompt) that define its personality and behavior
- A description that explains its purpose
- Tools that the agent can use (in this case, the
SearchAsyncfunction)
- Tool Binding: The
AIFunctionFactory.Create()method converts theSearchAsyncmethod into a tool that the agent can invoke. The framework automatically handles:- Parameter validation based on the
[Description]attributes - JSON serialization/deserialization
- Error handling and retries
- Parameter validation based on the
- Telemetry: The
UseOpenTelemetry()call ensures that all agent interactions are logged and can be observed through Application Insights or other monitoring tools. - Dependency Injection: The agent factory receives an
IServiceProvider, allowing it to resolve dependencies likeSearchFunctionsandIChatClient.
Updating the Chat Component
Finally, we need to update Chat.razor to use our new AI agent. The changes are pretty straightforward:
Key changes in the code-behind:
- Inject the IServiceProvider instead of IChatClient:
@inject IServiceProvider ServiceProvider
@using Microsoft.Agents.AI- Resolve the agent in
OnInitialized():
private AIAgent aiAgent = default!;

protected override void OnInitialized()
{
    // Resolve the keyed AI agent registered as "ChatAgent" in Program.cs
    aiAgent = ServiceProvider.GetRequiredKeyedService<AIAgent>("ChatAgent");
    // ... rest of initialization ...
}- Use agent streaming in
AddUserMessageAsync():
// Replace ChatClient.GetStreamingResponseAsync with agent streaming
await foreach (var update in aiAgent.RunStreamingAsync(
    messages: messages.Skip(statefulMessageCount),
    cancellationToken: currentResponseCancellation.Token))
{
    var responseUpdate = update.AsChatResponseUpdate();
    messages.AddMessages(responseUpdate, filter: c => c is not TextContent);
    responseText.Text += update.Text;
    chatOptions.ConversationId = responseUpdate.ConversationId;
    ChatMessageItem.NotifyChanged(currentResponseMessage);
}
That’s it! The agent handles everything else—tool invocation, reasoning, and response generation.
Step 3: Running and Testing the Enhanced Application
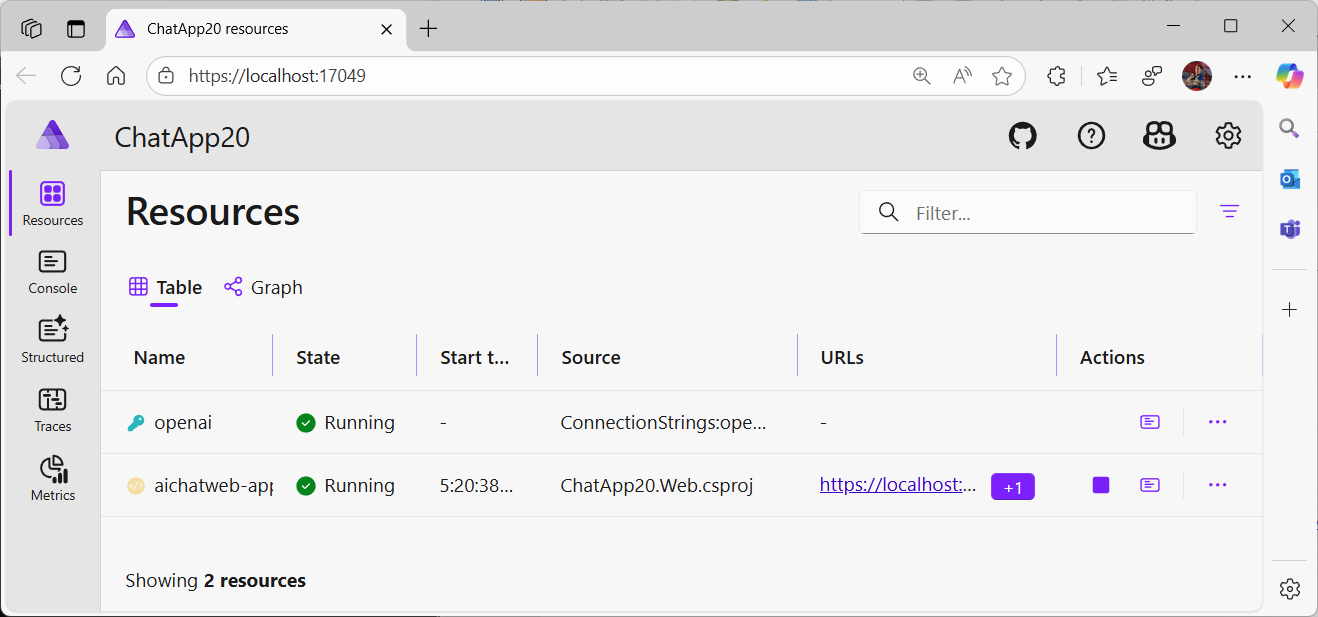
Running with .NET Aspire
One of the best parts about using the AI templates is that everything runs through .NET Aspire. This gives you:
- Service discovery between components
- Unified logging and telemetry in the Aspire dashboard
- Health checks for all services
- Easy configuration for all your secrets and settings
Run the app. The Aspire dashboard opens automatically in your browser
Configuring Azure OpenAI
On first run, you’ll be prompted to configure Azure OpenAI:
- Azure Subscription: Select your subscription
- Resource Group: Choose existing or create new
- Azure OpenAI Resource: Select or provision
- Model Deployments: Ensure you have:
- A chat model (e.g.,
gpt-4o-mini) - An embedding model (e.g.,
text-embedding-3-small)
- A chat model (e.g.,
The configuration will be saved locally and reused for subsequent runs.
Testing the Agent
Once everything is running, click on the web endpoint in the Aspire dashboard (usually https://localhost:7001).

Let’s test it out:
- Basic conversation:
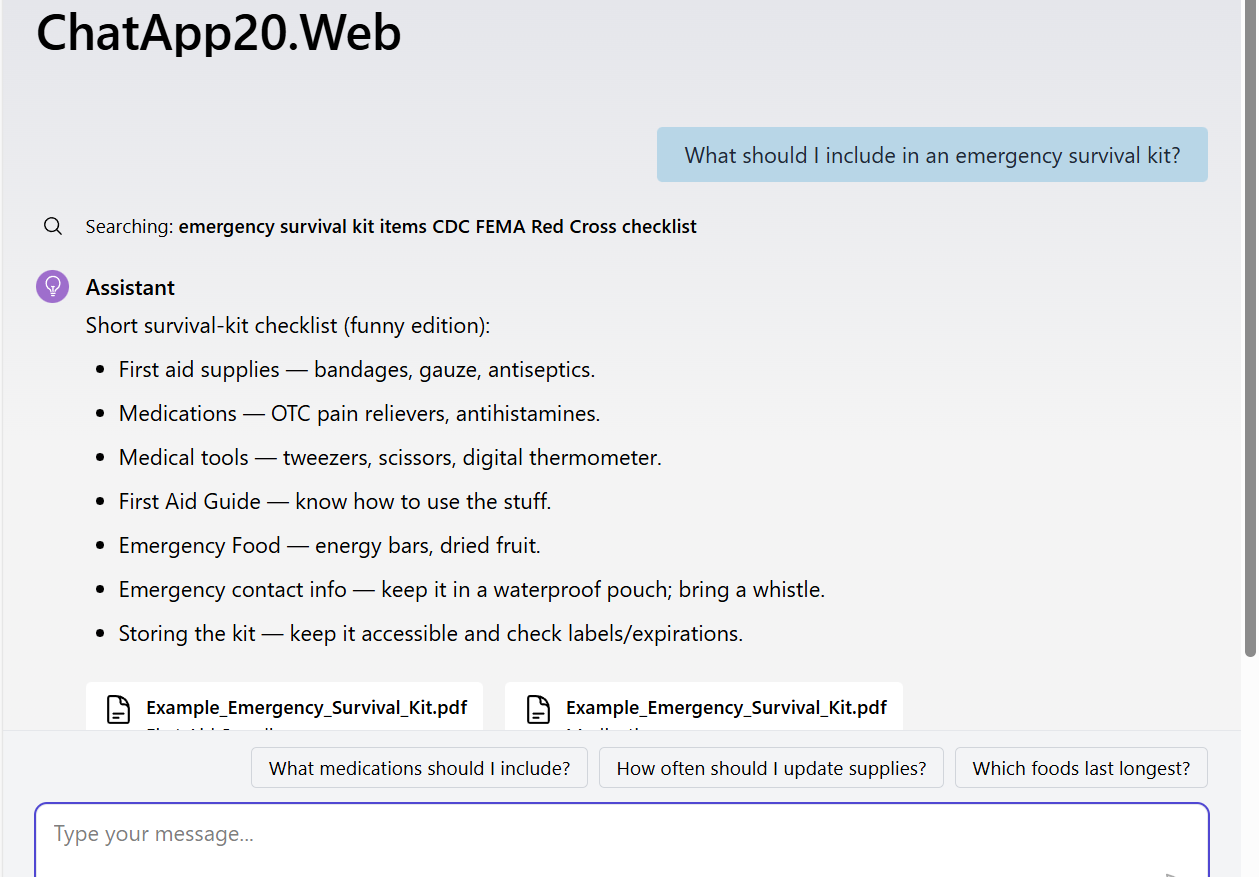
You: Hello! How are you? Agent: Hey! I'm great — fully charged, like an Emergency Survival Kit. - Tool invocation with semantic search:
You: What should I include in an emergency survival kit? Agent: Short survival-kit checklist (funny edition) First aid supplies — bandages, gauze, antiseptics. <citation filename='Example_Emergency_Survival_Kit.pdf' page_number='1'>water and food supplies</citation> - File-specific queries:
You: Tell me about the GPS watch features
Agent: The GPS watch includes...
      <citation filename='Example_GPS_Watch.pdf' page_number='2'>real-time tracking</citation>
Here’s the cool part: check out the Aspire dashboard while the agent is working. You can actually see:
- When the agent decides to invoke the search tool
- What parameters it passes
- The search results it gets back
- How it synthesizes everything into a response
This level of observability is invaluable when you’re debugging or optimizing your agent’s behavior.
Advanced Scenarios
Adding More Tools to Your Agent
You can easily extend your agent with additional capabilities:
public class WeatherFunctions
{
    [Description("Gets the current weather for a location")]
    public async Task<string> GetWeatherAsync(
        [Description("The city and state/country")] string location)
    {
        // Call weather API
        return $"Weather for {location}: Sunny, 72°F";
    }
}

// In Program.cs
builder.Services.AddSingleton<WeatherFunctions>();

builder.AddAIAgent("ChatAgent", (sp, key) =>
{
    var searchFunctions = sp.GetRequiredService<SearchFunctions>();
    var weatherFunctions = sp.GetRequiredService<WeatherFunctions>();
    var chatClient = sp.GetRequiredService<IChatClient>();

    return chatClient.CreateAIAgent(
        name: key,
        instructions: "You can search documents and check weather...",
        tools: [
            AIFunctionFactory.Create(searchFunctions.SearchAsync),
            AIFunctionFactory.Create(weatherFunctions.GetWeatherAsync)
        ]
    ).Build();
});
Note
You can check out the full running sample in Generative AI for Beginners – .NET.Multi-Agent Scenarios
The Agent Framework makes it easy to coordinate multiple specialized agents:
// Register a research agent
builder.AddAIAgent("ResearchAgent", (sp, key) =>
{
    var chatClient = sp.GetRequiredService<IChatClient>();
    var searchFunctions = sp.GetRequiredService<SearchFunctions>();

    return chatClient.CreateAIAgent(
        name: "ResearchAgent",
        instructions: "You are a research specialist. Find and summarize information from documents.",
        tools: [AIFunctionFactory.Create(searchFunctions.SearchAsync)]
    ).Build();
});

// Register a writing agent
builder.AddAIAgent("WritingAgent", (sp, key) =>
{
    var chatClient = sp.GetRequiredService<IChatClient>();

    return chatClient.CreateAIAgent(
        name: "WritingAgent",
        instructions: "You are a writing specialist. Take information and create well-structured, engaging content.",
        tools: []
    ).Build();
});

// Register a coordinator agent that uses both
builder.AddAIAgent("CoordinatorAgent", (sp, key) =>
{
    var chatClient = sp.GetRequiredService<IChatClient>();
    var researchAgent = sp.GetRequiredKeyedService<AIAgent>("ResearchAgent");
    var writingAgent = sp.GetRequiredKeyedService<AIAgent>("WritingAgent");

    // Create functions that delegate to other agents
    async Task<string> ResearchAsync(string topic)
    {
        var messages = new[] { new ChatMessage(ChatRole.User, topic) };
        var result = await researchAgent.RunAsync(messages);
        return result.Text ?? "";
    }

    async Task<string> WriteAsync(string content)
    {
        var messages = new[] { new ChatMessage(ChatRole.User, $"Write an article based on: {content}") };
        var result = await writingAgent.RunAsync(messages);
        return result.Text ?? "";
    }

    return chatClient.CreateAIAgent(
        name: "CoordinatorAgent",
        instructions: "Coordinate research and writing to create comprehensive articles.",
        tools: [
            AIFunctionFactory.Create(ResearchAsync),
            AIFunctionFactory.Create(WriteAsync)
        ]
    ).Build();
});
Note
For more examples of multi-agent coordination patterns, check out the Generative AI for Beginners – .NET.Custom Agent Middleware
You can add custom middleware to agents for logging, caching, or custom behavior:
builder.AddAIAgent("ChatAgent", (sp, key) =>
{
    var chatClient = sp.GetRequiredService<IChatClient>();
    var searchFunctions = sp.GetRequiredService<SearchFunctions>();
    var logger = sp.GetRequiredService<ILogger<Program>>();

    return chatClient.CreateAIAgent(
        name: key,
        instructions: "...",
        tools: [AIFunctionFactory.Create(searchFunctions.SearchAsync)]
        )
    .AsBuilder()
    .Use(async (messages, options, next, cancellationToken) =>
    {
        // Custom pre-processing
        logger.LogInformation("Agent processing {MessageCount} messages", messages.Count());

        // Call next in pipeline
        var result = await next(messages, options, cancellationToken);

        // Custom post-processing
        logger.LogInformation("Agent generated response with {ContentCount} content items", result.Contents.Count);

        return result;
    })
    .UseOpenTelemetry(configure: c => c.EnableSensitiveData = true)
    .Build();
});
Note
You can find more examples of custom middleware patterns in the Generative AI for Beginners – .NET.Best Practices
1. Design Clear Tool Descriptions
The quality of your agent’s tool invocations depends heavily on good descriptions:
[Description("Searches for specific information in product documentation. " +
             "Use this when the user asks about features, specifications, or how to use products. " +
             "Returns relevant excerpts with filename and page numbers for citations.")]
public async Task<IEnumerable<string>> SearchAsync(
    [Description("The specific phrase, keyword, or question to search for. " +
                 "Be specific and include relevant context.")]
    string searchPhrase,
    [Description("Optional: The exact filename to search within (e.g., 'ProductManual.pdf'). " +
                 "Leave empty to search all documents.")]
    string? filenameFilter = null)
{
    // Implementation
}
2. Test Agent Behavior
Create unit tests for your agent tools and integration tests for agent workflows:
public class SearchFunctionsTests
{
    [Fact]
    public async Task SearchAsync_WithValidQuery_ReturnsResults()
    {
        // Arrange
        var mockSemanticSearch = new Mock<SemanticSearch>();
        mockSemanticSearch
            .Setup(s => s.SearchAsync("test", null, 5))
            .ReturnsAsync(new List<IngestedChunk>
            {
                new IngestedChunk { DocumentId = "test.pdf", PageNumber = 1, Text = "test content" }
            });

        var searchFunctions = new SearchFunctions(mockSemanticSearch.Object);

        // Act
        var results = await searchFunctions.SearchAsync("test");

        // Assert
        Assert.NotEmpty(results);
        Assert.Contains("test content", results.First());
    }
}
3. Monitor Agent Performance
Use Application Insights or .NET Aspire’s dashboard to monitor:
- Token usage per agent interaction
- Tool invocation patterns (which tools are used, how often)
- Response times for agent operations
- Error rates for tool calls
- User satisfaction through feedback mechanisms
Performance Considerations
Streaming vs. Non-Streaming
The Agent Framework supports both streaming and non-streaming responses:
Use streaming when:
- Building interactive chat interfaces
- Users expect real-time feedback
- Processing long-running queries
Use non-streaming when:
- Processing in the background
- Batch operations
- Simple API endpoints
Tool Call Optimization
Minimize unnecessary tool calls:
// Good: Specific instructions
"Use the search tool only when the user asks a specific question about the documents.
Don't search if you can answer from general knowledge."

// Bad: Vague instructions
"You have access to a search tool."
Deployment to Azure
The application is ready for deployment to Azure using .NET Aspire’s Azure provisioning:
# Login to Azure
az login

# Create Azure resources
cd ChatApp20.AppHost
azd init
azd up
This will:
- Provision Azure OpenAI resources
- Deploy the web application to Azure Container Apps
- Set up Application Insights for monitoring
- Configure service connections and authentication
For detailed deployment instructions, see the .NET Aspire Azure deployment documentation.
Summary
And there you have it! We’ve taken a standard AI chat app and transformed it into a proper agent system using Microsoft Agent Framework. The upgrade gives you better architecture with clean separation of concerns, easier testing, and built-in observability—all while using the .NET patterns you already know.
What I really appreciate is that Microsoft Agent Framework doesn’t force you to learn a completely new way of doing things. It builds on familiar concepts like dependency injection, middleware, and telemetry, making it feel natural for C# developers.
If you’re building AI applications with .NET, I highly recommend giving the Agent Framework a try. Start with the AI templates, then layer on the agent capabilities as your needs grow. Check out the official documentation and Luis’ announcement post to learn more!
0 comments