⏱ Updated on June 28, 2017
In this very first post, I would like to cover how you can use Machine Learning as a service using different cloud API offerings today. We will look at Azure Machine Learning Studio to start with.To go over these in detail, we will go ahead and build a movie recommendation service using the movielens dataset. Recommendation engines are used everywhere today predicting search queries, music, books, movies and a lot more! Online sources claim that more than 75% of movies or shows watched on Netflix are powered through the Netflix movie recommendation engine. Let us see if we can better this number with the recommendation engine we can build!
The post has the following sections:
- Background
- Prerequisites for this tutorial
- Approach for building this recommendation engine
- Creating the Movie Recommendation model in Azure Machine Learning Studio
- Creating our Movie Recommendation Web application with ASP.NET Core
- Wrap Up
Don’t have time? Don’t worry! The complete solution is also available on GitHub and the corresponding Azure Machine Learning studio experiment can be found here.
Background
Artificial Intelligence (AI) is exploding in popularity today. Like many things, it’s not new either. In fact, some rather exciting things about AI have been promised since the 1960s! Although not all bright-eyed promises about AI have come to pass, the subset of AI known as Machine Learning (ML) has been used in various computing systems for quite some time. Now more then ever, the availability of compute power coupled together with powerful algorithms and availability of massive data is leading to a unique opportunity to build smarter applications providing differentiated experiences.
If you’re not familiar with machine learning, there is a bit to learn up front. Although it’s not necessary to get an advanced degree in this subject matter to be successful, there will be some learning required on your part if you’re starting from nothing.Machine Learning (and Data Science) is fundamentally a scientific process where you explore data, manipulate it to your benefit, try different approaches to solving a problem, iterate on each approach, and evaluate your work. Although programming is heavily involved, it’s more of a means to an end.Through a series of blog posts, we would like to show you different ways on how .NET developers can leverage Machine learning and AI to build engaging customer experiences.To aid with this, we would like to go over the different scenarios on how .NET developers can leverage Machine learning and AI to build engaging customer experiences.In the process, we would love to learn from your feedback as we explore this space together.
Prerequisites for this tutorial
Please make sure you have the following to make this experience work for Azure:
- An active Azure account. If you don’t have one, you can sign up for a Free Azure Trial.
- Go through the getting started experience with Azure Machine Learning Studio.
- While not explicitly required but .NET development works best with Visual Studio you will require .NET components installed.
- MovieLens 20M dataset
- ASP.NET Core web app prototype using AzureML movie recommender (preview)
- [Optional] MovieLens 1M Movie Recommendation Model
Approach
Azure Machine Learning Studio comes pre-packages with a variety of sample data. For this tutorial we will use the MovieLens dataset which comes with movie ratings, titles, genres and more. In terms of an approach for building our movie recommendation engine we have the following options.
- Population Averages
- The simplest recommendation engine one can build would be using population averages. So essentially take all reviews for a given movie and create an average rating. If the average rating is higher than a certain threshold say 4/5, we can recommend this movie to our user. This simple solution might work well but it does not account for user preferences. I might be a huge action movie fan and love the ‘Mission Impossible’ series, but my friend might be more so a Sci-fi fan and loves ‘Star Trek’. Both these movies might have high ratings based on population averages but neither me, nor my friend would be impressed with a recommendation engine providing these suggestions.
- Content-based
- Content-based filtering methods are based on a description of the item and a profile of the user’s preference. In a content-based recommender system, keywords are used to describe the items and a user profile is built to indicate the type of item this user likes. In other words, these algorithms try to recommend items that are similar to those that a user liked in the past.
- Collaborative filtering
- ‘Collaborative filtering’ operates under the underlying assumption that if a person A has the same opinion as a person B on an issue, A is more likely to have B’s opinion on a different issue than that of a randomly chosen person.
- These two text book recommendation approaches ‘content-based approach’ and a ‘collaborative filtering’ solve the problem of lack of preferences, presented by population averages. Azure’s MatchBox Recommender combines the best of both worlds to provide the most accurate recommendations.
- Graphical Models
- While a hybrid approach using Content based and colloborative filtering works well, it has two underlying assumptions. The first, that user preferences are static and do not change over time, second the relationship between user and item preferences are simple. In reality, this is not true. Graphical models help out providing a solution to the two assumptions above e.g. the Markovian structure, can capture the temporal aspects of user preferences in recommendation system but in the interest to keep this blog simple, we won’t discuss this approach in much detail here.
For this model we will build a hybrid approach based content-based and collaborative filtering using Azure Machine Learning studio.
Once the model is completed, we will evaluate it by trying to predict ratings for movies that the model has not seen and compare it against the actual rating for these movies. Once we are happy with its performance, we will then publish this model as a web service and call it using REST through ASP.NET Core MVC application. You can find the completed sample here. All you need to do is to change the API key and URI in the ‘appsettings.json’ file to match your azure account and model settings.
Let’s get started
If you are short on time, you can just go ahead open up the already completed movie recommender based upon the MovieLens 1M dataset here and you can directly jump to ‘Setup a webservice section’. If you would like to understand a wee-bit more on how this model was built you can follow along the steps below.
Creating the Movie Recommendation model in Azure Machine Learning Studio
An analytic framework that one goes through while incorporating machine learning involves pre-preprocessing, feature extraction and selection, applying the machine learning model and some kind of scoring to understand how well the model worked. So, let’s get started!
Step 1: ‘Choosing the dataset’
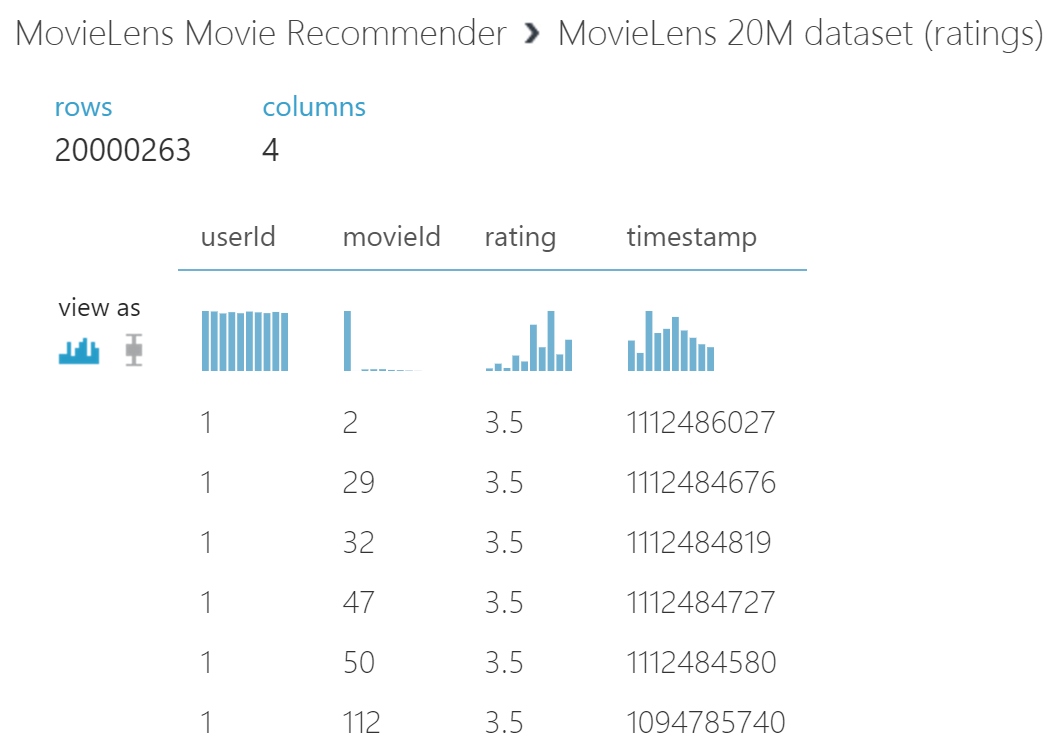
We will use the MovieLens20M dataset which you can download from here. The dataset for most part is already pre-processed and comes with movies.csv which has the movieId, along with the title of the movie and genres. The ratings.csv contains the userId, movieId, rating and time-stamp.
Login into Azure Machine Learning studio and using the DataSets tab upload both movies.csv and ratings.csv as new datasets.
After you have uploaded these two datasets, you can now start using them.
Step 2: ‘Preparing the data to build the model’
Now that the datasets have been uploaded, move to the experiments tab and create a new experiment and choose ‘Blank Experiment’. Go ahead and name your experiment, say ‘MovieLens Movie Recommender’.
Step 2a: Choosing the datasets
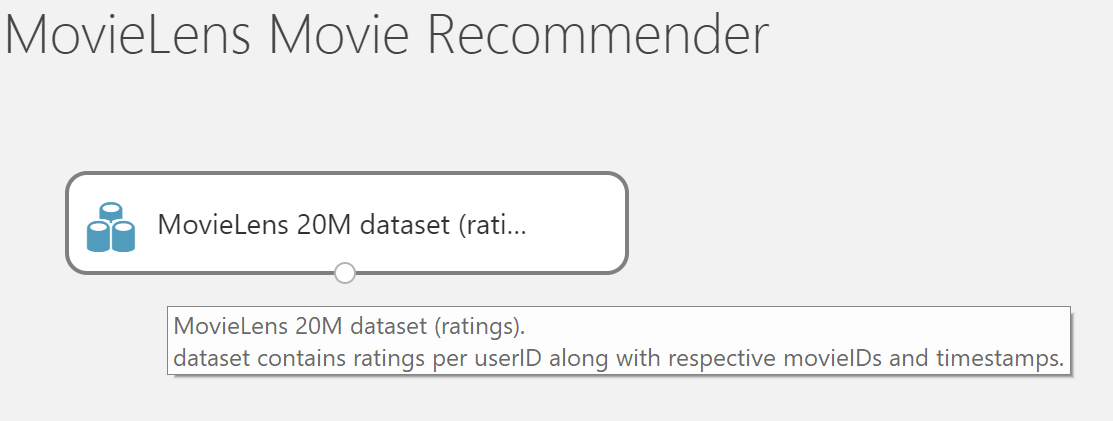
All models essentially start with the dataset, so let’s go ahead and drop the Ratings (MovieLens) dataset to our experiment.
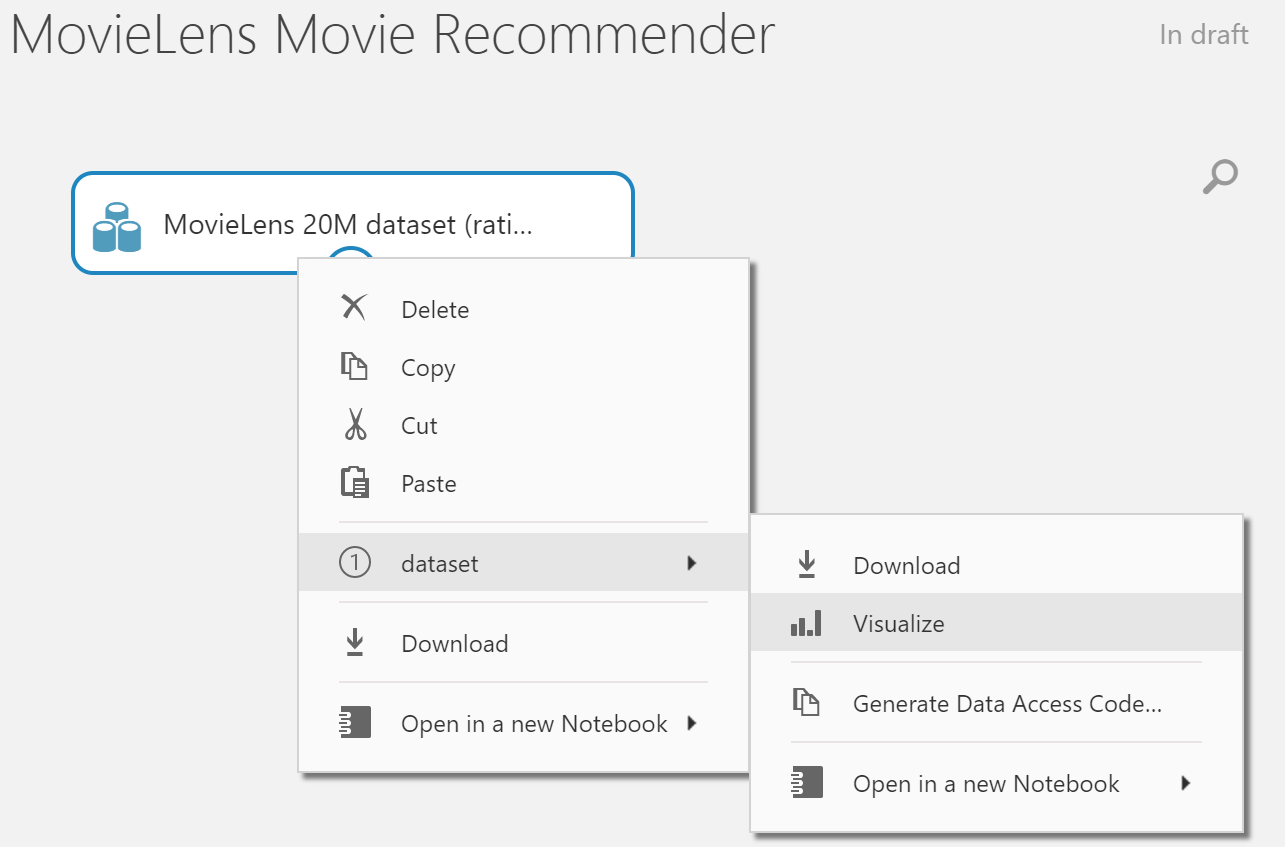
Once added you can go ahead and visualize the dataset.
This is a neat trick as it allows you to view the dataset and the transformations during the course of your model. As you can see this dataset comes in with the 20M ratings and 4 columns: userId, movieId, rating and time-stamp as shown below:
Step 2b Feature Engineering
In order, to get the best result for our recommendation engine, we next need to do some feature engineering, which means to pick only columns in this dataset which we believe will impact the prediction. ‘UserId’, ‘MovieId’, ‘Rating’ all seem important but the ‘Timestamp’ on when this rating came in doesn’t seem all that important.
So let’s go ahead and remove the ‘Timestamp’ column by using the ‘select columns in dataset’. You can type ‘select column’ in the experiment pane to find this widget.
Go ahead and connect the dataset with the select columns in the dataset module. You will notice a red warning icon, which is there as we need to choose the columns to select.
Select ‘userId’, ‘movieId’ and ‘rating’ columns respectively.
In addition to the user ratings, with the MovieLens dataset we also have the movie genre available as an item feature, making use of this item feature will improve this model and also allow us to avoid the cold start problem which I will describe in the next section. So let’s make use of it as well.
Step 2c Splitting the dataset
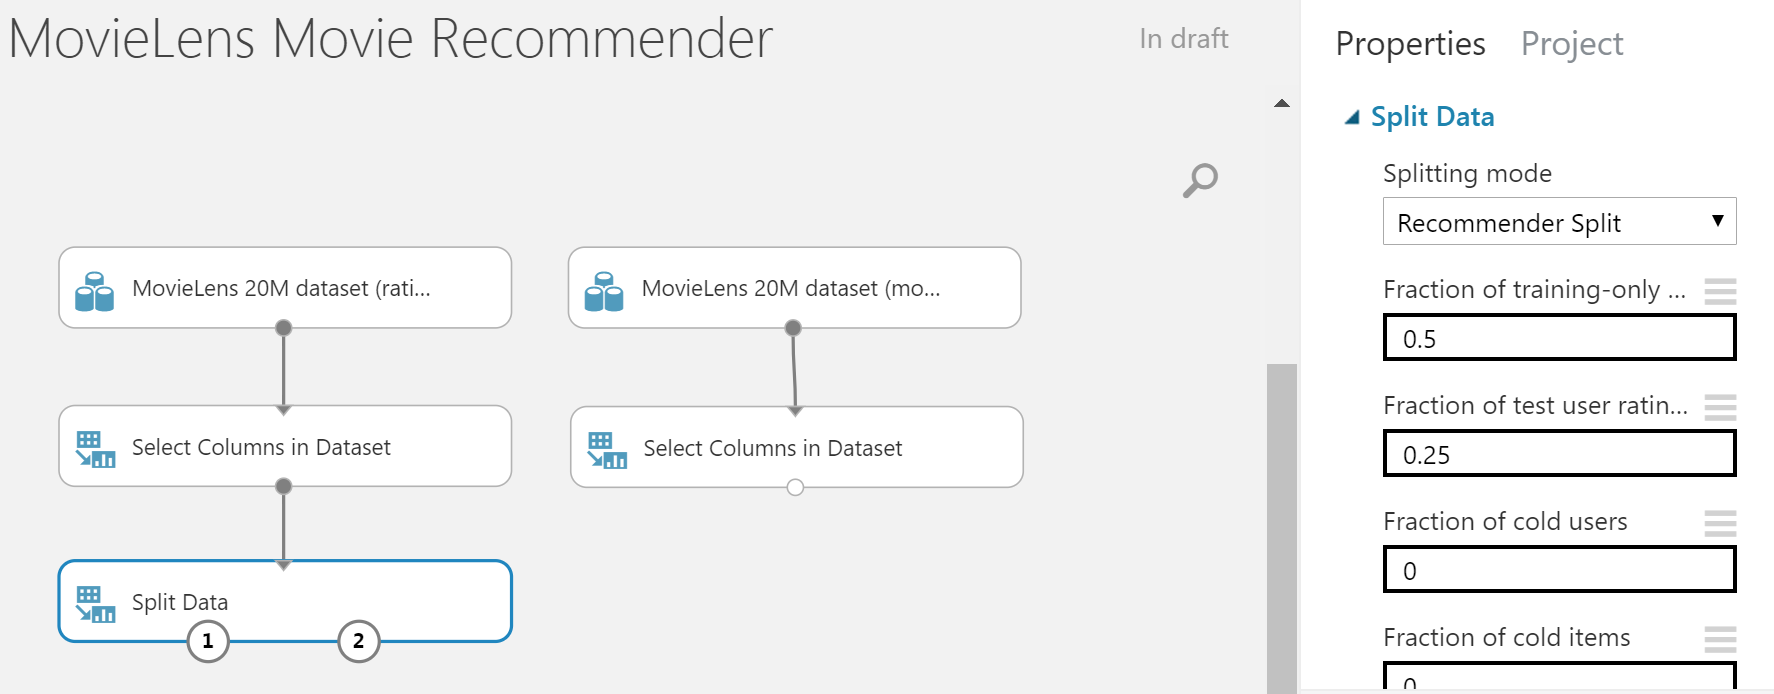
When training a machine learning model, we always need to do two things per dataset, first shuffle the data and next split the data into training and test datasets. A 50/50 split between training data and test data is very common and doing this allows us to avoid the problem of overfitting or underfitting.
To split your dataset, you can use the split data module available under Data Transformation category. Be sure to use the ‘Recommender Split’ in splitting mode for this model.
Step 3: Using the Matchbox Recommender
Now that our data has been prepared we can go ahead and apply a machine learning model. Azure Machine Learning studio comes packaged with many common machine learning models. Matchbox recommender is one such model.
There are two primary approaches to recommendation systems. The first is a content-based approach, which makes use of features for both users and items. The is a collaborative filtering approach. The underlying assumption of the collaborative filtering approach is that if a person A has the same opinion as a person B on an issue, A is more likely to have B’s opinion on a different issue than that of a randomly chosen person
The Matchbox recommender combines collaborative filtering with a content-based approach. It is therefore considered a hybrid recommender. When a user is relatively new to the system, predictions are improved by making use of the feature information about the user, thus addressing the well-known “cold-start” problem. We don’t have any user features available in the MovieLens dataset so instead we will use item features (e.g. genre) and provide recommendations on related items, this will help resolve the “cold-start” problem.
Remember, once you have collected a sufficient number of ratings from a particular user, it is possible to make fully personalized predictions for them based on their specific ratings rather than on their features alone. Hence, there is a smooth transition from content-based recommendations to recommendations based on collaborative filtering. Even if user or item features are not available, Matchbox will still work in its collaborative filtering mode.
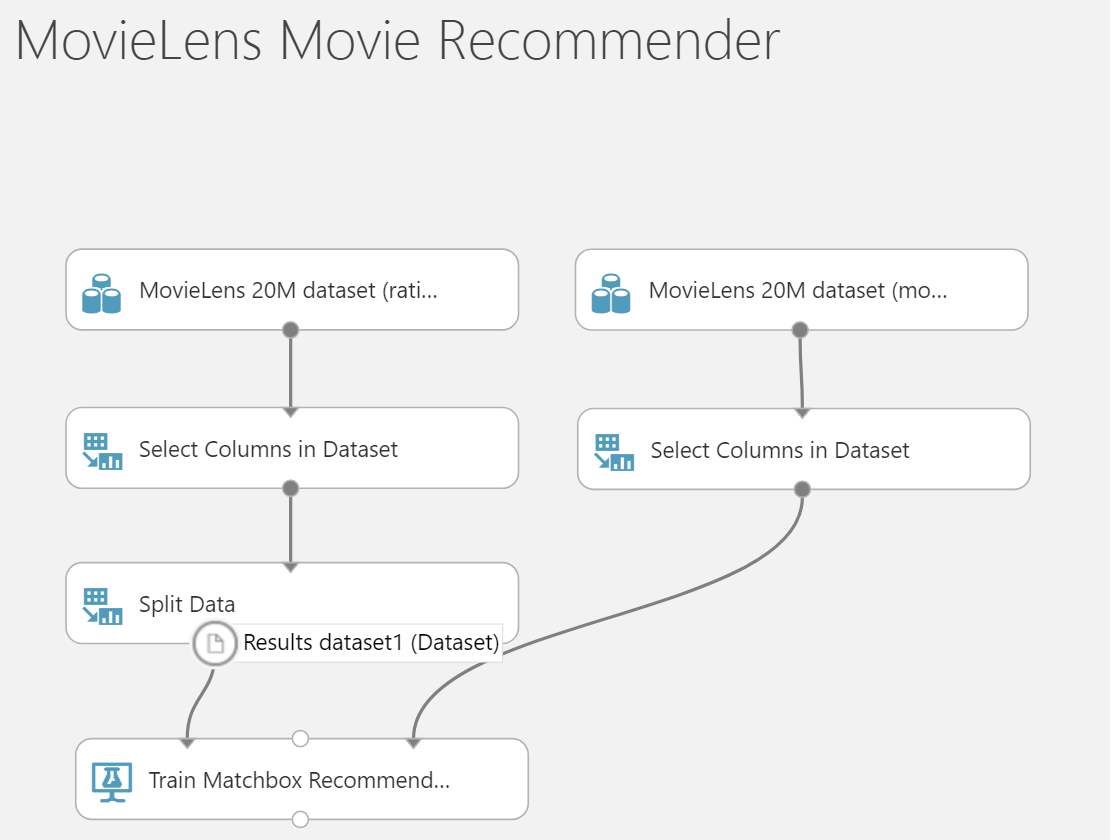
The first input to the Train MatchBox Recommender requires a triplet of user-item-rating, so let’s start with that.
If you hover over the other two inputs the matchbox recommender takes in, you can see it can be easily extended to use more user features etc. but we will do this later!
Go ahead and add the Matchbox Recommender (Train) module to our experiment and take the ‘training’ data input from the split data module and connect the two. The properties window for this module will allow you to choose properties specific to this module like the number of traits to run, number of iterations and the number of recommendations to make.
Next, connect the third input for the MatchBox Recommender with the item features dataset (movieId, Genre) as well. This will allow our MatchBox Recommender to work as a hybrid recommender.
Once training is complete you can also go ahead and save your trained model to be used again. This will save you time w.r.t. retraining the same model again and again. You can do so by using the following option shown below:
Step 4: ‘Scoring our Matchbox Recommender ’
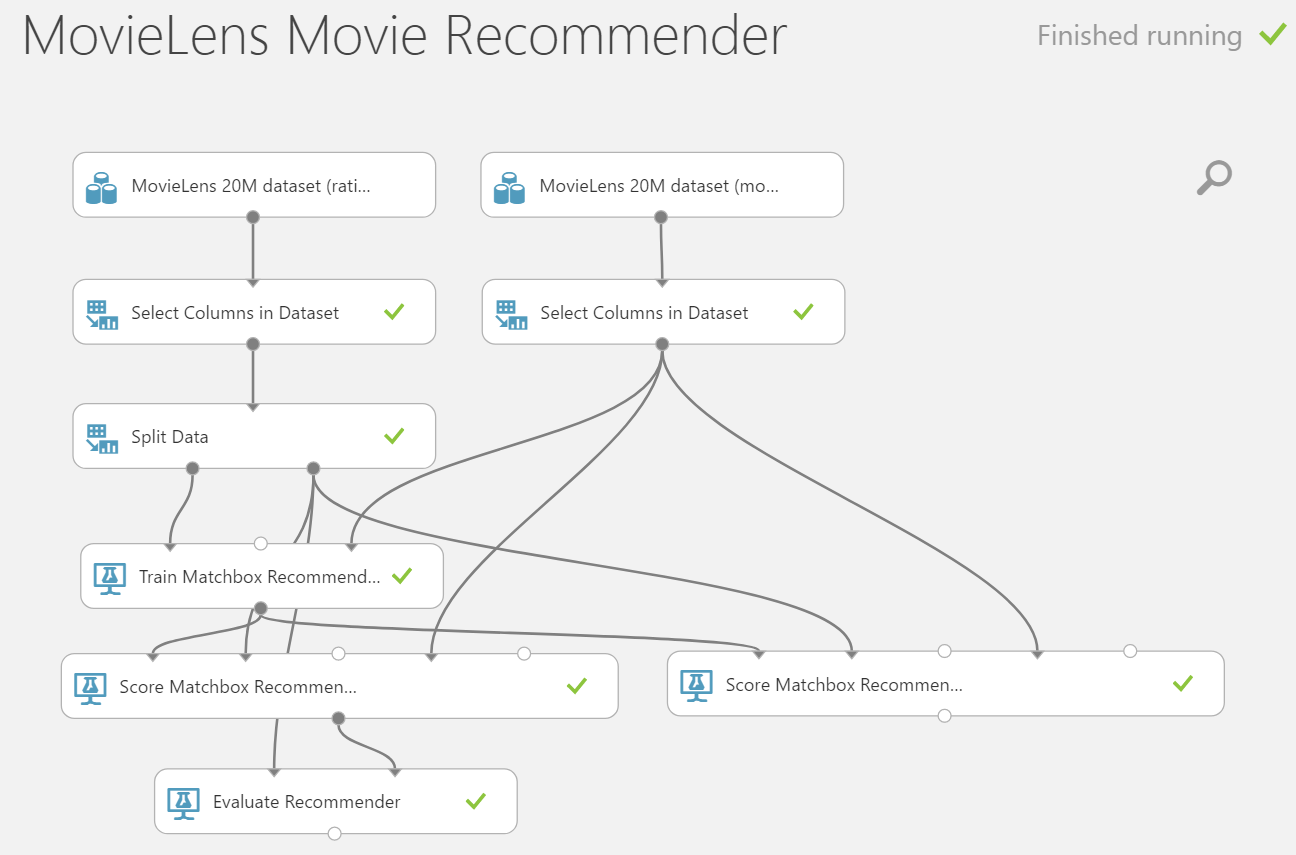
Once training is complete the next step is to go ahead and score the recommender. Just like the train Matchbox recommender drag and drop the score matchbox recommender and connect the output of train matchbox recommender and the test data from the ‘Split Data’ module to it. This will allow us to score the trained model against the test data.
The recommender kind prediction property will allow us to choose between performing a rating, item and related recommender kinds.
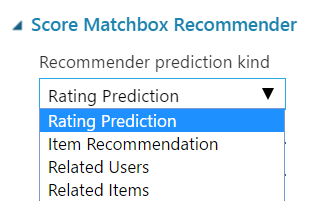 We will use the rating prediction to evaluate our algorithm and the related items prediction to then recommend a set of movies.
At this point, we are almost done, go ahead and run your model! Once you are run is complete and successful you should see green tick marks against your modules.
Step 5: Evaluating your model
To figure out, how our model is performing, we will need to go ahead and evaluate our model. Go ahead and drag and drop the ‘Evaluate Recommender’ module.
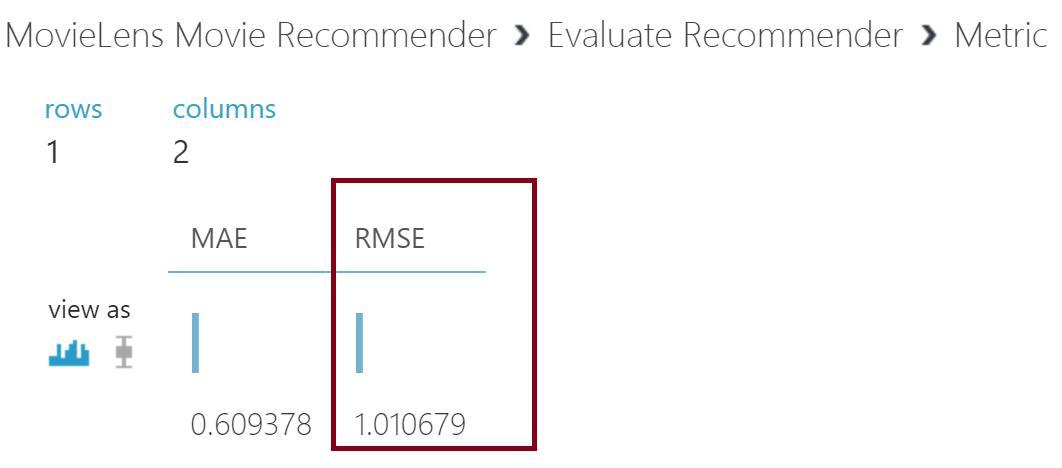
Evaluate Recommender compares the ground truth ratings of the test dataset with the predicted ratings of the scored dataset, computes the mean absolute error (MAE) and the root mean squared error (RMSE), and returns both metrics in the output dataset. RMSE is a frequently used measure of the differences between values (sample and population values) predicted by a model or an estimator and the values actually observed.
As a comparison point the RMSE for Netflix using BellKor’s Pragmatic Chaos was measured to be 0.8553. Go ahead and re-run your model, once complete visualize your RMSE metric and do find out whether we beat the Netflix recommender!, not too bad ;)!
Step 6: Set up and deploy our web service
For our ASP.NET core application to be able to consume this model in production we need to go ahead and set this up as a service. You can set this up as a service using the ‘Set Up Web Service’ option and picking the Predictive Web Service setup option.
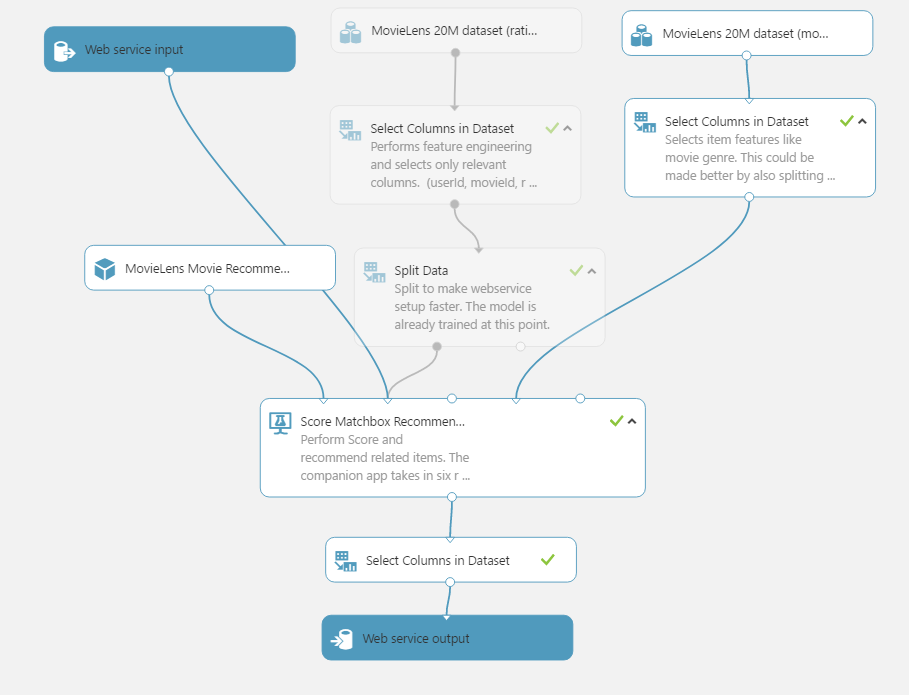
Once the ‘Predictive Web Service is setup’, you should see the webservice input and output modules appear. Modify them as follows:
This out-of-the-box configuration would work for us but it would require providing an additional input ‘timestamp’ to our prediction service which will eventually get filtered away. We can optimize this flow a little by directly going to the ‘Score Matchbox Recommender input’ shown above.
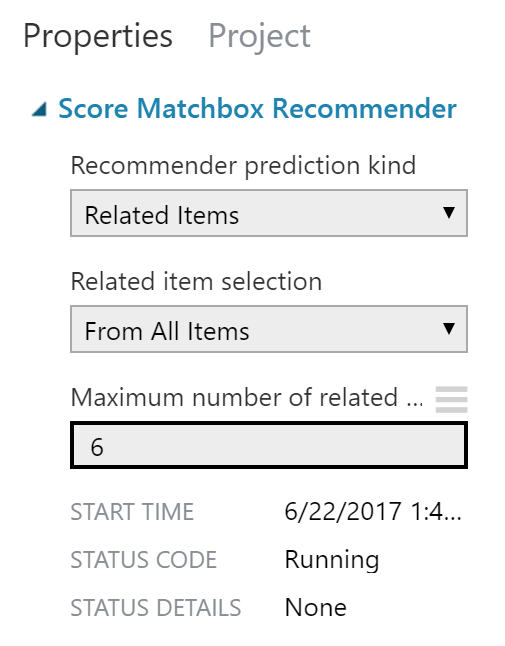
Another thing to make sure before we go ahead and publish this webservice is that the ‘Score MatchBox Recommender’ is set to score all recommended item selection and maximum number of items is set to ‘6’, for our companion app to work best. This is a must for it work in a production/web-service environment.
To speed up the setup phase you can also add another split as shown for scoring. This will save you time without affecting your results as your model has already been trained at this point, but this is optional.
One last thing to make sure of is that the webservice output is only accepting the six movie recommendations, this will require an additional ‘Select Columns in Dataset’. When you are done your model would look like as follows:
Step 7: Testing our webservice
After deploying your webservice, you should see the following dashboard. The dashboard should provide you the API Key, which we will use to connect to our webservice. In addition to this, we can also test out the default end-point using the test capability provided. So, let’s go ahead and do that.
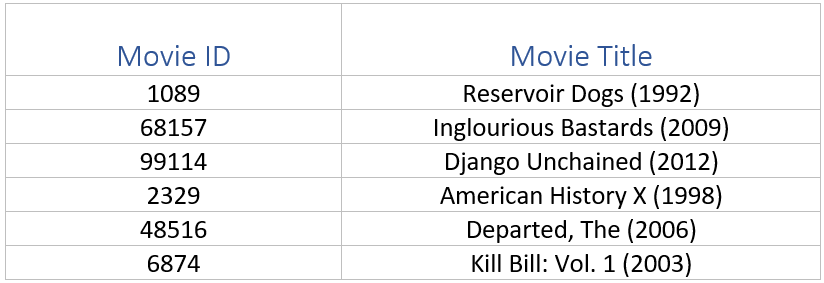
For testing this, I am going to pick a movie from the MovieLens database that I have seen, provide a rating for it and see how well this model works. I picked the Movie ‘Se7en’ (id:47), and since I really liked the movie I am going to pick a 5/5 rating for this movie and submit my input to get a predictive result for a choice of six recommended related movies that I would like.
You should get response back as a JSON object:
Mapping the MovieID’s returned to Movie Titles, this seems to work fairly well.
Step 8: Integrating the movie recommendation service to my app
Azure Machine Learning studio makes the web-service integration easy by also providing you the .NET code you need. Click the ‘Request/Response’ link in the Default End-point section.
This will take you to the request/response API documentation page for this Movie Recommender. Go ahead and traverse to the sample code section. It will provide you the code you need, in this case the C# code to connect to this service as a part of the InvokeRequestResponseService method.
All you need to do to customize it, is to replace the apiKey string with the apiKey for your webservice and you are good to go!. You can find the apiKey on the original dashboard for this webservice.
The sample provided with this post specifies the apiKey and the URI in the appsettings.json file.
Creating our ASP.NET Core movie recommendation website
With our movie recommendation model in Azure ready to go, we can go next and start creating our ASP.NET Core website.
Step 9: Creating our movie-recommendation website with ASP.NET Core
We are on home stretch now, go ahead and clone this sample to start with. Alternatively you can also create a new ASP.NET Core MVC app using the File->New experience in Visual Studio using the code sample provided as a reference.
The first thing we need to do in order to make the code sample work is to add the ‘apikey’ and ‘uri’ to the appsettings.json file. You will obtain these after building your model in Azure Machine Learning Studio.
This very simple app has the following components as you would expect:
- Model (Movie) which contains a list of Movie ID’s and Movie Titles. On model instantiation, the model is populated with a list of IMDB movie titles.
- Controller (MoviesController) which handles user interaction, work with the model, logic to query our Azure movie recommendation service and selection of which views to recommend
- Views (‘Choose’ and ‘Recommend’), the former view will allow a user to choose movies liked in the past and the second view ‘Recommend’ will display the list of recommended movies based upon that data point.
You can build and start the app up, the app will startup up in the ‘Choose’ view as shown below. Choosing a movie you have liked in the past say ‘Air Force One (1997)’ will result in a JSON request getting created and then querying a prediction from the web-service using this code snippet (InvokeRequestResponseService).
The resulting JSON object containing the recommended ‘movie id’s are then mapped to ‘movie-name’s which are represented as a part of the Recommended view.
Wrap Up
This tutorial shows one of the many examples where, Machine Learning can benefit your .NET application. Using Azure Machine Learning studio however is only one of many other ways how .NET developers can integrate ML and AI into their applications. In the coming tutorial we will look at how you can use .NET with other ML/AI technologies.
Thank you for reading to the end, I look forward to hearing your thoughts and feedback on this post.












0 comments