Differences between Web Site Projects (WSP) and Web Application Projects (WAP) are highlighted in blogs such as this one. Based on that, if you feel a WAP would be better for your particular needs than a WSP, but have already created a WSP, you may be asking yourself, “Can I convert my WSP into a WAP, without starting from scratch?”.
This posting explains how to convert an existing Web Site Project to a Web Application Project in Visual Studio 2010. The most striking differences to a Web Site Project are that WAPs have a project file to include and exclude files, and compile to a single assembly.
The guidelines below include several of the basic steps detailed in the Walkthrough: Converting a Web Site Project to a Web Application Project in Visual Studio. This is an excellent topic to review as it discusses some specific issues you may encounter which were discovered in previous versions of Visual Studio (VS). Please keep in mind while reading it that it is based on a WSP to WAP conversion using previous versions of Visual Studio.
Let’s get started.
Open and Verify your Visual Studio Web Site Project
Before converting your WSP to a WAP, you should open it in Visual Studio and verify that is it working correctly. This will help prevent the need to research errors that have nothing to do with the conversion process.
- In the File menu, click Open Web Site.
- The Open Web Site dialog box is displayed.
- Select the project folder that you want to open, and then click Open.
- In the Build menu, click Build Web Site.
- In the Debug menu, click Start Debugging. Alternatively, you can press F5.
- Verify your project compiles and runs as expected
Create a new, empty Visual Studio WAP
A good strategy for converting a WSP to a WAP is to create a new, blank Visual Studio Web Application Project in a separate directory, but in the same solution. This avoids changing any part of the existing Web site files. It also allows you to copy existing functionality and files into the new WAP easily, within the same Visual Studio instance.
- In the File menu, click Add, and then click New Project.
- The Add New Project dialog box is displayed.
- In the Installed Templates section of the Add New Project dialog box, expand the language that you want to use, and then select Web to display the Web-related templates.
- Select Empty ASP.NET Web Application.
- Type values for Name, Location, and then click OK to create the Web Application Project.
- After the project has been created, delete the Web.config file that is created automatically.
Set Project / Assembly References
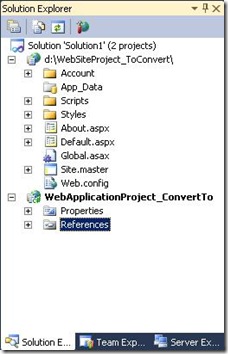
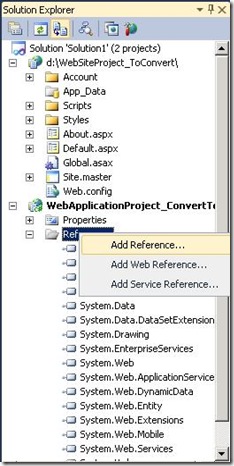
If the WSP required additional project or assembly references, you need to add them to the WAP. You can see the list of default references associated with the new (empty) Visual Studio Web Application Project under the References node in Solution Explorer.
- In the Solution Explorer, make sure Show All Files is turned on.
- In the Solution Explorer, right-click References, and then click Add Reference.
- The Add Reference dialog box is displayed.
- Select the reference that you have already added in the Web Site Project and then click OK.
- Note: To help prevent errors, add references to the Web Application Project for assemblies that existed in the \bin folder of the WSP.
Copy and Convert the App_Code folder from the Web Site Project to the Web Application Project
In WSPs, the files in the App_Code folder are all compiled together and then referenced (automatically) as a “dll” by all other files in the WSP. In WAPs, this is not the case. All code is compiled together as one .dll. I’ve found that copying the App_Code folder over first and converting it to the WAP model helps to head off some dependency issues which could arise if one copied the entire site, converted, and then tried to compile.
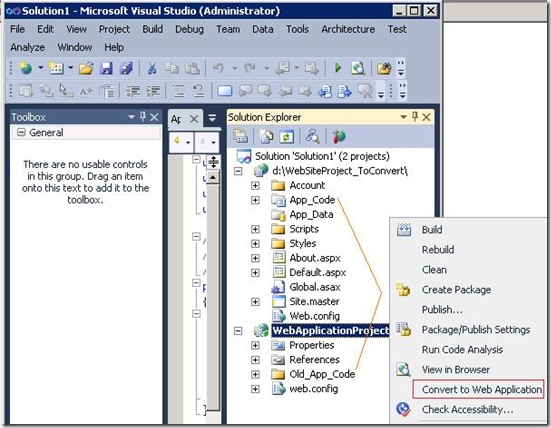
- In the Solution Explorer, copy the entire App_Code folder from the WSP to the WAP
- In the Solution Explorer, select the WAP’s root node; right-click, select Convert to Web Application
- You will see our standard Convert to Web Application confirmation dialog. Select “Yes” to this dialog.
- The App_Code folder should now be renamed to Old_App_Code folder
- Note: Do NOT name it back. As mentioned above, in the WAP model all code will be compiled into one assembly. At runtime, ASP.NET doesn’t know what type of project model you have created and will take anything in the “App_Code” folder and create a dynamic assembly for it, thereby causing “could not load type” exceptions as there would be duplicate types exists in two assemblies (the one for the VS web application and the one for App_Code). Learn more about why App_Code folder does not work well with WAPs.
- Compile the WAP
- If you see an error, the most likely causes are:
- Missing assembly reference. See the section above to add missing references to your project.
- Files marked with Build Action = Content instead of Build Action = Compile. Any file you want compiled should be marked as such.
- To set the Build Action property:
- Select the file in the Solution Explorer
- Press F4 (Brings up the File’s Property Grid)
- Look at the Build Action property. Change as necessary.
Copy and Convert the remaining Files and Folders from the WSP to the WAP
Once your Old_App_Code folder is compiled (by compiling your WAP in the step above), your WAP will have an assembly in the \bin directory. This will make it easier for the remaining files you are copying over to successfully compile, especially if they reference or use code in the files contained within that folder.
- Select the remaining files / folders from the WSP project and copy them into the WAP.
- Make sure not to copy the App_Code folder again.
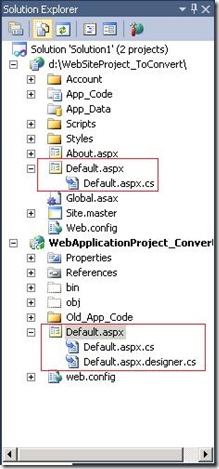
- In the Solution Explorer, right click the root node of the WAP and select Convert to Web Application.
- Don’t worry, this won’t affect (or try to reconvert) any files or the Old_App_Code folder you have already converted.
- Note: This will cause VS to automatically generate a .designer.cs (or .vb) file for each page, user-control, and master page in the project. Additionally, each .aspx/.ascx will be modified to use the ‘Codebehind’ instead of the ‘CodeFile’ attribute in the Page directive.
- Example of the ‘CodeFile’ to ‘Codebehind’ change
- WSP file: <%@ Page Title=”Home Page” Language=”C#” CodeFile=”Default.aspx.cs” Inherits=”_Default” %>
- Converted WAP file: <%@ Page Title=”Home Page” Language=”C#” Inherits=”_Default” Codebehind=”Default.aspx.cs” %>
- Example of the ‘CodeFile’ to ‘Codebehind’ change
Compile your WAP
After all the files have been added and converted, you should build your project again to see if there are any compilation errors. At this point, some of the most likely causes of errors are:
- Code files set with Build Action = Content. These should be changed to Compile. Refer to the above section.
- Missing project or assembly references. See above for steps for adding project or assembly references.
- Class name collisions. In the WSP model, each .aspx and associated codefile was compiled together as a separate, individual unit. Therefore, one could have files such as foo\widget.ascx.cs and bar\widget.ascx.cs where the classes were the same. Once these files are moved to a WAP and all compiled together, class name collisions occur with errors something like, “has multiple definitions with identical signatures”. If this occurs, unique class names should be created.
Run your WAP
After completing the above steps and you have a WAP which successfully compiles, you are ready to try running your application. One of the most common problems I’ve seen encountered is the “Unknown server tag ‘SomeTag: Control’ (as it applies to user controls and such)”. This can be corrected in one of two ways.
- Add or modify the register directive on the page that is using the control. This will only register it for this specific page.
- <%@ Register Namespace”namespace the control is in” TagPrefix=”SomeTag” Assembly=”Name of dll compiled into the \bin folder” %>
- Register the control in the Web.config, making it available to all pages in the project
- In the <pages><controls> section add the following:
- <add tagPrefix=”SomeTag” namespace=”namespace the control is in” assembly=” Name of dll compiled into the \bin folder” />
Hope this helps!
Nichole Baker
SDET, Visual Studio Web Tools


In Visual Studio 2019 the “Convert to Web Application” is located in the Project Menu.
I have VS 2019 “Microsoft Visual Studio Enterprise 2019 Version 16.4.5”. I did not see Convert to Web Application under project menu
If you select a Web Application Project in Solution Explorer, then the option will be available in the Project menu at the very bottom. I think, It has been removed from the context menu, because it’s very rarely used nowadays.
BTW. I use VS v16.6.0.
I can’t understand from this step “Copy and Convert the App_Code folder from the Web Site Project to the Web Application Project”.
It is not done in my project. I have old asp site which have asp:menu which rendered by table and cant work in touch devices. So I want to change asp.net version for that is it necessary to convert it to web app? if you have any suggestion please mail me or write here. I want to render all control to new style by asp.net