


This is a guest blog from Toine de Boer.
This blog takes a look at the Android side of the interactive widget created in the previous blog on iOS Widgets. Android is generally less strict and easier to work with, and you can build everything directly within your .NET MAUI project in Visual Studio. The complexity comes from the many available options to get a task done and the need to consider older Android versions.
Just as in the iOS widget blog, this isn’t a step-by-step tutorial. Instead, it highlights the biggest and most important parts in the order you’ll typically encounter obstacles when building an Android widget. It begins with creating a simple static widget and gradually builds toward a configurable, fully interactive widget. Source of a fully working widget on GitHub > Maui.WidgetExample.
Prerequisites
For Android widgets there are no real prerequisites. Although there are no .NET MAUI components for Android widgets, we can build them ourselves using the native Android approach. The upside is that everything can be done inside Visual Studio; optionally you can use Android Studio for designing layouts with its visual editor and preview tools. Having worked extensively with Android XML layouts in the past, and because this blog focuses on functionality rather than appearance, I’m manually creating the XML layouts while using Copilot for assistance.
As soon as I want something that looks a bit more polished, I switch to Android Studio to create the layouts in XML. To do this, create a dummy Android project, add a widget (for example, via File > New > Widget), and start designing the XML layout. This allows you to take full advantage of the live preview tool and the attributes panel, where you can see and edit all available options for each view.
.NET MAUI handles Android-specific resource files well when you organize them in a folder structure similar to a native Android app in the ./Platforms/Resources folder. Thanks to this, creating a widget does NOT require any changes in your .csproj—the project file remains untouched. I create or copy files and folders outside Visual Studio to prevent Visual Studio from modifying the .csproj.
For the iOS widgets, I already created a .NET MAUI project demonstrating a way to communicate with a widget, and I’ll be reusing that for Android. Most of the existing code remains the same. All the added Android widget code goes into the ./Platforms/Android folder.
Creating the Widget
Android widgets are not normal views like in your app, but they do live inside the .NET MAUI app. Widgets are limited to the set of Android views available through RemoteViews; custom views are not supported. You can still style them reasonably well, though you will need to be creative with shapes, vectors, and other drawables.
The starting point of an Android widget is an AppWidgetProvider. It can use an AppWidgetManager to supply RemoteViews to widgets based on ID. RemoteViews are used by Android to display views from another process; they use the same XML layout style as normal Android views, but they are loaded into a RemoteViews object.
[BroadcastReceiver(Label = "My Widget")]
[MetaData(AppWidgetManager.MetaDataAppwidgetProvider, Resource = "@xml/mywidget_provider_info")]
public class MyWidgetProvider : AppWidgetProvider
{
   public override void OnUpdate(Context? context, AppWidgetManager? appWidgetManager, int[]? appWidgetIds)
   {
      if (context == null || appWidgetIds == null || appWidgetManager == null)
      {
         return;
      }

      foreach (var appWidgetId in appWidgetIds)
      {
         var views = new RemoteViews(context.PackageName, Resource.Layout.mywidget);
         views.SetTextViewText(Resource.Id.widgetText, "Count:5 (static)");
         appWidgetManager.UpdateAppWidget(appWidgetId, views);
      }
   }
}
The AppWidgetProvider relies on a configuration file located in the Resources/xml folder, referenced via the MetaData attribute in the Resource field. This file lets you configure widget settings such as preview images, dimensions, resize limits, and features.
<!-- Resources/xml/mywidget_provider_info.xml -->
<?xml version="1.0" encoding="utf-8"?>
<appwidget-provider xmlns:android="http://schemas.android.com/apk/res/android"
   android:minWidth="120dp"
   android:minHeight="80dp"
   android:maxResizeWidth="140dp"
   android:updatePeriodMillis="0"
   android:initialLayout="@layout/mywidget"
   android:resizeMode="horizontal|vertical"
   android:widgetCategory="home_screen"
   android:configure="widgetexample.WidgetConfigurationActivity"
   android:widgetFeatures="reconfigurable"
   android:previewImage="@drawable/mywidget_preview_image" />
One of the most important entries is android:initialLayout, which refers to the view layout located in Resources/layout. This layout is loaded into a RemoteView.
<!-- Resources/layout/mywidget.xml -->
<?xml version="1.0" encoding="utf-8"?>
<LinearLayout
   xmlns:android="http://schemas.android.com/apk/res/android"
   android:orientation="horizontal"
   android:layout_width="match_parent"
   android:layout_height="wrap_content">

   <TextView
      android:id="@+id/widgetText"
      android:text="Static widget"
      android:textSize="16sp"
      android:layout_width="wrap_content"
      android:layout_height="wrap_content" />
</LinearLayout>
A big difference between a RemoteView and a regular Android view is that you can’t directly manipulate the view from your code. Each view only allows a limited set of properties to be updated, and all changes must go through the RemoteViews object using its helper methods. You pass in the resource ID of the view you want to update, for example: views.SetTextViewText(Resource.Id.widgetText, "Hello World");
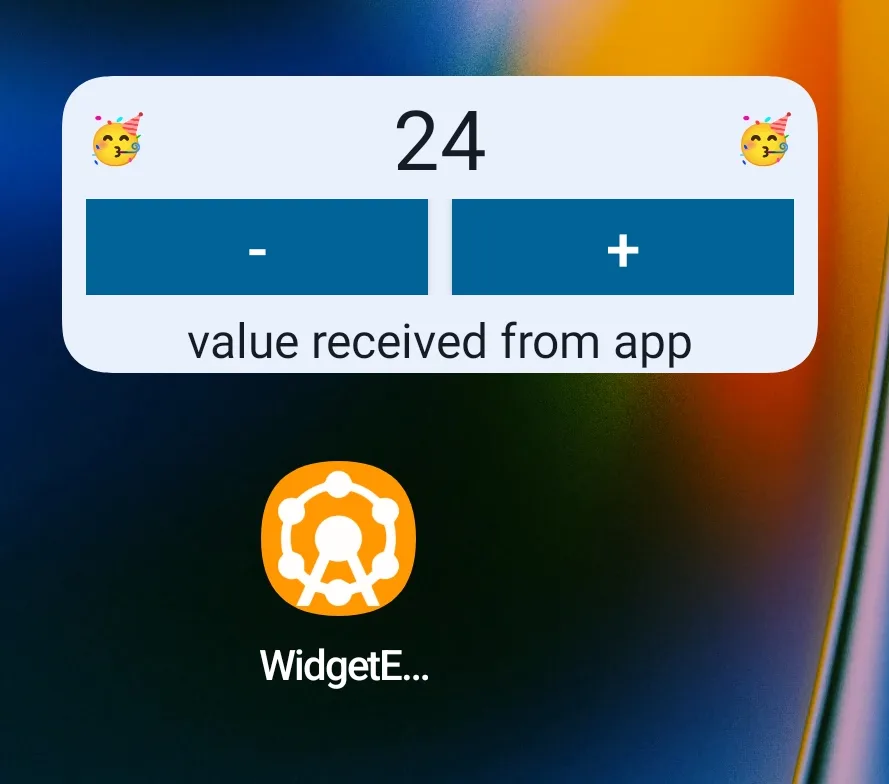
At this point, you can build the app and should see the widget appear in your phone’s widget gallery.
Data sharing between App and Widget
Sharing data between app and widget is simpler than on iOS because inside the widget you can use C# .NET MAUI code. You can even share in-memory data between widget and app to some extent, although this can be unreliable due to lifecycle issues. A persistent storage approach is recommended. Because we already set up shared data storage for the iOS widgets, we continue using the existing SharedPreferences mechanism on Android for cross-platform consistency.
// example how to store data in .NET MAUI (Preferences)
Preferences.Set("MyDataKey", "my data to share", "group.com.enbyin.WidgetExample");

// example how to store data on Android, on the same location (SharedPreferences)
var preferences = context.GetSharedPreferences("group.com.enbyin.WidgetExample", Context.MODE_PRIVATE);
var value = preferences.GetString("MyDataKey", null);
Note
Storage keys are case-sensitive; keep keys simple and lowercase to avoid problems.Communication from App to Widget
Like on iOS, the Android widget doesn’t know when the app updates data, and the app doesn’t automatically know when the widget does. On Android, there are several ways to communicate between the app and the widget; you can even update widget views at runtime from your app. The most reliable mechanism is using Intents.
The principle is simple: you create an Intent and give it an action string. This Intent can then be broadcast whenever needed; for example, after a background process finishes or when a user presses a button on a widget.
// Broadcast an Intent with action ‘ActionAppwidgetUpdate’
var intent = new Android.Content.Intent(AppWidgetManager.ActionAppwidgetUpdate);
Android.App.Application.Context.SendBroadcast(intent);
Components that need to receive Intents declare the same action string. In .NET MAUI, subscribing to Intent actions is straightforward using the [IntentFilter] attribute. If a component needs to receive Intents from outside its own app, set Exported = true. Widgets need this because they effectively live outside the app.
// Subscribing your AppWidgetProvider to listen to Intents
[BroadcastReceiver(Label = "My Widget", Exported = true)]
[IntentFilter(new[] { AppWidgetManager.ActionAppwidgetUpdate })]
[MetaData(AppWidgetManager.MetaDataAppwidgetProvider, Resource = "@xml/mywidget_provider_info")]
public class MyWidgetProvider : AppWidgetProvider
{
   public override void OnReceive(Context? context, Intent? intent)
   {
      var myIntent = Intent;
      // ...
   }
}
// Subscribing a Service to listen to Intents
[Service(Exported = true)]
[IntentFilter(new[] { AppWidgetManager.ActionAppwidgetUpdate })]
public class WidgetListenerService : Service
{
public override StartCommandResult OnStartCommand(Intent intent, StartCommandFlags flags, int startId)
{
var myIntent = intent;
return StartCommandResult.NotSticky;
}
}// Subscribing an Activity to listen to Intents
[IntentFilter(new[] { Intent.ActionView })]
public class MyActivity : Activity
{
protected override void OnCreate(Bundle savedInstanceState)
{
base.OnCreate(savedInstanceState);
var myIntent = Intent;
}
}Refreshing Widgets Manually
The AppWidgetProvider listens by default to Intents with the built‑in action AppWidgetManager.ActionAppwidgetUpdate. When such an Intent is received, it typically triggers a refresh of the widget. You can limit which widgets respond by scoping the Intent to your package and including specific widget IDs.
// Refreshing all Widgets of a specific AppWidgetProvider
public static void RefreshWidget(Context context)
{
   var appWidgetManager = AppWidgetManager.GetInstance(context);
   var componentName = new ComponentName(context, Java.Lang.Class.FromType(typeof(MyWidgetProvider)));
   var appWidgetIds = appWidgetManager?.GetAppWidgetIds(componentName);

   var intent = new Intent(AppWidgetManager.ActionAppwidgetUpdate);
   intent.SetPackage(context.PackageName);
   intent.PutExtra(AppWidgetManager.ExtraAppwidgetIds, appWidgetIds);

   context.SendBroadcast(intent);
}
// Handling incoming Intent on an AppWidgetProvider
[BroadcastReceiver(Label = "My Widget", Exported = true)]
[IntentFilter(new[]{ AppWidgetManager.ActionAppwidgetUpdate})]
[MetaData(AppWidgetManager.MetaDataAppwidgetProvider, Resource = "@xml/mywidget_provider_info")]
public class MyWidgetProvider : AppWidgetProvider
{
public override void OnUpdate(Context? context, AppWidgetManager? appWidgetManager, int[]? appWidgetIds)
{
if (context == null || appWidgetManager == null || appWidgetIds == null)
{
return;
}
foreach (var appWidgetId in appWidgetIds)
{
var views = BuildRemoteViews(context, appWidgetId);
appWidgetManager.UpdateAppWidget(appWidgetId, views);
}
}
public override void OnReceive(Context? context, Intent? intent)
{
base.OnReceive(context, intent);
}
}Refreshing Widgets by Schedule
Android offers several ways to schedule widget updates, and these approaches can be combined:
updatePeriodMillissetting: Defined in theappwidget-providerXML configuration file. Easiest option, uses a fixed update interval, minimum 30 minutes.AlarmManager: Capable of repeatedly broadcasting anIntent. Minimum interval of about 60 seconds; may be restricted. Alarms are not restored after device restart.WorkManager: Reliable, survives device restarts, supports many configuration options. Minimum repeat interval is 15 minutes.
Making Widgets Interactive
Widgets can allow users to perform small actions, for example by pressing a button. These actions are triggered via Intents and must be wrapped in a PendingIntent so they can be executed long after the widget and its views have been created. PendingIntents are reusable; keep the requestCode unique to avoid overwriting them.
// Attach Intent to the increment button
var incrementIntent = new Intent(context, typeof(MyWidgetProvider));
incrementIntent.SetAction("com.enbyin.WidgetExample.INCREMENT_COUNTER");
var incrementPendingIntent = PendingIntent.GetBroadcast(
   context,
   101,
   incrementIntent,
   PendingIntentFlags.UpdateCurrent | (Build.VERSION.SdkInt >= BuildVersionCodes.S ? PendingIntentFlags.Mutable : 0)
);

views.SetOnClickPendingIntent(Resource.Id.widgetIncrementButton, incrementPendingIntent);
Handle button interactions by listening for custom actions in the AppWidgetProvider:
[BroadcastReceiver(Label = "My Widget", Exported = true)]
[IntentFilter(new[] {
   AppWidgetManager.ActionAppwidgetUpdate,
   "com.enbyin.WidgetExample.INCREMENT_COUNTER"
})]
[MetaData(AppWidgetManager.MetaDataAppwidgetProvider, Resource = "@xml/mywidget_provider_info")]
public class MyWidgetProvider : AppWidgetProvider
{
   public override void OnReceive(Context? context, Intent? intent)
   {
      if (intent == null || context == null)
      {
         base.OnReceive(context, intent);
         return;
      }

      switch (intent.Action)
      {
         case "com.enbyin.WidgetExample.INCREMENT_COUNTER":
         {
            var currentCount = Preferences.Get(MainPage.SharedStorageAppIncomingDataKey, 0);
            currentCount++;
            Preferences.Set(MainPage.SharedStorageAppIncomingDataKey, currentCount);
            UpdateAllWidgets(context);
            return;
         }
      }

      base.OnReceive(context, intent);
   }
}
Communication from Widget to App
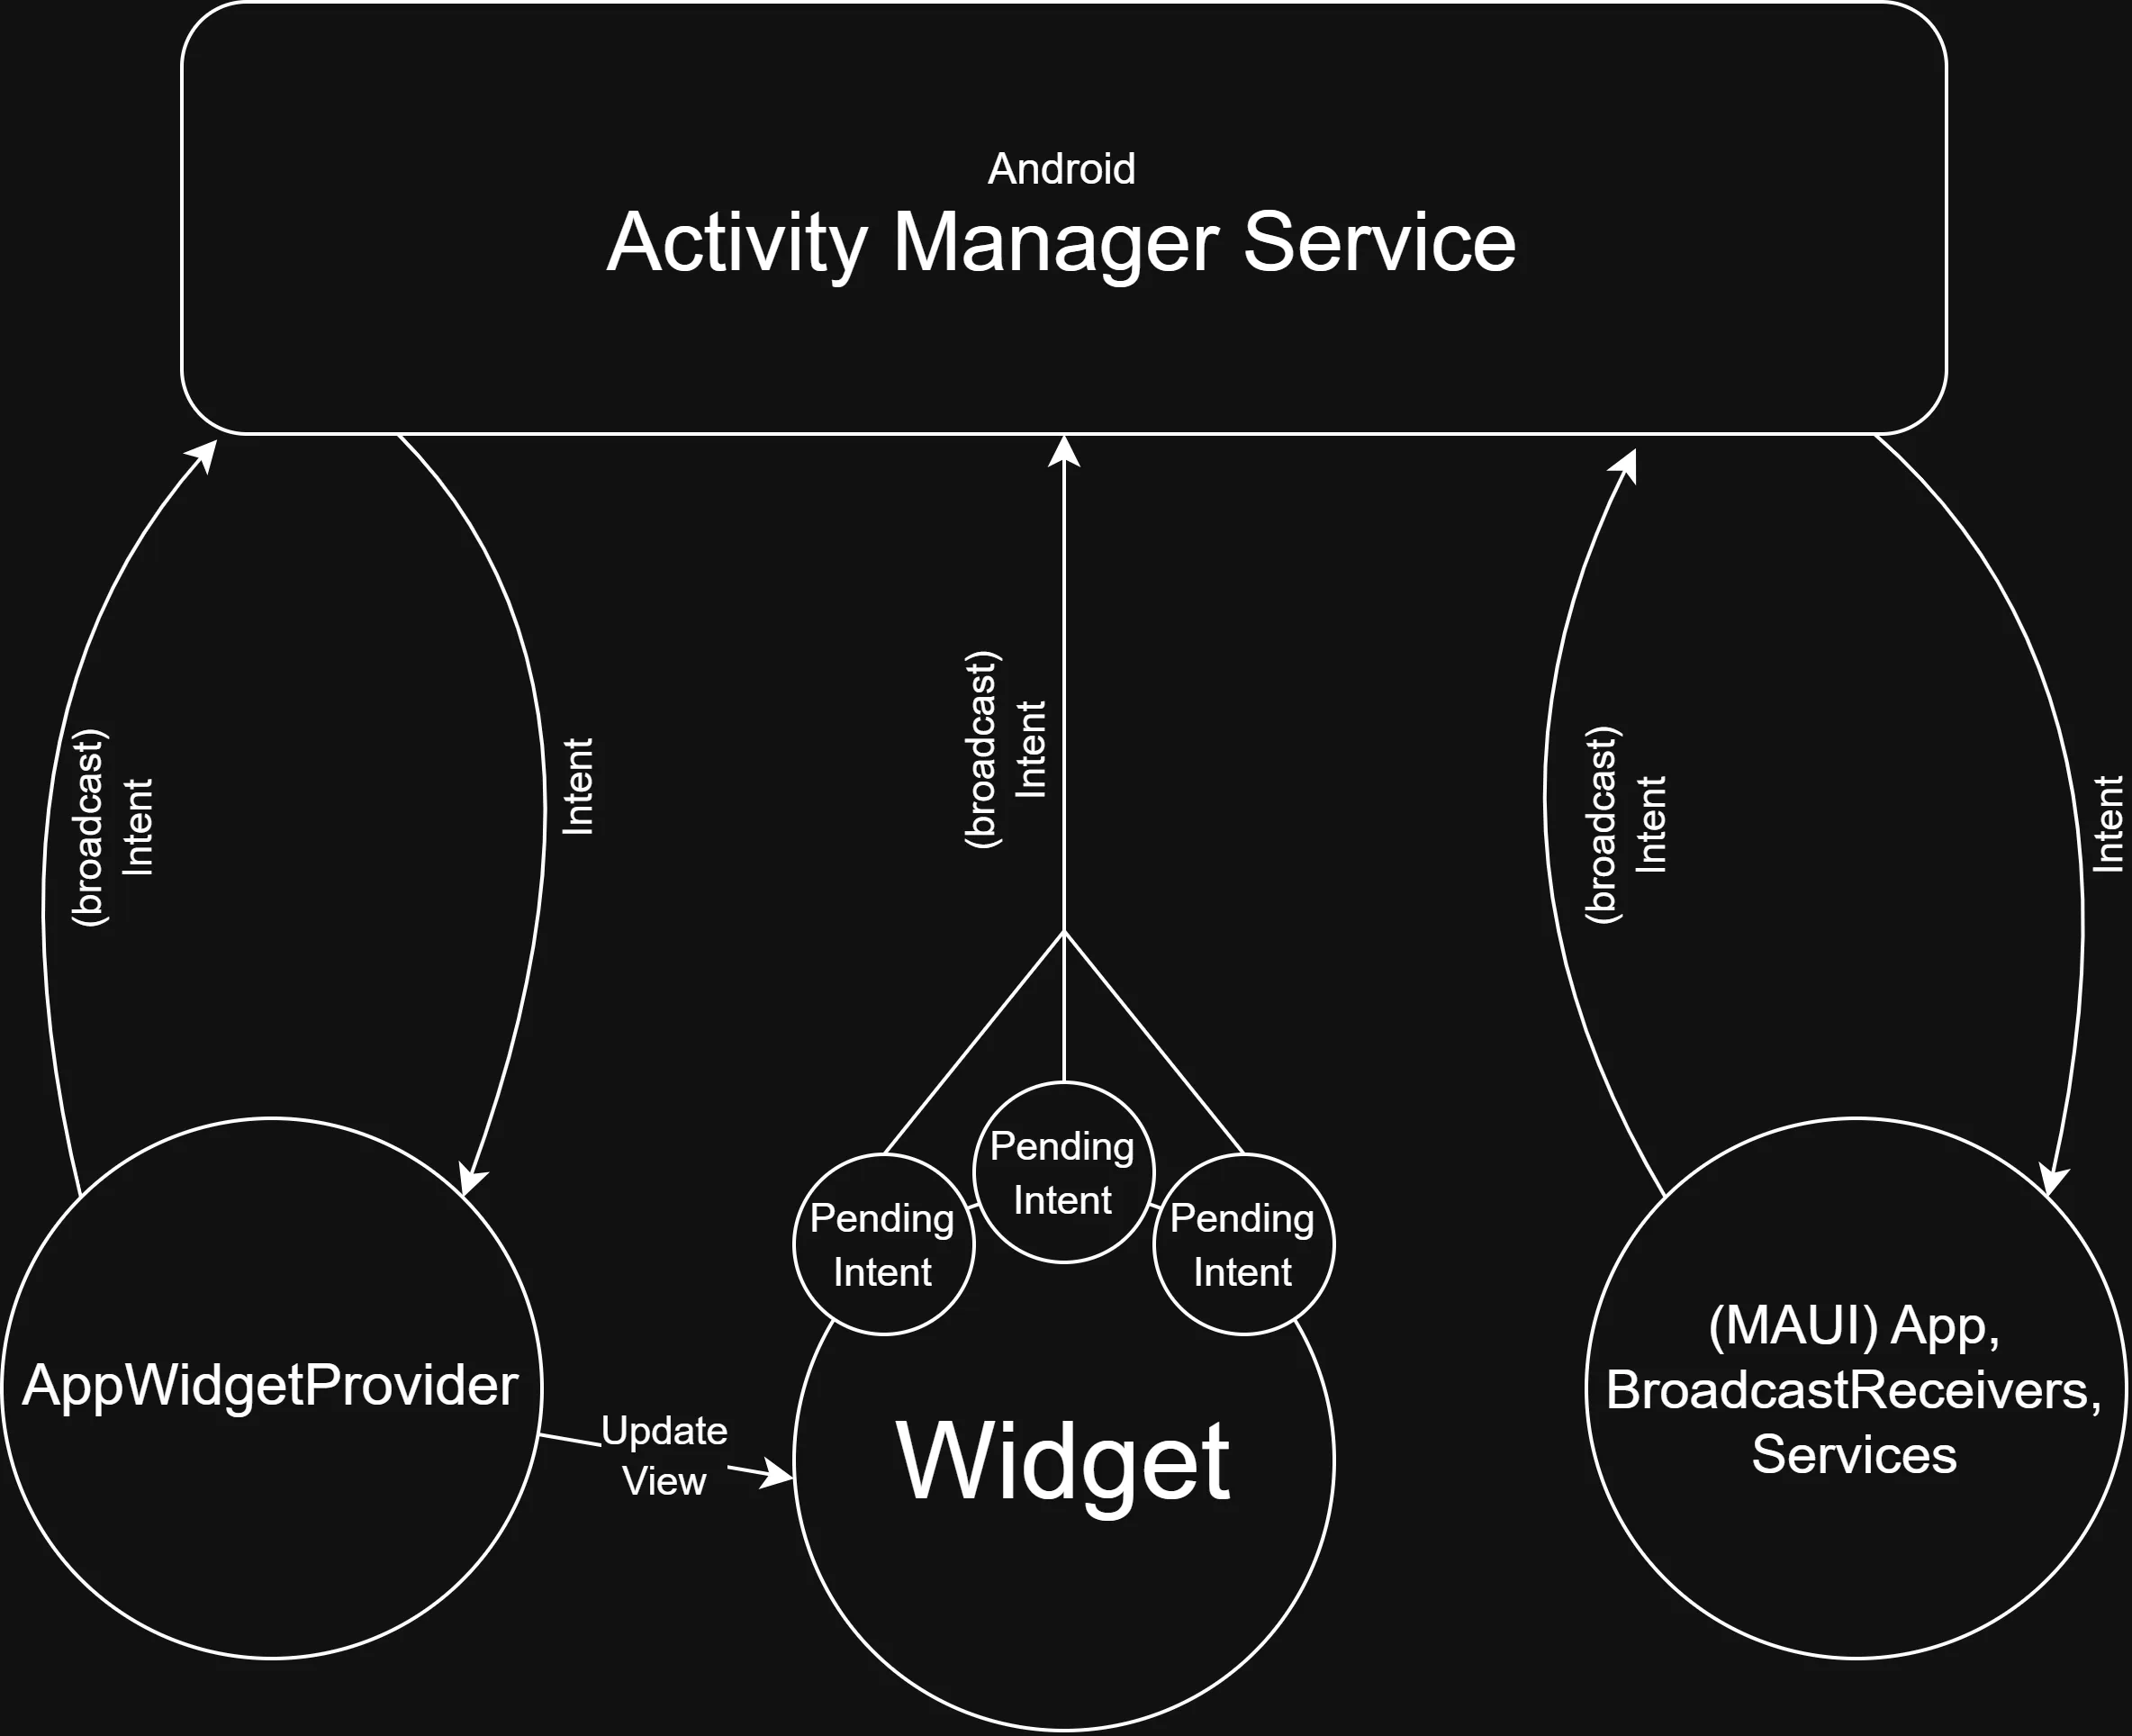
All triggers, data transmissions, and other forms of communication to and from the widget are handled via Intents. Components such as BroadcastReceivers, Services, AppWidgetProviders, and Activities can specify which types of Intents they listen to, and can also broadcast any Intent for others to receive. Below is a brief overview of the data flows showing how these components communicate via Intents to manage the interactive widget.
You can also use an Intent to launch your app. Instead of broadcasting Intents in the background, send them directly to an Activity by using PendingIntent.GetActivity(). Like any Intent, you can attach data to it. A common approach when launching the app with an Intent is to use deep links (URLs) to pass structured data into the app. You can then retrieve the incoming data in OnCreate() (for a cold start) or OnNewIntent() (when the activity is already running).
// Example of making a PendingIntent using Deep Link / URL
var openAppIntent = new Intent(Intent.ActionView);
openAppIntent.SetData(global::Android.Net.Uri.Parse($"{App.UrlScheme}://{App.UrlHost}?counter={currentCount}"));
openAppIntent.SetFlags(ActivityFlags.NewTask | ActivityFlags.ClearTop);
var openAppPendingIntent = PendingIntent.GetActivity(
   context,
   103,
   openAppIntent,
   PendingIntentFlags.UpdateCurrent | (Build.VERSION.SdkInt >= BuildVersionCodes.S ? PendingIntentFlags.Immutable : 0)
);

views.SetOnClickPendingIntent(Resource.Id.widgetText, openAppPendingIntent);
[Activity]
[IntentFilter(new[] { Intent.ActionView },
Categories = new[] { Intent.CategoryDefault, Intent.CategoryBrowsable },
DataScheme = App.UrlScheme,
DataHost = App.UrlHost)]
public class MainActivity : MauiAppCompatActivity
{
protected override void OnCreate(Bundle? savedInstanceState)
{
base.OnCreate(savedInstanceState);
HandleIntent(Intent);
}
protected override void OnNewIntent(Intent? intent)
{
base.OnNewIntent(intent);
HandleIntent(intent);
}
private static void HandleIntent(Intent? intent)
{
if (intent?.Data != null)
{
var url = intent.Data.ToString();
// handle the URL as needed
}
}
}Compared to iOS widgets, Android widgets can directly access C# components. The IServiceProvider is also available, since MauiProgram.CreateMauiApp() is invoked just as it is in your app. Treat the widget as if it lives outside the app; keep business logic out of the AppWidgetProvider. If you want an Intent to first go through the AppWidgetProvider for widget UI updates, fire a new Intent from there and broadcast it to the app for business logic.
public override void OnReceive(Context? context, Intent? intent)
{
   if (intent == null || context == null)
   {
      base.OnReceive(context, intent);
      return;
   }

   switch (intent.Action)
   {
      case "com.enbyin.WidgetExample.INCREMENT_COUNTER":
      {
         var currentCount = Preferences.Get(MainPage.SharedStorageAppIncomingDataKey, 0);
         currentCount++;

         // Send silent trigger to app for background work
         var silentIntent = new Intent(context, typeof(WidgetSilentReceiver));
         silentIntent.SetAction(WidgetToAppSilentIntentAction);
         silentIntent.PutExtra(WidgetToAppSilentExtraValueField, currentCount);
         silentIntent.SetPackage(context.PackageName);
         context.SendBroadcast(silentIntent);

         UpdateAllWidgets(context);
         return;
      }
   }

   base.OnReceive(context, intent);
}
When you need to execute short actions in response to an Intent, a standard BroadcastReceiver is a great fit. Receivers can run only briefly before Android stops them. If you need more time, use a background Service.
[BroadcastReceiver(Exported = true)]
[IntentFilter([ MyWidgetProvider.WidgetToAppSilentIntentAction ])]
public class WidgetSilentReceiver : BroadcastReceiver
{
   public override void OnReceive(Context? context, Intent? intent)
   {
      if (context == null || intent == null || intent.Action != MyWidgetProvider.WidgetToAppSilentIntentAction)
      {
         return;
      }

      var counterValue = intent.GetIntExtra(MyWidgetProvider.WidgetToAppSilentExtraValueField, int.MinValue);
      if (counterValue != int.MinValue)
      {
         Preferences.Set(MainPage.SharedStorageAppIncomingDataKey, counterValue);
      }

      MainPage.RefreshWidget();
   }
}
Creating a configurable Widget
In the widget configuration file there is an option to specify an Activity as the user configuration screen for the widget. Such a widget configuration activity should be a small activity that stores its configuration changes immediately. After closing this screen the widget will automatically update once.
<!-- Resources/xml/mywidget_provider_info.xml -->
<?xml version="1.0" encoding="utf-8" ?>
<appwidget-provider
   xmlns:android="http://schemas.android.com/apk/res/android"
   android:widgetFeatures="reconfigurable"
   android:configure="widgetexample.WidgetConfigurationActivity">
   <!-- other widget settings -->
</appwidget-provider>
The field android:configure must reference the Activity with the Name specified in the Activity itself. Pay attention to the Name value.
[Activity(Label = "Configure Widget",
   Exported = true,
   Name = "widgetexample.WidgetConfigurationActivity",
   Theme = "@android:style/Theme.Material.Light.Dialog",
   ConfigurationChanges = ConfigChanges.UiMode)]
[IntentFilter([AppWidgetManager.ActionAppwidgetConfigure])]
public class WidgetConfigurationActivity : Activity
{
   protected override void OnCreate(Bundle? savedInstanceState)
   {
      base.OnCreate(savedInstanceState);

      SetResult(Result.Canceled);

      var extras = Intent?.Extras;
      if (extras != null)
      {
         _appWidgetId = extras.GetInt(AppWidgetManager.ExtraAppwidgetId, AppWidgetManager.InvalidAppwidgetId);
      }

      // Build the configuration View
      // The views used are NOT special widget views, so you can use event handlers
      // to store configuration changes
      SetContentView(layout);
   }
}
The configuration activity is a standard Android Activity, which means it uses regular Android views rather than RemoteViews. You could build these screens using the full .NET MAUI framework, but for this blog I used basic XML layouts and a standard non-.NET MAUI Activity.
Using the Context
A critical concern is using the correct Android Context. It is tempting to always use the easily accessible Android.App.Application.Context, but when working with widgets this context can be null in many situations. This becomes even more important when widgets trigger background services, as using the wrong context can cause the service to crash silently. Use the context provided by Android to the background service; if that’s not available, at least check whether Platform.CurrentActivity is accessible.
Performance Considerations
Each Android app can have only one Application instance. Widgets (AppWidgetProviders) and BroadcastReceivers automatically run within the same application as the app. Using them loads the entire .NET MAUI stack, including a call to MauiProgram.CreateMauiApp(). This can cause an initial delay of a few seconds, for example when a widget button is pressed for the first time.
You can reduce this delay by avoiding unnecessary UI-related work. A simple approach is to create a minimal version of the .NET MAUI app that initializes only the essentials needed for the widget. For example:
public static class MauiProgram
{
   public static MauiApp CreateMauiApp()
   {
      var builder = MauiApp.CreateBuilder();
      builder
         .UseMauiApp<App>()
         .ConfigureFonts(fonts =>
         {
            fonts.AddFont("OpenSans-Regular.ttf", "OpenSansRegular");
            fonts.AddFont("OpenSans-Semibold.ttf", "OpenSansSemibold");
         });

#if DEBUG
      builder.Logging.AddDebug();
#endif

      return builder.Build();
   }

   public static MauiApp CreateMinimalMauiApp()
   {
      var builder = MauiApp.CreateBuilder();
      builder.UseMauiApp<App>();
      return builder.Build();
   }
}
To take advantage of the minimal setup, detect whether the app is being started for a widget or for the full app. On Android, in MauiApplication this can be achieved by checking the ProcessInfo of the current running app process.
[Application]
public class MainApplication : MauiApplication
{
   public MainApplication(IntPtr handle, JniHandleOwnership ownership) : base(handle, ownership) { }

   protected override MauiApp CreateMauiApp()
   {
      bool isBackgroundOnly = IsBackgroundExecution();
      return isBackgroundOnly ? MauiProgram.CreateMinimalMauiApp() : MauiProgram.CreateMauiApp();
   }

   private bool IsBackgroundExecution()
   {
      try
      {
         var activityManager = (ActivityManager?)GetSystemService(ActivityService);
         if (activityManager == null)
         {
            return false;
         }

         var runningAppProcesses = activityManager.RunningAppProcesses;
         if (runningAppProcesses == null)
         {
            return false;
         }

         foreach (var processInfo in runningAppProcesses)
         {
            if (processInfo.Pid == Process.MyPid())
            {
               bool isBackground = (int)processInfo.Importance > (int)Importance.Visible;
               return isBackground;
            }
         }
      }
      catch
      {
         // ignore errors and assume foreground
      }

      return false;
   }
}
On iOS, you can follow a similar approach in the AppDelegate by checking whether the app is being launched due to a silent push notification and initialize a minimal .NET MAUI app in that case.
Note
On Android, you can run a widget in a separate process withProcess = ":widget_process" in the BroadcastReceiver attribute, but this bypasses the .NET MAUI framework, preventing access to shared Preferences and other essentials.Final Thoughts
Android widgets offer more options and provide direct access to your C# code, unlike iOS widgets. Approach this carefully and implement a solution that works reliably across devices, especially for cross-platform scenarios. Some Android device manufacturers restrict or alter the widget experience; this blog focuses on standard Android widgets.
Before wrapping up, here are a few final tips:
- Test your widget on both new Android devices and at least one device running your minimum supported version.
- Always use the Android
Contextprovided by theAppWidgetProviderorBroadcastReceiver; services should use their own context. - Avoid heavy UI constructs for widgets; prefer simple layouts over adapter-based views to prevent flicker.
0 comments