
This post instructs you on how to run an unattended installation of Team Foundation Server, a new feature to TFS 2012. There is another copy of this post located here, on the TFS Setup, Administration, and Operations blog.
**Note: **As nothing in this area has changed for TFS 2013, the title of this document has been amended to encompass the 2013 release as well.
Introduction
What is Unattended Installation?
Unattended install is a feature of Team Foundation Server that lets a user pre-set all configuration parameters for a desired TFS instance in advance. This allows TFS to be configured from start to finish without pausing for input from the Configuration Wizard during the process. Unattended Installation takes place via the command prompt. This paper describes the two commands through which it is performed: Create and Configure.
Who Should Use Unattended Install?
This feature is ideal for users who are very familiar with TFS and the configuration process, and whose environment divides TFS functions over many different machines. For example, many large-scale enterprise systems have several servers that are designated to builds. Unattended install allows an administrator to quickly kick off the Team Build installation process on these machines without having to supervise each one independently. Furthermore, since the configuration for each build server will likely be almost or completely identical, it should be easy to set each machine’s configuration parameters quickly.
Feature Overview
The unattended install feature can be used to configure all different instance types of TFS. These include: Basic, Standard, AT-Only, Build, Proxy, and SharePoint Extensions. To do this, you must determine in advance how the instance should be configured—usually by creating an .ini file and editing it — and then run the specified configuration in the command prompt. This paper covers both the Create command to make this file and the Configure command to actually run the configuration. It explains the different options, or parameters, for these commands and touches on a few scenarios that unattended install does not support.
The feature’s name is somewhat of a misnomer because the “unattend” commands actually perform configuration work as opposed to installation. In order to carry out the full end-to-end installation of TFS, from loading the bits onto the disk to configuring them, you must make a batch file or PowerShell script that combines the unattend commands with an additional install command. The first command to run is the install command, which is not part of the unattend feature. To install the bits, navigate to the location of the program’s main executable (this is likely on a DVD that is inserted into the machine). Then, depending on whether the version of the program is TFS or TFS Express, enter one of the following commands:
tfs_server.exe /quiet or tfs_express.exe /quiet
After this step is complete, proceed to the unattend commands in the next sections.
Creating a Configuration File
The first step to initiate an unattended installation is to create a configuration file for the specific type of installation to be performed. This step creates a file with all relevant parameters for the given installation and performs an environment scan on the machine to populate them with smart default values.
Navigate to the Tools directory within the TFS folder. By default, this folder is placed in the Program Files folder of the local machine’s C: drive.
cd C:Program FilesMicrosoft Team Foundation Server 11.0Tools
Once in the Tools folder, you can run the Create command. The basic syntax for this command is:
tfsconfig unattend /create /type:
Here is a valid example command:
tfsconfig unattend /create /type:basic /unattendfile:configbasic.ini
See the results below. The command will be recognized and an activity log created.

The Create command has two required parameters and one optional parameter. ‘/inputs:’ is optional and will be explained later. ‘/type:’ and ‘/unattendfile:’ are always required. The possible configuration types are explained in the following section. ‘/unattendfile:’ represents the user-specified path for the configuration file and must end in.ini.
Types of Installations
The unattended install feature supports all the same installation types that the Configuration Wizard supports and contains fields for the same set of configuration parameters. For the most part, the name of each configuration type for unattended install mirrors the name in the Wizard. Here is a list of names and descriptions of the types of unattended configurations:
- BASIC: Configures the essential development services for Team Foundation Server. This includes Source Control, Work Item Tracking, and Test Case Management.
- STANDARD: Configures the essential development services along with integration with Reporting Services and SharePoint Products. Requires at a minimum to either set ‘UseWss=False’ or provide ‘WssAdminSiteAccountName.’
- Note – Since the configuration file for this install type allows Reporting and/or SharePoint to be disabled, it embodies both the Standard and Advanced configurations in the Configuration Wizard. The configuration file default is to set ‘UseReporting=True’ and ‘UseWss=True,’ thereby invoking a standard configuration.
- ATONLY: Reinstalls the Team Foundation Server application tier using existing databases or adds another application tier to a load-balanced farm.
-
BUILD: Configures Team Build services. Creates, replaces, or restores build hosts. Creates, adds, replaces, or restores build controllers and build agents.
-
Note – there are four types of Build configurations: create, replace, restore, and scale. It’s a good idea to decide which type of configuration you need and specify it with an input parameter when creating your .ini file, as the contents of the .ini file will differ depending on the configuration type.
-
PROXY: Configures a version control proxy service.
-
SPINSTALL: Installs SharePoint on server operating systems.
- Note – Unlike in the Configuration Wizard, SharePoint is not installed automatically before an unattended TFS Standard configuration. Therefore, the user may need to run ‘spinstall’ before ‘standard’ if the user plans to set ‘UseWSS=True.’
- SPEXTENSIONS: Configures SharePoint extensions.
-
Note – Unlike in the Configuration Wizard, SharePoint is not installed automatically during a SharePoint Extensions configuration. The user must run ‘spinstall’ before ‘spextensions’ if SharePoint is not already installed on the machine
-
UPGRADE: Upgrades Team Foundation Server to the current version from a previous release (where permitted). This includes upgrading TFS 2012 quarterly RTM’s and GoLive CTP’s.
- Note – Upgrade is not currently listed as an install option in the help guidance for this feature, but it does exist. We are working to remedy this now.
- Note – Before running this configuration, you will need to ensure you have a current backup of your databases and then override ‘ConfirmBackup’ so that ‘ConfirmBackup=True.’ Otherwise, the configuration will not run. While the smart defaults in the configuration file for each type normally result in a successful configuration, it is important to examine the validity of each parameter in this file after it has been created. The smart default may not match the user’s expectation or intention. For some installation types, such as standard, additional information must always be entered by the user before the configuration file will run. To enter or overwrite parameter values, you can either specify inputs in the Create command or open and edit the configuration file after it has been created.
To specify inputs in the Create command, append the optional ‘/inputs:’ parameter to the end. Inputs are specified as
Here is an example command that utilizes the ‘/inputs:’ parameter:
tfsconfig unattend /create /type:standard /unattendfile:configstandard.ini
/inputs:UseWss=False;UseReporting=False
Note: It is not required to create a configuration file before running the command to configure a TFS instance. However, skipping to the Configure command requires knowledge of the specific installation type’s parameters and often their default values for the local machine. Thus, it is not advisable to skip the file creation step except for in very specific cases, like when revising or replicating a pre-existing machine configuration.
Editing the Configuration File
To edit the configuration file that resulted from the previous step, simply enter the name of the filepath into the command prompt. This will open the file in a text editor.
Below is an example of a file that was generated for a standard configuration. Since the file is named “create” and exists in the local directory, it was opened by entering **create.ini****into the command prompt.
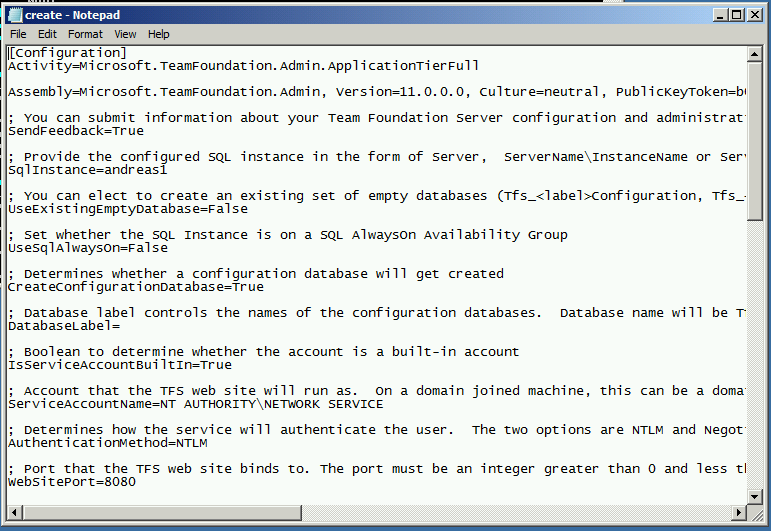
The lines with a leading semicolon are comments to help clarify the meaning of the parameter below it. Be sure to edit the line containing the parameter and not the comment. Once the desired changes are made, save the file and close it.
Running the Configuration
The final step of the unattended installation is to run the desired configuration on the machine. This process performs the same validation checks as the Configuration Wizard and then configures the specified TFS instance on the machine.
The Configure command can be run in two ways. The first option is to specify a configuration file. This uses the file that was created in the previous two steps and is the recommended way to run an unattended configuration. The other way is simply to specify a type of installation to run (in the same way that a user specifies a configuration file type in the Create command), with the option of specifying inputs to override the smart defaults. These options are mutually exclusive; you cannot specify both a file and a type.
The basic forms of the Configure command are:
:: Option 1
tfsconfig unattend /configure /unattendfile:
:: Option 2
tfsconfig unattend /configure /type:
Each parameter for the Configure command is explained in the table below.
Table of Configure Parameters
|
Command |
Behavior |
User Input |
Required? |
|
/unattendfile:, /type: |
Same behavior as in Create. Unattendfile: the path for the .ini input file. Type: The type of unattended configuration to run.
|
Specify a configuration file. Specify one of the possible types. |
Either the configuration file or the type is required, but only one may be specified. |
|
/inputs: |
Has the same syntax as in the Create command. When ‘/type’ is specified, allows override of smart defaults; when ‘/unattendfile’ is specified, overrides values in the file. |
|
Optional |
|
/verify |
Stops the process after the verification checks; does not configure |
No additional input |
Optional |
|
/continue |
Overrides the default behavior of stopping configuration on a warning until user presses ‘Enter.’ |
No additional input |
Optional (Has no effect when ‘/verify’ is also specified) |
Note: In cases where the user intends to run a configuration without creating a configuration file to manage the inputs, it is strongly recommended to run ‘/verify’ before proceeding with the full configuration.
Examples:
Below are two examples of valid configuration commands.
:: Example 1
:: Run readiness checks only on a configuration by type with 1 override
tfsconfig unattend /configure /type:atonly /inputs:UseSqlAlwaysOn=True /verify
:: After viewing results of the checks, run configuration straight through
tfsconfig unattend /configure /type:atonly /inputs:UseSqlAlwaysOn=True /continue
:: Example 2
:: “configureatonly.ini” has been made using “tfsconfig unattend /create…”
:: Basic command to run a configuration by file
tfsconfig unattend /configure /unattendfile:configureatonly.ini
Sample Output
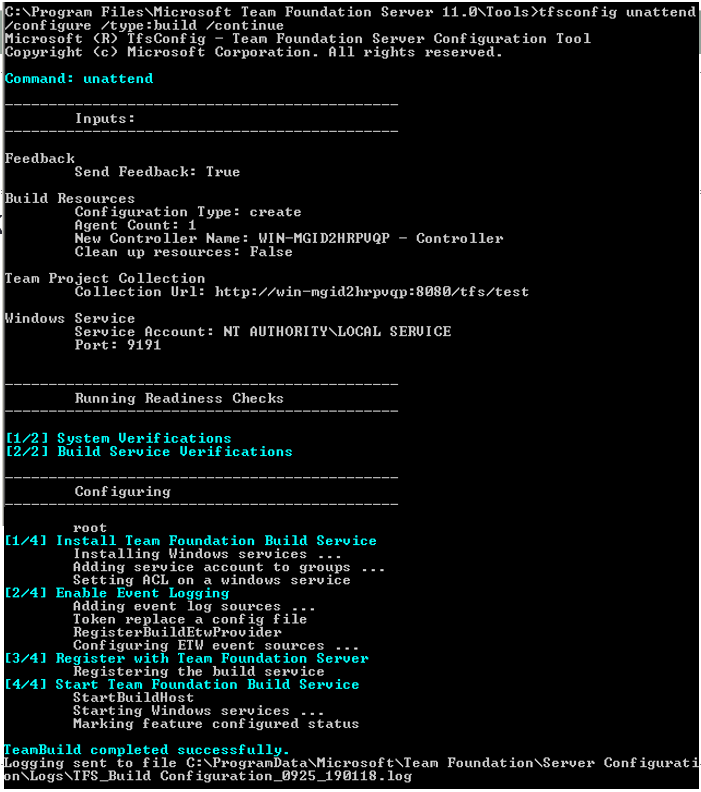
The screenshot below is sample output for a successful unattended Build configuration. Notice that the input parameters for the configuration are displayed on the screen as the command is run, followed by the readiness checks and the configuration steps. A final message is displayed at the bottom stating whether or not the configuration completed successfully, followed by the file path to the event log for the process.
If there had been any issues with the configuration process, warnings would be displayed in yellow and errors would be displayed in red. Warnings require the user’s approval to continue with configuration unless ‘/continue’ is specified. In the case that there are errors, configuration will not succeed.
Feature Limitations
There are a few scenarios that unattended installation does not currently support:
- Unattended install is only intended for use in on-premises scenarios. Although the Configuration Wizard can also install Build and Proxy instances that point to Azure databases, this functionality has not been implemented for the command line (there is no place to supply the Azure Cloud Storage account information).
- As stated above, the ‘standard’ and ‘spextensions’ processes do not install SharePoint automatically during unattended configuration. SharePoint must be installed separately using ‘spinstall’ before running these installations if it has not been installed already.
- Unattended install is available for Team Foundation Server Express; however, only the ‘build’ and ‘basic’ (where ‘SqlInstance=SqlExpress’) configuration types will succeed. Unattended install will block on configuration types that cannot be installed on the Express SKU, such as ‘spinstall,’ ‘spextensions,’ and ‘proxy,’ and will raise errors for the ‘atonly’ and ‘Standard’ configuration types, since TFS Express is only compatible with SQL Express.
- Reusing unattended configuration files across machines is not currently supported because configuration files use the machine name in certain default parameter values. It is a goal to improve this functionality in the future. In the meantime, users can write their own scripts to dynamically switch out the machine names in their configuration file to suit their needs.
Other Resources
Help Documentation
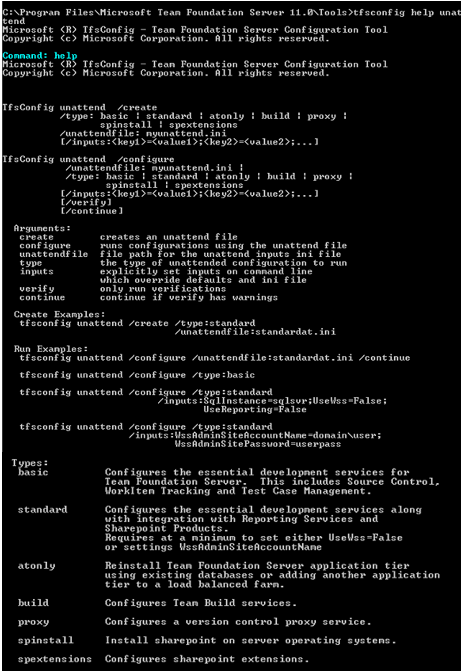
Most of the information covered in this whitepaper is summarized in TFSConfig Help for user reference. This Help documentation lists the commands necessary to run an unattended install and includes all required and optional parameters for these commands. It also provides example commands and a description of each of the supported installation types.
To access the Help documentation for this feature, navigate to the Tools folder in your TFS directory using the command prompt. If you installed Team Foundation Server to Program Files on your C: drive, the command will look like this:
cd C:ProgramFilesMicrosoft Team Foundation Server 11.0Tools
Once you have navigated to the appropriate location, type: tfsconfig help unattend
The following page contains a screenshot of the information that should appear.
Again, although not listed here as a valid type, unattended “upgrade” is also supported.
0 comments