This blog post shows how you can deploy an application from Visual Studio Team Services to Azure Virtual Machine Scale Set. An application running on a VM Scale Set is typically deployed in one of the two ways:
- Install new software on a platform image at deployment time by using VM extensions.
- Create a custom VM image that includes both the OS and the application in a single VHD
Creating a custom image approach, also known as immutable deployments has its advantages. It is predictable, as you are promoting the image which you have already tested. It is also easy to scale and makes rollback to a well-known previous state easier. Another important scenario is when you want to scale out, the VM extension based approach can result in a slow scale out because the extensions will run on a new VM each time it is created. If the scale set is based on a custom image, any new VM is a copy of the source custom image and the scale out will be faster as the prerequisites and application are already installed.
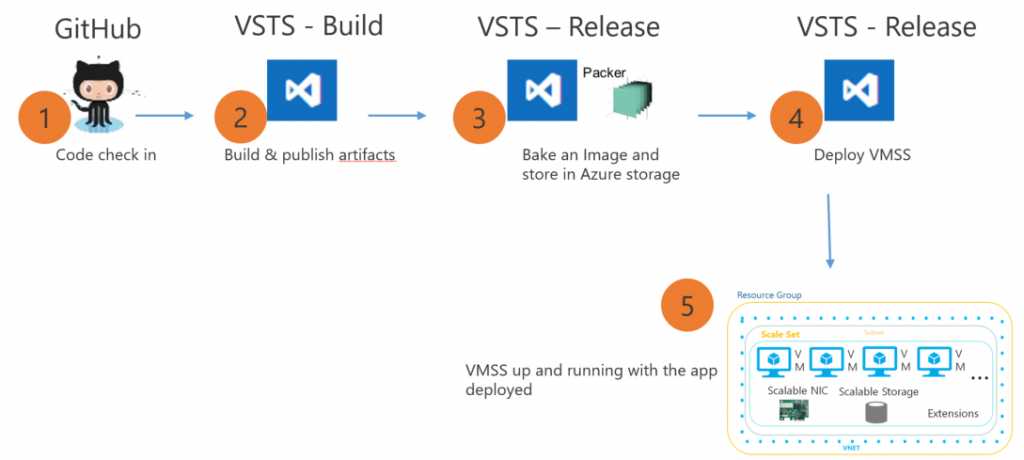
In this example, we will first build and test a NodeJs application and then use the new Build immutable machine image task to build custom Ubuntu 16.04 VHD image which has NGINX, PM2 and the NodeJs application installed and configured. This image can then be used for Azure Virtual Machine Scale Sets deployment.
Code
Download/fork our NodeJs sample app. Upload your code to Team Services or you’re on-premises Team Foundation Server: either push your code to Git or check in your code to TFVC.
Build
- Open your team project in your web browser
- Create a build definition (Build & Release tab > Builds)
- Click Empty to start with an empty definition.
- In the repository tab of build definition make sure the repository selected is the one where you pushed (Git) or checked in (TFVC) your code
On the Tasks or Build tab, add these steps.
| Package: npm install | Install your npm package dependencies.
For example, in case of sample app it will be NodejsWebApp1 |
| Build: Gulp | Transpiles typescript to JavaScript.
|
| Package: npm test | Test your application.
For example, in case of sample app it will be NodejsWebApp1 and a Mocha test will be run |
| Build: Publish Build Artifacts | Publish the build outputs.
|
Enable continuous integration (CI)
On the Triggers tab, enable Continuous integration (CI). This tells the system to queue a build whenever someone on your team commits or checks in new code.
Save, queue, and test the build
Save and queue the build. Once the build is done, click the link to the completed build (for example, Build 1634), click Artifacts, and then click Explore to see the files produced by the build.
Release
- Open the Releases tab of the Build & Release hub, open the + drop-down in the list of release definitions, and choose Create release definition with empty definition.
- Select the build definition you created earlier as the source of artifact to be deployed.
Now add these steps. Bake Immutable image for VMSS and Azure PowerShell. The Bake Immutable image for VMSS uses Packer to create a VHD. The whole bake process involves:
- Creating a new Virtual Machine with the selected base OS
- Installing all the prerequisites and application on the VM by using a deployment script
- Creating a VHD and storing it in the Azure storage account
- Deleting the new Virtual Machine which was created
| Bake Immutable image for VMSS |
|
| Azure PowerShell | This task will update the Virtual Machine Scale Set with the new VHD which was created.
# get the VMSS model $vmss = Get-AzureRmVmss -ResourceGroupName resource_group_name -VMScaleSetName VM_scale_set_name # set the new version in the model data $vmss.virtualMachineProfile.storageProfile.osDisk.image.uri=”$(bakedImageUrl)“ # update the virtual machine scale set model Update-AzureRmVmss -ResourceGroupName resource_group_name -Name resource_group_name -VirtualMachineScaleSet $vmss You can use variables to pass on the resource group and Virtual Machine Scale Set names. |
- Type a name for the new release definition and, optionally, change the name of the environment from Default Environment to Dev. Also, set the deployment condition on the environment to “Automatically start after release creation”.
- Save the new release definition. Create a new release and verify that the application has been deployed correctly.
Packer configuration template
The Bake immutable image for VMSS task makes it easy for users who are new to immutable VHD based deployments to use Packer without learning concepts like provisioners and builders. If you are deploying to Virtual Machines by using deployment scripts then you can try out this task and use it for either creating new Virtual Machine instances or creating/updating Virtual Machine Scale Sets.
The auto generate mode of the task generates the packer configuration with:
- Builder for Azure
- Provisioners depends on the type of base OS selected. For Linux, it is shell script and for Windows it is PowerShell script. The deployment script provided is used by the provisioner.
A custom packer configuration json can also be used.
Setup Continuous Delivery from Azure portal
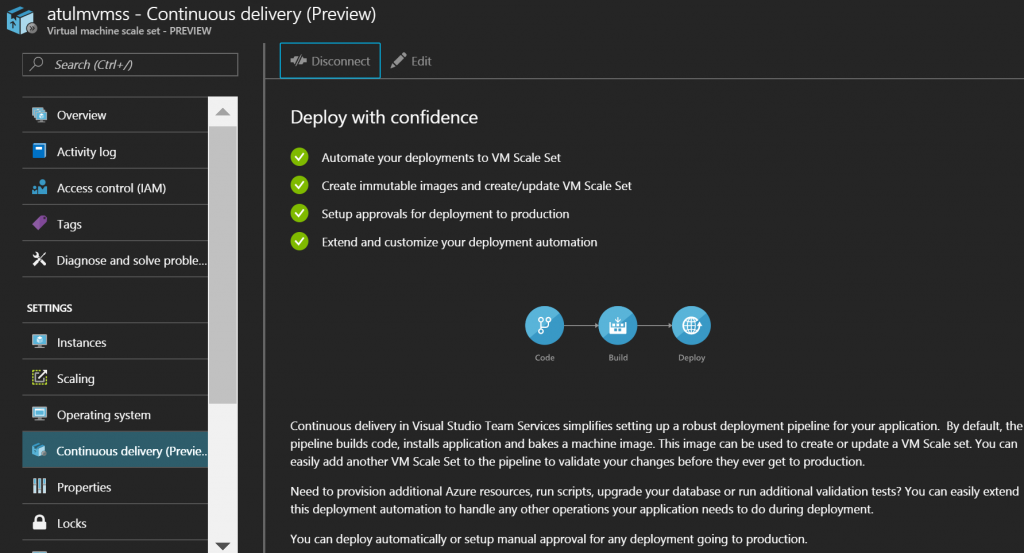
The entire build and release Continuous delivery can be setup from the Azure portal as well by using the Continuous Delivery option available in the Virtual Machine scale set blade.
There are few things you should keep in mind while setting immutable deployments. For example:
- The Azure storage account (which is used as VHD storage) should be in the same location as the VM Scale Set which will get updated by the generated image
- If the VM Scale set was created by using a platform image, then it cannot be updated by using Custom image.


Is there a way to make the immutable image build faster? When I tried, it took me for almost 20mins.
I’m looking for ways to add a power shell script file like deploy.ps1 to the webdeploy package produced by the Visual Studio Build task in devops pipeline. I need to specify a package script path powershell script.