
Let’s face it. Sometimes your Dev Box just… hangs around too long. Whether you’ve moved to a new project, left the company, want to create a new dev box with the latest tools, it’s time to clean things up. 🎯
With Dev Box Auto-Deletion now in public preview, offboarding just got a whole lot easier. Here’s everything you need to know to keep your environment tidy and your costs under control (without deleting anything you still need!).
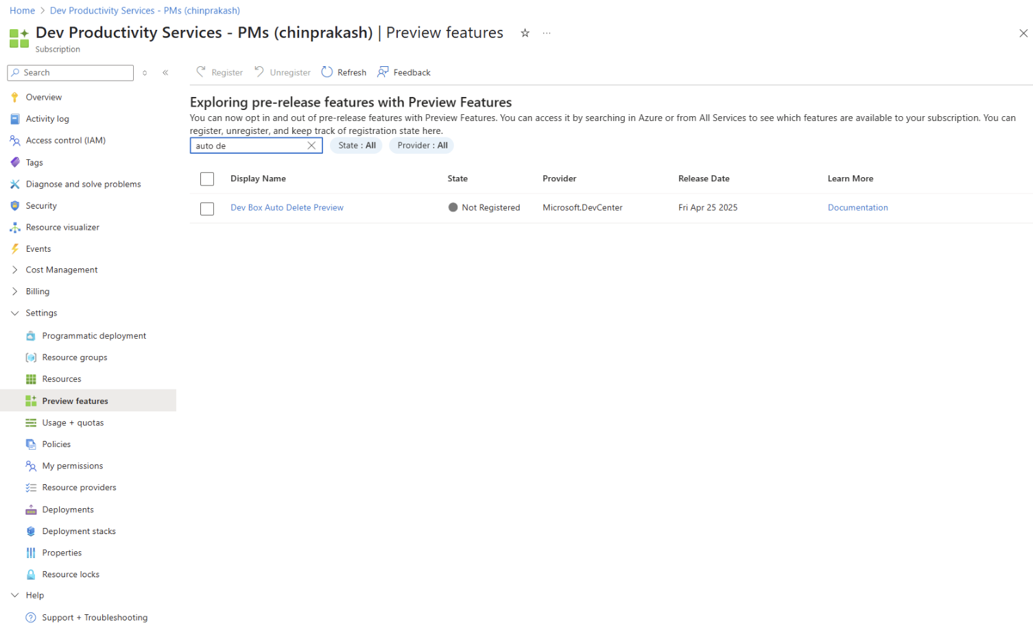
🚀 Step 1: Enable the Auto-Deletion Preview Feature
Before anything else, you need to register the preview feature in your Azure subscription:
- Head over to your Azure subscription.
- In the left-hand navigation, click Preview features.
- Search for auto delete.
- Find Dev Box Auto Delete Preview, click on it, and register.
✨ You’re now ready to get into the good stuff.
🧠 Step 2: Set Up Auto-Deletion in Your Project
In your Dev Box project, go to:
Settings > Dev box settings > Cost controls
Enable the checkbox: ✅ Automatically delete unused dev boxes
Then configure your cleanup rules:
- Inactivity threshold: The number of days a box can go unused without a remote desktop connection before it’s flagged for deletion.
- Grace period: The number of days the developer or admin has to respond before the box is deleted.
👉 Example: If both are set to 7 days, then on Day 8, a notification goes out, and the clock starts ticking for deletion until the end of the second 7 days.
Bonus tip: Want a custom number of days beyond the dropdown? Use the API for full control.
🛑 Step 3: Cancel Deletions (as an Admin)
Admins can step in to stop a deletion before it happens:
- Navigate to the Dev Box pool with the flagged box.
- Click the ellipses (…) next to the Dev Box.
- Select Cancel deletion.
This helps prevent accidental deletions for the wrong boxes or users.
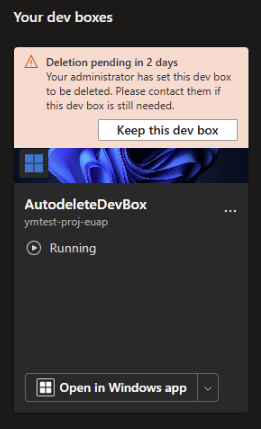
🙋 Step 4: Cancel Deletions (as a Developer)
Don’t panic when you see this in your email:
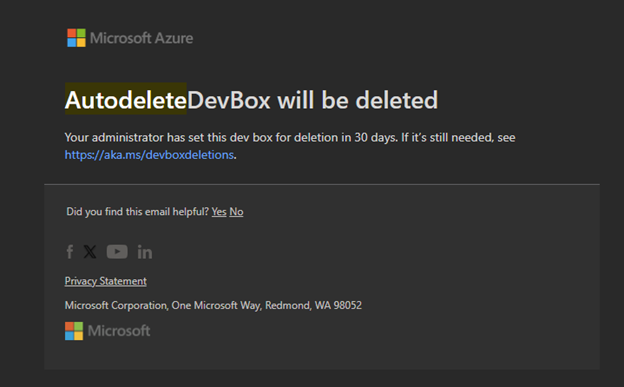
That’s your cue to take action. You’ll also receive an email letting you know your box is scheduled for deletion.
Just click Keep this dev box from the Dev Box Developer Portal to cancel the deletion and retain your environment.
🧼 Bonus: Admin-Initiated Deletion with Grace Period
Admins can also manually schedule individual Dev Boxes for deletion without relying on automatic inactivity rules.
- Navigate to the Dev Box pool.
- Click the ellipses (…) next to the Dev Box.
- Select Delete with grace period (recommended).
- Choose a custom deletion date within the grace period window.
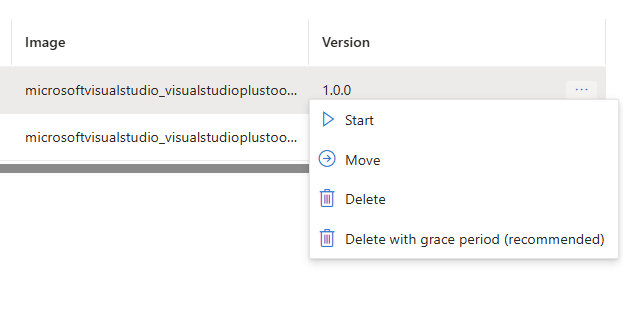
This option is perfect for offboarding developers during transitions, re-orgs, or departures—giving teams time to respond before the Dev Box is permanently deleted.
🎯 Why It Matters
The new offboarding flow helps teams:
- Reduce costs by automatically removing stale Dev Boxes
- Empower developers to keep the resources they still need
- Give admins flexibility and control over cleanup
- Prevent surprises through clear notifications
Clean Dev Boxes mean happier budgets and fewer headaches for everyone.
🙌 Keep the Feedback Coming
Have feedback or want to help shape what’s next? We’re listening. Drop your ideas and let’s improve Dev Box together. 💬
Interested in trying out Microsoft Dev Box? Start here!
0 comments