
Background
Classification of a photo using machine learning tools can be challenging. Over the last year, significant improvements in the algorithms that power these tools have dramatically improved their efficacy. Developers are now able to create state-of-the-art complex models using powerful tools like Microsoft Cognitive Toolkit, Tensorflow, Theano, Caffe, and others.
With just a few clicks and no custom code, you can easily build your own predictive model using CustomVision.ai, a new addition to Microsoft Cognitive Services. The Custom Vision Service makes image classification powered by Deep Neural Nets very accessible to developers. Let’s explore it!
Scenario
In our recent engagement with Vectorform, we built a simple Android application that allows a user to obtain a food’s nutritional values based on a photo of that food. To make this scenario simpler, we will assume that the target photo has either a single food item in it or that the user will indicate the food item in question.
The main functionality of the app (image recognition) is powered by Custom Vision, where we will detect what the item is: for example, an apple or a tomato. Once we know what the food is, our goal of finding nutritional info from publicly available services is easy.
What is Custom Vision Service?
To put it simply, Custom Vision is the younger sibling of Microsoft’s Computer Vision API with one big difference: in Custom Vision, you can fine-tune a predictive model to the dataset at hand (hence the “Custom” part). Custom Vision utilizes the concept of Transfer Learning, a method in which a powerful pre-trained model (ResNet, AlexNet) is taught to pay more attention to the distinctive features seen in user-provided dataset and classes.
Obtaining the data
Obtaining labeled data for our app took several hours. We wanted to use food pictures taken by real people (not stock photos) and to have 100-200 images per class. Flickr has quite a variety of client-side tools that allow image search and bulk download. Search results, however, were not 100% accurate and required a bit of cleanup (like removing a few photos of dogs and kids from a dataset representing the food class “cupcake”).
Once the data was downloaded (one image class per folder) it was split into train and test subsets. This is an optional step that you can take if you desire a more detailed evaluation of model performance.
We created the script prepareTrainTestImages.py to partition the data into 3/4 for training and 1/4 for testing.
Training the model
Now let’s go to CustomVision.ai and try training different food classification models. When doing this for the first time you may want to use this overview as a point of reference.
We will try building a few models, starting with a super simple model with 5 classes, then expanding the model to classify 14 types of food. Next, we will see if grouping the classes is helpful in improving prediction accuracy.
Tiny model
To get started, we’ll begin by classifying the following foods. For the purposes of this example, we’ll select foods that are visually distinct from each other:
- Apple
- Banana
- Cake
- Fries
- Sandwich
Creating a classification model in CSV is easy:
- Create a name for the project
- Create a new class and upload corresponding training images
- Repeat step #2 as needed
- Press the “Train” button
- Sit back and relax
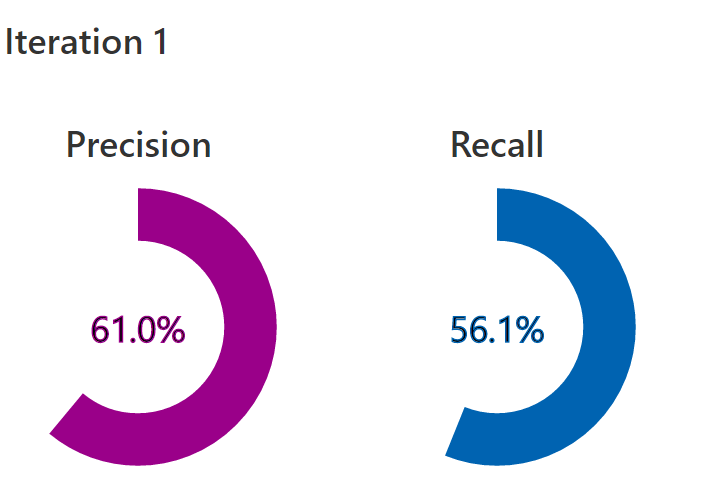
Once the model is trained, the statistics below are displayed in the Custom Vision portal for each iteration. We had pretty good model performance out of the box with both precision and recall exceeding 90%! Precision metrics tell us the percentage of correct predictions for a given image. Recall measures how much a classifier can detect (what percentage of the apples in the test were classified as such).
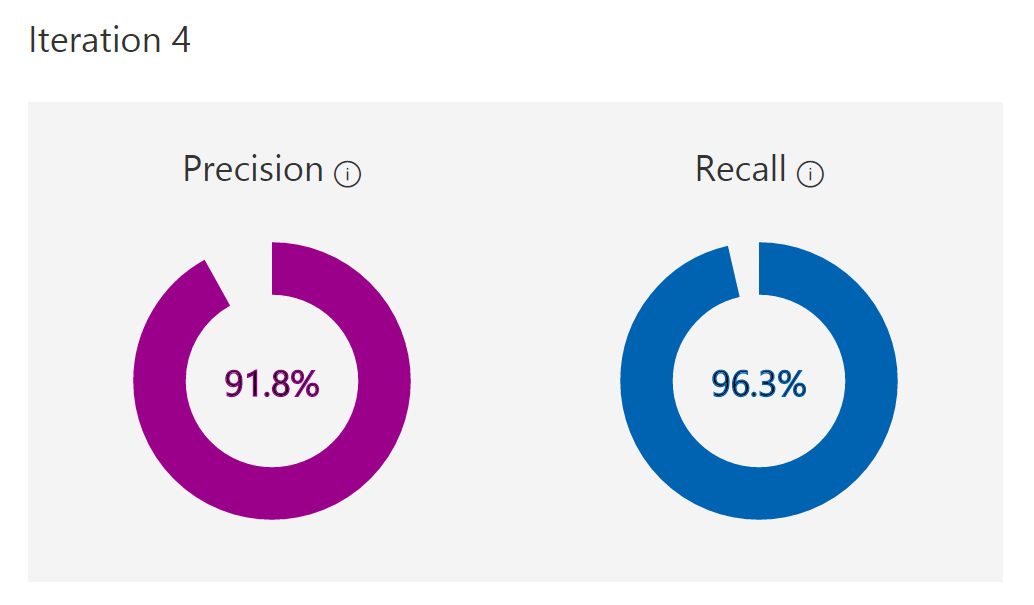
Custom Vision introduces a “Probability Threshold” slider (we used the default value of 90%) that is used to calculate Precision and Recall. When interpreting the predictions you get a probability per tag; for example, the probability that picture A contains an apple is 95%. If the probability threshold is 90%, then this example will be taken into consideration as a “correct prediction”. Depending on your application needs, you may want to set a higher/lower probability threshold.
By going to the “Training Images” tab, you can view the images that confused the model. Some “cake” samples below were incorrectly classified as “sandwich”. And honestly, they do resemble a sandwich a bit.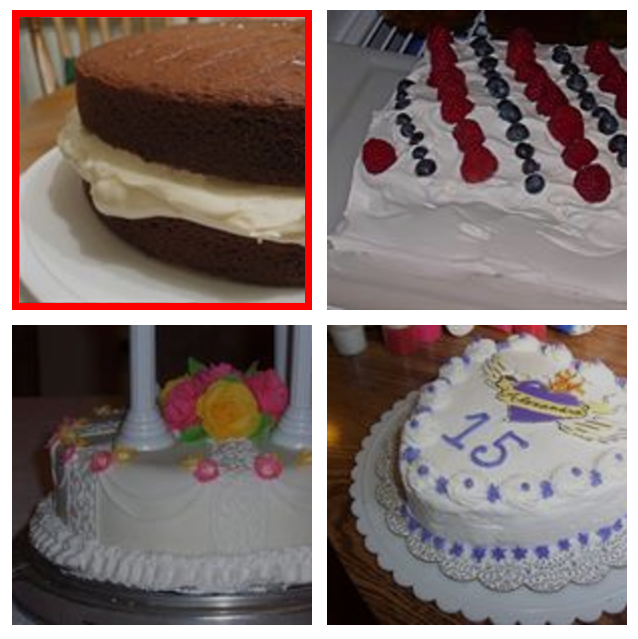
To get a more detailed analysis of how each class performs, we have created a script that will send test images to the model endpoint and evaluate results. See evalWebservice.py (in the GitHub repository).
The script expects a CSV file with two columns as input. Column 1 should have a path to test the image. Column 2 should have the name of a true class (matching the exact “tag” name in the Custom Vision UI). To run the script again, modify your endpoint/key accordingly.
Once the script is done testing the endpoint, the following table will display: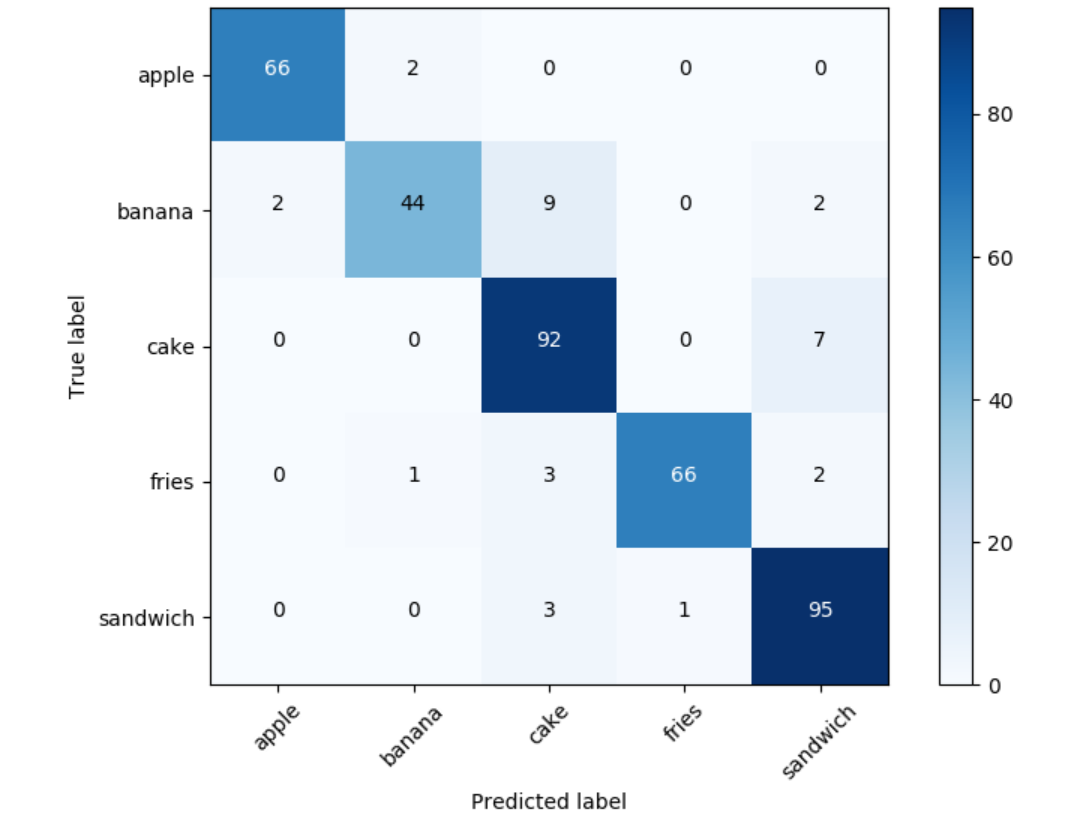
This visualization is called a Confusion Matrix; items on the diagonal are cases where the model’s prediction is correct (that is, 95 images were predicted to be sandwiches and they were in fact sandwiches). In our model, train and test images contain one type of food and when interpreting Custom Vision predictions and building Confusion Matrix we focus on the one with the highest probability.
The numbers that are off the main diagonal show where the model made classification mistakes. Nine bananas were incorrectly classified as cakes, and seven cakes as sandwiches. Those mistakes give us good insight that the color and the texture-rich variety of cakes make it quite complex for the model to learn the requisite class features; as a result, this class is easy to confuse with something else.
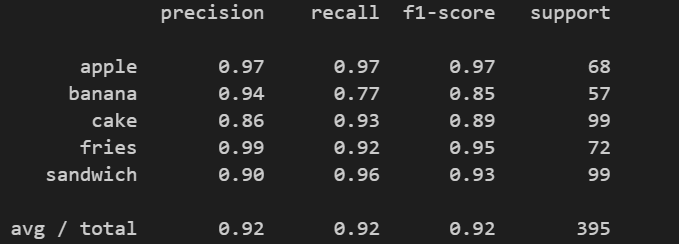
In this console output of evalWebservice.py, we see that “apples” are the most correctly predicted food (with high precision, high recall and thus high F1-score). “Cake” has the lowest precision: only 86% present of “cake” predictions were correct (comparing to the glorious 90%+ for other classes).
Bigger model
Our 5-class model did reasonably well and it took us only a few minutes to train! Most of the time was spent uploading the images.
If we expand the model, adding nine more food classes, let’s see what happens.
- Apple
- Banana
- Bell pepper (new)
- Burger (new)
- Cake
- Canned drinks (new)
- Cupcake (new)
- Fries
- Green salad (new)
- Ice cream (new)
- Onion (new)
- Pomegranate (new)
- Sandwich
- Tomato (new)
In our first iteration, we purposefully provided classes of food items with quite different appearances. Now, we will be providing some similar-looking foods to see how well the Custom Vision-based model can distinguish items like apples vs. tomatoes (both are round, shiny, often red objects), cakes vs. cupcakes vs. ice cream (colorful, varied textures), sandwiches vs. burgers (different types of bread/buns). Despite the variety of items this time, we’ll give Custom Vision only 100-300 training images per class. Again, our images are mostly amateur photography and of varied quality. For a very simple model, you could try an even smaller amount of training data.
Here are the results of training this model with 14 classes (ouch!):
As the classifier is shown a larger variety of classes (some of which are very tricky!) it starts making more mistakes.
Let’s look at the Confusion Matrix to understand where the classifier is making most of its mistakes.
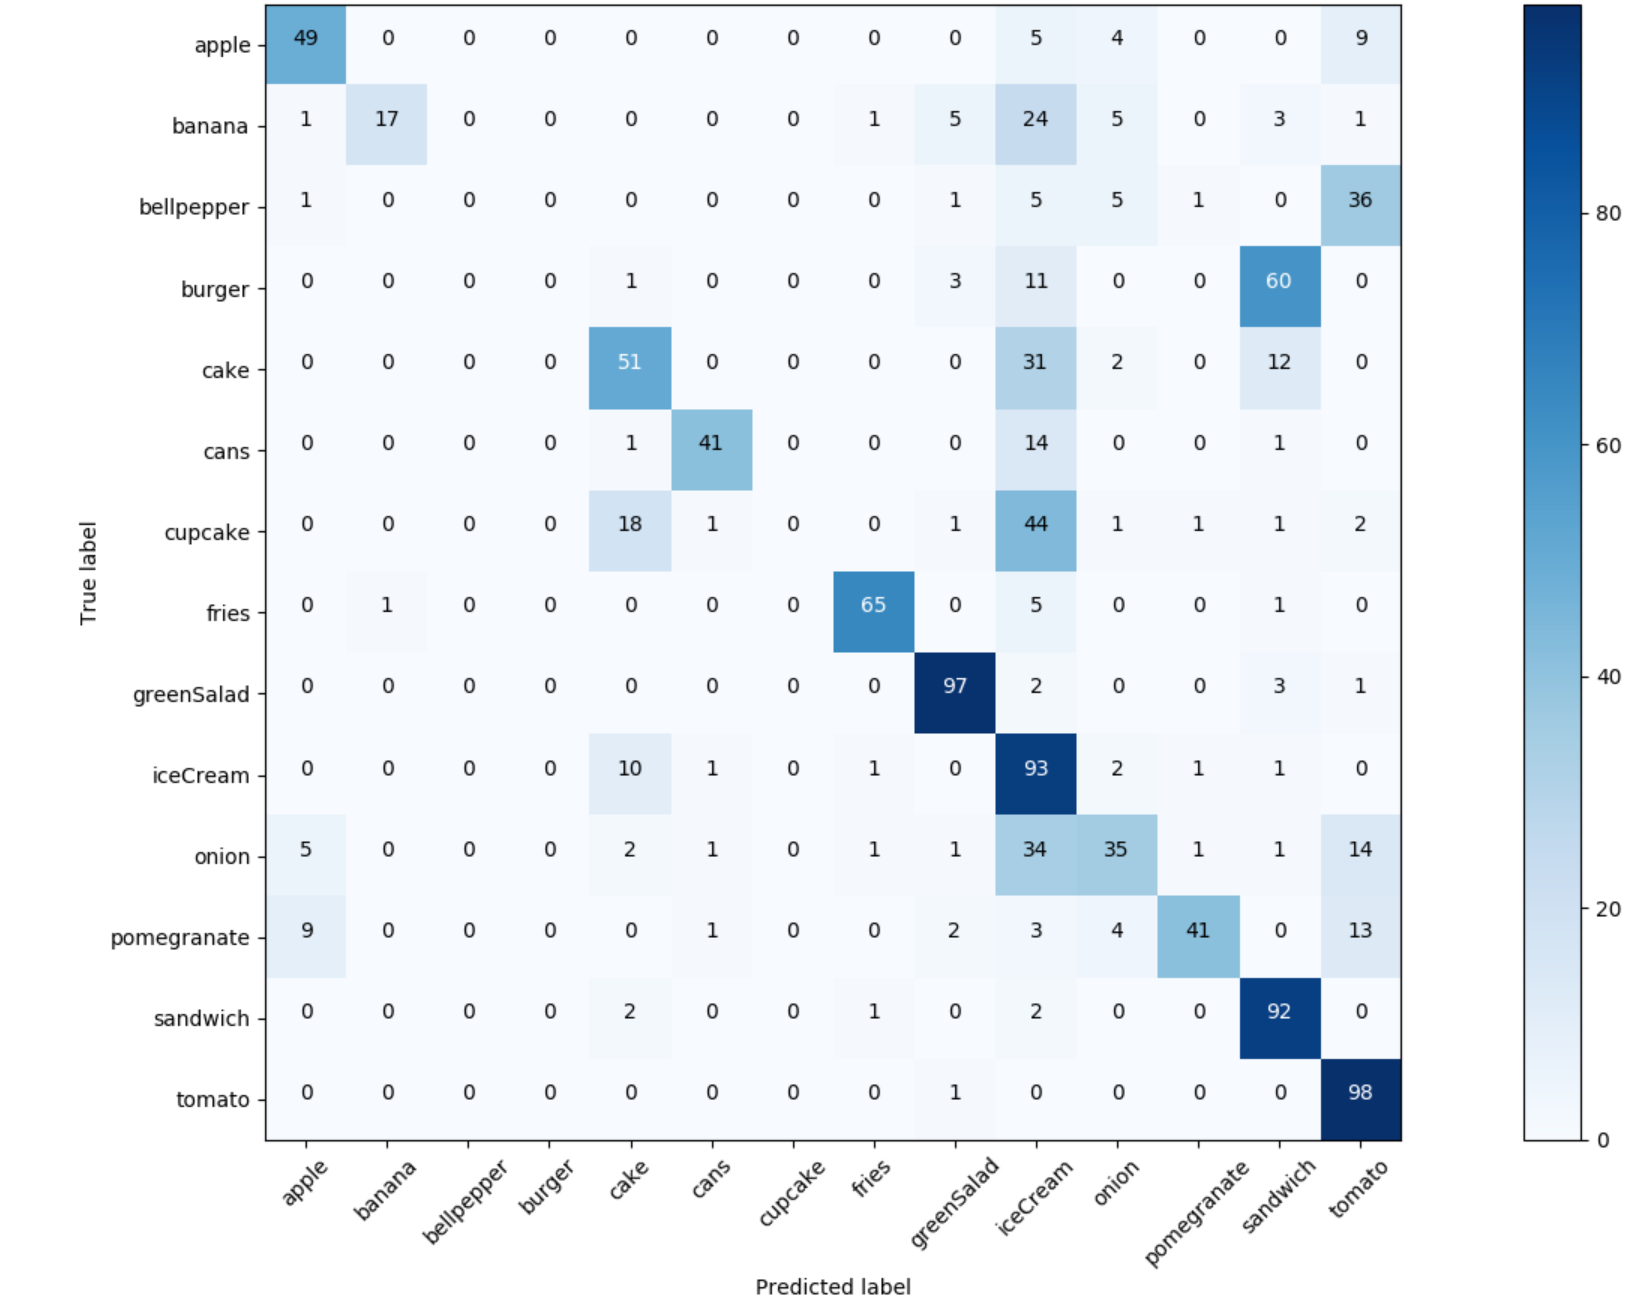
As we can see “tomato” has a splendid recall (out of 99 tomatoes in test set, 98 were correctly classified). However, the precision of the “tomato” class is damaged by the addition of “bellpepper”. A similar situation exists with “sandwich” and “burger”. “Fries”, “greenSalad” and “cans”, however, are performing quite well.
If we look at the columns of the Confusion Matrix we can see that the “iceCream” class is leading the board as the class that other items are most often confused with. We can see 24 bananas were incorrectly classified as “iceCream” (do we have lots of white-yellow ice cream in the training set?), as well as 31 cakes and 44 cupcakes (probably because cupcakes and ice cream cones often have similar swirly tops).
“Layered” Model
Now let’s deal with some of the problematic classes. We’ll do this by creating a layered model, in which we use two models to address the problematic classes.
We’ll let the uber-model determine if something falls into the general sandwich-burger food type. Then we’ll make an additional call to a specialized small model that was trained only on 2 classes: #1 Sandwich, and #2 Burger. We’ll do the same with the tomato-bell pepper case.
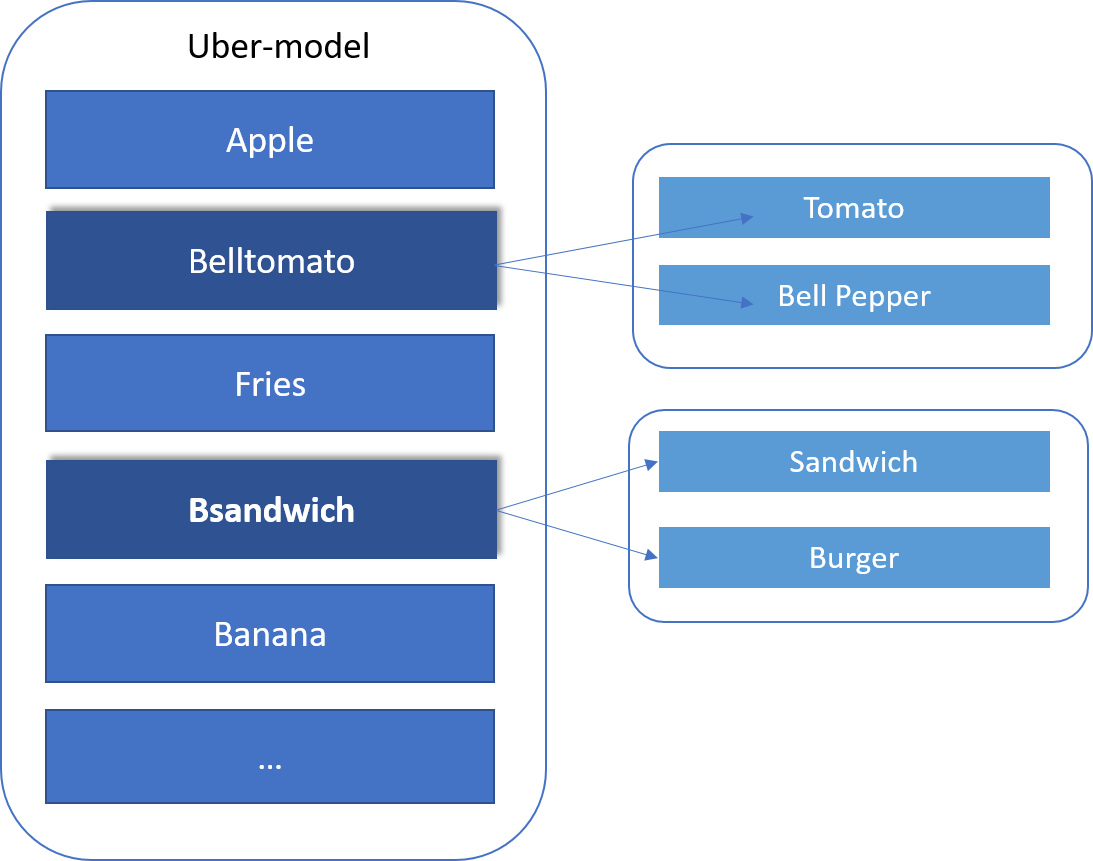
Let’s train the uber-model first (where we combined several foods together).
Note: we’re using the same train and test images, and just grouping them differently.
After training, we see a definite boost in overall Precision and Recall for the model: 8% in precision and 4.5% in the recall.
Now let’s train Layer 2 models for tomatoes vs. bell peppers and sandwiches vs. burgers and see how the classification performance is.
There is definitely an improvement!
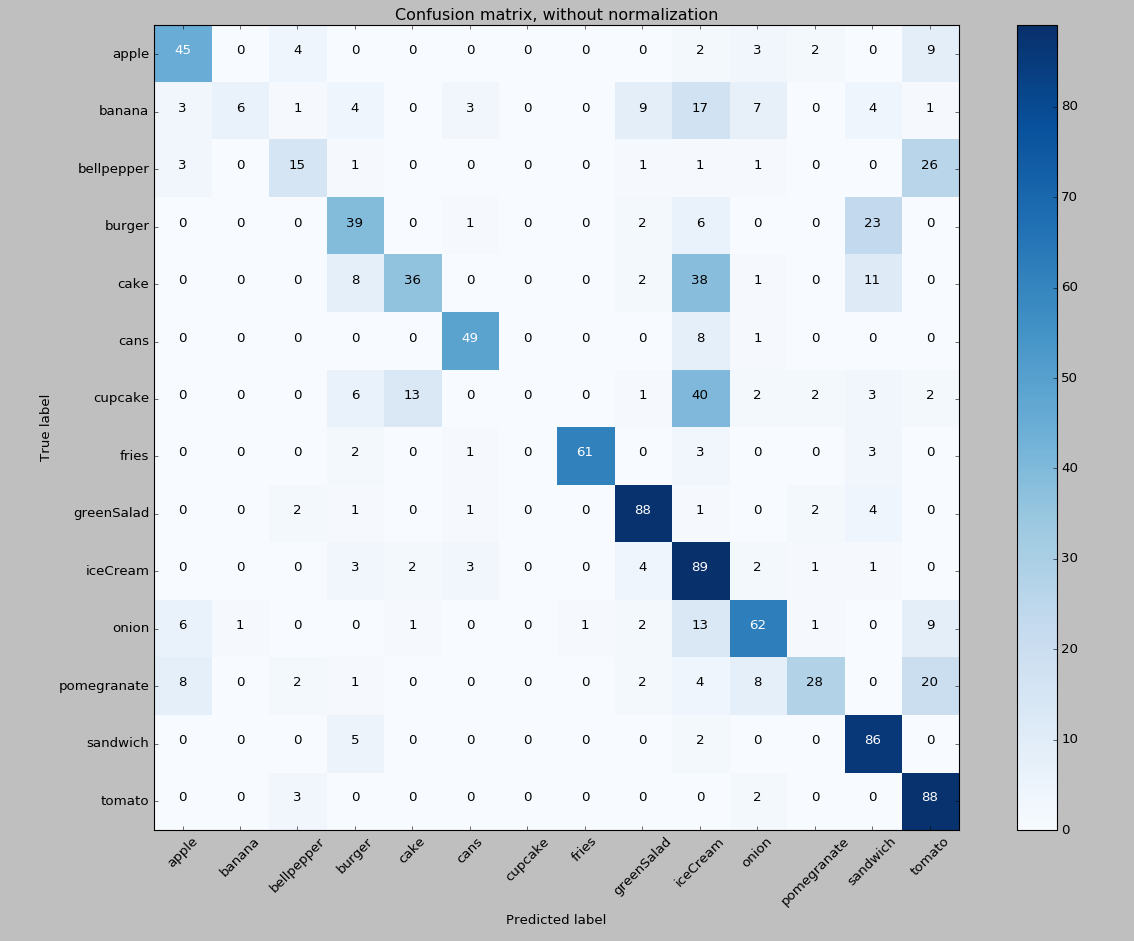
Previously, most of the bell peppers (36 out of 49) were classified as tomatoes and 0 bell peppers were classified correctly. In the layered model, we are starting to get correct predictions for bell peppers. It’s quite fascinating, especially if we remember that we’re training on the same set of images!
As an observation, since the uber-model in Layer 1 has combined the classes of tomatoes and bell peppers (mostly red, somewhat round, glossy objects), some of the “apples” started to get misclassified as the class “belltomato”. That’s understandable, as a red apple does look similar to a tomato. Adding more data to the classes or maybe creating a “belltomatapple” class may be helpful in the next iteration.
With sandwiches and burgers, there is also a positive trend. In the original iteration, zero burger predictions were made, and pretty much all burgers were incorrectly classified as sandwiches. In the layered model, we had 39 correct burger predictions.
A layered model approach is only one of many options to consider to improve model’s performance. Increasing the number of train images and further refinement of image quality are definitely worth trying as well.
Android App
To demonstrate the full power of the Custom Vision classification we built, we created a mobile application on Android that would capture a food-related image, hit our endpoint to determine what food is pictured in the image, use the Nutritionix service to get nutritional information about that food, then display the results to the user.
The app provides several ways to capture an image for use:
- Use an image URL
- Capture a photo with the phone’s camera
- Choose a photo from the phone’s gallery
Once we were done with adding support for classifying food items via the Custom Vision endpoint in the Android application, we used a nutrition API that provides relevant nutritional information about the image sent to the Custom Vision endpoint. In this demo, we leveraged the Nutritionix Nutrition API.

In the following sections, we will describe and show the code for the integration/consumption of the Custom Vision endpoint.
Code
Below is an example of how you can call Microsoft’s Custom Vision using Java on an Android app.
The snippet below requires an API endpoint from the Microsoft Custom Vision.
AndoridManifest.xml
Here we declare the required user permissions, application activities, and application services.
<?xml version="1.0" encoding="utf-8"?>
<manifest xmlns:android="http://schemas.android.com/apk/res/android"
    package="com.claudiusmbemba.irisdemo">

    <uses-feature
        android:name="android.hardware.camera"
        android:required="true" />

    <uses-permission android:name="android.permission.INTERNET" />
    <uses-permission android:name="android.permission.ACCESS_NETWORK_STATE" />
    <uses-permission android:name="android.permission.CAMERA" />
    <uses-permission android:name="android.permission.WRITE_EXTERNAL_STORAGE" />

    <application
        android:allowBackup="true"
        android:icon="@mipmap/ic_launcher"
        android:label="@string/app_name"
        android:roundIcon="@mipmap/ic_launcher_round"
        android:supportsRtl="true"
        android:theme="@style/AppTheme">
        <activity
            android:name=".MainActivity"
            android:label="@string/app_name"
            android:theme="@style/AppTheme.NoActionBar">
            <intent-filter>
                <action android:name="android.intent.action.MAIN" />

                <category android:name="android.intent.category.LAUNCHER" />
            </intent-filter>
        </activity>

        <service
            android:name=".services.IrisService"
            android:exported="false" />

        <activity android:name=".NutritionActivity" />

        <service
            android:name=".services.NutritionixService"
            android:exported="false" />
    </application>

</manifest>
Main.java
At the top of our Main file, we declare our Custom Vision endpoint as well as the Nutritionix endpoint (using a custom string formatter)
# Variable declarations
    ... (removed for brevity)
    //TODO: CHANGE ME!!
    private final String ENDPOINT = "your-cvs-endpoint-url";
    private final String NUTRI_ENDPOINT = "https://api.nutritionix.com/v1_1/search/%s";
    public static final String FOOD_RESULT = "FOOD_RESULT";
    public static final String NUTRITION_RESULT = "NUTRITION_RESULT";
    public static final String IRIS_REQUEST = "IRIS_REQUEST";
    ... (removed for brevity)
BroadcastReceivers
In order to get the results from our Async Background API calls, BroadcastReceivers are created and configured for each service (Custom Vision API & Nutritionix API).
private BroadcastReceiver irisReceiver = new BroadcastReceiver() {
@Override
public void onReceive(Context context, final Intent intent) {
runOnUiThread(new Runnable() {
@Override
public void run() {
if (intent.getExtras().containsKey(IrisService.IRIS_SERVICE_ERROR)) {
String msg = intent.getStringExtra(IrisService.IRIS_SERVICE_ERROR);
resultTV.setText(msg);
Toast.makeText(getApplicationContext(), msg, Toast.LENGTH_SHORT).show();
} else if (intent.getExtras().containsKey(IrisService.IRIS_SERVICE_PAYLOAD)) {
IrisData irisData = (IrisData) intent
.getParcelableExtra(IrisService.IRIS_SERVICE_PAYLOAD);
food_result = irisData.getClassifications().get(0);
clearText();
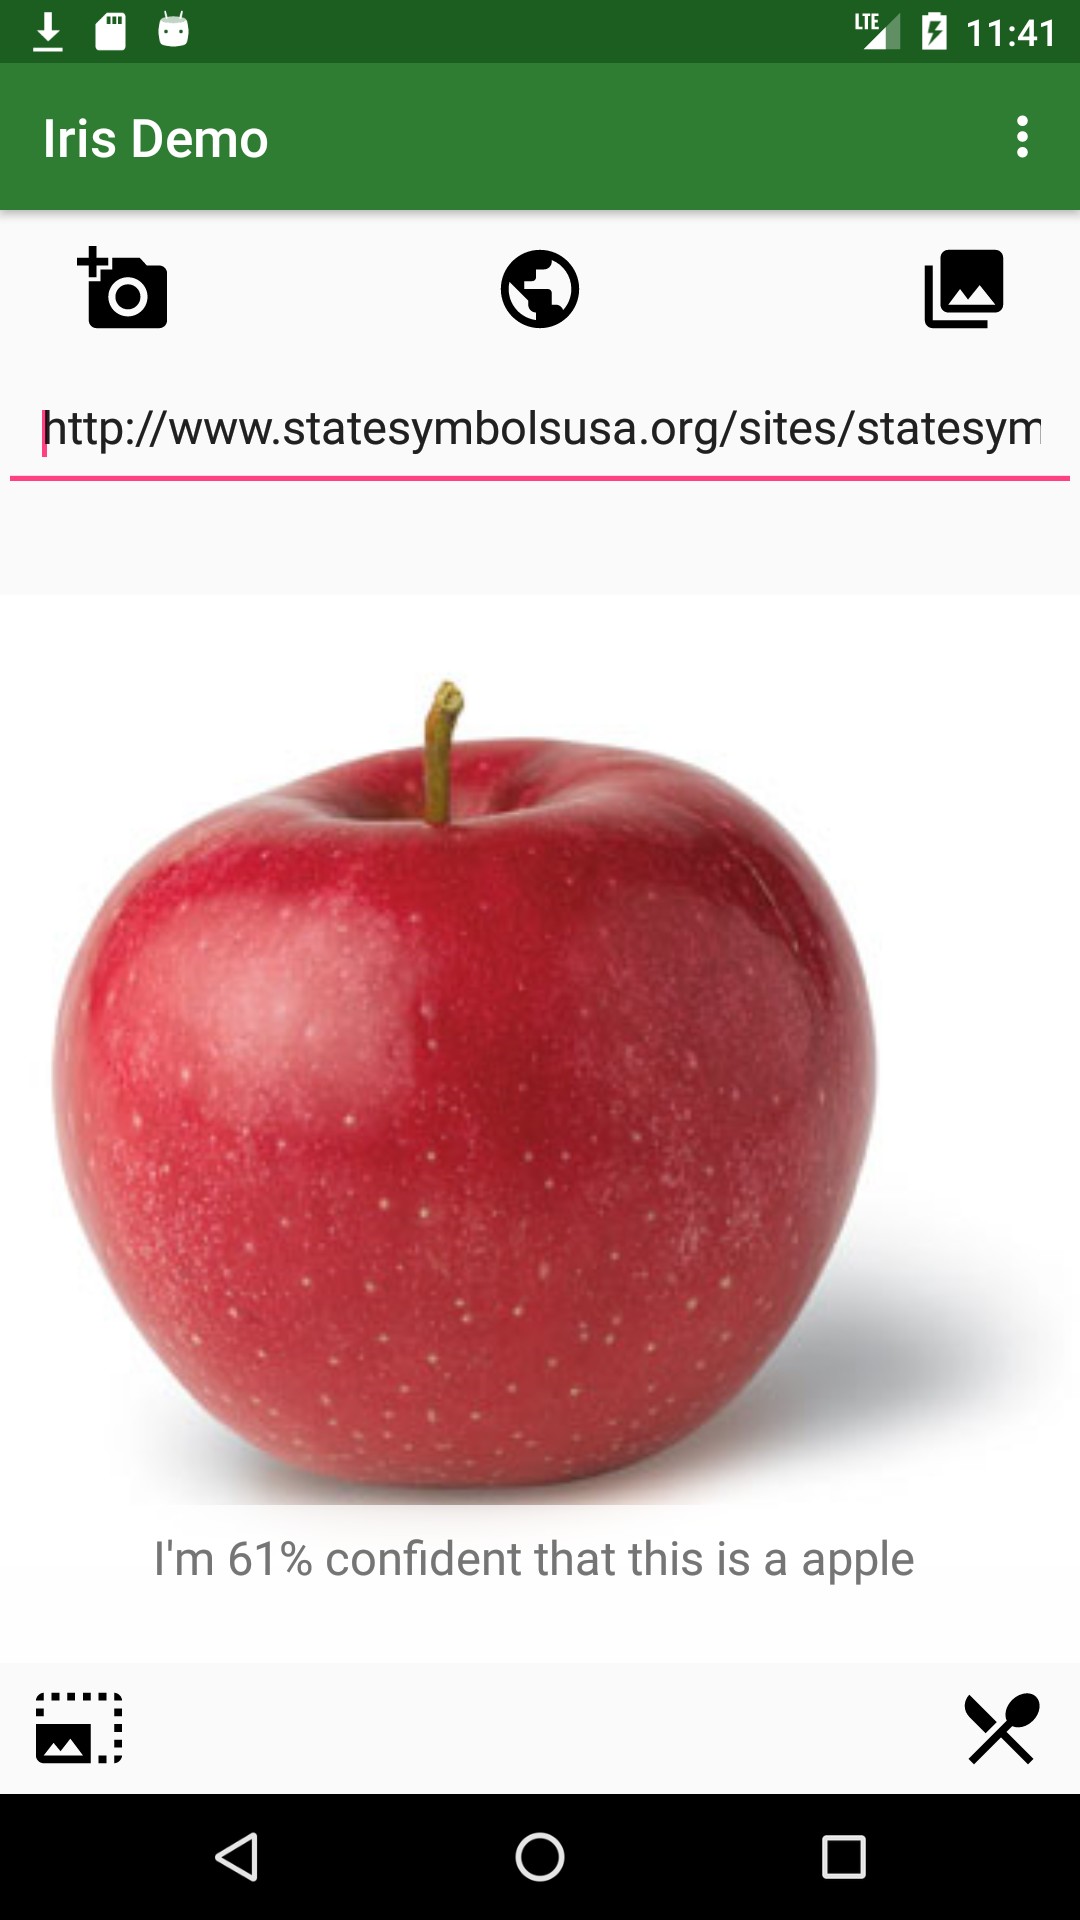
String msg = String.format("I'm %.0f%% confident that this is a %s \n", food_result.getProbability() * 100, food_result.getClass_());
resultTV.append(msg);
for (int i = 0; i < irisData.getClassifications().size(); i++) {
Log.i(TAG, "onReceive: " + irisData.getClassifications().get(i).getClass_());
}
requestNutritionInfo();
}
}
});
}
};
private BroadcastReceiver nutritionixReceiver = new BroadcastReceiver() {
@Override
public void onReceive(Context context, Intent intent) {
if (intent.getExtras().containsKey(NutritionixService.NUTRITION_SERVICE_ERROR)) {
String msg = intent.getStringExtra(NutritionixService.NUTRITION_SERVICE_ERROR);
Toast.makeText(getApplicationContext(), msg, Toast.LENGTH_SHORT).show();
} else if (intent.getExtras().containsKey(NutritionixService.NUTRITION_SERVICE_PAYLOAD)) {
NutritionixData results = (NutritionixData) intent.getParcelableExtra(NutritionixService.NUTRITION_SERVICE_PAYLOAD);
nutritionixHit = results.getHits().get(0);
nutritionButton.setEnabled(true);
}
}
};
Hitting the Custom Vision Endpoint
In order to call the Custom Vision Endpoint, we build a RequestPackage either with the image URL provided or the device image, converted to a byteArray, and then set the request method to “POST”.
After packaging that RequestPackage object into our intent, which we constructed from the Custom Vision Class (IrisService.class), we can then start the service. When the result from that API call is returned, it will be received by the irisReceiver BroadcastReceiver mentioned above.
  private void requestIrisService(final String type) {

        final Bitmap croppedImage = image.getCroppedImage();

        AsyncTask.execute(new Runnable() {
            @Override
            public void run() {
                RequestPackage requestPackage = new RequestPackage();
                Intent intent = new Intent(MainActivity.this, IrisService.class);
                requestPackage.setParam(IRIS_REQUEST, "IRIS");

                if (type.equals(URL)) {
                    requestPackage.setEndPoint(String.format(ENDPOINT, URL));
                    requestPackage.setParam("Url", urlText.getText().toString());
                } else if (type.equals(IMAGE)) {
                    ByteArrayOutputStream stream = new ByteArrayOutputStream();
                    croppedImage.compress(Bitmap.CompressFormat.JPEG, 50, stream);
                    byte[] byteArray = stream.toByteArray();
                    Log.d(TAG, "requestIrisService: byte array size = " + byteArray.length);
                    requestPackage.setEndPoint(String.format(ENDPOINT, IMAGE));
                    intent.putExtra(IrisService.REQUEST_IMAGE, byteArray);
                }

                requestPackage.setMethod("POST");
                intent.putExtra(IrisService.REQUEST_PACKAGE, requestPackage);

                try {
                    startService(intent);
                } catch (Exception e) {
                    runOnUiThread(new Runnable() {
                        @Override
                        public void run() {
                            resultTV.setVisibility(View.GONE);
                            Toast.makeText(getApplicationContext(), "Image too large.", Toast.LENGTH_LONG).show();
                        }
                    });

                    e.printStackTrace();
                }
            }
        });
    }
Helpers/HttpHelper.java
Making the Http Request
The static helper method makeRequest() below is called by the service class IrisService.class. It passes in the RequestPackage mentioned above and an optional InputStream (if using an image).
In order to successfully make the HTTP request, an OkHttpClient client object is constructed and a Request.Builder is configured with the Custom Vision predictionKey passed as a request header. Then, the client is used to execute the request. Eventually, it returns a successful stringified response body or throws a caught error if something went wrong.
public static String makeRequest(RequestPackage requestPackage, InputStream data)
            throws Exception {

        String address = requestPackage.getEndpoint();

        OkHttpClient client = new OkHttpClient();

        Request.Builder requestBuilder = new Request.Builder();

        iris = (requestPackage.getParams().containsKey(MainActivity.IRIS_REQUEST)) ? true : false;

        if (requestPackage.getMethod().equals("POST")) {
            RequestBody requestBody = null;
            if (iris) {
                //TODO: CHANGE ME!!
                requestBuilder.addHeader("Prediction-Key","a5427...");
                if (requestPackage.getParams().containsKey("Url")) {
                    requestBuilder.addHeader("Content-Type","application/json");
                    JSONObject json = new JSONObject(requestPackage.getParams());
                    requestBody = RequestBody.create(MediaType.parse("application/json; charset=utf-8"), String.valueOf(json));
                } else {
                    if (data != null) {
                        requestBuilder.addHeader("Content-Type","application/octet-stream");
                        requestBody = RequestBodyUtil.create(MediaType.parse("application/octet-stream; charset=utf-8"), data);
                    } else {
                        throw new Exception("No image data found");
                    }
                }
            } else {
                MultipartBody.Builder builder = new MultipartBody.Builder()
                        .setType(MultipartBody.FORM);
                Map<String, String> params = requestPackage.getParams();
                for (String key : params.keySet()) {
                    builder.addFormDataPart(key, params.get(key));
                }
                requestBody = builder.build();
            }
            requestBuilder.method("POST", requestBody);
        } else if (requestPackage.getMethod().equals("GET")) {
            address = String.format("%s?%s", address, requestPackage.getEncodedParams());
        }

        requestBuilder.url(address);

        Request request = requestBuilder.build();
        Response response = client.newCall(request).execute();
        if (response.isSuccessful()) {
            return response.body().string();
        } else {
            throw new IOException("Exception: response code " + response.code());
        }
    }
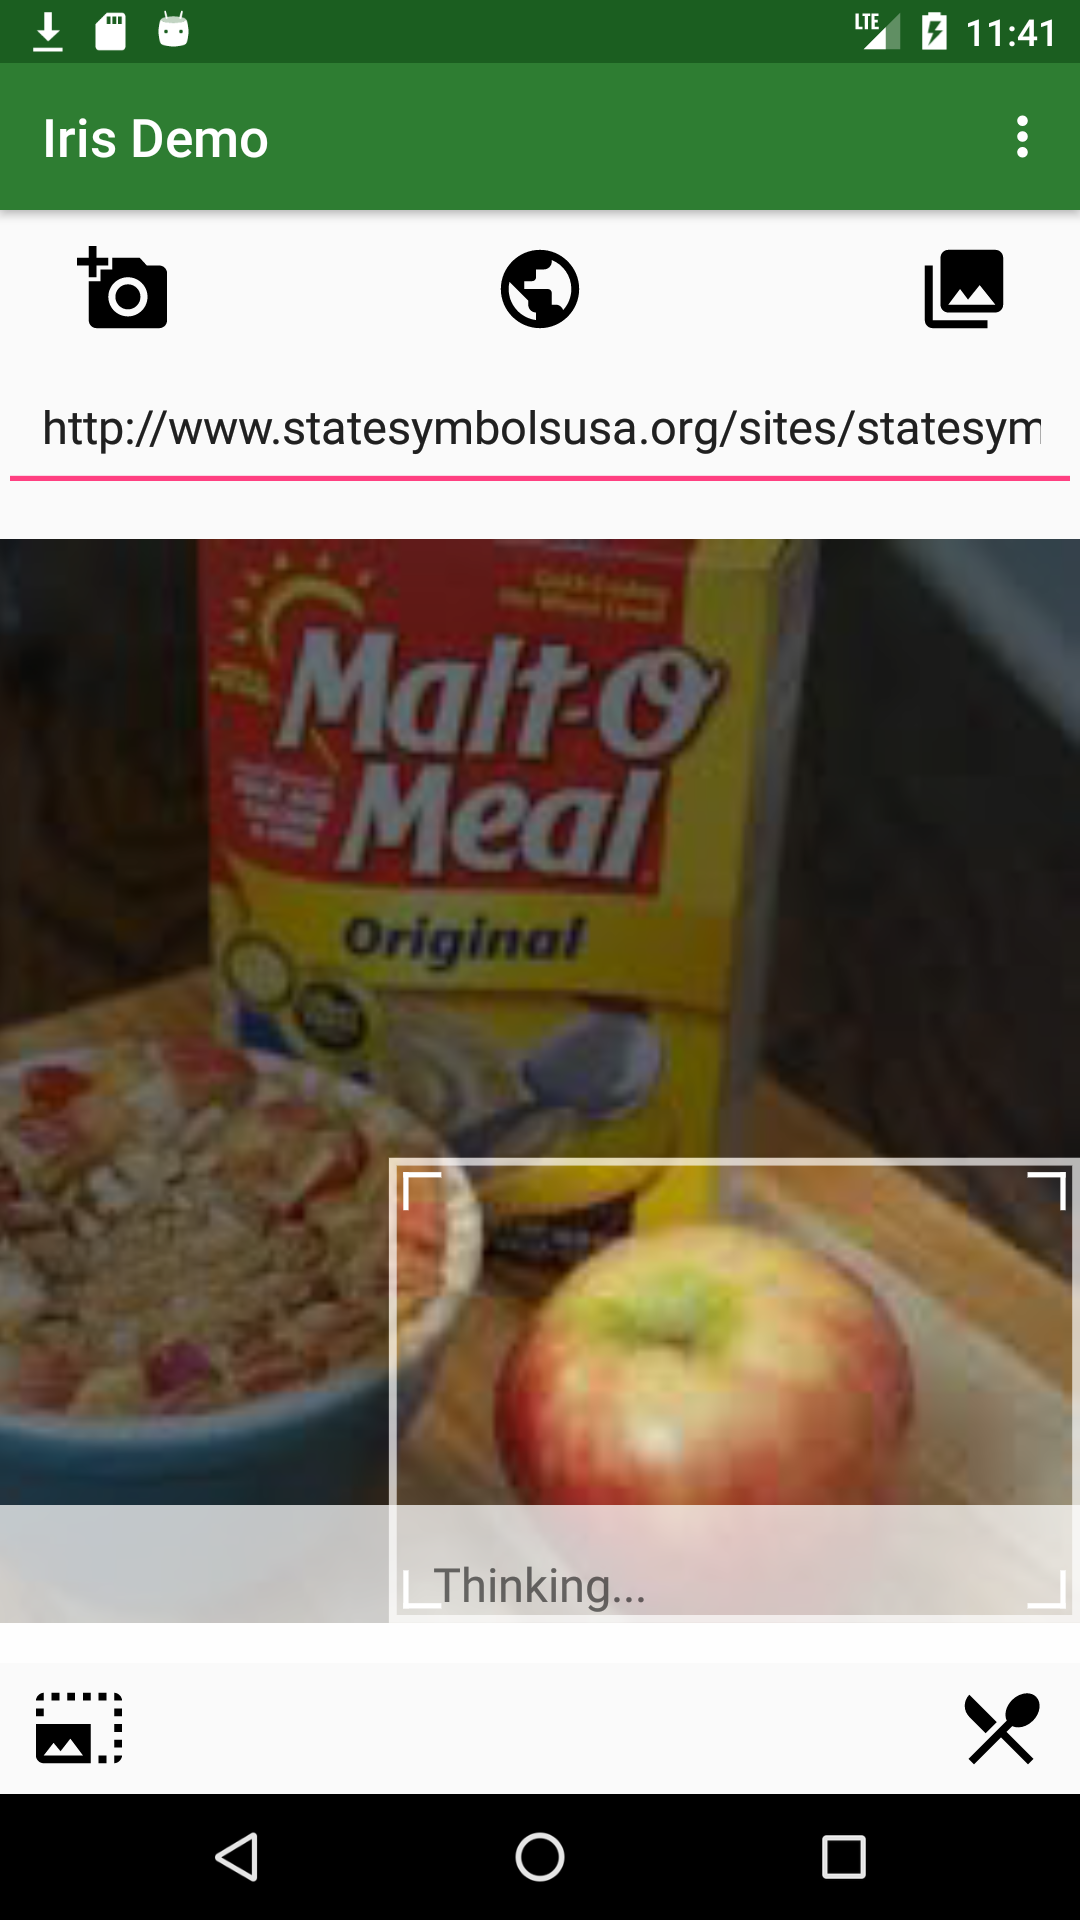
Screenshots

Conclusions
Custom Vision Service brings domain-specific Deep Neural Network-powered image recognition to your fingertips. Building a quick proof of concept app with a handful of classes is very simple. You can also easily make a prediction endpoint to experiment with, which works well in domains where the number of classes is finite and the visual appearances of those classes are distinct. Simplicity comes with a cost, however, as you can customize the training data, but not the algorithms. Additionally, as we’ve seen in this post, closely related classes need to be specifically addressed with techniques like layered models.
Nevertheless, Custom Vision is suitable for a broad range of domains. For example, you could use this technique to detect items in a customer’s online cart, recognize UI elements, pre-filter images into categories to simplify further analyses, and so on.
Additional Information
The code for this example is available in our GitHub repository.
Custom Vision Service official documentation, overview and tutorials are here.
Cover image from Unsplash, used under CC0 license.
0 comments