


You just created a Cosmos DB account. The portal handed you two keys and a connection string, it worked, and you moved on. That’s what most developers do, and it causes problems later.
This post is a guide for developers launching a new Cosmos DB app who want a secure default setup without enterprise-grade complexity. It focuses on the decisions that matter on day one.
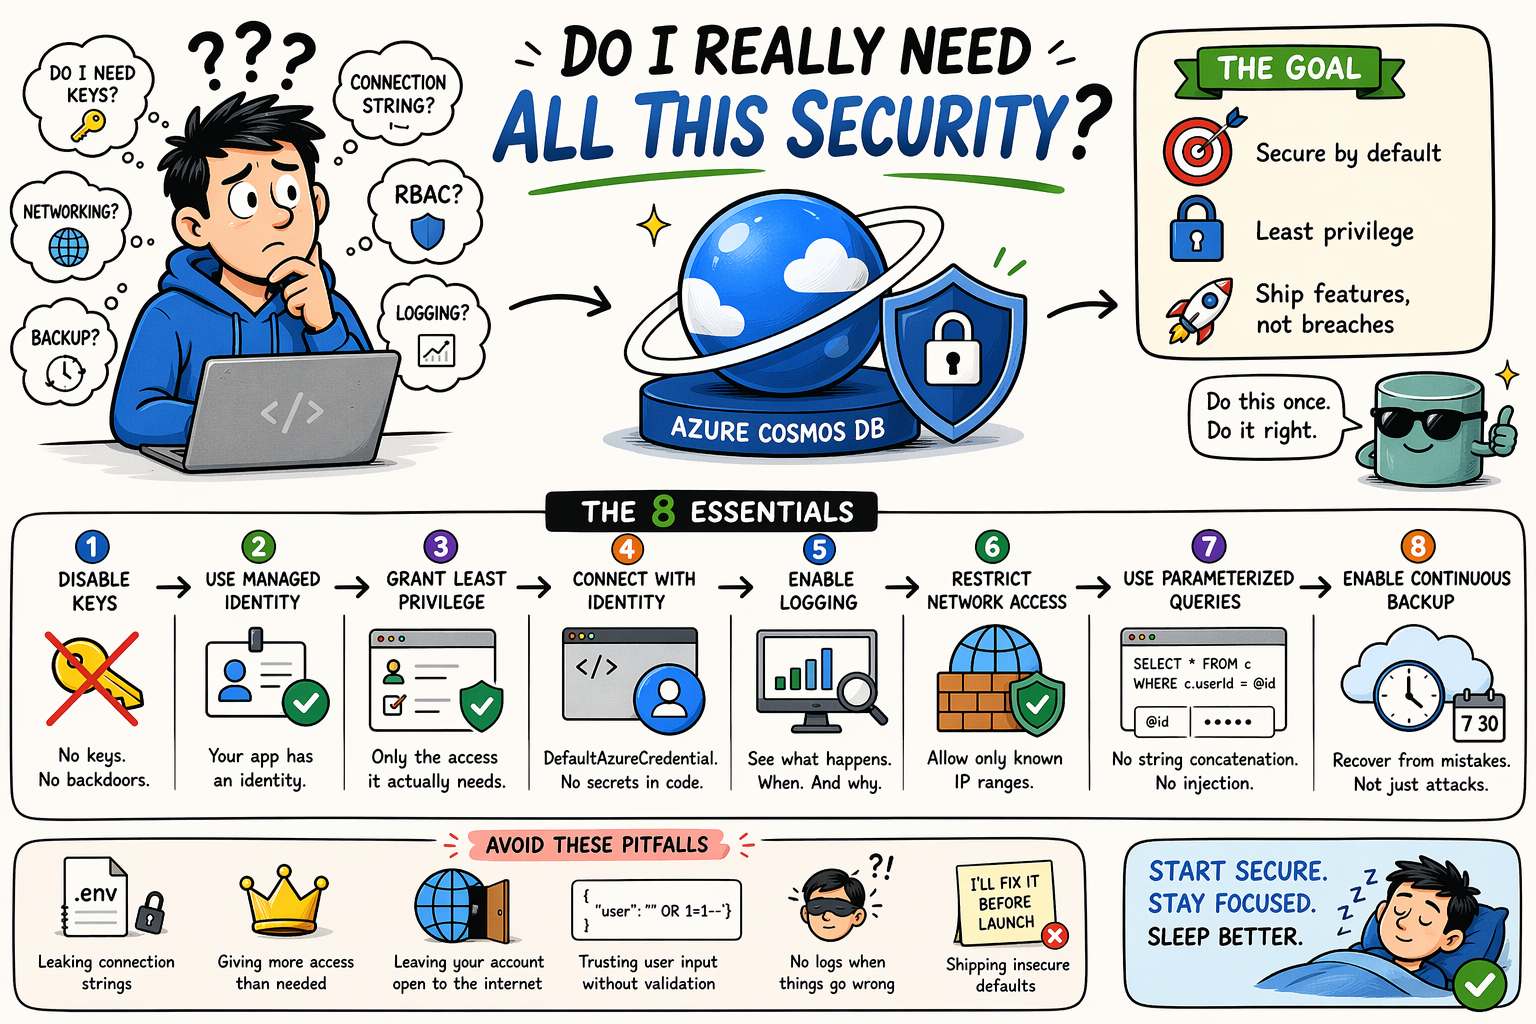
The honest two-minute threat model
Before diving into setup, it is worth noting what actually goes wrong in real apps.
Most security issues in any workload are not advanced attacks. There are simple mistakes that create unnecessary risks.
- Accidentally leaking your connection string in a
.envfile, logs, screenshots, or pull requests. - Giving your app more access than it needs, increasing the blast radius when something goes wrong.
- Leaving your account open to the internet: a Cosmos DB endpoint with no network restrictions is reachable from anywhere. If a credential leaks, nothing stands between an attacker and your data.
- Trusting data from clients without validating it: Cosmos DB NoSQL accepts any JSON. Your app is the only barrier between user input and your database. Unsanitized queries, unbounded document sizes, and injection-friendly string concatenation are risks you have to handle.
- Flying blind after a breach: if audit logs are not enabled before something goes wrong, you can’t determine what was accessed, when, or by whom. Without logs investigation becomes guesswork.
- Making assumptions in development that you carry into production: the “I’ll fix it before launch” config that ships unchanged.
Two things to understand first
Before you configure anything, there are two concepts that shape how your Cosmos DB security model works.
- Keys or Entra ID?
When you create a Cosmos DB account, you get two primary and secondary key pairs. They work immediately, they’re simple, and almost every tutorial uses them. That simplicity is also the problem.
Keys are bearer tokens. Anyone who has one can read, modify, or delete your data. With diagnostic logging enabled, you can see what happened, when it happened, and details such as IP and user agent, but shared keys don’t give you reliable identity attribution for who used the key. If a key leaks, the only option is to regenerate it and update every system that depends on it, which is painful, error-prone, and often incomplete.
Entra ID (formerly Azure AD) is the alternative. Instead of a key, your app gets an identity (a managed identity or service principal), and you grant that identity specific permissions. Access can be scoped, audited, and revoked without rotating secrets across your systems.
Recommendation: start with Entra ID from day one, even in development. The initial setup is minimal and avoids an entire class of risk.
- What should my app actually be able to do?
Cosmos DB has two kinds of access:
| Layer | What it controls | Managed by |
| Control plane | Create/delete accounts, databases, containers; change settings | Azure RBAC (via IAM) |
| Data plane | Read, write, query, delete documents | Cosmos DB RBAC (built-in data roles) |
Most developers only think about data plane access: can my app read and write data? But you also need to think about whether your app (or your CI/CD pipeline, or your teammates) should be able to change the account itself.
For a typical app:
- Your application should only have data plane access, with the minimum role it needs (reader vs. contributor, scoped to the right database or container).
- Developers should have data plane access for local development, ideally scoped narrowly.
- CI/CD pipeline should have only the permissions required to deploy, often just data plane write access, sometimes control plane for schema/container management.
Each identity should have its own access. Avoid sharing a single connection string or credential across users, environments, or systems.
The minimum viable security setup
Here’s what to configure before you write a single line of business logic.
Step 1: Disable local authentication (keys)
Yes, do this even in development. It forces the right authentication mode from the start.
In the Azure CLI, run the following command:
az cosmosdb update --name <your-account> --resource-group <your-rg> --disable-local-auth trueOnce disabled, keys no longer work and all access requires an Entra ID identity. This prevents anyone, including you, from accidentally using a key.
If you’re not ready to do this yet, at minimum, do not store your connection strings in source control. Use environment variables, or a secure store such as Azure Key Vault. Use tools that scan repos for leaked secrets.
Step 2: Create a managed identity for your app
If your app runs in Azure (App Service, Functions, Container Apps, AKS, or similar), assign it a system-assigned managed identity. This avoids managing credentials directly, and Azure handles rotation automatically.
For App Service:
az webapp identity assign --name <your-app> --resource-group <your-rg>This returns a principalId. Copy it; you’ll use it in the next step.
For local development, use your developer identity via az login or a user-assigned managed identity. The DefaultAzureCredential class in the Azure SDK handles both scenarios.
Step 3: Assign the right Cosmos DB RBAC role
Grant your app only the permissions it needs using data plane roles.
| Role | ID | Can do |
| Cosmos DB Built-in Data Reader | 00000000-0000-0000-0000-000000000001 |
Read documents and metadata |
| Cosmos DB Built-in Data Contributor | 00000000-0000-0000-0000-000000000002 |
Read + write + delete documents |
Grant your app’s managed identity the appropriate role:
az cosmosdb sql role assignment create \
--account-name <your-account> \
--resource-group <your-rg> \
--role-definition-id "00000000-0000-0000-0000-000000000002" \
--principal-id <your-apps-principal-id> \
--scope "/"
--scope "/" grants access to the entire account. To scope narrower, use "/dbs/<database>" or "/dbs/<database>/colls/<container>". Scope as narrowly as your app actually needs.
Step 4: Connect your app using identity, not keys
Update your application code to authenticate using managed identity. The pattern is the same whether you’re using C#, Python, JavaScript, or Java:
C# (.NET):
using Azure.Identity;
using Microsoft.Azure.Cosmos;

var client = new CosmosClient(
    accountEndpoint: "https://<your-account>.documents.azure.com:443/",
    tokenCredential: new DefaultAzureCredential()
);
DefaultAzureCredential works everywhere: local dev uses your az login session, Azure uses the managed identity, CI/CD uses a service principal or federated identity. Same code, and in the best setup, no secrets.
Step 5: Turn on diagnostic logging
Enable logging before you need it. Without it, investigating incidents becomes difficult. Enable diagnostic settings and route logs to a Log Analytics workspace.
Recommended categories:
DataPlaneRequests: every request to your data (expensive at high volume, consider sampling)QueryRuntimeStatistics: query-level telemetryPartitionKeyStatistics: useful for performanceControlPlaneRequests: config changes, important for compliance
Step 6: Restrict network access
By default, your Cosmos DB endpoint is publicly reachable. Restrict access to known IP ranges to reduce exposure.
In the portal: Cosmos DB account → Networking → Selected networks → add your known IP ranges (your office, your CI/CD egress IPs, your developers’ IPs).
From the CLI:
az cosmosdb update \
--name <your-account> \
--resource-group <your-rg> \
--ip-range-filter "<your-ip>,<ci-cd-egress-ip>"
This reduces the attack surface and should be treated as a baseline until you move to Private Endpoints.
Step 7: Use parameterized queries, always
Cosmos DB NoSQL accepts whatever JSON you send it. It doesn’t protect you from malformed queries or injection. The only protection is your app.
The SDK supports parameterized queries in every language. Use them:
// Avoid string concatenation:
var query = $"SELECT * FROM c WHERE c.userId = '{userInput}'";

// Use parameterized queries instead:
var query = new QueryDefinition("SELECT * FROM c WHERE c.userId = @userId")
    .WithParameter("@userId", userInput);
The same principle applies in every SDK language. Use the parameter object, never string concatenation. This applies to any value that originates from user input, query parameters, or external systems.
Step 8: Turn on continuous backup (point-in-time restore)
Data loss is often caused by mistakes, not attackers. Continuous backup provides a reliable recovery option.
Enable continuous backup (7 or 30 days) to allow point-in-time restore. Enable it at account creation if you can. Switching from periodic to continuous backup is supported on existing accounts and it is a one-way change.
In the portal: Cosmos DB account → Backup & Restore → Backup policy → Continuous (7 days) or Continuous (30 days).
From the CLI:
az cosmosdb update \
--name <your-account> \
--resource-group <your-rg> \
--backup-policy-type Continuous \
--continuous-tier Continuous7Days
Tip
If you want to automate this through an agentic experience in VS Code, try using Agent Kit. It already embeds these best practices.What I’m not asking you to do (yet)
This post is about day one. There are things that matter but don’t need to happen on day one:
- VNet and Private Endpoints: Step 6 covers IP allowlisting as a starting point. Private endpoints and VNet integration are the next step.
- Customer-Managed Keys (CMK): Relevant for compliance scenarios but adds operational overhead. Most apps don’t need this initially.
- Microsoft Defender for Cosmos DB – Strongly recommended but can be enabled once you have data worth protecting.
The goal is to get the foundation right, so you do not need to redesign your security model later.
The one thing that can be challenging to undo
Migrating from keys to managed identity later means touching every deployment, every environment, and potentially every SDK call. It becomes a multi-day project with real risk of breaking changes.
Starting with DefaultAzureCredential from day avoids the problem entirely.
Quick reference checklist
Use this before you commit your first real code:
- Local authentication disabled; no keys or connection strings in source control
- Managed identity assigned to compute; RBAC role scoped and assigned; app using
DefaultAzureCredential - Each developer authenticates with their own Entra ID identity on a dev account
- Diagnostic logging enabled and routing to Log Analytics Workspace
- Public access restricted to known IP addresses
- All queries use parameterized values, never string concatenation
- Continuous backup enabled (7 or 30 days)
Resources
- Secure your Azure Cosmos DB for NoSQL account
- Connect to Azure Cosmos DB for NoSQL using role-based access control and Microsoft Entra ID
- Use managed identities for App Service and Azure Functions
- DefaultAzureCredential Class
- Monitor Azure Cosmos DB data using Azure Monitor Log Analytics diagnostic settings
- Configure IP firewall for Azure Cosmos DB
- Configure access from private endpoints for Azure Cosmos DB
- Parameterized queries, Query language in Cosmos DB
- Continuous backup with point-in-time restore in Azure Cosmos DB
- Migrate an Azure Cosmos DB account from periodic to continuous backup mode
- About Azure Key Vault
- About secret scanning
- git-secrets
About Azure Cosmos DB
Azure Cosmos DB is a fully managed and serverless NoSQL and vector database for modern app development, including AI applications. With its SLA-backed speed and availability as well as instant dynamic scalability, it is ideal for real-time NoSQL and MongoDB applications that require high performance and distributed computing over massive volumes of NoSQL and vector data.
To stay in the loop on Azure Cosmos DB updates, follow us on X, YouTube, and LinkedIn. Join the discussion with other developers on the #nosql channel on the Microsoft Open Source Discord.


0 comments
Be the first to start the discussion.