
Introduction
This post is Part 1 of the series Serverless Application Development with Azure Functions and Azure Cosmos DB, where we explore how to build end-to-end serverless applications using Azure Functions for compute and Azure Cosmos DB for storage. Together, these services allow you to build scalable, event-driven, cost-efficient cloud solutions without managing servers or infrastructure.
Throughout the series, you’ll progressively build real application components starting with simple HTTP APIs, adding persistent storage, implementing event-driven patterns using the Cosmos DB Change Feed, and orchestrating workflows with Durable Functions.
Posts in this series:
- Building Your First Serverless HTTP API on Azure with Azure Functions and FastAPI (this post)
- Building a Serverless Python CRUD API with Azure Functions and Azure Cosmos DB
- Event-Driven Python Apps with Azure Functions and Cosmos DB Change Feed
- Orchestrating Workflows with Durable Functions on Azure
Overview of Serverless architecture
Serverless is a cloud-native development model that lets developers build and run applications while the cloud provider takes care of provisioning, scaling, and maintaining servers. Developers focus on writing business logic and defining the cloud resources their application needs, such as APIs, functions or databases. Once deployed, the cloud provider automatically handles scaling based on demand.
A Serverless model typically follows a pay-as-you-go pricing model, meaning there is no cost when the application is idle. For example, an HTTP API built using a serverless function runs only when a user sends a request. If there are no requests, the application consumes no compute resources and costs nothing.
Key characteristics of a serverless application include:
- No server or capacity management – no need to provision or size machines
- Automatic scaling – scales up or down based on traffic
- Pay per use – you pay only for actual execution
- Event-driven execution – code runs in response to events like HTTP requests, messages, or timers
Serverless architecture works especially well for applications with infrequent or unpredictable traffic. It is commonly used to build microservices and event-based systems, and it helps teams move faster by reducing operational overhead and accelerating time to market.
Now that we understand what serverless is, let’s see how it works in practice by building a simple HTTP API using Azure Functions, Azure’s serverless compute service.
Setup for local development
To build and run a serverless HTTP API locally on Azure, you’ll need the following tools:
- Python 3.11 (or later)
- Visual Studio Code
- Azure Functions extension for VS Code (for a guided GUI experience)
- Azure Functions core tools (required to run functions locally)
Building the application
We’ll build a simple Hello World HTTP API using an HTTP trigger in Azure Functions. An HTTP trigger allows an Azure Function to run in response to an HTTP request, similar to a traditional REST API endpoint. Instead of writing the function from scratch, we’ll use Azure Functions’ Hello World template to get started quickly.
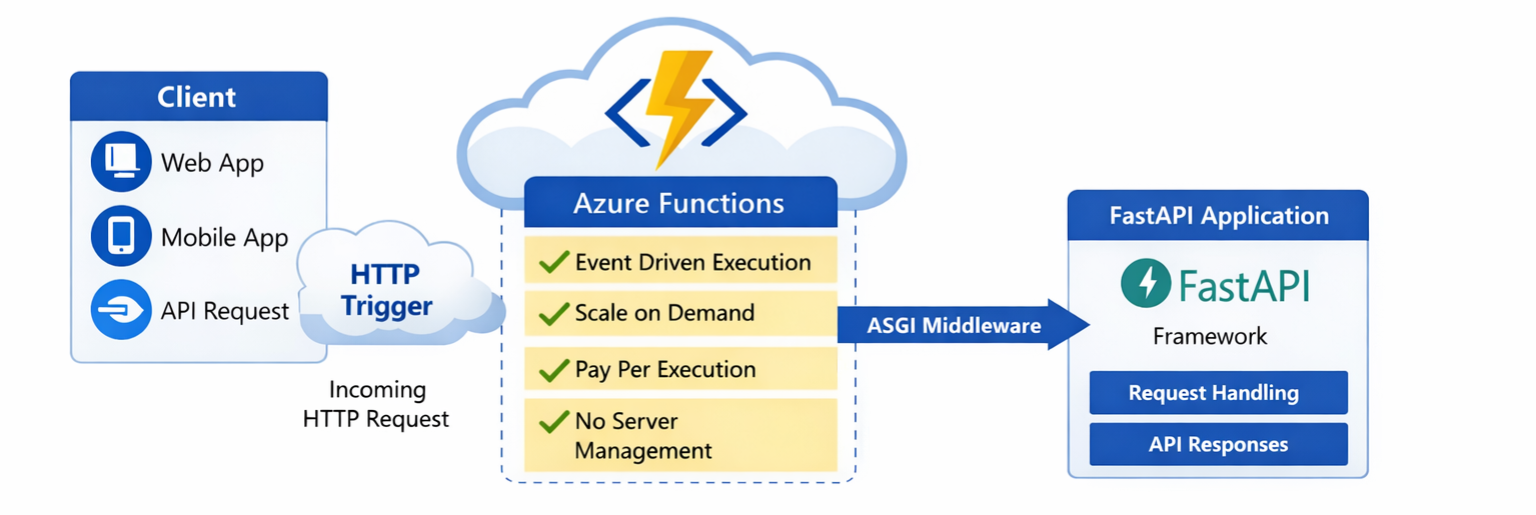
Before we begin writing any code, it’s helpful to visualize how the application works end-to-end. The diagram below shows the flow of an incoming HTTP request from the client, through Azure Functions’ HTTP trigger, into the FastAPI application running behind an ASGI middleware layer. This is the architecture we’ll be building in this tutorial.
Step 1: Initiate the Azure Functions project
Using the Functions CLI (installed via Azure Functions Core Tools), run the following command in a new folder. This creates the base structure and configuration files required for an Azure Functions project.
func init funcProject –python
Step 2: Create an HTTP trigger function
Navigate into the project folder and create an HTTP trigger:
cd funcProject
func new --name MyHttpFunction --template "HTTP trigger"
This command generates a function_app.py file containing the HTTP-triggered function, along with configuration files required by the Azure Functions runtime.
Understanding the generated files
host.json
The host.json file contains global configuration settings that apply to all functions in the app, such as logging and extension versions. Learn more about host.json settings.
local.settings.json
The local.settings.json file stores settings used only for local development, such as environment variables and storage configuration. Learn more about local.settings.json file in Azure functions project.
This file is only used for local development and is not deployed to Azure.
Running the Azure Function locally
Step 1: Start the Function Runtime
func start
You’ll see output similar to:
MyHttpFunction: http://localhost:7071/api/MyHttpFunction
Step 2: Test the HTTP Endpoint
Open the URL in a browser or test it using curl or Postman. You should receive the following response:
“This HTTP triggered function executed successfully. Pass a name in the query string or in the request body for a personalized response."
Integrating FASTAPI
Azure Functions provide the production-ready, serverless execution environment, including scaling, availability, and infrastructure management.
FastAPI is a modern, high-performance web framework for building APIs in Python that can be used alongside Azure Functions as an API framework. It helps developers structure endpoints, validate requests, and generate API documentation more easily. Together, Azure Functions and FastAPI combine the operational strengths of serverless computing with the developer experience of a modern web framework.
Step 1: Install FastAPI and Uvicorn
pip install fastapi uvicorn
Step 2: Create the FastAPI app (fastapi_app.py)
from fastapi import FastAPI

app = FastAPI()

@app.get("/api/hello")
def hello(name: str = "World"):
    return { f"Hello, {name}!"}
Step 3: Test the FastAPI app locally
uvicorn fastapi_app:app
Open the browser at: http://127.0.0.1:8000/api/hello
Expected response: ["Hello, World!"]
Step 4: Forward Azure Function Requests to FastAPI
FastAPI is an ASGI application, while Azure Functions expects a standard HTTP handler. To bridge this gap, Azure provides an ASGI middleware that forwards incoming HTTP requests to the FastAPI app.
Update the function_app.py as follows:
import azure.functions as func
from fastapi import Request
from fastapi.responses import Response
from fastapi_app import app as fastapi_app
from azure.functions._http_asgi import AsgiMiddleware

function_app = func.FunctionApp()

#Create ASGI middleware to connect Azure Function -> FastAPI
asgi_middleware = AsgiMiddleware(fastapi_app)

@function_app.route(route="{*routes}", auth_level=func.AuthLevel.ANONYMOUS)
async def fastapi_handler(req: func.HttpRequest) -> func.HttpResponse:
    """Proxy all HTTP traffic to FastAPI."""
    return await asgi_middleware.handle_async(req)
Step 5: Test the Integrated Function Locally
Run: func start
Azure Functions automatically prefixes HTTP routes with /api, which is why the endpoint includes /api/hello.
Test at: http://localhost:7071/api/hello
Expected response: ["Hello, World!"]
Adding Request Validation and API Documentation with FastAPI
So far, our API accepts requests and returns responses, but it doesn’t enforce any structure on the input. One of FastAPI’s key strengths is its ability to automatically validate request data and generate interactive API documentation with minimal effort.
Let’s enhance our API to accept structured input and see these features in action.
Step 1: Define a Request Model
FastAPI uses Pydantic models to define the shape of incoming requests. These models automatically validate the input data.
Add the following code to your fastapi_app.py file:
from pydantic import BaseModelclass HelloRequest(BaseModel):name: str
This model specifies that our API expects a JSON request body containing a name field of type string.
Step 2: Add a POST API Endpoint to Use the Model
Next, add the /helloUser endpoint to accept this model as input:
@app.post("/helloUser")
def hello(request: HelloRequest):
    return {f"Hello, {request.name}!"}
With this change, FastAPI automatically validates the incoming request. If the request body is missing the name field or has an invalid type, FastAPI returns a clear error response.
Step 3: Test Validation Locally
Send a POST request to: http://localhost:7071/api/helloUser
With the following JSON body: {"name": "Azure"}
You should receive: ["Hello, Azure!"]
If you send an invalid request (for example, an empty body), FastAPI automatically returns a validation error explaining what went wrong.
Step 4: Explore the Auto-Generated API Documentation
FastAPI generates interactive API documentation based on the application’s routes and schemas. Because Azure Functions modifies HTTP routing, we need to explicitly configure the documentation endpoint. Add the following code to function_app.py to make the Swagger UI accessible when running FastAPI with Azure Functions.
from fastapi.openapi.docs import get_swagger_ui_html

@fastapi_app.get("/api/docs", include_in_schema=False)
async def custom_swagger_ui_html() -> HTMLResponse:
    """Custom Swagger UI endpoint that works with Azure Functions."""
    return get_swagger_ui_html(
        openapi_url="",
        title=fastapi_app.title + " - Swagger UI",
        swagger_ui_parameters={"spec": fastapi_app.openapi()},
    )
Open the following URL in your browser: http://localhost:7071/api/docs
Here, you’ll see all available API endpoints with the expected request and response formats. Swagger UI also provides the ability to test APIs directly from the browser. This documentation is generated automatically from your route definitions and request models, and it stays in sync as your API evolves.
Deploying Function app to Azure.
Now that the function app works locally, let’s deploy it to Azure.
Prerequisite
- An active Azure subscription.
- Azure CLI installed (
az –-version) - Logged in to azure (
az login)
Step1: Create a Resource Group
az group create --name fastapi-func-rg --location eastus
Step 2: Create a Storage Account
Azure Functions requires a storage account for runtime state and scaling metadata, even if you do not explicitly store data.
az storage account create--name fastapifuncstorage123 --location eastus--resource-group fastapi-func-rg --sku Standard_LRS
Step 3: Create the Function App
az functionapp create--resource-group fastapi-func-rg--consumption-plan-location eastus --os-type Linux --runtime python --runtime-version 3.12 --functions-version 4--name fastapi-function-demo --storage-account fastapifuncstorage123
This command creates the Azure functions’ Python runtime and uses a consumption (pay-per-use) plan.
Step 5: Deploy the code
func azure functionapp publish fastapi-function-demo
During deployment:
- The project is packaged and uploaded
- Dependencies from requirements.txt are installed
- The Function App is restarted
- A live endpoint URL is generated
Step 6: Test the Deployed API
Your API will be available at: https://<function-app-name>.azurewebsites.net/api/hello
Your FastAPI-powered serverless API is now live on Azure.
Recap & Next Steps
In this post, we built a complete serverless HTTP API on Azure. We introduced serverless architecture, created an HTTP-triggered Azure Function, integrated FastAPI for routing, validation, and documentation, and deployed the final application to Azure.
In the next post, we’ll extend this application by persisting data from our HTTP API into a serverless database, exploring how storage and compute work together in a fully serverless architecture.
Resources
- Github sample: Build HTTP API with Azure Functions and Fast API
- Learn more about Azure Functions: Azure Functions overview | Microsoft Learn
- Python developer quickstart: Build a scalable web API using Azure Functions | Microsoft Learn
- Learn more about FastAPI: FastAPI
- Learn more about Pydantic models: Models – Pydantic Validation
About Azure Cosmos DB
Azure Cosmos DB is a fully managed and serverless NoSQL and vector database for modern app development, including AI applications. With its SLA-backed speed and availability as well as instant dynamic scalability, it is ideal for real-time NoSQL and MongoDB applications that require high performance and distributed computing over massive volumes of NoSQL and vector data.
To stay in the loop on Azure Cosmos DB updates, follow us on X, YouTube, and LinkedIn.
0 comments
Be the first to start the discussion.