CRM 4.0 (Titan) Server-Side programming: Creating custom ASPX pages and consuming Titan’s Web-Services
I’m doing several Titan labs (CRM 4.0 labs), so I’m going to write a posting about what I’m doing. It is always interesting archiving this kind of ‘HOW TOs’.
So!, I’m gonna create a plain new custom ASPX page (using Visual Studio 2005) where we’re going to allow updates to several custom entities I’ve got.
The business purpose for this page would be allowing week & hours for time entry related to projects, etc. The business purpose is not the important point in this case. What I want to show is how to create a custom ASPX that access and updates into CRM-Titan.
First step: Creating the ASPX Page
In order to create an ASPX page, we open VS.2005 and we create a new Web-Site (normal stuff in VS.2005). I prefer doing it in C#. J
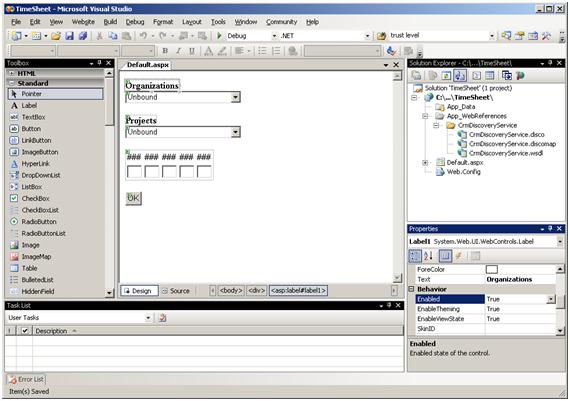
So, within the ‘default.aspx’ page we add two combo-boxes, one for companies and another one for projects. We also add a Table, and within that table we add several labels and textbox controls which represent current week and hours for time entry.
The ASPX design-time (in Visual Studio 2005) would be something similar to the following:

And the HTML and Web-controls tags (ASPX code) would be something like:
|
<%@ Page Language=”C#” AutoEventWireup=”true” CodeFile=”Default.aspx.cs” Inherits=”_Default” %> <!DOCTYPE html PUBLIC “-//W3C//DTD XHTML 1.0 Transitional//EN” “http://www.w3.org/TR/xhtml1/DTD/xhtml1-transitional.dtd”> <html xmlns=”http://www.w3.org/1999/xhtml” > <head runat=”server”> <title>CDLTLL – My custom ASPX page</title> </head> <body> <form id=”form1″ runat=”server”> <div> <asp:Label ID=”Label1″ runat=”server” Font-Bold=”True” Text=”Organizations”></asp:Label><br /> <asp:DropDownList ID=”ddlOrganizations” runat=”server” Width=”200px”> </asp:DropDownList><br /> <br /> <asp:Label ID=”Label2″ runat=”server” Font-Bold=”True” Text=”Projects”></asp:Label><br /> <asp:DropDownList ID=”ddlProjects” runat=”server” Width=”200px”> </asp:DropDownList><br /> <br /> <asp:Table ID=”tblTimeEntries” runat=”server”> <asp:TableRow ID=”TableRow1″ runat=”server”> <asp:TableCell ID=”Mon” runat=”server”></asp:TableCell> <asp:TableCell ID=”Tue” runat=”server”></asp:TableCell> <asp:TableCell ID=”Wed” runat=”server”></asp:TableCell> <asp:TableCell ID=”Thu” runat=”server”></asp:TableCell> <asp:TableCell ID=”Fri” runat=”server”></asp:TableCell> </asp:TableRow>
<asp:TableRow ID=”TableRow2″ runat=”server”> <asp:TableCell><asp:TextBox ID=”Mon_Hours” runat=”server” Width=”20″></asp:TextBox></asp:TableCell> <asp:TableCell><asp:TextBox ID=”Tue_Hours” runat=”server” Width=”20″></asp:TextBox></asp:TableCell> <asp:TableCell><asp:TextBox ID=”Wed_Hours” runat=”server” Width=”20″></asp:TextBox></asp:TableCell> <asp:TableCell><asp:TextBox ID=”Thu_Hours” runat=”server” Width=”20″></asp:TextBox></asp:TableCell> <asp:TableCell><asp:TextBox ID=”Fri_Hours” runat=”server” Width=”20″></asp:TextBox></asp:TableCell> </asp:TableRow>
</asp:Table> <br /> <asp:Button ID=”btnOK” runat=”server” Text=”OK” /></div> </form> </body> </html> |
So far, this is plain ASPX code, nothing about CRM-Titan, yet.
Second step: Adding CRM-Titan Web-Service References
No we start the fun part, let’s add some CRM-Titan Web-References into our WebSite project!! J
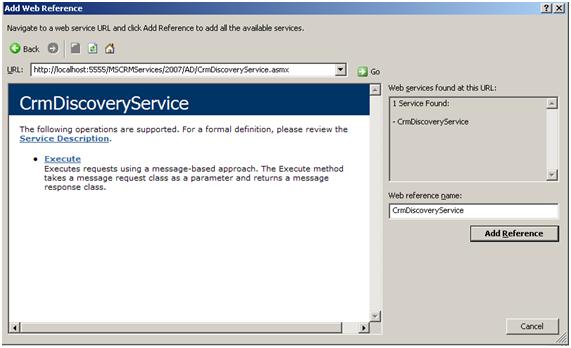
OK, first, we add a web reference to the CrmDiscoveryService (the one with AD authentication, there is another one for Passport authentication aa well as SPLA for custom forms authentication), so the URL we have to use is the following:
|
http://localhost:5555/MSCRMServices/2007/AD/CrmDiscoveryService.asmx |
The ‘Add Web Reference’ window would be like:

So, what is new in this CrmDiscoveryService?. Because of CRM-Titan provides now Multi-Tenancy (Multi-Tenancy: A single CRM server could be servicing multiple business organizations), before calling the real ‘data-web-service’, we need to know which web-service we have to use. I mean, since each CRM server may be serving a call for a different organization each time, the web services must be notified of the target organization a user is intending to reach. So this CrmDiscoveryService Web-Service allows to query all the CRM organizations on the server as well as instantiate CrmTicket credentials to allow requests for specific organizations.
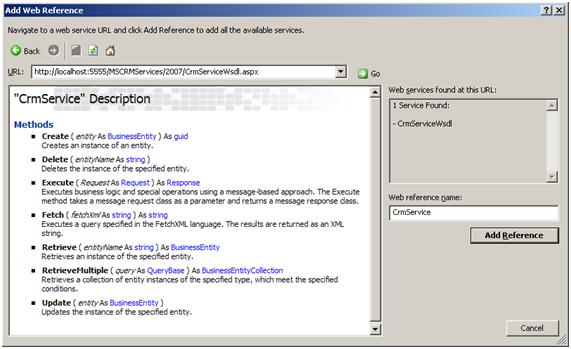
Now, we add another web reference for the updated CrmService, which has the following URL:
|
http://localhost:5555/MSCRMServices/2007/CrmServiceWsdl.aspx |

So we have added references to the required CRM-Titan web-services using Windows integrated security for authentication.
Third step: Writing C# Code-Behind accessing Titan’s WebServices
Now, we add some C# code within the ASPX page ‘code-behind’.
BTW, whenever you see a prefix like ‘cdltll_’ into my code, it is the CRM prefix that CRM internally concatenates to every schema name (for columns, entities, etc.). By default, CRM adds the prefix ‘new_’ but I prefer changing it to my own prefix (From CRM à Settings à Org.Settings à System Settings à Customization à Prefix), which could be you company’s initials or in my case, are my own initials (CDLTLLà Cesar De La Torre Llorente). J
So!, first interesting code would be when we want to connect and get all the available organizations and loading the that list within the ‘Organizations’ Combo-box. To do so, we should call the CrmDiscoveryService coding something like the following:
|
//Instantiate web-service proxy class CrmDiscoveryService.CrmDiscoveryService discoveryService = new CrmDiscoveryService.CrmDiscoveryService(); //Provide current Windows/AD Credentials discoveryService.Credentials = System.Net.CredentialCache.DefaultCredentials;
//Configure what we want to request RetrieveOrganizationsRequest orgsRequest = new RetrieveOrganizationsRequest();
//Make request for organization information RetrieveOrganizationsResponse orgsResponse = (RetrieveOrganizationsResponse)discoveryService.Execute(orgsRequest);
//Loop to populate the organizations … |
Likewise, if we want to get the ‘project list’ (from my project custom entity), it would be something like:
|
CrmService.CrmAuthenticationToken token = new CrmAuthenticationToken(); token.OrganizationName = “My Organization’s Name”;
CrmService.CrmService crmService = new CrmService.CrmService(); crmService.Credentials = System.Net.CredentialCache.DefaultCredentials; crmService.CrmAuthenticationTokenValue = token;
QueryByAttribute query = new QueryByAttribute(); ColumnSet cols = new ColumnSet(); cols.Attributes = new string[] { “cdltll_projectid”, “cdltll_name” };
query.ColumnSet = cols; query.EntityName = EntityName.cdltll_project.ToString(); query.Attributes = new string[] { “ownerid” };
WhoAmIRequest userRequest = new WhoAmIRequest(); WhoAmIResponse user = (WhoAmIResponse)crmService.Execute(userRequest);
// The logged on users userid query.Values = new object[] { user.UserId.ToString() };
BusinessEntityCollection retrievedProjects = crmService.RetrieveMultiple(query);
//Loop to populate the projects … |
So, with kind of this code run within my Page_Load() method, I could get data in my ASP.NET page, like you can see down below:

Then, we can take the numbers/hours provided into the timesheet text-boxes (we should type it first, of course. ;-)), and update my custom entity called ‘Timesheet’.
Basically, we should write this code for updating against CRM-Titan Web-Service:
|
// Instantiate a new timesheet entity cdltll_timesheet timesheet = new cdltll_timesheet();
timesheet.cdltll_datesubmitted = new CrmDateTime(); timesheet.cdltll_datesubmitted.Value = DateTime.Now.ToShortDateString();
timesheet.cdltll_day1 = new CrmNumber(); timesheet.cdltll_day1.Value = Convert.ToInt32(Mon_Hours.Text);
timesheet.cdltll_day2 = new CrmNumber(); timesheet.cdltll_day2.Value = Convert.ToInt32(Tue_Hours.Text);
timesheet.cdltll_day3 = new CrmNumber(); timesheet.cdltll_day3.Value = Convert.ToInt32(Wed_Hours.Text);
timesheet.cdltll_day4 = new CrmNumber(); timesheet.cdltll_day4.Value = Convert.ToInt32(Thu_Hours.Text);
timesheet.cdltll_day5 = new CrmNumber(); timesheet.cdltll_day5.Value = Convert.ToInt32(Fri_Hours.Text);
// Set the current weeks Monday timesheet.cdltll_startdate = new CrmDateTime();
timesheet.cdltll_projectid = new Lookup(); timesheet.cdltll_projectid.Value = new Guid(ddlProjects.SelectedValue);
timesheet.cdltll_name = ddlProjects.SelectedItem.Text + ” – Timesheet submitted for ” + timesheet.cdltll_startdate.Value.ToString();
//Create de Web-Service objet-proxy CrmService.CrmAuthenticationToken token = new CrmAuthenticationToken(); token.OrganizationName = “My Organization’s Name”; CrmService.CrmService crmService = new CrmService.CrmService(); crmService.Credentials = System.Net.CredentialCache.DefaultCredentials; crmService.CrmAuthenticationTokenValue = token;
//Create/Update the TimeSheet within CRM-Titan Guid timeSheetId = crmService.Create(timesheet); |
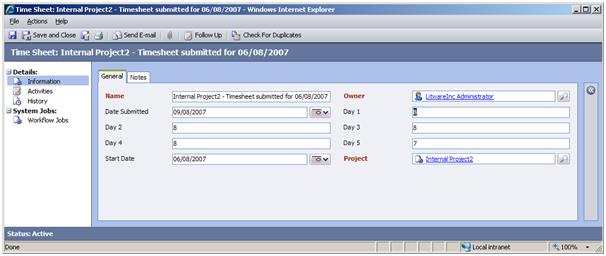
So after updating, let’s say this hours (8,8,8,8,7), if we enter into CRM-Titan client, we can see it already updated!! J

If anybody wants the whole ASP.NET page and project, just write on a comment on this posting, OK?. 🙂
–> Updated. Due to many requests, I have uploaded the source code within this post. Keep in mind this code was developed while CRM 4.0 was in BETA state. Several points could have changed.
05 ASP.NET Accessing CRM4 Web Services.zip

 Light
Light Dark
Dark
0 comments