


Adding Aspire to a Python RAG Application
Imagine you’re developing a RAG (Retrieval Augmented Generation) application with a Python backend, TypeScript frontend, and a few different Azure services. Your local development setup requires multiple terminal windows, hardcoded ports scattered across config files, and a deployment process that demands an Azure deployment just to test locally. Onboarding a new developer? Good luck walking them through all of this.
This was our situation with the azure-search-openai-demo, a sample showing how to build ChatGPT-like experiences over your own documents. The developer experience left room for improvement—especially for new team members trying to get up and running.
This post walks through adding Aspire to the azure-search-openai-demo application.
The Application: A RAG Chat Experience
Before diving into the Aspire integration, let’s understand what we’re working with. The azure-search-openai-demo is a production-ready RAG application that allows users to ask questions about their documents:

Its architecture combines:
- Backend: Python 3.11+ with Quart (an async Flask-like framework)
- Frontend: React with TypeScript, built using Vite
- Azure Services: OpenAI (GPT-4), AI Search, Blob Storage
- Document ingestion pipeline, vector search, semantic ranking, and citation rendering
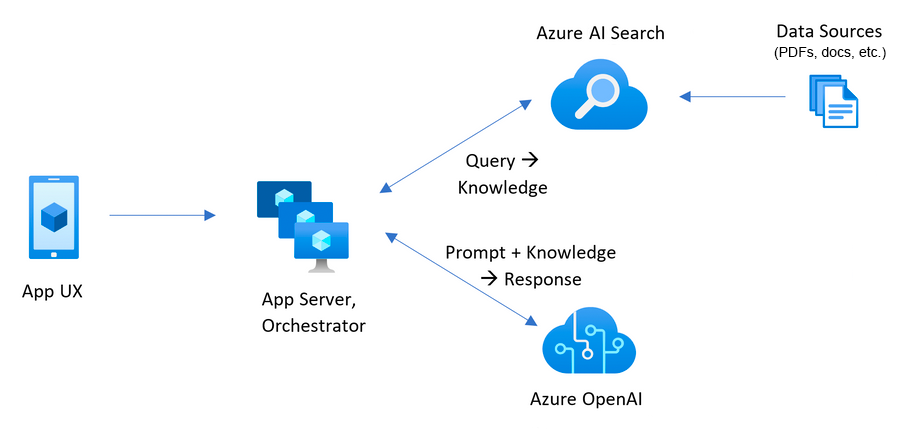
It’s a comprehensive example of how to build AI applications on Azure, complete with authentication, multimodal support, and deployment infrastructure.
The Developer Experience Challenges
Despite its sophistication, the local development workflow had some pain points:
| Challenge | Before Aspire | After Aspire |
|---|---|---|
| Local setup | Deploy to Azure first, then run locally | Run locally without cloud deployment |
| Starting services | Start.ps1/sh scripts | Single command startup |
| Environment variables | Multiple config files (.env, azure.yaml, etc.) | Declarative configuration in code |
| Observability | Application Insights (production only) | Aspire Dashboard (local + production) |
| Port management | Hardcoded ports (backend: 50505, frontend: 5173) | Dynamic assignment |
| Deployment | Write Bicep infrastructure templates | Define in AppHost, Aspire generates Bicep |
What is Aspire
Aspire streamlines building, running, debugging, and deploying distributed apps. With Aspire, you define your services in code and run everything with one command:
- Start your entire app locally with
aspire run—no terminal juggling - Services automatically discover each other through environment variables
- The dashboard collects logs, traces, and metrics using OpenTelemetry, an open standard you can take anywhere
- New team members can clone and run immediately
Language Support
Aspire includes dedicated packages for polyglot development:
Aspire.Hosting.Python– Run Python applications, scripts, and modulesAspire.Hosting.JavaScript– Run Node.js and Vite applicationsAspire.Hosting.Azure.*– Declaratively define Azure resources
This means you can run your Python and JavaScript applications alongside Azure services, all from a single AppHost file, with automatic environment variable injection and service discovery.
The Integration Journey
The transformation happened incrementally across four commits. Let’s walk through each commit. Don’t worry if you’re not familiar with C# – I’ll explain what each part does.
Commit 1: Creating the AppHost Foundation
The AppHost is a single file where you define your services. There’s no need for a separate folder or full project structure. We created an apphost.cs file in the top-level app folder:
#:sdk Aspire.AppHost.Sdk@13.1.0
#:package Aspire.Hosting.Azure.AppContainers@13.1.0
#:package Aspire.Hosting.Azure.CognitiveServices@13.1.0
#:package Aspire.Hosting.Azure.Search@13.1.0
#:package Aspire.Hosting.Azure.Storage@13.1.0
#:package Aspire.Hosting.JavaScript@13.1.0
#:package Aspire.Hosting.Python@13.1.0
using Aspire.Hosting.Azure;
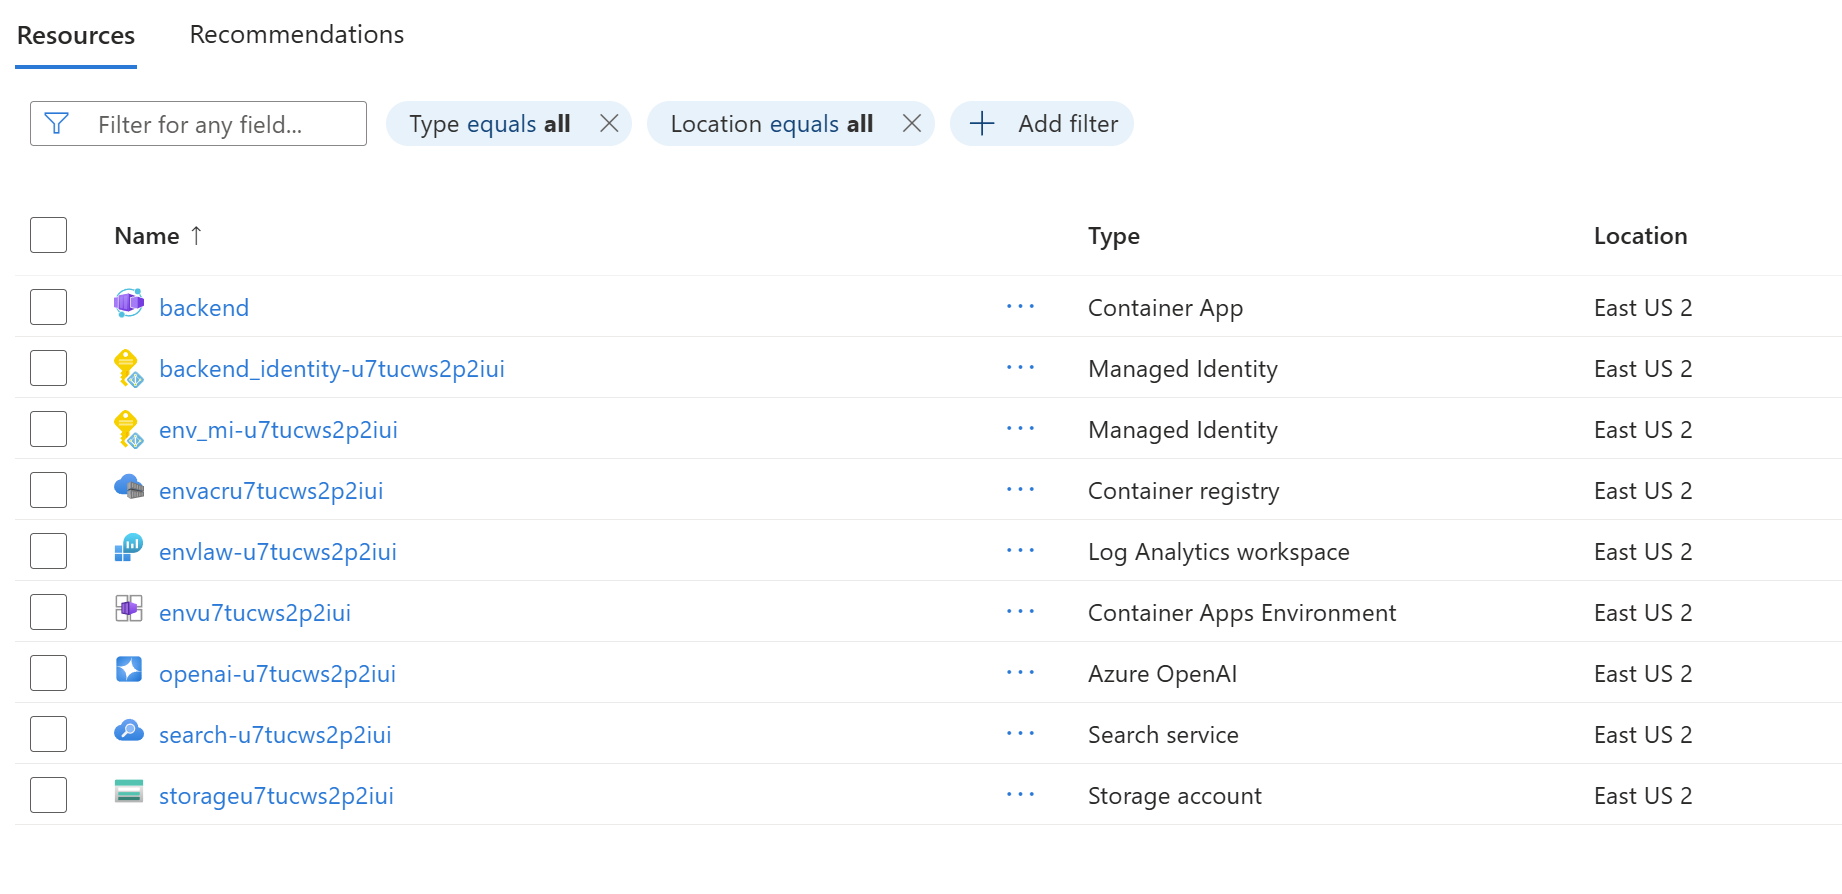
var builder = DistributedApplication.CreateBuilder(args);Defining Azure Resources
You define your Azure resources in the AppHost, and Aspire generates the Bicep for deployment:
// Storage account with blob container
var storage = builder.AddAzureStorage("storage");
var content = storage.AddBlobContainer("content");

// Azure AI Search
var search = builder.AddAzureSearch("search");

// Azure OpenAI with two model deployments
var openai = builder.AddAzureOpenAI("openai");
var chatModel = openai.AddDeployment("chat", "gpt-4o", "2024-08-06")
    .WithProperties(m => m.SkuCapacity = 30);
var textEmbedding = openai.AddDeployment("text-embedding", "text-embedding-3-large", "1")
    .WithProperties(m => m.SkuCapacity = 200);
Aspire handles provisioning these resources in Azure during deployment and provides connection information to your application automatically. No more copying connection strings or managing secrets in config files.
Configuring the Python Backend
Aspire can run Python applications. Instead of having start.ps1 and start.sh scripts with:
./.venv/bin/python -m pip install -r app/backend/requirements.txt

port=50505
host=localhost
../../.venv/bin/python -m quart --app main:app run --port "$port" --host "$host" --reload
We can model starting the Python application in the AppHost:
var backend = builder.AddPythonModule("backend", "./backend", "quart")
    .WithHttpEndpoint(env: "PORT")
    .WithArgs(c =>
    {
        c.Args.Add("--app");
        c.Args.Add("main.py");
        c.Args.Add("run");

        var endpoint = ((IResourceWithEndpoints)c.Resource).GetEndpoint("http");
        c.Args.Add("--port");
        c.Args.Add(endpoint.Property(EndpointProperty.TargetPort));
        c.Args.Add("--host");
        c.Args.Add(endpoint.EndpointAnnotation.TargetHost);

        // Hot reload for local development
        c.Args.Add("--reload");
    })
    .WithEnvironment("AZURE_STORAGE_ACCOUNT", storage.Resource.NameOutputReference)
    .WithEnvironment("AZURE_STORAGE_CONTAINER", content.Resource.BlobContainerName)
    .WithEnvironment("AZURE_SEARCH_ENDPOINT", search.Resource.UriExpression)
    .WithEnvironment("AZURE_OPENAI_ENDPOINT", openai.Resource.UriExpression)
    .WithEnvironment("AZURE_OPENAI_CHATGPT_DEPLOYMENT", chatModel.Resource.DeploymentName)
    .WithEnvironment("AZURE_OPENAI_EMB_DEPLOYMENT", textEmbedding.Resource.DeploymentName)
Key features here:
- Dynamic port assignment: No more hardcoded
50505 - Hot reload: Changes to Python files automatically restart the server
- Type-safe resource references: The Azure resources flow as strongly-typed objects
Aspire resolves the Azure expressions at runtime based on whether you’re running locally or deployed to Azure.
Configuring the Vite Frontend
At development time, Vite runs its own server to host the frontend files which allows for things like Hot Module Replacement. When the app is deployed, the frontend is packaged into the backend app, and served from a static folder.
The frontend integration is simple:
var frontend = builder.AddViteApp("frontend", "./frontend")
    .WithReference(backend)
    .WaitFor(backend);
WithReference(backend) automatically injects environment variables (BACKEND_HTTP, BACKEND_HTTPS) that tell the frontend how to reach the backend. No more hardcoded URLs.
We updated vite.config.ts to use these environment variables:
// Before:
proxy: {
    "/ask": "http://localhost:50505",
    "/chat": "http://localhost:50505",
    // ... repeated
}

// After:
const proxyTarget = {
    target: process.env.BACKEND_HTTPS || process.env.BACKEND_HTTP,
    changeOrigin: true
};

proxy: {
    "/ask": proxyTarget,
    "/chat": proxyTarget,
    "/speech": proxyTarget,
    "/config": proxyTarget,
    // ... all routes use the same dynamic target
}
Now the frontend automatically discovers the backend URL when running locally on a dynamic port.
WaitFor(backend) tells the frontend to wait until the backend is healthy before starting. This ensures the backend is ready to accept requests before the frontend tries connecting to it.
When deployed to production, the frontend is hosted from the backend:
backend.PublishWithContainerFiles(frontend, "./static");This tells the backend to take the published files from the frontend resource and put them in the ./static folder in the backend. The backend python code already supports this with routes like:
bp = Blueprint("routes", __name__, static_folder="static")

@bp.route("/")
async def index():
    return await bp.send_static_file("index.html")

@bp.route("/assets/<path:path>")
async def assets(path):
    return await send_from_directory(Path(__file__).resolve().parent / "static" / "assets", path)
Commit 2: Refactoring Environment Variables
We updated the application to use full endpoint URLs instead of service names:
# Before:
AZURE_SEARCH_SERVICE = os.environ["AZURE_SEARCH_SERVICE"]
AZURE_SEARCH_ENDPOINT = f"https://{AZURE_SEARCH_SERVICE}.search.windows.net"

# After:
AZURE_SEARCH_ENDPOINT = os.environ["AZURE_SEARCH_ENDPOINT"]
Why does this matter?
- Simpler code: No string concatenation to build URLs
- Flexibility: Works with custom domains and different cloud environments
- Aspire-friendly: Aspire provides full URIs via
Resource.UriExpression
The same pattern was applied to AZURE_OPENAI_ENDPOINT and other Azure service connections. This change touched 10 files across the codebase but resulted in cleaner, more maintainable code.
Commit 3: Adding OpenTelemetry Observability
Observability is where Aspire shines. OpenTelemetry is the industry standard for telemetry, and Aspire’s dashboard natively consumes OTLP (OpenTelemetry Protocol).
To enable OpenTelemetry in the app, we added app/backend/telemetry.py:
import opentelemetry._logs as otel_logs
import opentelemetry.metrics as otel_metrics
import opentelemetry.trace as otel_trace
# (additional imports omitted for brevity)

def configure_opentelemetry():
    # Configure Traces
    otel_trace.set_tracer_provider(otel_sdk_trace.TracerProvider())
    otlp_span_exporter = trace_exporter.OTLPSpanExporter()
    span_processor = otel_trace_export.BatchSpanProcessor(otlp_span_exporter)
    otel_trace.get_tracer_provider().add_span_processor(span_processor)

    # Configure Metrics
    otlp_metric_exporter = metric_exporter.OTLPMetricExporter()
    metric_reader = otel_metrics_export.PeriodicExportingMetricReader(
        otlp_metric_exporter,
        export_interval_millis=5000
    )
    otel_metrics.set_meter_provider(
        otel_sdk_metrics.MeterProvider(metric_readers=[metric_reader])
    )

    # Configure Logs
    otel_logs.set_logger_provider(otel_sdk_logs.LoggerProvider())
    otlp_log_exporter = log_exporter.OTLPLogExporter()
    log_processor = otel_logs_export.BatchLogRecordProcessor(otlp_log_exporter)
    otel_logs.get_logger_provider().add_log_record_processor(log_processor)

    # Configure standard logging to also emit to OpenTelemetry
    logging.basicConfig(
        level=logging.INFO,
        handlers=[
            logging.StreamHandler(),
            otel_sdk_logs.LoggingHandler(logger_provider=otel_logs.get_logger_provider())
        ]
    )
This configures the three signals of observability:
- Traces: Track requests as they flow through the system
- Metrics: Measure performance indicators
- Logs: Structured logging with automatic correlation
In app.py, we integrated this early in the startup process:
import telemetry

# Configure OpenTelemetry BEFORE creating the app
telemetry.configure_opentelemetry()

# ... later in create_app() ...
if os.getenv("APPLICATIONINSIGHTS_CONNECTION_STRING") or os.getenv("OTEL_EXPORTER_OTLP_ENDPOINT"):
    # Instrument HTTP clients
    AioHttpClientInstrumentor().instrument()
    HTTPXClientInstrumentor().instrument()

    # Instrument OpenAI SDK calls
    OpenAIInstrumentor().instrument()

    # Instrument the ASGI app to capture request/response
    app.asgi_app = OpenTelemetryMiddleware(app.asgi_app)
The conditional check ensures instrumentation only runs when telemetry endpoints are configured. Aspire automatically sets OTEL_EXPORTER_OTLP_ENDPOINT to point to its dashboard.
When running the application now, we get traces and metrics in the Aspire Dashboard:

You can see the 3 sparkle icons on the calls to openai. Clicking on these gives you insight into what is sent to the LLM:

You can even view how many tokens were used:

Commit 4: Enabling Azure Container Apps Deployment
The final piece was configuring deployment to Azure Container Apps. This code only runs when the application is being deployed, not when the app is run locally.
builder.AddAzureContainerAppEnvironment("env");

var backend = builder.AddPythonModule(
        "backend",
        "./backend",
        builder.ExecutionContext.IsRunMode ? "quart" : "gunicorn")
    .WithArgs(c =>
    {
        // In run mode, set up for local development with hot reload
        // In publish mode, use a production server
        if (builder.ExecutionContext.IsRunMode)
        {
           ... // run args
        }
        else
        {
            c.Args.Add("-k");
            c.Args.Add("uvicorn.workers.UvicornWorker");

            c.Args.Add("-b");
            c.Args.Add("0.0.0.0:8000");

            c.Args.Add("main:app");
        }
    })
    // ... all the previous configuration ...
    .WithExternalHttpEndpoints()
    .PublishAsAzureContainerApp((infra, app) =>
    {
        var c = app.Template.Containers.Single().Value;
        if (c != null)
        {
            c.Resources.Cpu = 1.0;
            c.Resources.Memory = "2.0Gi";
        }
    });
PublishAsAzureContainerApp tells Aspire to:
- Build a Docker container for the application
- Push it to Azure Container Registry
- Deploy it to Azure Container Apps with the specified settings
- The existing bicep sets Cpu to 1.0 and Memory to “2.0Gi”, so we do here as well.
The frontend builds into the backend’s static folder:
backend.PublishWithContainerFiles(frontend, "./static");This creates a single-container deployment with the frontend embedded, simplifying the deployment architecture.
Now deploying the app is as simple as:
aspire deployAnd answering a few questions, like which Subscription, Resource Group, and Region to deploy to, and the application is running in Azure:
Developer Experience Transformation
Here’s what local development looks like now.
Local Development: Before and After
Before Aspire:
# Create an azd environment
azd env new

# Deploy to Azure
azd up

# Start the app
./app/start.sh

# Check logs in terminal output
After Aspire:
# Single command
aspire run
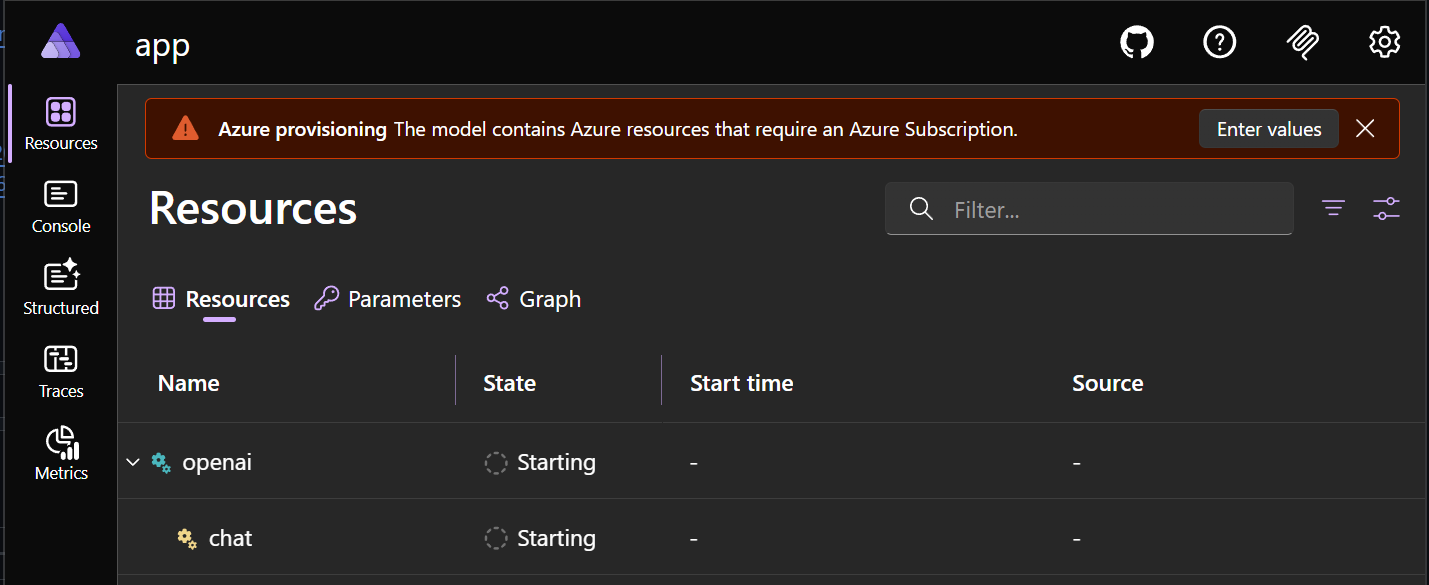
# A link to the Aspire Dashboard is displayedThe Aspire Dashboard
When you run the AppHost, the Aspire Dashboard launches automatically. It provides:
Live Resource Monitoring
- All services (backend, frontend, prepdocs) in one view
- Real-time status: starting, running, exited
- Console logs for each service with filtering
- Environment variables inspection
Distributed Tracing
- See request flows: Frontend → Backend → OpenAI → AI Search
- Performance timing for each operation
- Automatic correlation across services
- Click on any trace to see detailed spans
Structured Logs
- All service logs in one searchable interface
- Automatic correlation with traces via span IDs
- Filter by severity, service, time range
- Search across all logs simultaneously
Metrics
- Request rates and response times
- Resource utilization (CPU, memory)
- Custom application metrics
- Historical trends and graphs
Deployment: The New Way
Before Aspire:
# Write and maintain Bicep files
azd init
azd up
# Edit .env file
azd deploy
After Aspire:
aspire deploy                # Aspire handles everything
# Aspire generates Bicep → builds containers → deploys to ACA
# Environment variables flow automatically from AppHost
Key Learnings and Best Practices
What Worked Well
1. Start with Local Development First Get the AppHost working locally before tackling deployment. The Aspire Dashboard makes it easy to verify that all services connect correctly and environment variables flow as expected.
2. Incremental Migration We added Aspire over four commits, not in a “big bang” rewrite. Each commit was testable and deployable independently. This approach reduces risk and makes it easier to learn Aspire incrementally.
What’s Next: Document ingestion
The azure-search-openai-demo app provides two ways to ingest data: manual ingestion and cloud ingestion. Both approaches use the same code for processing the data, but the manual ingestion runs locally while cloud ingestion runs in Azure Functions as Azure AI Search custom skills.
For this first step of moving to Aspire, we only enabled manual ingestion. To enable cloud ingestion, we will need to add support for:
- The Azure Functions which provide the custom skills to Azure Search.
- Support for running the
setup_cloud_ingestion.pyscript during/after deployment.
In a future post, we’ll tackle these gaps and extend the Aspire AppHost to support cloud ingestion end to end, completing the document ingestion story for the azure-search-openai-demo app.
Wrapping Up
Adding Aspire to our Python RAG application gave us:
- ✅ Simplified local development – One command instead of managing multiple scripts
- ✅ Built-in observability – Aspire Dashboard with traces, logs, and metrics
- ✅ Streamlined deployment – AppHost → generated Bicep → Azure Container Apps
- ✅ Maintained polyglot architecture – Python and TypeScript, no rewrites needed
We added Aspire alongside our existing code with minimal changes.
Try It Yourself
Try it out now:
-
Install Aspire: Following the instructions.
-
Clone the sample:
git clone -b Aspirify https://github.com/eerhardt/azure-search-openai-demo cd azure-search-openai-demo -
Run it locally with Aspire:
aspire run -
Explore the Dashboard: It opens automatically at
https://localhost:17216You will be prompted to enter Azure information to deploy the Azure Search, Open AI, and Storage resources.
Once this completes, you can run the
prepdocsresource by clicking the play button, which will ingest the documents contained in thedatafolder.You can then open the
frontendURL to see the app running, and ask it a question about the documents. -
Deploy to Azure:
aspire deployNote: If you’re already using
azd, it also supports deploying Aspire AppHosts viaazd up. -
Study the commits: Check out the four commits that added Aspire.
-
Read the docs: Aspire documentation has excellent Python and JavaScript examples
0 comments