


This guide covers setting up Claude Code CLI and VS Code extension with Microsoft Foundry, configuring CLAUDE.md for project context, integrating Spec Kit for structured development, and running Claude Code in GitHub Actions.

Prerequisites
- Azure subscription with Foundry access
- Node.js 18+ (for Claude Code CLI)
- Optional: Azure CLI installed (
az logincompleted)
Step 1: Deploy Claude Models in Foundry
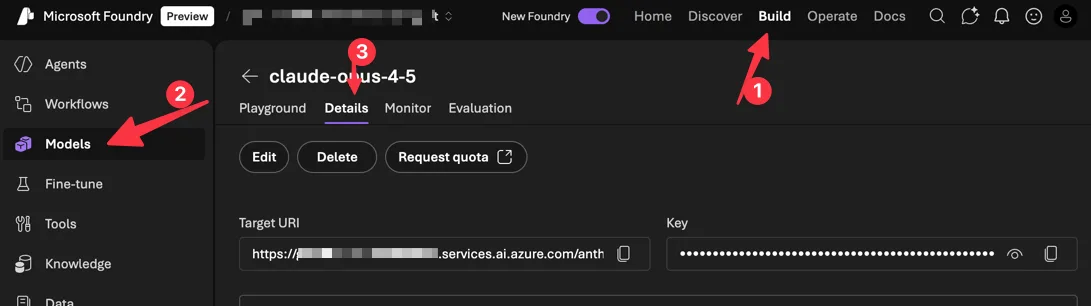
- Go to Discover → Models and search “Claude”
- Select your model (Opus 4.5, Sonnet 4.5, or Haiku 4.5)
- Click Deploy → choose Default settings
- Click on the Details tab and note your Target URI and Key

Alternative: Model Router
Model Router is a Foundry model that intelligently routes each prompt to the best underlying model based on query complexity, cost, and performance. Version 2025-11-18 supports Claude Haiku 4.5, Sonnet 4.5, and Opus 4.1 alongside GPT, DeepSeek, Llama, and Grok models.
For Claude Code users, this means:
- Automatic model selection: Simple prompts route to faster/cheaper models; complex coding tasks route to more capable models
- Cost optimization: Use routing profiles to balance quality vs. cost while maintaining baseline performance
- Single endpoint: One deployment handles all routing decisions across your model fleet
To use: First deploy the Claude models you want included, then deploy Model Router and enable them via model subset configuration.
Step 2: Install Claude Code CLI
npm install -g @anthropic-ai/claude-code
Verify installation:
claude --version
For more advanced installation options, visit Claude Code Docs.
Step 3: Configure for Foundry
Set these environment variables:
Bash / WSL:
# Required
export CLAUDE_CODE_USE_FOUNDRY=1

# Azure resource name (replace {resource} with your resource name)
export ANTHROPIC_FOUNDRY_RESOURCE={resource}
# Or provide the full base URL:
# export ANTHROPIC_FOUNDRY_BASE_URL=https://{resource}.services.ai.azure.com

# Optional: specify model deployment names, matching the deployment names in Foundry
export ANTHROPIC_DEFAULT_SONNET_MODEL="claude-sonnet-4-5"
export ANTHROPIC_DEFAULT_HAIKU_MODEL="claude-haiku-4-5"
export ANTHROPIC_DEFAULT_OPUS_MODEL="claude-opus-4-5"
PowerShell:
# Required
$env:CLAUDE_CODE_USE_FOUNDRY = "1"

# Azure resource name (replace {resource} with your resource name)
$env:ANTHROPIC_FOUNDRY_RESOURCE = "{resource}"
# Or provide the full base URL:
# $env:ANTHROPIC_FOUNDRY_BASE_URL = "https://{resource}.services.ai.azure.com"

# Optional: specify model deployment names, matching the deployment names in Foundry
$env:ANTHROPIC_DEFAULT_SONNET_MODEL = "claude-sonnet-4-5"
$env:ANTHROPIC_DEFAULT_HAIKU_MODEL = "claude-haiku-4-5"
$env:ANTHROPIC_DEFAULT_OPUS_MODEL = "claude-opus-4-5"
Authentication
Option A: Entra ID (recommended)
az login
Claude Code uses your Azure CLI credentials automatically.
Option B: API Key
Bash / WSL:
export ANTHROPIC_FOUNDRY_API_KEY="your-foundry-api-key"
PowerShell:
$env:ANTHROPIC_FOUNDRY_API_KEY = "your-foundry-api-key"
VS Code Extension Setup
The Claude Code VS Code extension provides a native graphical interface for Claude Code directly in your IDE.
- Install the extension from the VS Code Marketplace.
- Open VS Code settings (
Ctrl+,orCmd+,) and search for “Claude Code: Environment Variables”. - Click “Edit in settings.json” and add the following:
{ "Claude Code: Environment Variables": { "CLAUDE_CODE_USE_FOUNDRY": "1", "ANTHROPIC_FOUNDRY_RESOURCE": "{your-resource-name}", "ANTHROPIC_FOUNDRY_API_KEY": "<optional-for-non-entra-auth>" } } - Click the Spark icon in the sidebar to open the Claude Code panel.
- Claude Code will authenticate using your Azure credentials (run
az loginfirst if needed).
The extension supports auto-accept edits mode, plan mode, extended thinking, and file management with @-mentions—all while routing through your Microsoft Foundry deployment.
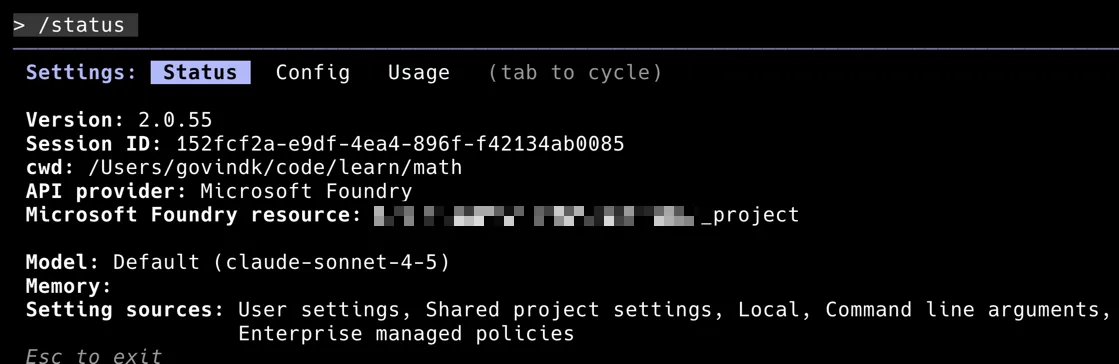
Step 4: Validate Configuration
Verify that Claude Code is correctly configured to use Microsoft Foundry. Open a terminal, launch Claude Code, and run the /status command:
claude
> /status
Confirm that:
- API provider shows “Microsoft Foundry”
- Microsoft Foundry resource points to your Foundry project
- Model matches your deployed model (e.g., claude-sonnet-4-5)
Step 5: CLAUDE.md Project Memory
Claude Code reads CLAUDE.md files for project context. Files are loaded in order (later files override earlier):
~/.claude/CLAUDE.md– global defaults./CLAUDE.md– repo root./current-dir/CLAUDE.md– current directory
Example CLAUDE.md for a Microsoft Agent Framework project in Python:
# Project: Customer Service Agent

## Overview
Multi-agent system using Microsoft Agent Framework with Foundry Agent Service.

## Tech Stack
- Python 3.11+
- agent-framework (Microsoft Agent Framework Python SDK)
- Microsoft Foundry for hosted agents
- MCP tools for enterprise data access

## Architecture
- `src/agents/` - Agent definitions (triage, specialist, escalation)
- `src/tools/` - MCP tool implementations
- `src/workflows/` - Multi-agent orchestration
- `tests/` - pytest with async fixtures

## Commands
```bash
# Run locally
python -m src.main

# Test
pytest tests/ -v

# Deploy to Foundry Agent Service
az ai agent deploy --config deploy.yaml
```

## Code Patterns
Use `AzureAIAgentClient` with `AzureCliCredential`:
```python
async with AzureAIAgentClient(async_credential=AzureCliCredential()) as client:
    agent = client.create_agent(instructions="...", tools=[...])
```

## Current Sprint
- Implementing RAG grounding with Foundry IQ
- Adding Fabric connector for sales data
Step 6: Initialize and Explore
# Start Claude Code in your project
cd your-project
claude

# Or run a one-off command
claude "explain the agent orchestration in src/workflows/"
Claude Code will read your CLAUDE.md and understand your project context.
Step 7: Spec Kit Integration
Spec Kit provides structured commands for turning requirements into implementation. Install globally or for one-time use.
Workflow
| Command | Purpose | Output |
|---|---|---|
/speckit.constitution |
Define project principles | .speckit/constitution.md |
/speckit.specify |
Capture requirements (what/why) | .speckit/spec.md |
/speckit.plan |
Technical design (how) | .speckit/plan.md |
/speckit.tasks |
Break into actionable tasks | .speckit/tasks.md |
/speckit.implement |
Execute all tasks | Code changes |
Example: Building an Agent Framework Tool
# 1. Set project principles
claude /speckit.constitution
# Creates .speckit/constitution.md with coding standards, patterns

# 2. Define the feature
claude /speckit.specify
> "Add a SharePoint MCP tool that retrieves documents for RAG grounding"
# Creates .speckit/spec.md with requirements

# 3. Plan implementation
claude /speckit.plan
# Creates .speckit/plan.md with architecture, dependencies

# 4. Generate tasks
claude /speckit.tasks
# Creates .speckit/tasks.md with ordered task list

# 5. Implement
claude /speckit.implement
# Executes tasks, creates files, runs tests
Step 8: GitHub Actions
Unit Test Generation for Agent Framework
name: Generate Agent Tests
on:
  pull_request:
    paths:
      - 'src/agents/**'
      - 'src/tools/**'

jobs:
  generate-tests:
    runs-on: ubuntu-latest
    permissions:
      contents: write
      pull-requests: write
    steps:
      - uses: actions/checkout@v4

      - name: Run Claude Code
        uses: anthropic-ai/claude-code-action@v1
        with:
          prompt: |
            Review the changed agent files and generate pytest tests.
            Use async fixtures for AzureAIAgentClient mocking.
            Follow patterns in tests/conftest.py.
          allowed_tools: "edit,write,bash"
        env:
          CLAUDE_CODE_USE_FOUNDRY: "1"
          ANTHROPIC_FOUNDRY_RESOURCE: ${{ secrets.AZURE_FOUNDRY_RESOURCE }}
          ANTHROPIC_FOUNDRY_API_KEY: ${{ secrets.AZURE_FOUNDRY_API_KEY }}
PR Review with @claude
name: Claude PR Assistant
on:
  issue_comment:
    types: [created]

jobs:
  respond:
    if: contains(github.event.comment.body, '@claude')
    runs-on: ubuntu-latest
    permissions:
      contents: read
      pull-requests: write
    steps:
      - uses: actions/checkout@v4

      - name: Claude Review
        uses: anthropic-ai/claude-code-action@v1
        with:
          prompt: ${{ github.event.comment.body }}
          context: "PR #${{ github.event.issue.number }}"
        env:
          CLAUDE_CODE_USE_FOUNDRY: "1"
          ANTHROPIC_FOUNDRY_RESOURCE: ${{ secrets.AZURE_FOUNDRY_RESOURCE }}
          ANTHROPIC_FOUNDRY_API_KEY: ${{ secrets.AZURE_FOUNDRY_API_KEY }}
Step 9: Monitor Usage in Foundry Control Center
In Foundry portal → Operate:
- Token consumption by model
- Request latency
- Error rates and rate limit hits
Set token limits in Claude Code or from Foundry Control Center:
Bash / WSL:
export ANTHROPIC_MAX_TOKENS=100000 # per request
PowerShell:
$env:ANTHROPIC_MAX_TOKENS = "100000" # per request
Troubleshooting
| Issue | Solution |
|---|---|
| 401/403 errors | Run az login. Verify you have the Azure AI User role on the Foundry resource. |
| Model not found | Check that the deployment name matches ANTHROPIC_DEFAULT_*_MODEL env var. |
| Region errors | Claude models are only available in East US2 and Sweden Central. |
| VS Code not using Foundry | Add environment variables to VS Code settings under “Claude Code: Environment Variables”. Restart VS Code after changes. |
| Rate limit (429) | Default: 1K RPM, 1M TPM. Request an increase via Azure support. |
Claude Code + Microsoft Foundry is a powerful combination for AI coding agents! Great setup guide. For those looking to build a quality dev setup, we review all the essential hardware – check out our Lenovo X1 Carbon review: https://petsonlypets.com/lenovo-x1-carbon-gen-9-review-still-worth-it-in-2024/ a top pick for devs. More at PetsOnlyPets.com
Great article. Few points that I’d appreciate clarification on.
1) How does a single integration between Azure AI Foundry and the Claude Code model translate into an “Enterprise AI Coding Agent”?
2) How can different development teams access this setup?
3) How is token consumption tracked when using a single API key?
Useful article but it doesn’t cover the “Enterprise” aspects of the offering at all. The whole benefit of an Azure-hosted solution should address topics such as governance, security, and scalability. This article just demonstrates how to achieve feature parity with Anthropic’s ClaudeCode offering on a single-user basis.
Сфера недропользования — это комплекс работ, связанный с освоением природных ресурсов.
Оно включает поиск полезных ископаемых и их рациональное использование.
Недропользование регулируется законодательством, направленными на безопасность работ.
Грамотный подход в недропользовании помогает сохранять ресурсы.
оэрн