


Part 1 of Build your own claw and agent harness with Microsoft Agent Framework.
In the overview we said a “claw” is really just an agent harness: a loop around a model, wired up with tools, planning, memory, and more. In this first post we stand up that loop and give our personal finance assistant its first three abilities:
- a custom tool (
get_stock_price), - web search for market news, and
- planning – so a vague request like “Review my watchlist and recommend some stocks to add” becomes a tracked, step-by-step
plan.
The remarkable part: we get almost all of this for free. Agent Framework’s harness bundles function invocation, history persistence, planning, and web search into a single call. We only supply what makes our agent ours – its instructions and its custom tool.
Let’s build it in three steps: construct a chat client, turn it into a harness, then run it through an interactive console.
Step 1 – Construct a chat client
Everything starts with a chat client – the thing that actually talks to a model. We point it at an endpoint, give it a credential for auth, and tell it which model deployment to use.
In this example we are using Microsoft Foundry with the Responses API.
.NET
// Read configuration from environment variables.
var endpoint = Environment.GetEnvironmentVariable("FOUNDRY_PROJECT_ENDPOINT")
    ?? throw new InvalidOperationException("FOUNDRY_PROJECT_ENDPOINT is not set.");
var deploymentName = Environment.GetEnvironmentVariable("FOUNDRY_MODEL") ?? "gpt-5.4";

// Build an IChatClient backed by a Microsoft Foundry project.
IChatClient chatClient =
    new AIProjectClient(new Uri(endpoint), new DefaultAzureCredential())
        .GetProjectOpenAIClient()
        .GetResponsesClient()
.AsIChatClient(deploymentName);FOUNDRY_PROJECT_ENDPOINT– your Microsoft Foundry project endpoint.FOUNDRY_MODEL– the model deployment to call (e.g.gpt-5.4).DefaultAzureCredential– handles auth from your environment (e.g. runaz loginlocally to use its session). In
production, prefer a specific credential such as ManagedIdentityCredential.
Python
# FoundryChatClient reads FOUNDRY_PROJECT_ENDPOINT and FOUNDRY_MODEL from the environment.
client = FoundryChatClient(credential=AzureCliCredential())FOUNDRY_PROJECT_ENDPOINT– your Microsoft Foundry project endpoint.FOUNDRY_MODEL– the model deployment to call.AzureCliCredential– uses youraz loginsession; swap in any other credential you prefer.
Many clients, one harness. We used a Microsoft Foundry client here, but the harness works with any chat client – Azure OpenAI, OpenAI, Anthropic, Google Gemini, Ollama, and more.
See the provider samples for how to construct each one:
Also see the documentation for all providers.
Step 2 – Turn the chat client into a harness
Now we wrap that client in the harness. In .NET you call AsHarnessAgent; in Python you call create_harness_agent. For now, we supply just two things: instructions (what the agent is for) and a custom tool.
Instructions
The harness handles how to operate; our instructions describe what the agent is for.
.NET
var instructions =
    """
    ## Personal Finance Assistant Instructions

    You are a personal finance and investing assistant. When asked about a stock, look up its
    current price with the get_stock_price tool, and use web search for recent news, earnings,
    or analyst commentary.

    ### Working style
    - Always verify numbers with a tool rather than relying on memory. Stock prices change.
    - Cite web sources inline when you use them.
    - Keep the user's watchlist in a memory file called `watchlist.md`: read it when reviewing
      the watchlist, and update it whenever the user adds or removes a ticker.
    """;
Python
FINANCE_INSTRUCTIONS = """\
## Personal Finance Assistant Instructions

You are a personal finance and investing assistant. When asked about a stock, look up its current
price with the get_stock_price tool, and use web search for recent news, earnings, or analyst
commentary.

### Working style
- Always verify numbers with a tool rather than relying on memory. Stock prices change.
- Cite web sources inline when you use them.
- Keep the user's watchlist in a memory file called `watchlist.md`: read it when reviewing the
  watchlist, and update it whenever the user adds or removes a ticker.
"""
A custom tool
A tool is just a function the model can call. We expose a get_stock_price function; the framework generates the JSON schema from its signature and parameter descriptions.
.NET
[Description("Gets the latest (delayed, illustrative) stock price for a ticker symbol.")]
public static StockQuote GetStockPrice(
    [Description("The stock ticker symbol, e.g. MSFT or AAPL.")] string symbol)
{
    // ... look up the price ...
    return new StockQuote(symbol.ToUpperInvariant(), price, "USD", DateTimeOffset.UtcNow);
}

public static AIFunction CreateGetStockPriceTool() => AIFunctionFactory.Create(GetStockPrice, "get_stock_price");
Python
def get_stock_price(
    symbol: Annotated[str, "The stock ticker symbol, e.g. MSFT or AAPL."],
) -> dict[str, object]:
    """Get the latest (delayed, illustrative) stock price for a ticker symbol."""
    # ... look up the price ...
    return {"symbol": ticker, "price": round(price, 2), "currency": "USD", "as_of": ...}
The samples return mock prices from an in-memory dictionary so they run with no external dependencies. In a real assistant you’d call a market-data API here.
Wire it together
With the instructions and tool in hand, one call builds the agent.
.NET
AIAgent agent = chatClient.AsHarnessAgent(new HarnessAgentOptions
{
    ChatOptions = new ChatOptions
    {
        Instructions = instructions,
        Tools = [StockTools.CreateGetStockPriceTool()],
    },
});
Python
agent = create_harness_agent(
    client=client,
    agent_instructions=FINANCE_INSTRUCTIONS,
    tools=get_stock_price,
)
That single call gives us function invocation, per-service-call history persistence, a TodoProvider and AgentModeProvider for planning, and web search – all on by default and each configurable. We only supplied what makes our agent ours: its instructions and a custom tool.
This is why web search and planning “just work”. We never wrote web-search code – the harness adds a hosted web-search tool by default (turn it off with DisableWebSearch / disable_web_search), so “Any recent news on NVDA?” works out of the box. And because the harness includes a TodoProvider and an AgentModeProvider, asking it to “Review my watchlist and recommend some stocks to add” while in plan mode makes it produce a plan, write a todo list, then move into execute mode.
Note that hosted web search needs to be supported by your service to work out of the box. We are using Microsoft Foundry with Responses, which fully supports web search.
Step 3 – Run it through the harness console
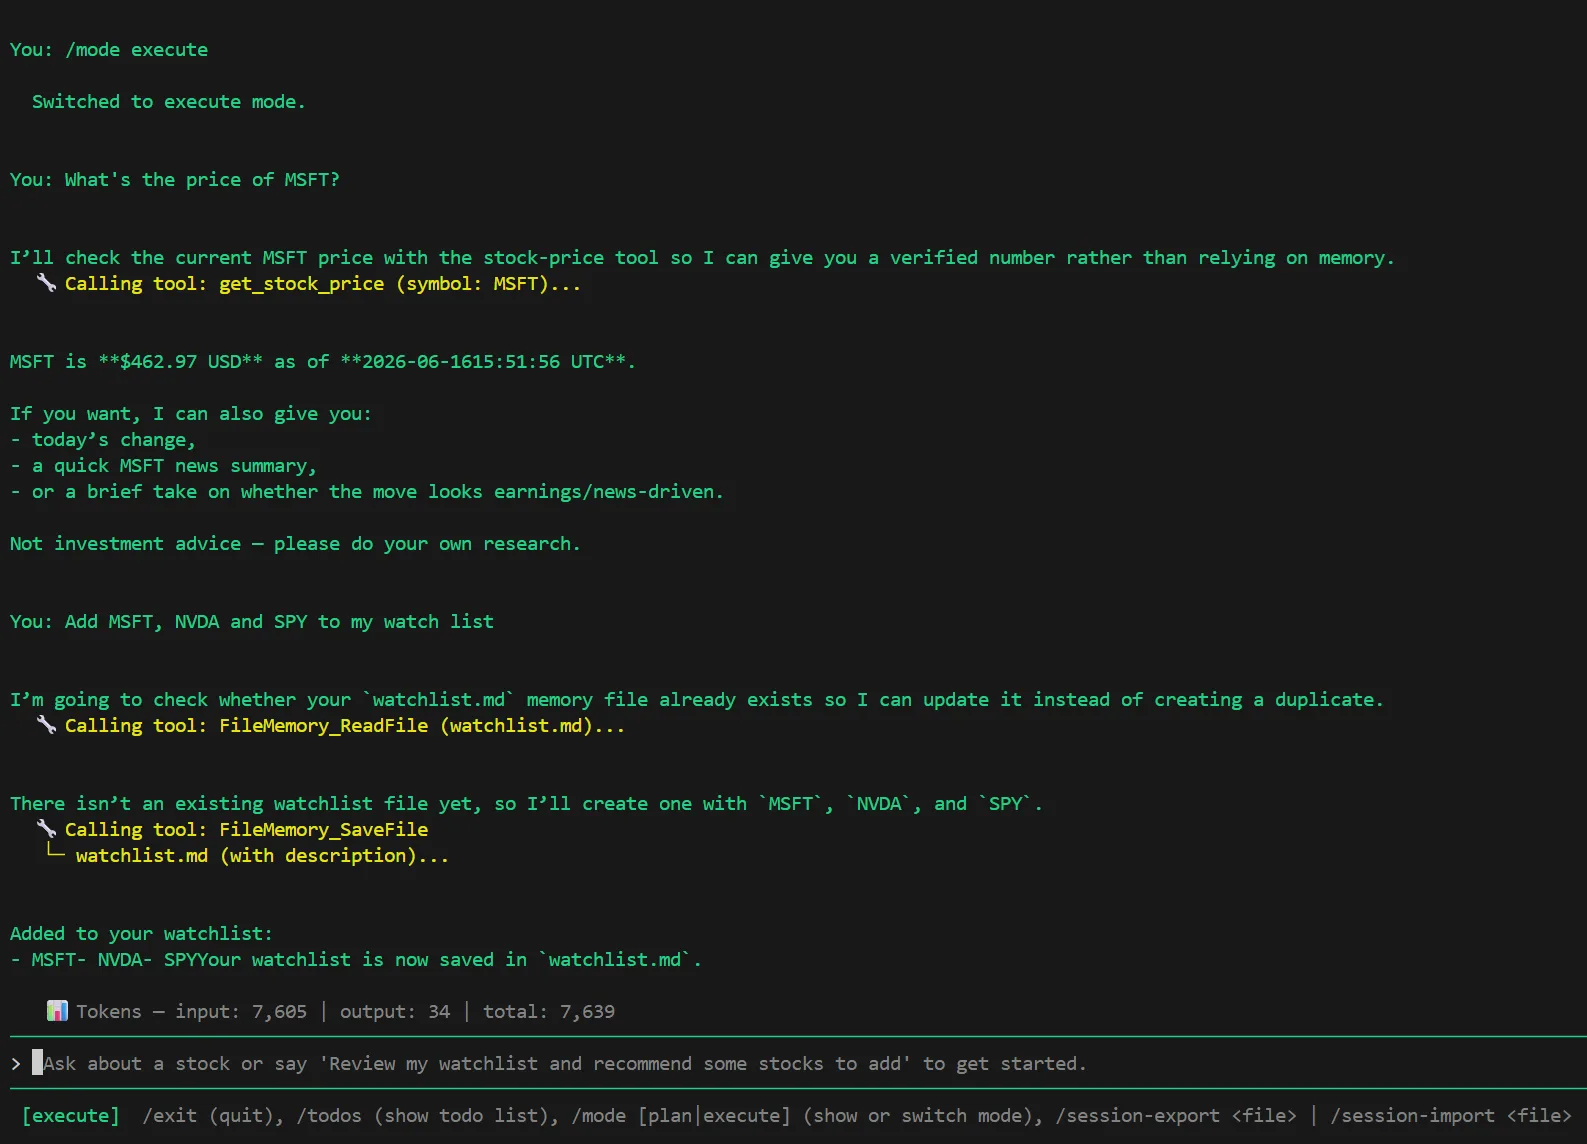
Finally, we hand the agent to a shared harness console – a streaming terminal UI with /todos, /mode, and /exit commands, and output colored by mode (cyan for planning, green for execution).
The console is is provided as a sample. Both languages ship the full source, designed to be copied and adapted as a starting point for your own UX (web app, chat surface, IDE extension, …):
- .NET:
Harness_Shared_Console - Python:
console
.NET
await HarnessConsole.RunAgentAsync(
    agent,
    userPrompt: "Ask about a stock or say 'review my watchlist' to get started.",
    new HarnessConsoleOptions { /* observers + command handlers */ });
Python
await run_agent_async(
    agent,
    session=agent.create_session(),
    observers=build_observers_with_planning(agent),
    initial_mode="plan",
    title="💹 Finance Assistant",
)
Run the sample:
.NET
cd dotnet
dotnet run --project samples/02-agents/Harness/BuildYourOwnClaw/Claw_Step01_MeetYourClaw
Python
uv run python/samples/02-agents/harness/build_your_own_claw/claw_step01_meet_your_claw.pyThen try these in order:
/mode execute– switch out of the default plan mode; quick lookups don’t need a plan.What's the price of MSFT?– watch the agent call yourget_stock_pricetool.Any recent news on NVDA?– watch it use web search.Add MSFT, NVDA and SPY to my watch list/mode plan– switch back to plan mode for a bigger, multi-step task.Review my watchlist and recommend some stocks to add– watch it plan, ask clarifying questions, then execute. Type/todosto see the list of todos and/modeto inspect the current mode.
The default location for memories is the agent-file-memory directory, but can be customized via options. Under this directory, you have a subdirectory for each session. Thanks to the agent instructions, the watchlist is saved to watchlist.md in the current session folder.
Save and resume a session
The console can also persist the whole session to disk. Under the hood /session-export simply serializes the AgentSession object – conversation history and context-provider state such as the directory containing your file memory – to JSON via the agent’s SerializeSessionAsync, then writes it to a file. /session-import reads that file back and deserializes it into a live session. Continue in order:
/session-export my-session.json– saves the current session (including the watchlist memory) to a file on disk./exit, then relaunch the app – you’re back to a fresh, empty session./session-import my-session.json– restores the saved session from disk./mode execute– switch out of the default plan mode; quick lookups don’t need a plan.What's on my watchlist?– the agent answers from the restored memory; nothing was re-typed.
How plan mode works
Why does plan mode ask questions and request approval, while execute mode just gets on with it? The trick is structured output.
The harness ships with two modes out of the box – plan (the default) and execute – and the console’s planning observer treats them differently. In execute mode the model replies with ordinary prose and gets to work. In plan mode, the console asks the model for a structured response instead of free-form text, by setting a response format with a JSON schema:
.NET
// In the console's planning observer, only while in plan mode:
options.ResponseFormat = ChatResponseFormat.ForJsonSchema<PlanningResponse>();
Python
# In the console's planning observer, only while in plan mode:
options["response_format"] = PlanningResponse
That schema forces the model into one of exactly two shapes:
.NET
class PlanningResponse
{
    PlanningResponseType Type;        // Clarification or Approval
    List<PlanningQuestion> Questions; // one or more items
}

class PlanningQuestion
{
    string Message;          // the question, or the plan summary
    List<string>? Choices;   // suggested options (clarification only)
}
Python
class PlanningResponse(BaseModel):
    type: PlanningResponseType         # "clarification" or "approval"
    questions: list[PlanningQuestion]  # one or more items

class PlanningQuestion(BaseModel):
    message: str                       # the question, or the plan summary
choices: list[str] | None = None # suggested options (clarification only)- Clarification – the model isn’t sure what you want yet, so it returns one or more questions. Each can carry a list of
Choices, which the console renders as pickable options (you can always type a free-form answer too). “Which MSFT – Microsoft or another ticker?” - Approval – the model has a plan and returns a single item whose
Messageis the plan summary. The console surfaces it as an “Approve and switch to execute mode” prompt, so nothing executes until you say so.
This is what makes planning feel deliberate: the agent gathers what it needs, shows you the plan, and only then flips to execute mode and works through the todo list. The PlanningResponse type lives in the console sample in both languages, so you can copy and tailor the schema – different question types, richer approvals – to fit your own UX.
Turning features off
Everything the harness gives us – todos, agent modes, web search, file memory, file access, tool approval – is on by default and individually toggleable. If a feature doesn’t fit your scenario, switch it off with a single option. For example, to drop the todo list and web search:
.NET
AIAgent agent = chatClient.AsHarnessAgent(new HarnessAgentOptions
{
    DisableTodoProvider = true,
    DisableWebSearch = true,
    ChatOptions = new ChatOptions { Instructions = instructions, Tools = [/* ... */] },
});
Python
agent = create_harness_agent(
    client=client,
    agent_instructions=FINANCE_INSTRUCTIONS,
    tools=get_stock_price,
    disable_todo=True,
    disable_web_search=True,
)
The common .NET switches are DisableTodoProvider, DisableAgentModeProvider, DisableWebSearch, DisableFileMemory, DisableFileAccess, and DisableToolApproval; Python exposes the equivalent flags it supports (disable_todo, disable_mode, disable_memory, disable_web_search). Our Part 1 sample leaves everything on – we just don’t lean on file access or approvals yet; those get their own spotlight in Part 2. Start with everything on, then trim to taste.
The runnable samples
- .NET:
dotnet/samples/02-agents/Harness/BuildYourOwnClaw/Claw_Step01_MeetYourClaw - Python:
python/samples/02-agents/harness/build_your_own_claw
Use these building blocks in your own agent
The harness wires all of this up for you, but none of it is locked inside the harness. Web search is just a tool, and modes and todos are each a plain context provider — you can pick up exactly the pieces you want and add them to any agent, even without adopting the full harness. Here’s where to find them:
| Feature | .NET (type — namespace) | Python (import) |
|---|---|---|
| Web search | HostedWebSearchTool – Microsoft.Extensions.AI (add to ChatOptions.Tools) |
chat_client.get_web_search_tool() |
| Planning modes | AgentModeProvider – Microsoft.Agents.AI |
from agent_framework import AgentModeProvider |
| Todo lists | TodoProvider – Microsoft.Agents.AI |
from agent_framework import TodoProvider |
In .NET, the mode and todo providers ship in the Microsoft.Agents.AI package, while the hosted web-search tool comes from Microsoft.Extensions.AI. In Python, all three live in the agent-framework package. The providers plug in through an agent’s context providers and web search through its tools — the same wiring the harness does on your behalf.
What’s next
Our claw can look things up, search the web, and plan. But it can’t yet touch your data, and there’s nothing stopping it from taking a sensitive action. In Part 2 – Working with your data, safely we will give it file access, gate risky actions behind approvals, and add durable memory so it remembers your preferences.
📚 The series
Part of Build your own claw with Microsoft Agent Framework:
- Overview: Build your own claw and agent harness with Microsoft Agent Framework
- Part 1 – Meet your agent harness and claw (you are here)
- Part 2 – Working with your data, safely
- Part 3 – Scaling its capabilities
- Part 4 – Production-ready (coming soon)
0 comments
Be the first to start the discussion.